The ceiling plinth is a designer favorite and an easy-to-work element. It gives the room a sense of completeness, helps to hide possible flaws and shortcomings in the finish. When installing a baguette with your own hands, straight sections of the planks usually do not cause difficulties, the most difficult thing is to figure out how to join and glue the skirting boards to the ceiling in the corners.

Features of installation of fillets
The ceiling baguette is selected based on the tasks that it solves in the interior, i.e. whether it is only a decorative element or masks the irregularities of the corners, joints of the wall and ceiling. The molding is recommended to be mounted before finishing on a previously prepared surface. After its installation, the ceiling is painted and wallpaper is glued. The correct installation sequence for baguettes is described in this article.
If it so happened that they decided to glue the fillets on top of the wall covering (to mask irregularities and defects in the finish of the joints), you should choose light friezes made of polyurethane or polystyrene, work as carefully as possible and keep in mind that during the next repair, the cornices will have to be dismantled along with wallpaper.
Necessary fixtures and tools
Whatever the material of the plinth, you cannot do without joining, fitting and trimming the panels. So you need to choose the best tool for obtaining an even cut and a suitable adhesive or putty composition. To work with friezes in the corners you will need:
- glue, liquid nails or putty;
- spatula and container for putty mixture;
- sharp knife or file;
- miter box;
- dry cloth to remove excess glue;
- pencil, ruler;
- masking tape, if the molding is glued to finished surfaces;
- fasteners for a wooden baguette.

Wall and ceiling preparation
Docking and fitting the skirting board in the corners begins with the preparation of the surface, which must be smooth, dry and clean, i.e. leveled, puttied and primed.

If the baguette is planned to be glued directly to the plaster, experts recommend pre-coating the work areas with water-based paint and dry.
Rules for docking ceiling plinths in corners of various shapes
Work on gluing a baguette to the ceiling in the corners begins with measurements and cutting blanks for each of them. The corners in the room are of two types - internal, the value of which is 90 °, and external - 270 °. In these cases, the planks are cut at 45°. If, as a result of measurements, it turned out that the parameters are far from ideal, then the rounding radius is divided by two and the desired value for cutting is obtained.
Note! When joining the inner corner, the lower part of the baguette remains longer than the upper, for the outer - vice versa. The molding, which is glued on the right, is cut on the left side, the left fillet is on the right.

Advice! In order not to be mistaken with the directions of the corners and the sides of the planks, it is better to first attach each frieze to the wall and mark the place of the cut.
In addition to the right angle, you can find non-standard roundings or bay windows in the room. In such cases, the decoration is as follows:
- Depending on the curvature of the corner, the plinth plank is cut into 4-5 equal parts about 5 cm in size.
- Each element is glued to the wall, the joints are carefully puttied and painted.
Important! When using a relief cornice, you need to pay attention to the fit of the pattern, the result of negligence in such a case involuntarily attracts the eye.
Ways to trim fillets at the right angle
Docking and trimming the corners of ceiling moldings can be done in three ways.
Trimming with a miter box (industrial or homemade)
Having determined the angle (90 or 270 °), the side and direction of the cut, the plinth plank is placed in the miter box, pressed to the bottom of one of the sides. Then the excess is cut off.

Method for right angles if there is no miter box
On a solid base (cardboard, plywood), two parallel lines are applied at a distance of 10 cm from each other, between which a perpendicular is drawn. On both sides of the central axis, a distance of 5 cm is measured. The resulting points are connected by intersecting lines. The result is a template for cutting 45° corners.
The molding is laid between the lines, combined with the markup and a right angle is cut in the right direction.

Method for non-standard angles
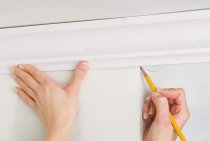
The plinth strips are applied in turn to the decorated corner, their contours are applied to the ceiling. The resulting intersection point is transferred to the plinth in the desired direction and connected to the opposite edge. How to do it right, you can see in the photo.

As a result, we have a line along which we cut off the required angle on a flat solid surface.
Preparing for installation
The following points are the same for all cutting methods:
- With a sharp knife (file), cut off the edge of the baguette, trying not to delaminate / crumble the edge of the panel. The foam strips are cut evenly, the soft texture of the material will allow you to tightly press and mask the junction. Wooden and polyurethane - with an inclination inward.
- By connecting the resulting strips, the quality of the docking is determined.
- If necessary, the elements are ground and adjusted to each other.
Fixing ceiling skirting boards
Regardless of the choice of installation method for fillets, the sequence of actions will be as follows:
- An adhesive is applied to the inner surface of the molding. When applying glue, it is convenient to use a glue gun, if putty is selected - with a spatula.

- The panel is applied to the allotted place in 3 planes - wall, ceiling, corner - and pressed for a few seconds. The strength and duration of fixation depend on the baguette material. Wooden friezes are additionally fastened with self-tapping screws, which are subsequently puttied and painted over.

- Excess adhesive solution that has come out is immediately removed. The place of the corner joint is once again treated with putty or sealant. This will prevent cracks from appearing.
How to fix baguettes on straight sections, read here.
Important! Make sure that the glued plinth does not repeat the unevenness of the wall, does not look like a “wave”, but remains even over the entire surface. Found cavities, cracks and gaps need to be puttied. Then the ceiling frame will look spectacular and perform its main function.
To understand how to properly glue a baguette on the ceiling in the corners, the video below will help.