Backfilling pillows for the floor on the ground
The surface of the future floor is raised to the required height by installing a cushion of non-porous soil.
Any soil that can be easily compacted can be used as a material for the pillow device: sand, fine gravel, sand and gravel, and with a low level of groundwater - sandy loam and loam. It is advantageous to use the soil left on the site from the foundation. wells and septic tanks (except for peat and black soil).
The pillow soil is carefully compacted by layer-by-layer (not thicker than 15 cm) tamping with soil spilling with water. The degree of soil compaction will be higher if a mechanical rammer is used.
The thickness of the pillow from bulk soil is recommended to be made within 300-600 mm. It is still not possible to compact bulk soil to the state of natural soil. Therefore, the soil will settle over time. A thick layer of loose soil can lead to too much and uneven subsidence of the floor.
To protect against ground gases - radioactive radon, it is recommended to make the top layer in the pillow from compacted rubble or expanded clay. This underlying capping layer is made at least 100 mm thick. The content of particles smaller than 4 mm in this layer should be no more than 10% by weight. The capping layer must be ventilated.
Read: “Protecting your home from radioactive radon soil gas”
The top layer of expanded clay, in addition to protection from gases, will serve as additional thermal insulation for the floor. For example, a layer of expanded clay 18 cm thick corresponds to 50 mm in terms of heat-saving capacity. foam. To protect against punching of insulation boards and waterproofing films, which in some floor designs are laid directly on the backfill, a leveling layer of sand is poured over the compacted layer of crushed stone or expanded clay, twice the thickness of the backfill fraction.
Prior to filling the soil cushion, it is necessary to lay water and sewer pipes at the entrance to the house, as well as pipes of the soil ventilation heat exchanger. Or lay cases for mounting pipes in them in the future.
Floor installation in a private house
The floor is an integral part of any premises, whether it is a private house (apartment) or a public building.
Undoubtedly, one of the main parts that determine the entire interior of the room as a whole and ensure comfortable living and durability of the building.
This part of the premises is quite expensive (up to 30% of the total costs) and laborious in terms of arrangement, it is the top layer of the floor that divides the building into zones.
For a one-story private house, such a division is as follows: basement, residential part, attic.
The base is the most wearing part, since the loads on it are the most constant.
Therefore, it lends itself to repair most often, although high-quality laying of the base and the use of high-quality materials make it possible to forget about repairs for a long time.
The material for the base should be selected taking into account the purposes of operation, the microclimate in the room, and its choice should be taken seriously: for example, you can’t lay parquet in a toilet or bathroom, and it’s better not to use laminate flooring in the kitchen or in the hallway.
Concrete floor on the ground
Fig.4. Ground floor construction. 1 - Concrete preparation; 2 - Hydro-gas isolation; 3 and 4 - Thermal insulation; 5 - Floor screed with "warm floor" system; 6 and 7 - Finishing floor; 8 - Separating edge layer.
Floors on the ground are a multi-layer structure, Fig.4. Let's go through these layers from bottom to top:
- Laid on a soil cushion ground filter materialmoisture. contained in freshly laid concrete (for example, a polyethylene film with a thickness of at least 0.15 mm.). The film is put on the walls.
- Along the perimeter of the walls of the room, to the total height of all layers of the floor, fix separating edge layer from strips 20 - 30 mm thick. cut from insulation boards.
- Then arrange a monolithic concrete floor preparation 50-80 mm thick. from lean concrete of class B7.5-B10 on a fraction of crushed stone 5-20 mm. This is a technological layer designed for sticking waterproofing. The radius of adjoining concrete to the walls is 50-80 mm. Concrete preparation can be reinforced with steel or fiberglass mesh. The mesh is laid in the lower part of the slab with a protective concrete layer of at least 30 mm. For reinforcing concrete foundations, steel fibers 50-80 mm long and 0.3-1 mm in diameter can also be used. At the time of hardening, the concrete is covered with a film or poured with water. Read: "Composition and preparation of lean concrete class B10"
- For hardened concrete floor preparation bonded waterproofing. Or two layers of rolled waterproofing or roofing material on a bitumen basis are laid on the mastic with each layer being placed on the wall. The rolls are rolled out and joined with an overlap of 10 cm. Waterproofing is a barrier to moisture, and also serves as protection against the penetration of ground gases into the house. The waterproofing layer of the floor must always be connected to the same waterproofing layer of the wall. Butt joints of film or roll materials must be sealed.
- On a layer of hydro-gas insulation laying insulation boards. Extruded polystyrene foam will probably be the best option for floor insulation on the ground. Foam plastic is also used, with a density of at least PSB35 (residential premises) and PSB50 for heavy loads (garage). Styrofoam eventually collapses upon contact with bitumen and alkali (these are all cement-sand mortars). Therefore, before laying foam plastic on a polymer-bitumen coating, one layer of polyethylene film should be laid with an overlap of sheets of 100-150 mm. The thickness of the insulation layer is determined by heat engineering calculation.
- On the insulation layer laying underlayment (for example, a polyethylene film with a thickness of at least 0.15 mm.), which creates a barrier to moisture. contained in the freshly laid concrete floor screed.
- Then lay a monolithic reinforced screed with a "warm floor" system (or without a system). When underfloor heating, it is necessary to provide expansion joints in the screed. The monolithic screed must be at least 60 mm thick. it is made of concrete of a class not lower than B12.5 or from a solution based on cement or gypsum binder with a compressive strength of at least 15 MPa (M150 kgf / cm 2). The screed is reinforced with welded steel mesh. The grid is laid in the lower part of the layer. Read: "How to make a concrete floor screed". For a more thorough leveling of the surface of the concrete screed, especially if the final floor is made of laminate or linoleum, a self-leveling mortar from factory-made dry mixes with a thickness of at least 3 cm is applied over the concrete layer.
- For screed installing a clean floor .
This is a classic floor on the ground. On its basis, various versions are possible - both in design and in the materials used, both with and without insulation.
Option - concrete floor on the ground without concrete preparation
Using modern building materials, a concrete floor on the ground is often done without a layer of concrete preparation. A layer of concrete preparation is needed as a basis for sticking rolled waterproofing on a paper or fabric basis impregnated with a polymer-bitumen composition.
In floors without concrete preparation, a stronger, specially designed polymer membrane, a film 0.4–2 mm thick, is used as waterproofing. which is laid directly on the soil cushion.
If extruded polystyrene foam boards with profiled joint joints are used for the construction of the thermal insulation layer, then such boards can be laid directly on the ground backfill. In this case, the polymeric waterproofing film is laid on top of the insulation layer.
It should be noted that in residential premises, floor insulation is mandatory.
Ground floor with dry screed
In floors on the ground as the upper bearing layer, instead of a concrete screed, in some cases it is advantageous to make a dry prefabricated screed from gypsum-fiber sheets, from sheets of waterproof plywood, as well as from prefabricated floor elements from different manufacturers.
For residential premises on the first floor of the house, a simpler and cheaper option would be to install a floor on the ground with a dry prefabricated floor screed, Fig.5.
The floor with a prefabricated screed is afraid of flooding. Therefore, it should not be done in the basement, as well as in wet rooms - a bathroom, a boiler room.
The floor on the ground with a prefabricated screed consists of the following elements (positions in Fig. 5):
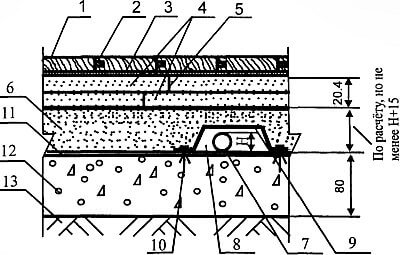
Fig.5. Floor on the ground with a dry prefabricated screed in a private house.
Floor construction methods
For the construction of the floor in the basement, the following materials can be used: concrete, soil, logs, monolithic slabs.
When using a monolithic slab, we can talk about the maximum reliability of the floor. Of course, such a floor can only be made at the earliest stages of building a house, that is, during the laying of the foundation. In addition, the basement floor will turn out comfortable and warm if you make it the so-called "Swedish stove". This technology involves laying insulation under the slab. If the building provides for the presence of a basement, then this option is also preferable. Concrete can be poured directly onto the ground, but it is best to compact sand and gravel beforehand, making a kind of “pie” (pillow) out of these materials. Such a cake increases the reliability of the structure, especially if loam and clay are present on the site.
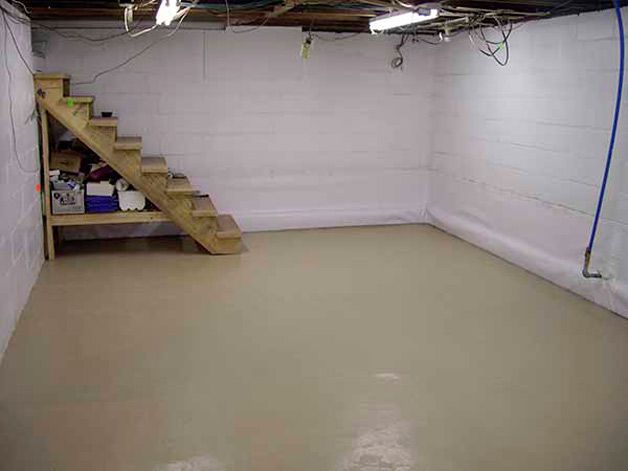
The concrete floor in the basement is the most common option.
A basement floor using a log is made in those houses where the likelihood of flooding from groundwater is minimal (or a high-quality drainage system has been made). In addition, such a coating can be made in the garage, which has a deep cellar.
Dirt floors can also be relevant, but only in cases where it is absolutely necessary to save room height or money.
With subsiding soil, it is recommended to concrete the floor using reinforcement. The thickness should be such that the floor can not change its shape when the soil moves.
concrete floor
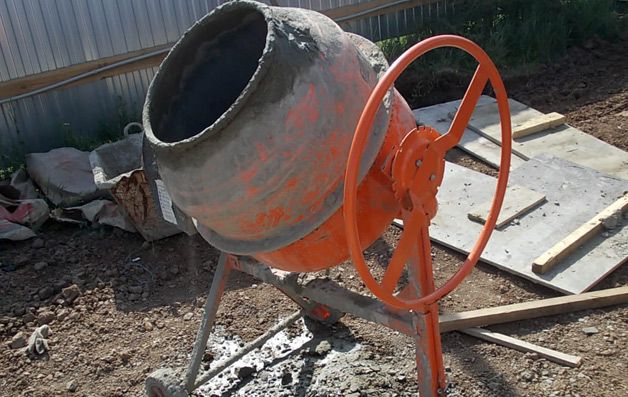
To pour the concrete floor in the basement, you will need the following tools:
- Concrete mixer. If you do not have it, then the solution can be kneaded by hand, casting the floor in small squares. Despite the fact that such work takes a lot of effort, it can be done in the basement without problems.
- Trowel and grater. These tools will come in handy when you need to level the cement slurry. Concreting in this case is of extremely high quality. In addition, the floor needs to be sanded if some kind of flooring is planned in the future. If this flooring is made of wood, then additional leveling of the concrete floor is not required.
- Bulgarian with disks on stone.
Experts recommend choosing M400 cement, quarry sand and standard crushed stone for the floor.
When mixing the mortar in a concrete mixer, use the ingredients in the proportions indicated on the cement bag.
The stages of work are as follows:
First of all, the building level is taken and with its help the bottom of the pit is leveled, which in the future will become the basement floor. The soil must be compacted with any available tools.
Sand is poured onto the bottom of the pit, which must be leveled and laid in an even layer of 10-20 cm. It is also well compacted, while being periodically irrigated with water.
Medium-sized crushed stone is poured onto the sand layer. The crushed stone cushion is also carefully compacted. It turns out a kind of "pie" of sand and gravel, which will become the basis for creating a basement floor.
Then comes the turn of creating a layer of waterproofing floor. In most cases, traditional roofing material or some modern material in the form of a canvas is used for this. The roofing material should be laid overlapping with the sheets overlapping each other by about 10 cm.In addition, they should also go into the basement walls by about 25 cm.
Next comes the insulation. To make a basement floor, heat insulators based on stone or basalt wool, fiberglass are usually used. Materials of this type will qualitatively absorb the moisture that has appeared, thereby preventing the basement from flooding. Of course, mineral wool heaters quickly become unusable, so it is recommended to use modern heat insulators (for example, polyurethane foam).
It is also possible to perform thermal insulation in the basement of a private house, using high-density foam. The material must be laid as tightly as possible.
All resulting gaps must be closed with a mounting sealant.
Increased attention should be paid to the gaps that will be formed at the point of contact of the heat-insulating material with the basement walls. In these areas, do not use foam, leaving a special gap
It is necessary because in the case of heaving of the soil without it, the heat-insulating layer and the concrete screed can be deformed. As a rule, the width of the gap does not exceed a couple of centimeters.
After all the stages of preparation, we proceed directly to pouring the concrete solution.
concreting
If it is planned to install some heavy appliances in the basement (for example, machine tools for a workshop), then the floor must be additionally reinforced and made thicker (more than 10 cm). In the event that there is no serious load on the floor in your basement, then a concrete mortar thickness of 5 cm is enough. In this case, it is not necessary to reinforce the base.
To create a reinforced belt, a mesh of reinforcement is made. The thickness of the reinforcing bars should be 5 mm. They are tied together with wire.
The cement mortar must be made in accordance with the proportions specified by the manufacturer. All elements of the future solution must be mixed in a concrete mixer. Gradually, water is added to the solution until it acquires the necessary viscosity and plasticity.
Concreting of the floor should take place in stages, but without interruptions. The solution must be leveled over the entire surface area. Before pouring concrete, it is best to install beacons that will clearly demonstrate the thickness of the concrete layer. The resulting "pie" of sand, gravel and concrete will successfully cope with the loads.

In order for the thickness of the concrete to be the same everywhere, a special beacon profile is used.
Once the cement mortar has dried, the concrete surface must be sanded. But before this process, expansion joints are necessarily made. A grinder with a special disk cuts the surface in such a way that several meters are obtained between the seams. This simple method helps prevent cracking of the concrete floor in the future.
Program releases
-
Unusual kitchen-living room with a disappearing table 0+
December 1, 2019
-
Eccentric kitchen-living room with honeycombs on the ceiling 0+
November 24, 2019
-
Living room in the style of American classics 0+
November 17, 2019
-
Space capsule, areas for children and relaxation in a fantasy garden 0+
November 10, 2019
-
Grand remodeling of the living room with a fireplace and access to the garden 0+
November 3, 2019
-
Cozy bedroom in tropical bungalow style 0+
October 27, 2019
-
Japanese living room interior with a library under the clouds 0+
October 20, 2019
-
Spacious attic filled with light and air 0+
October 13, 2019
-
Asymmetric living room with optical illusions in the style of Salvador Dali 0+
October 6, 2019
-
Attic with five seating areas in the tower 0+
September 29, 2019
-
Large recreation area at the cosmonaut's site 0+
September 22, 2019
-
Paradoxical interior of the kitchen-dining room with a gable roof 0+
September 15, 2019
-
Minimalism and avant-garde in a country living room 0+
September 8, 2019
-
Musical living room with home theater and bar area 0+
September 1, 2019
-
A gazebo with a swing, a concrete sofa and a large outdoor stove instead of an impenetrable field 0+
August 25, 2019
-
Kitchen, bar and lounge area on the roof 0+
August 18, 2019
-
Rope park in a birch grove and an open terrace on stilts 0+
August 11, 2019
-
Bold interior of a multifunctional attic with a bathroom and a cinema 0+
August 4, 2019
-
Attic under the roof for romantic dates 0+
July 28, 2019
-
Sitting area with a library and a huge bed in a small bedroom 0+
July 21, 2019
-
Stylish recreation area for adults and a tree house with a climbing wall for children 0+
July 14, 2019
-
Picturesque pier on the shore of the pond 0+
July 7, 2019
-
Large-scale alteration on the roof for a large family 0+
June 30, 2019
-
The second life of old things and a glass wall in a spacious attic 0+
June 23, 2019
-
Gazebo with an earthen roof and a pier on a plot by the lake 0+
June 16, 2019
-
Bright and extravagant solution for a large attic 0+
June 9, 2019
-
Stylish living room with a library from an empty garage 0+
June 2, 2019
-
Luxurious minimalism in the living room with a purple fireplace 0+
May 26, 2019
-
Elegant brutality. Living room in a knight's style 0+
May 19, 2019
-
Sea blue and deck board in the kitchen-living room 0+
May 12, 2019
-
Garden atmosphere in the bedroom with floating furniture 0+
May 5, 2019
-
A bold solution for the kitchen-living room in blue-gray tones 0+
April 28, 2019
-
Attic in the style of Belgian minimalism for princely daughters 0+
April 21, 2019
-
Geometric harmony and outrageous details in the living room 0+
April 14, 2019
-
Fairytale living room with fireplace and library 0+
April 7, 2019
-
Eternal lime summer, birds in the decor and a fireplace in a bright interior 0+
March 31, 2019
-
Mint kitchen-living room with live fire 0+
March 24, 2019
-
The atmosphere of Istanbul and luxurious palaces in a cozy country bedroom 0+
March 17, 2019
-
Bedroom with dressing room based on American films 0+
March 10, 2019
-
Spacious living room on 35 square meters 0+
March 3, 2019
-
Multifunctional rooms in the castle for a little princess 0+
February 24, 2019
-
Luxurious bedroom with bathroom and dressing room 0+
February 17, 2019
-
Airy and light two-story living room with cork floor and openwork mesh 0+
February 10, 2019
-
Two-story children's room for a little Indian 0+
February 3, 2019
-
Kitchen-living room on a warm veranda in the style of a chalet 0+
January 27, 2019
-
Cozy minimalism and a Parisian terrace in the bedroom of young parents 0+
January 20, 2019
-
New Year's Edition 0+
December 31, 2018
-
Attic with kitchenette, recording studio and fireplace 0+
December 23, 2018
-
Pop loft style with arches and lamps in the living room of an unusual house 0+
December 16, 2018
-
Air veranda for the family of Maria Zakharova 0+
December 9, 2018
The device of a reliable floor in the basement of a private house
In most cases, in private houses, the basement has a rather small area, so the owners try by hook or by crook to make sure that there is as much free space as possible. For example, the question of the dimensions of the room (in particular, its height) is quite acute if the basement is used as a garage. But even in an ordinary vegetable cellar, you want to be able to straighten up to your full height. That is why many suburban homeowners are wondering how to make the floor as low as possible. Some people solve the problem radically - they simply leave the floor in the basement of the house as it was after digging the foundation pit, that is, unpaved.
If the building is located on a relatively elevated site with good drainage, there should not be any particular problems with arranging the basement. On the other hand, if the soil under the house is sufficiently moist and groundwater comes close, then the arrangement work will come out much more expensive.
When the house is still under construction, then, if possible, it is better to choose a strip foundation. This approach will give certain advantages in the arrangement of the basement: strong walls, initial zoning of space in accordance with living rooms, etc.

What you need to consider before starting work
The construction of a basement in a private house begins with a soil analysis.The result of the geological study will answer a number of questions:
- To what depth can underground rooms be immersed and the level of their clean floor;
- What kind of waterproofing to use for structures;
- Will a drainage system be required around the house?
The answer to these questions is laid down in the project, where the diagrams reflect all the necessary dimensions of the structures, design marks, the dimensions of the foundation wall, and the material of its manufacture.
At the design stage, the issue of heating and thermal insulation of walls and floors should be resolved.
For normal operation, the following must also be developed:
- Ventilation system with hood and windows;
- Ways to finish all surfaces of the room (walls, ceiling, floor).
Recommendations and tips for laying individual types of floor
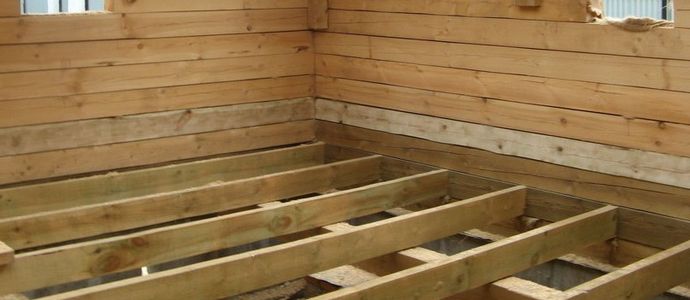
As mentioned earlier, a wooden base in a basement or living space without a basement is mounted on logs laid on a waterproofing pad.
The material for such a pillow can be sandstone, gravel or simple soil.
In this case, the logs are not laid on the pillow itself, but on brick columns (at least 2 bricks high), which are located over the entire floor area so that the step between the bars laid on them is 40-70 cm.
If the wooden base is laid on the floors, for example, between the basement or attic and the living quarters, then no waterproofing is needed in this case.
Logs are fixed through the way with the help of anchors or self-tapping screws.
Next, boards or plywood are mounted (with a step between the lags of up to 50 cm, it is recommended to lay plywood, and in two layers, and with a step of 50 cm or more, boardwalk is better suited).
When laying a wooden floor, it should be borne in mind that the wood used must first be impregnated to prevent it from being affected by various rodents, microorganisms and insects.
Before laying the concrete base, it is necessary to lay a waterproofing layer on the previously compacted sand cushion, and then a heat-insulating layer.
How to level the floor under linoleum. You can find out the answer by reading the article on our website.
Many people ask themselves the question: how to cut a laminate? Here it is shown what and how you can cut it without much effort. Try!
In this article, you will learn how to lay a cork underlayment under a laminate. Good luck with your repair!
Only with such preliminary preparation can you start laying the concrete base.
The layer of laid concrete must be at least 5 cm and must correspond in level to the level of the foundation of the house at its highest point.
Next, we lay a finishing screed - a cement-sand mortar laid on special beacons to ensure the smoothness and evenness of the base.
A concrete slab can still serve as the basis for pouring a concrete screed.
If the slab is flat, then you can safely save on waterproofing - you don’t need to lay it, and, having laid only thermal insulation, cover it with a fine cement-sand screed.
This will be enough.
The finished floor covering should be laid on the screed only after it has dried and bonded.
By the way, if the flooring is laminate, then it is necessary to first lay the concrete with a special bedding, and if parquet, then plywood must be laid under it.
If you want to lay tiles, then you don’t need anything other than tile adhesive.