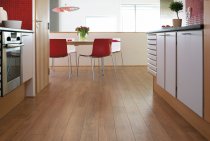
Not everyone is satisfied with the floor in the kitchen, made of wood. The tile is much stronger and more durable, it is easier to clean, it is not afraid of moisture, it looks better. But the complete replacement of the flooring in the room scares away many with the scale of repair work and high costs. Is there an option to do without a radical restructuring? How can you lay tiles on a wooden floor in a kitchen? To the surprise of many ordinary people, this is not only possible, but not so difficult.

Assessing the condition of an old wooden floor
Can you put tiles on a wooden floor? An important point when laying tiles is a quality base. Moreover, it must be static, otherwise the tile may begin to crack and crumble. A tree is not suitable for the role of such a base, as it is too susceptible to the influence of humidity and temperature. Boards can “walk”: dry out from time to time, bend, swell from moisture. Therefore, most of the work when laying tiles on a wooden floor will be devoted just to preparing the base. The resulting multi-layer construction will allow to combine materials with different characteristics, such as wood and ceramic tiles.
The first step is to make a thorough inspection and analysis of the condition of the wood floor. In most apartments, the design of a wooden floor consists of four components:
- On top is a fine finishing coating, usually linoleum.
- Leveling layer consisting of sheets of plywood or chipboard.
- Tongue-and-groove subfloor boards.
- Logs on which the entire structure is located.

The top two layers of the wooden floor will have to be removed unequivocally, and the third layer will also have to be partially disassembled in order to assess the state of the lag.
From a common sense point of view, laying tiles on a wooden base makes sense if it is in good condition. Otherwise, you will have to replace too many elements, that is, practically assemble a new floor. It is easier to use other options for the base under the tile. It can be a cement screed, a construction of expanded clay and gypsum boards.
Do not lay tiles on freshly laid wooden floors: they must be allowed to age for at least two to three years. During this time, the floor elements will take their final position, changing under the influence of the microclimate of the room.
To analyze the condition of the floor, you need:
- Completely remove the finish coat and substrate (plywood, chipboard).
- Assess the condition of the floor boards. It is better to carefully dismantle them with a nail puller in order to assess the condition of the wooden beams.

It is recommended to remove the floorboards in any case: the weight of the tiles is quite significant, and you will probably have to add logs to reduce the distance between them. In addition, it will be more convenient to update the insulation between the lags.
Foundation preparation
The most significant stage of repair work. It will include the following steps:
- Strengthening and leveling the lag, increasing, if necessary, their number. Impregnation with antiseptic.
- Laying a layer of waterproofing. This is mandatory in a room with high humidity or the possibility of leaks.
- Insulation lining. In most cases, fine-grained expanded clay is used, but mineral wool, foam plastic, polyurethane foam and other materials for floor insulation can also be used.

For each type of insulation, you must follow the rules for its installation. Do not forget about natural ventilation - we leave a gap of 5-6 cm between the insulation and the subfloor boards.
- A wooden board is mounted in place. Previously, the floor surface must be cleaned of a layer of paint.This can be done using chemical means, mechanically (sanding paper, grinder) or using a building hair dryer: after heating, the paint swells and is easily removed with a spatula.
A compensation gap of 1 cm wide is left between the floor surface and the wall. After gluing with a vapor-tight membrane and filling it with mounting foam, it will become a reliable waterproofing layer.
- In order for the surface of the base of the floor under the tiles to be perfectly flat, it is recommended to clean it with sandpaper or a grinder. Passages are carried out in three directions: along, across and obliquely.

The next step is the formation of the substrate under the tile. Several options are possible here:
- The boards are impregnated with a layer of drying oil or latex. On this layer, while it is not yet dry, a paint grid is installed. Its ends should climb a little on the wall. A layer of lightweight cement screed no more than 3 cm thick is poured on top. Polymer compounds can be used instead of cement.
- You can use gypsum fiber boards, chipboard or sheets of thick plywood. The use of drying oil and paint mesh is mandatory; in addition, it will be necessary to coat the joints between individual sheets of material stacked in a checkerboard pattern. After drying, the surface is primed.

Laying tiles
In order for the floor surface to look as impressive as possible, it is better to lay tiles from the middle of the room. In this case, the ornament will be located symmetrically, and the trimmed incomplete elements will be at the edges of the room. The middle of the room is determined simply: with the help of a tape measure, the midpoints of the longest walls forming an angle are found, then perpendiculars are drawn from them. The place where they intersect will be the center of the room.
It is recommended to initially lay the tiles on the floor surface without fixing. This will help evaluate the future appearance of the coating and make adjustments if necessary.
Installation of tiles is carried out in the following sequence:
- In accordance with the manufacturer's recommendations, tile adhesive is diluted. Cooking a lot is not worth it, about one or two square meters of surface. That way it won't dry out while you're laying the tiles.
- The adhesive solution is applied with a notched trowel to an area sufficient for laying two or three tiles.
- The tile is placed on the adhesive solution. The position of each element is controlled by the building level and adjusted, if necessary, with a rubber mallet. Excess mortar that has come out through the seams between the tiles is removed immediately with a damp cloth.

When laying, to maintain clear distances between adjacent parts of the tile, you should use plastic crosses, which are sold at any hardware store.
- After the final drying, separating elements are removed from the seams between the tiles, the seams are rubbed with a special solution - grout.
- At the final stage, the floor surface is wiped with a damp cloth. If necessary, the polishing of the tile coating is performed.