It is impossible to imagine a kitchen without a stove - it has been and remains an integral attribute of this room, despite the popularity of microwaves and multicookers. Most often, this is a gas stove, which is superior to an electric one in many ways: it is economical, heats up faster, has a long service life and various additional functions. The replacement of this simple and reliable device rarely occurs due to its failure, most often the old gas stove is simply replaced with a more advanced model. And then a lot of questions arise: how to choose a gas hose for a stove, how to connect it, is it possible to do it yourself? We will try to answer each of them.

Who has the right to install a gas stove in your apartment?
Despite the fact that the rules for connecting the stove are simple, and the installation procedure will not cause difficulties for almost any apartment owner, it is strictly forbidden to install it yourself. Gas equipment is a source of increased danger. If you decide to connect the gas stove yourself, then the least trouble that can happen is a fine from the organization that checks the operation of gas equipment. The model of the installed stove is clearly stated in the documentation for the apartment, so questions cannot be avoided during the next check. You can imagine the worst case scenario for yourself, knowing that gas is an explosive substance that, if connected incorrectly, can threaten the health and life of not only the inhabitants of the apartment, but also housemates.
Only organizations that have received a license for this type of activity have the right to connect household gas stoves. Therefore, after purchase, there are three ways to install this household appliance:
- Many stores that sell gas equipment also provide installation services.
- The technical passport of the product must contain a list of organizations that have the right to connect it. You can use their services by choosing the most advantageous option.

After replacing the stove, it is recommended to call the gas service, which will check the correct installation and make changes to the relevant documents.
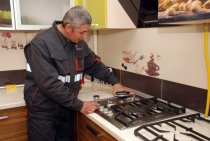
- The least expensive option is to call a master from an organization that services gas appliances in your home. In this case, the stove will be immediately connected, checked and a corresponding mark will be made in the data sheet. The only inconvenience is the need to adapt to their schedule.
Knowing how to connect a gas stove is necessary in order to prepare a place for it in advance, purchase the necessary components and monitor the work of hired specialists. Despite the presence of a license, there is a chance to encounter insufficient competence of installers.
Removing the old stove
Before proceeding with the installation of a new device, it is necessary to remove the old one. How to disassemble the gas stove, which is installed in the kitchen? The algorithm of actions is quite simple:
- The gas valve is closed on the downstream (supply pipe) of the riser. It is easy to check whether gas has stopped flowing into the stove - just try to light one of the burners.
- The lock nut is unscrewed from the lowering of the gas pipe. If the stove was connected with a flexible hose, then there are usually no problems. But in gas appliances installed a long time ago and connected with pipes, the coupling is usually covered with paint and unscrews very badly. In this case, the liner can be cut below the tap, for which a grinder is used, and unscrewed with a gas wrench.
- The plate moves away from the wall. Using the desired key, unscrew the drive (connecting element with a long thread) directly at the device itself.

If a fairly significant time interval is expected between the dismantling of the old plate and the installation of a new one, then it is recommended to put a plug below the tap instead of a drive.
Preparing a site for a new appliance
When replacing the plate, everything is simple: the new device is installed in the same place. But if you want to change the location of the device, then you need to take into account some of the nuances:
- The distance from the gas pipeline to the stove should not exceed four meters. It is better if it is within two meters.
- Almost all modern gas stoves have additional features such as lighting and electric ignition. Therefore, you will need to install a grounded outlet near the device.
- It is most convenient to connect to the gas pipeline using a flexible hose. The gas hose must have an internal diameter of at least 10 mm. This is necessary for the unhindered flow of gas. Hoses can be made from a variety of materials, but the most common choice is rubber hose with a metal braid. It will allow you to move the plate a little if necessary.

It is quite difficult to confuse a gas hose with a water one: the water one has red and blue stripes on the braid, the gas one has yellow marks. When replacing the stove, it is also advisable to change the flexible hose to a new one.
Gas stove connection
Installation sequence:
- The new plate is released from packaging. Only the protective film should be left, which will protect it from possible contamination during installation.
- Manufacturers usually indicate in the documents the gap that must be left between the plate and the wall. Based on these recommendations, the device is installed in its place.
- With the help of the level, the horizontalness of the working surface is checked. The necessary adjustment can be made with the help of twisting legs. If they are missing in the design, then something will have to be enclosed.
- A sealant is wound around the threaded connection of the gas pipeline and the flexible hose. FUM tape is best suited for this purpose, but flax does not guarantee a tight connection.
- The hose is connected to the drop below the tap using the appropriate key.
- When connecting a flexible hose to the household appliance itself, you must remember to install the gasket. It has a metal mesh. The gasket has a diameter of 13 mm and is usually supplied. It will extend the life of the stove, as it will retain various debris. After tightening all the connections with the keys, you can begin to check their tightness.

The most commonly used threaded connection is 1/2', but sometimes you may encounter a 3/8' connection. In this case, you will need a special adapter installed between the tap and the flexible hose.
The check is carried out using a soapy solution, which is coated with the joints (you can use a shaving brush), and then the tap is opened. If there are no bubbles, then the connection is tight and you can safely use the gas stove. If bubbles are inflated, then you will have to unwind everything, rewind the seal and connect the gas hose.
Dielectric insert
Separately, we should dwell on the use of a dielectric insert. Few ordinary people have heard about this device and know about its purpose.
A dielectric insert is needed to prevent the negative effects of stray currents. In apartment buildings, one cannot be sure that one of the neighbors will not leak current through the gas riser from an ungrounded household appliance. These currents can seriously damage the electrical components of the gas stove - backlight, electric ignition or control unit. The dielectric insert prevents their transmission through the metal braid of the flexible hose to the household appliance itself.
The use of a flexible rubber-fabric hose without a braid eliminates the possibility of the passage of electric current.
A dielectric insert is installed between the tap and the flexible hose. Naturally, its threaded connection must also be properly sealed and checked.

How to connect to the balloon?
The use of bottled gas in stoves of apartment buildings, although rare, occurs, especially in rural areas. In order to correctly connect the stove to natural gas cylinders, some features should be taken into account.

- The distance from the gas stove to the cylinder must be at least 1.5 meters. Ideally, if possible, the cylinders are placed outside the living quarters in a special metal box. It must be securely closed to prevent access by unauthorized persons.
- The room intended for cooking should have a good hood. In principle, the stove can be installed in a room without windows or even in a wide corridor. The main thing is that there is high-quality ventilation.
- Gas in cylinders has a pressure higher than the pressure in a conventional gas pipeline. Therefore, the use of a reduction gear is mandatory. It is very convenient if the package comes with a set of adjustable gearboxes, then you do not have to buy them separately.

The connection procedure is as follows:
- The gas hose is connected to the stove. Tightness is provided by a wound seal, less often a special sealant (if a bellows pipe is used).
- The other end of the hose is connected to the reducer in the same way.
- With a horizontally standing gearbox, a connection is made to the cylinder.
- A soapy solution is used to check the connections for gas leaks.
- The burner lights up. If the flame burns evenly, there is no soot and bluish flashes, this means that the connection is made correctly.

As you can see, it is not difficult to connect the stove to the cylinder yourself. But it should be noted that most of the incidents associated with household gas explosions occur just because of the incorrect connection of the cylinders. Therefore, such work should be carried out independently only in the most extreme case, and in this case it is necessary to act as carefully and accurately as possible. It is better not to take risks and invite a specialist.
Hood over the burners
Using forced ventilation over a food preparation area has many advantages:
- The smells formed during cooking do not spread throughout the apartment.
- Most of the soot and grease goes into ventilation, which allows you to make repairs in the kitchen much less often.
- Majority modern hoods equipped with additional functions, the use of which increases the comfort of cooking.
- The hood also provides additional protection in the event of a possible gas leak.

The process of installing a hood in the kitchen quite simple, but there are a few mandatory rules for its installation:
- The width of the hood should exceed the working surface of the stove or be at least equal to it.
- The minimum distance from the burners to the hood is 65 cm. It is better to raise it higher, but so as not to reach for the control panel.
- The exhaust pipe must have a minimum bend.
- The air duct itself should consist of small straight elements.