Not every home master can put tiles in the bathroom himself. That is why many people prefer to resort to an easier way to ennoble this room - to make toilet repair plastic panels. The main advantage of structures of this type is the assembly according to the principle of the designer, which makes it possible to disassemble the panels easily and without loss if necessary. The design features of this type of finish allow oxygen to circulate freely, which is fundamentally important in conditions of high humidity.

Benefits of choosing PVC panels
Popularity PVC panels does not decrease, we propose to figure out what justifies the increased demand.
- Ease of installation. You can finish the toilet with PVC panels using a minimum set of tools. At the same time, the walls do not require preliminary alignment, and the material itself is very easy to give the necessary shape and size.
- You can use plastic material in any type of room, not only on the walls, but also on the ceiling.
- A diverse color palette that allows you to embody the most interesting ideas. Modern manufacturers offer glossy and matte panels of various colors, including those imitating natural stone, brick, wood, and tile.

- Low price, which varies depending on the quality of the material and the prestige of its manufacturer, but generally remains affordable.
- If the installation work is not carried out independently, then you will have to pay much less for the services of the master than for laying ceramic tiles or, for example, natural stone.
- Resistant to fluctuations in humidity. Plastic is not afraid of drops of water, temperature changes, mold, fungi. Even if the material is used in an unheated room, there will be no deformation or loss of color brightness.
- Reliable manufacturers guarantee the safety of their products of all properties for a quarter of a century.
- Unpretentiousness in use and care. Plastic panels are remarkably washed from dirt with a soapy solution.

The plastic trim also has several disadvantages:
- Installing plastic panels will still steal some toilet space, which does not happen when painting or wallpapering.
- Vinyl does not burn well, but if it begins to melt, it releases acrid, toxic smoke.
- Choosing a plastic finish from unscrupulous sellers, you can buy a low-quality product that will be very fragile, brittle.
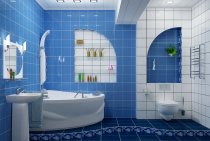
On the video you can see the results of the repair in the toilet when it is finished with PVC panels:
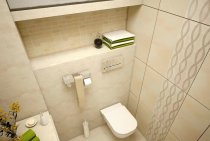
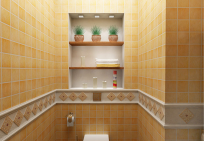
[smartcontrol_youtube_shortcode key="toilet repair with plastic panels" cnt="2" col="2" shls="true"]Examples of repairing a toilet with plastic panels with your own hands are shown in the photo below.
The cost of repairing a toilet using plastic panels
If you have not decided which is better - to upgrade the bathroom yourself or order a turnkey toilet repair service, keep in mind that in Moscow such a repair with plastic paneling will cost you 11-13 thousand rubles, in St. Petersburg - 9-11 thousand rubles. In the regions, prices can vary quite significantly.

Choosing panels for finishing the toilet
Use our recommendations to avoid becoming a victim of scammers:
- PVC is an incredibly flexible material that bends at an angle of more than 90⁰. You can check the quality of the material if you take the panel from different ends with your hands and start bending it. High-quality plastic will bend into a ring.
- Smell the material you buy. Your nose should not smell anything, because high-quality plastic is devoid of any odors.
- Narrower panels are easier to properly level, wide ones will leave a lot of unnecessary trimmings.
- All quality products have the appropriate certificates. Their absence from the seller should make you suspicious.

Advice. When buying PVC panels, always take a small stock of several elements. After all, if during the laying process it turns out that your initial calculations were wrong, it may turn out that just such a model is no longer available.
We mount plastic panels in the toilet
Sheathing a toilet with your own hands using plastic panels is not at all a difficult task if you have the desire and a supply of free time.
Before you go to the store, recalculate the area of future installation, add another 15% to the resulting figure for cuts.

Necessary materials and tools
Before you make the installation of plastic panels in the toilet, you need to stock up on useful equipment. You will need:
- PVC panels, as well as edging profile for them;
- aluminum or plastic profile;
- hydraulic level;
- self-tapping screws;
- screwdriver and drill;
- cutting tool;
- drawing tool.

Preliminary work
Before starting the installation of plastic trim, perform the following steps:
- We remove the old finish from the walls.
- If possible, we change the old wiring and water pipes.
- We process the walls with a primer mixture.
- If it is planned to install cabinets, shelves, accessories in the room, we install additional strips under them.
- The material must be brought into the apartment a few hours before the start of work so that its temperature equals the temperature in the room.

Installation
The sequence of work will be as follows:
- We fix plastic or metal guides on the walls.
- On the ceiling, the crate should be mounted perpendicular to the direction of fixing the plastic elements, and on the walls - horizontally.
- We install guides in increments of 0.5 m.
- Fixing profiles.
- Carefully insert the first plastic panel into the U-shaped profile, fix it with self-tapping screws. Some builders use a construction stapler for fixing, but this step is only acceptable if a wooden crate is installed, which is inappropriate in toilets.

- We gradually fasten all subsequent panels, carefully making sure that they fit together as tightly as possible. The hardest part is fixing the last element. Therefore, carefully calculate its width, otherwise there is a risk of spoiling the entire structure.
- After the work on the wall is completed, you can proceed to facing the surface of the ceiling. If the plans include the installation of spotlights, holes should be cut for them in advance. Do not forget about functional openings for sockets, switches, ventilation systems.
It's important to know! The cutting of the material is carried out on the front side.
- Having finished the installation of the panels, we fix the decorative plinth.
A self-made repair in the toilet will become your pride, will make you want to repeat your feat. Do not resist him, because it is much more pleasant to do everything yourself than to redo it for negligent workers.