Finishing the surfaces of a bathroom or kitchen with tiles is a necessary step in the repair of any apartment. Who is to be entrusted with its implementation? The market price of facing works is quite high and the desire of the townsfolk to reduce the cost of this type of finish is quite understandable. We will figure out whether hiring expensive craftsmen is really necessary or laying tiles with your own hands is a doable task.
It is important to understand that a person who decides to do the lining on his own must have such qualities as patience, accuracy and perseverance. After all, laying tiles is a painstaking process. The quality of laying directly affects the durability of the tile. The only difficulty for an inexperienced beginner may be the need to cut tiles. Here, without certain skills and special equipment, it is really difficult to cope. But we solve this issue: if there is no self-confidence, you can contact a specialist. The price for the provision of services for cutting tiles is not comparable to the savings from independently performed facing work. If there is a desire to cope on your own, then you can carefully cut the tile with a glass cutter or use a tile cutter.

Training
Before proceeding directly to the finishing work, it is necessary to determine the volume of purchased tiles and the list of necessary tools.
There is absolutely no need to independently calculate the amount of tiles required for finishing. The assortment offered in stores is huge, tiles differ in type, size, thickness, etc. Therefore, to determine the required volume, you can contact the sales consultant. To make the correct calculation, you only need to measure the bathroom (height, length and width), as well as know the plumbing parameters (bath, sink, toilet bowl). It would also be useful to measure the doorway, since its area will not be taken into account in the calculation. In modern salons-shops, you will be determined by the required volume of tiles, taking into account the size of your bathroom, the number of corners and protrusions in it to be faced. They will help you choose a tile for the floor, combined with the design of the walls.
When buying tiles, always purchase a stock - at least 10% of the total. Purchase in parts is unacceptable, since tiles belonging to the same article, but produced at different times and in different batches (series) may have visually noticeable differences.
In preparation for finishing the surfaces of the bathroom, you must have at your disposal the following tools:

- building level (small and medium);
- angle grinder (Bulgarian);
- glass cutter or tile cutter;
- perforator;
- attachment for a construction mixer;
- pliers;
- roulette;
- comb spatula and rubber spatula for grouting;
- crosses for seams, embroidery for seams;
- containers for water and solutions;
- whetstone.
Practical recommendations for laying tiles on the wall
To achieve the best result, it is necessary to strictly follow the technology containing the following main steps:
- Surface preparation.
- Surface marking.
- Wall decoration with solid tiles.
- Laying cut pieces of tiles.
- Seam grouting.
Before proceeding to the implementation of the above steps, you need to decide on the method of laying out the tiles:

- “seam to seam” is the most common method;
- diagonal layout is a more expensive method than the traditional one;
- "chess" layout - a variant of the classic method for a two-color tile;
- Layout "in dressing" - more suitable for rectangular tiles.
Surface preparation
Ready for wall cladding, what are they? First of all, equal.The ideal surface for tiling is characterized by a vertical deviation of no more than 2 mm per 1 m of wall length. This value can be checked by the width and height of the wall, using the building level (the deviation should not exceed 0.2%). In addition, the walls must be carefully cleaned of old coatings and dirt, as well as primed.

There is an opinion that in the process of preparation it is necessary to fix a reinforcing metal wire mesh on the wall. We consider this approach inappropriate. If the surface of the wall is destroyed (cracks appear, plaster crumbles), then no reinforcing layer can fix the situation. The only way out is to completely remove the old coating and plaster and prime the wall again.

The proposed method of preparing the wall will ensure strong adhesion of the tile to the surface and the maximum possible service life.
Surface marking
Proper marking of the walls will allow you to smoothly and accurately complete the cladding. First you need to install guides, which can be used as profiles for drywall installation. Having measured the height of one tile row on the wall (taking into account the thickness of the seams, approximately 0.5 cm), we put a mark for the location of the guide. At the mark level, we mark the horizon line around the entire perimeter. It is best to use a laser level for this, but in its absence, you can get by with a water level. Having marked the wall, you need to fix the guides. Profiles are attached to the surface with dowels and self-tapping screws. Fix first at the edges, then in the middle, make sure that the fixation is rigid.

Now you can mark the surface. Armed with a level and a marker, mark the vertical and horizontal lines for the rows of tiles.
When marking, try to arrange the tiles in such a way that there are no thin cuts less than 5 cm, since this cutting is very difficult. It is better to optimize the location of the tiles in such a way that the size of the trimmings on all sides is the same or there are none at all.
Wall decoration with solid tiles
By fixing the guides, we have created a solid support for laying the first row of tiles. The preparation is completed, you can start facing.
There are many articles and advice about what the solution must be applied to the wall. This method is not effective, because while you are gluing several tiles, the solution applied to the wall is already starting to dry out, which can affect the quality of the adhesion of the tile to the surface.
Since the walls are primed, the adhesive will stick to them well, so it's best to apply the grout to the tile itself.

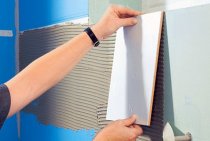
Starting laying the first row, a small amount of mortar should be applied to the surface of the tile with a comb trowel. The tile must be laid carefully, first leaning the bottom edge against the guide, then carefully laying it completely on the wall surface. It is impossible to press down strongly, since excess mortar should not be squeezed out from under the tile and fill the gaps between the tiles.
Check yourself with a building level, make sure that the laying corresponds to the horizontal and vertical plane. Attach the level to the laid tiles - there should be no gap between them.
To create equal seams between tiles, use crosses, they must be installed at the intersection of the seams - at the corners of four adjacent tiles.

Do not lay more than two rows of tiles at once. In order to avoid subsidence of the laid rows under their own weight, it is recommended to carry out facing work gradually, allowing them to dry out.
Laying cut tiles
After facing the walls with solid tiles, you can proceed to cutting and decorating the remaining space with fragments of tiles. The laying technique in this case does not differ from working with a solid tile.Please note: when facing corners and joints, if the cut edge enters the corner, then the tile on the adjacent wall should overlap it with the factory edge.
You should dwell in detail on the methods of cutting tiles.

Tile marking must be done taking into account the seams on each side of the fragment. You can cut the tile evenly with a glass cutter or a tile cutter. If you need to make a hole in the tile, use either tile crowns or the so-called ballerinas. You can also use tile drills with a diameter of 6-8 mm. Using a drill, you need to drill out the perimeter of the hole, and then remove the central part of the hole with pliers.
Grouting
This stage is the final in the decoration of the walls in the bathroom. It is important to pay special attention to the composition, quality and color of the grouting material, because the general attractiveness of the appearance of the lined surfaces depends on it, among other things.
Before proceeding directly to the grouting, you need to make sure that the solution is completely dry, and you also need to remove all the crosses.
Filling the joint with grout is carried out using a rubber spatula. For large areas, you need to use a large rubber spatula, and for hard-to-reach - small. Grouting movements should be sweeping diagonally up and down. Then the seams will be rubbed evenly, in a plane with a tile and will not be strongly pressed deep into.

After application, the grout is allowed to dry slightly (the drying period can be found in the grout instructions), and then the excess is removed from the surface. Some advise using rags and even your own fingers for this, but a more convenient way is to use a wet sponge (for example, for washing a car). Also, diagonally with sweeping movements, you need to remove excess grout from the tile several times - until obvious stains disappear. You can wipe the tiles with a dry cloth only after the grout has completely dried - at least a day later.

Putting tiles on the floor
Laying tiles on the floor, in fact, does not differ from wall cladding. When finishing the floor in the bathroom, hallway or kitchen, you also need to pay special attention to the quality of the base. Cement screed, concrete or GVL - any floor surface must be flat. The horizontalness of the base should not deviate more than 3 mm per 1 m of the length of the surface (you can also check with a level). The floor must be primed with a deep penetrating primer.
Before you start laying tiles on the floor, do not neglect the marking of the surface. The marking of the floor does without fixing the guides, but it is necessary to outline the location of the rows of tiles.
Since floor tiles must withstand heavy loads, it is very important to fill 100% of the tile surface with mortar when laying. The main thing is that voids do not form under the laid tile - this can lead to “breaking through” of the tile during operation.

The grouting technology completely repeats the grouting on the walls.