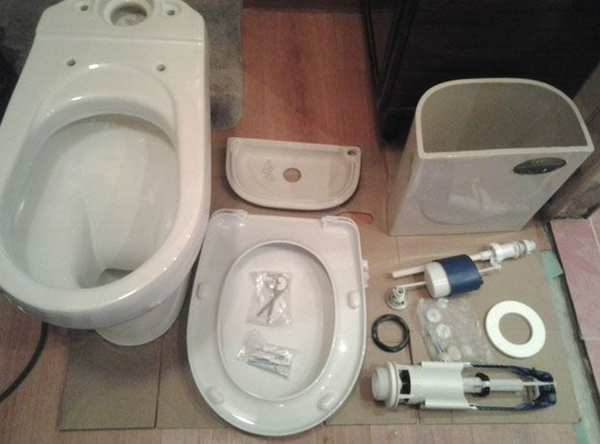
Technology and stages of installation of the toilet
The toilet installation procedure includes the work of dismantling the old plumbing fixture. Before that, turn off the water and disconnect the flexible hose. Then, without fail, the water is drained from the device and the drain tank is disconnected. If necessary, you can use a hammer if the plumbing fixture is no longer useful. In this case, you need to be careful with the fragments, as they can get into the sewer pipe and cause a blockage.
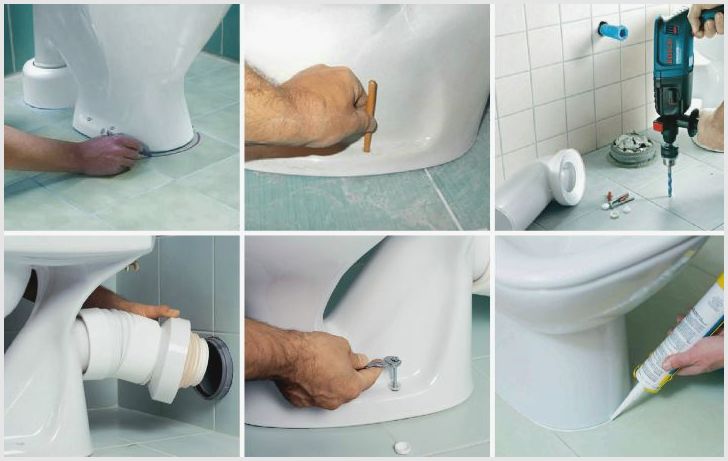
After removing the water from the bowl, they begin to clean the socket of the cast-iron sewer. Rust, remnants of old sealant, dirt are removed from it. Then the transition cuff (123x110 mm) is lubricated with sealant and placed in a cast-iron socket.
In the event that, after dismantling the old appliance, a wooden board is visible under it, it is removed, and the resulting cavity is filled with cement mortar, which is leveled with a spatula relative to the floor level and allowed to dry for 20-30 minutes. To mark holes for attaching plumbing to the floor with dowels, they take the device and the eccentric cuff and temporarily place it in the place where it will be located. Further, the toilet installation technology provides for marking the holes with a marker or pencil. When the holes are at an angle, then you need to drill them at an angle, and then insert dowels of the appropriate size into them.
Install the fittings of the drain tank, as they interpret the rules for installing the toilet bowl and the instructions (it must be included in the kit). Plastic nuts should be tightened by hand and very carefully so as not to damage the gasket and not overtighten the dowel. It is necessary that the moving elements of the valve mechanism do not come into contact with the walls of the tank. The gasket is treated with a sealant.
The eccentric cuff is inserted into the adapter cuff with the petal part and fixed to the sealant in the cast-iron socket. The outlet of the bowl is inserted to the very base into the eccentric cuff, having previously treated it with a sealant. The fastenings of the holes must match, for which the cuff should be rotated carefully and evenly. Further, the main thing is not to overtighten the bowl to the floor, using screws and plastic washers.
It will help to properly mount the plumbing installation diagram of the toilet. In the next step, the bowl is placed on the drain tank. But before that, the gasket is attached to the bowl with a sealant. The tank is carefully fixed, preventing the gasket from moving.
Then the screws are evenly tightened, the lid, seat, flush mechanism, and toilet connections are installed in the correct sequence.
Produce a test flush, if necessary, adjust the mechanism.
If everything is done in accordance with the instructions, there can be no leaks.
The mechanism for replacing the seat in a new toilet
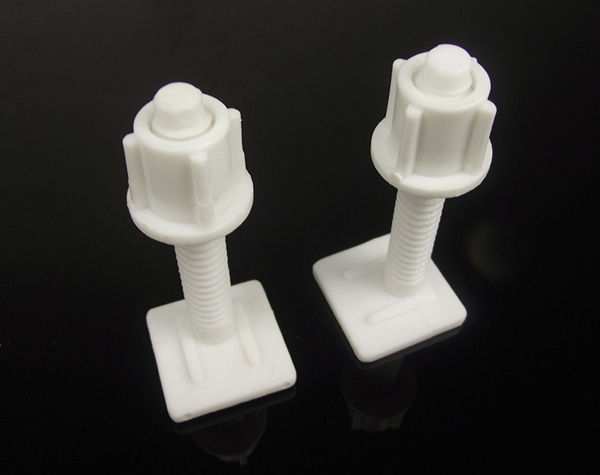
In the new toilets, everything is much simpler, since the fixing bolts are made of plastic. In this case, the plastic screw is usually at the top, so you can use a screwdriver or pliers to remove the seat. Plastic bolts do not "stick" and are usually not a problem, except that they can be accidentally damaged by applying too much force when unscrewing.
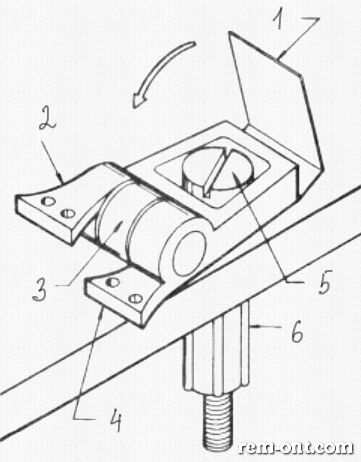
The new toilets have plastic bolts on the seat, so removing it is much easier than older models that use iron bolts and washers.
- The screw is covered with a plastic cap.
- Place for fixing the toilet lid.
- Plastic hinge.
- Place for fastening.
- Screw (plastic).
- Washer (also plastic).
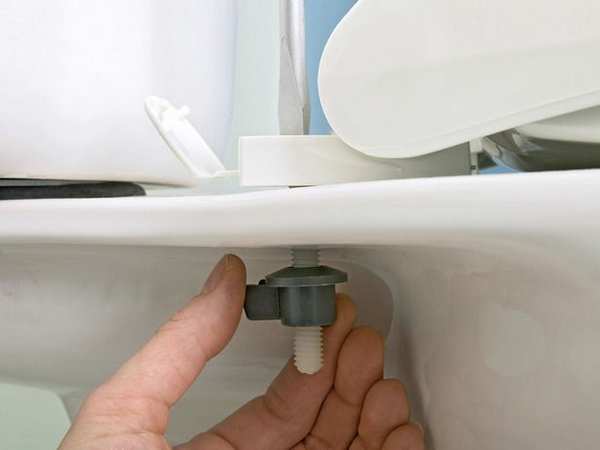
When replacing a toilet seat, the only thing you need to do is unscrew the plastic washers. Sometimes a screwdriver is needed for this, although, in most cases, the screw can be unscrewed by hand.
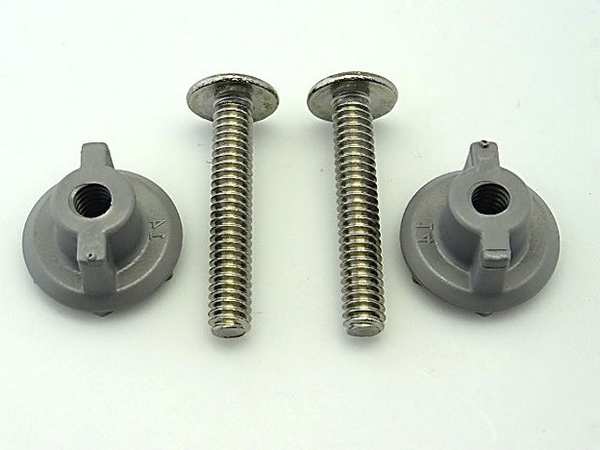
Standard toilet seat fasteners are two plastic washers and two bolts.

An example of a unique plastic mount for a Maxwell toilet seat from the famous GERBER brand.
When buying a new seat, it is sold immediately with a set of plastic bolts, so there will be no more problems with rust.
Well, then everything is simple - insert the bolts into the appropriate holes and fasten with the help of nuts from the heart.
How to choose a toilet for a country toilet 4 practical tips
Types of toilet bowls for a country street toilet
The toilet bowl for the country toilet is selected according to the following criteria:
- The design should be simple, and its acquisition should not be associated with significant financial costs, which are inappropriate in this case;
- Outside toilets usually do not have a drain. since bringing water to the street bathroom and installing a tank is an additional consumption of materials and unjustified labor costs, as well as a quick overflow of the drain pit with the need for frequent pumping. Therefore, a design is provided that implies the absence of areas subject to contamination. For example, a toilet bowl for giving without a knee corresponds to such a requirement;
- You need a device that is easy to mount and, if necessary, remove to clean the cesspool.
Wooden toilet seats
Such a country bathroom can be called the simplest solution. For ease of use, a wooden counter is formed about 30-40 cm high from the floor for a comfortable fit. The width of the toilet seat is greater than the diameter of the drain pit. In place of the oval cutout, a circle with a lid, made of plastic, is installed on the toilet seat. A thick foam attached to the base can replace the finished circle.
A convenient design option is toilet seats, the upper platform of which is stretched over the entire length of the toilet. As a result, it becomes not only a seat, but also a stand for the necessary toiletries.
If the toilet building is located above the cesspool, it is important that ventilation is provided in the country toilet. Such a measure will allow high-quality ventilation of the country bathroom, not only with the door open, but also during the stay of people there
To equip ventilation, you will need a plastic or metal pipe with a length of about 3 meters and a diameter of at least 10 cm.
In order for such a toilet in the form of a counter to be functional and not interfere with the cleaning of the cesspool, the upper platform is fixed on hinges so that it can be tilted up when the pit is filled. If a simple wooden solution does not provide sufficient aesthetics, it is worth considering the designs of the toilet in the country house described below.
We install the toilet on a wooden floor with our own hands video
How to install a toilet in the house with your own hands
Close.
The subtleties of installing the system If an independent installation of a siphon with plumbing is carried out, then the first step is to carry out preparatory work on laying the sewer.
The Genoa bowl is a floor-mounted Turkish toilet designed for bathrooms. This irreplaceable attribute is most often used.
Cast iron Genoa bowl is more expensive, but it is reliable and resistant to corrosion. Such a toilet.
Paper creativity is subject to any age, and it is from him, perhaps, that children begin to get acquainted with creativity.
In case you have a hand router, the task of making grooves in the legs can.
In this article I will show 2 ways to remake children's clothes: from a T-shirt and from a child's.
In the second transformation of light energy. These rather new technologies arose from the need to use environmentally friendly ones.
Girls, dear, this is not horror, these are just ideas for creativity, it's not necessary.
Hello, owners of crazy pens and connoisseurs of handmade! This site has been open for about 5 years now.
Multi-colored toys They hung them on it for us, And we look at the Christmas tree, And for us today.
The cable is attached to the wall using plastic round brackets. 10.
Dolls amulets made of fabric Slavic dolls amulets are made of fabric. They have been very popular for a long time.
The best way to get to know the valley is by viewing it from the tops of the hills that surround it, perhaps the time is unfavorable for this.
Likuvannya zakhvoryuvan zhovchny mіkhur folk methods Kamenі in zhovchny mikhur folk lykuvannya. Zhovchokamyan's ailment.
Toddlers will surely enjoy circling round cups or saucers, as you will need for such Christmas trees.
A master class on sewing a warmer for a teapot in the form of a cockerel will help you do it yourself.
A sea of yellow rudbecks.
We are not the authors of most of the developments and materials with which we introduce you. We only collect them and process them for more.
Don't look what's on your chest, but look what's ahead! In service since June, into battle.
So that the putty does not crumble during the operation of the plumbing equipment, a fresh cement joint is wrapped with a fabric strip or bandage, and a liquid cement solution is again applied on top.
Installing a toilet also requires compliance with certain rules. Fixing the toilet to the floor can be glued with epoxy, or traditionally screwed to a board that is flush with the floor surface. The cost of installing a toilet bowl is low, so we recommend entrusting this work to professionals.
When installing a wall-mounted toilet bowl on glue, the installation site is preliminarily cleaned of dust and debris, dried and degreased. Similarly prepare the base of the toilet bowl.
Mixing adhesive with solvent. the composition is applied to both surfaces, set the toilet in place and press it firmly to the floor.
If the connection with the sewer socket does not involve the use of special seals, at the same time as the installation, the joint is also pre-sealed: a sealant harness is wound around the outlet of the toilet.
Working with epoxy glue requires strict adherence to the instructions and precautions:
- all actions should be performed in rubber gloves or mittens;
– at the end of work, hands should be washed with warm water and soap;
– glue and hardener that have got on the skin must be immediately removed with any solvent and the affected area washed with warm water;
– the temperature when working with epoxy adhesive must be at least 10 °C.
Fixing the toilet bowl in the traditional way begins with the manufacture and installation of taffeta. A thick oak board is best suited for her.
If the toilet is with a direct outlet, a hole for it is marked on the surface of the taffeta, drilled around the perimeter, and the remaining jumpers are cut with a chisel.
Before installation, the taffeta should be oiled to prolong its service life, and nails should be driven into its lower surface so that they protrude 20–30 mm and securely bind the taffeta to the cement pad.
Having completed all these preliminary operations, the prepared recess in the floor is filled with mortar and the taffeta is set in place.
When the cement grabs, proceed to install the toilet itself. Screws for fastening must be treated with any grease; this preventive measure will facilitate the possible replacement of the toilet in the future. To exclude spalls and cracks, rubber gaskets are also installed under the heads of the fixing screws, in addition to washers.
Having fixed the toilet bowl, the socket of the sewer pipe is sealed with a resin strand and a cement solution.
What are they like
To figure out how to properly install a toilet, you first need to get at least some idea about their types.
Photos of all types of toilet bowls
First, let's give you this classification:
- Mounted or wall mounted. Such plumbing does not come into contact with the floor, but is mounted on a solid wall structure - installation. It also has a drain tank.All communications, pipes are hidden. Outwardly, it looks very aesthetically pleasing, but the installation of the installation will require a lot of money and effort. In addition, the secrecy of communications complicates the process of maintenance and repair.
- Attached. Such products are mounted on the floor, although communications and a drain tank are hidden in the wall. That is, only the clock and the drain button are visually visible. Not the best solution in terms of practicality. Yes, everything looks neat, most of the elements are hidden. But in the event of malfunctions, leaks, all the characteristic shortcomings of this method appear.
- Intrafloor. Such for apartments, houses are not relevant, since they provide for installation directly into the recess of the floor. This is a popular solution when arranging public toilets. It makes no sense to talk about them in detail. This is a simple hole in the floor, with the operation of which many people have difficulty. It is unlikely that someone would want to install such a miracle of plumbing in their own home.
- Floor. The most standard and well-known ways to install plumbing. The design is not expensive, it is easy to mount, the dismantling of the toilet bowl is simple, smooth, as well as maintenance and installation.
Release forms
- Oblique. Such releases are present in almost every typical multi-storey building that was built from the 60s to the 90s approximately. This, in fact, is the best option among all existing ones, since it is not scary to make a mistake during installation.
- Vertical. Most often found in stalinkas, which were built in the middle of the twentieth century. The socket is hidden under the base of the toilet, and the sewer pipe goes into the ceiling and connects to the riser of the neighbors. Leaks were quite rare, although they caused some inconvenience. But still, it is rather difficult to meet such options now, and it is not very convenient to work with them. If this is an old house, where the ceilings are very high, then this saves the situation. With the current heights of the walls, it is difficult to perform a vertical release. In any case, work has to be done.
If the toilet bowl, installed on a wooden floor, is loosened
Toilet bowls are attached to the floor with screws passed through the holes in the base of the device. The screws are driven into the floor or wooden plank embedded in concrete.
A frequent occurrence of installing toilets on a wooden floor or board is a violation of the “integrity” of the structure after some time. The reason for this is leakage, due to which water enters the wooden surface and destroys it over time. Therefore, the toilet, installed on taffeta, after a while, as a rule, loosens.
Small repairs with little effort
If you can't tighten the screws, remove them. Lay small chips through the holes in the pedestal of the toilet bowl into the holes in the taffeta. Place pre-cut pieces of rubber under the screw heads, grease and wrap again. To reduce the swing of the toilet, you can put a piece of sheet plastic in the gap between the end of the pedestal and the taffeta.
Big repairs require a lot of effort:
1. Pass a hacksaw blade without a frame between the floor and the end of the pedestal.
2. Use a cloth to cut the screws.
3. After closing the valve, carefully disconnect the hose from the flush tank.
4. Remove the toilet outlet from the sewer socket, having previously disconnected the flush tank from the appliance.
5. Using taffeta pliers, remove the remaining screws. With the complete destruction of taffeta, it should be thrown away, replacing it with an oak board.
6. Prepare the outlet of the toilet bowl “for a new installation”: clean it from the previous seal, wipe it dry and coat the grooves with minium putty. Wrap strands of seal on top of the putty, and on top of it - a few turns of twine, which should also be “covered” with putty.
7. At the final stage of the repair, lower the outlet of the toilet bowl into the socket of the sewer pipe and tighten the screws.
Taffeta Replacement
Measure the dimensions of the old taffeta and cut out the new taffeta from the oak plank. Drill a hole in the taffeta for direct release. Experts advise treating taffeta with drying oil.
On the back side of the taffeta, fill the nails, and on the front side, using a drill, drill holes for the screws. The recess for taffeta should be filled with cement mortar and the prepared wooden board should be lowered into it with the side with nails.
Toilet installation rules
The fastest and easiest way to connect the toilet to the sewer pipe is to use a corrugated cuff. But at the same time, it is not possible to place the device as close as possible to the pipe socket. This circumstance is important when the toilet room is small.
When the outlet of the toilet bowl and the sewer socket are located on the same axis, experts recommend using a straight cuff, but if on different axes, an eccentric cuff, such as in the photo. The rules for installing a toilet bowl suggest that when purchasing a flexible water supply, its length is taken into account, which should be equal to the distance from the connection point of the filling mechanism to the cold water pipeline. To this value add 15-20 centimeters.
It is necessary to pay attention to the thread diameter (1/2 or 3/8 inch) and the type of connection (external/internal). Also, do not forget about buying a fum tape
In the process of dismantling the toilet, the remaining water may pour out of it, so the presence of a floor cloth will not be superfluous.
Best Answers
Clara Bitchy:
Only cement mortar, and to stand. Gypsum is afraid of moisture - a solution with the addition of gypsum is good only in a dry place, it will crumble from moisture after a while. And to speed up the solution, you can add liquid glass, which will give it waterproofing properties, and hardens so quickly that you may not have time to lay it :-)
about 100 janina:
no need to reinvent the wheel - do it with cement ... although my husband put it just like that ... didn't fill anything...
Grandfather Au:
fill it with solution
Cat smile:
Fill Ata with cement mortar - cement with sand (1: 4), put a wooden shield on top, and temporarily connect the toilet. , It will stand like this for a couple of days - then - you will put it tightly.
Starr Grandfather:
3 parts of cement + 1 part of gypsum (alabaster) will set in 2 hours. The more plaster, the faster. If 1:1 then grabs in 20-30 minutes Sand by itself! It will turn out something like this: 1 part of cement: 2 parts of sand: 1 part of gypsum
Barabas:
Fill with tile adhesive, it does not need to be diluted with sand, it will harden faster and will not crack.
Online magazine Tips for hosts:
The faster the colder. The law is like this. In addition to the cement mixture, you can’t think of anything. There are fast-hardening cements (tooth fillings were made from such in the old days), but they are prohibitively expensive and rarely come across in wide sale.
The following composition can be the solution - mix dry cement with gypsum, 2 hours of cement - 1 hour of gypsum, add 2 parts of sand, water for all this, half of the total, even take a little less, add during mixing if it turns out too thick. Dissolve PVA in water, 10-15% of the volume of water. Pour the previously mixed ingredients into the water, mix them thoroughly for about a minute. We wait a couple of minutes, mix again and fill the niche with the resulting solution with a spatula and smooth its surface.
It'll catch up in about an hour. The toilet can be installed and connected to the sewage system in three hours, and it can be used (carefully!). But, drill and install fasteners, the next day, or even better, at least let it stand for a day.
For reference, cement mixtures, as well as mixtures with other binders, do not dry out, they seize (plastics polymerize).
Drying, a process that has practically nothing to do with setting, and sometimes has a bad effect.For example, if you decide to speed up the process of "drying" with a jet of hot air, you will only get cracking. But the strength and setting speed can be accelerated by steaming, i.e. being in a humid hot environment (but this is not for home conditions, this is how concrete products are made in factories)
As a rule, the setting speed can be accelerated only at the cost of strength, or moisture resistance, as in our case ... Therefore, filling with the above mixture may begin to break down after a few years.
elena anikina:
you can use a rotband or alabaster, they harden faster than everyone else
Chuck Casemerczak:
Indeed, there is no need to rush. Gently and slowly pour good cement. Put a board on top (through the newspaper so as not to dry). Put the toilet and attach it with a corrugation. Tell everyone to sit down carefully. After a couple of days, as it hardens, calmly drill and fasten.
Stas Shabanov:
buy a floor bag. It will dry up after 3 hours.
Alexei:
you still have to screw the toilet into your flooded miracle with dowels or screws.
That is why they laid a board, a mortgage, it is easier to fasten screws into it, ordinary ones, on wood.
Only weave nails were stuffed into the board on the sides, they made a hedgehog out of it, and poured it with a solution, the solution seized the nails, and the board did not jump out after shrinkage.
In conditions of quick repairs, plumbers simply fitted a new board tightly, dunked it into molten bitumen, ran with it to the floor and, while warm, pressed it into place.
run:
cement
Ludmila Bogoslovskaya:
Cement usually takes a long time to dry. Best of all for such things are high-speed hydraulic seals. For example PCI Polifix 5 minutes, which hardens within 5 minutes. And after this time, you can already veneer it from above and fill it with water
Installation
So, the dismantling can be considered completed, and therefore it's time to move on to another stage. Understanding how to properly install a toilet is actually not difficult. You just need to understand what type of release you are dealing with. As you remember, it can be vertical, horizontal and oblique.
It is about how to install a toilet bowl with your own hands with all three variations of the release that we will now tell.
Vertical
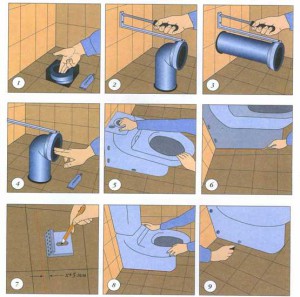
Diagram of how to connect the toilet to the sewer and fix it to the floor
- First, remove all debris from the sewer socket, make it relatively clean.
- Place the cuff into the socket using silicone sealant.
- Insert the release into the cuff, but do not use the sealant yet, place it in the required place, make markings for the holes.
- Now installing a toilet bowl with your own hands provides for the need to make the necessary holes with a power tool.
- Please note that installation on a tile has its own characteristics. You must first drill a layer of tiles with a special drill. Moreover, its diameter should slightly exceed the diameter of the drill, suitable for fastening.
- Apply sealant to the outlet, insert into the cuff and fix with screws.
- The problem of damage to the floor is quite relevant. Therefore, the installation of the toilet on the tile must be carried out carefully. Try to tighten the screws evenly so that the plumbing does not warp.
- It is necessary to tighten not until it stops, but until the product stops hanging out, staggering.
- For better fastening, grease all cracks with a solution of cement and clay.
- Now you can connect the toilet to the sewer, and you probably know about these subtleties from our previous materials. One way or another, but connecting the toilet is quite simple.
Horizontal
We have already figured out how to install a toilet bowl with our own hands with a vertical release, and therefore we move on to a direct one, that is, a horizontal one.
- If the sewer system is configured specifically for the use of direct release, then the installation process will be similar to the previous method.
- If the toilet is not suitable, then the toilet will be connected to the sewer using a corrugation and an eccentric cuff. They are mounted on a sealant, and it is not recommended to stretch the corrugation too much, otherwise there is a risk of collecting fecal deposits in areas that have sagged.
oblique
Instructions for installing a toilet with an oblique outlet
Under certain circumstances, the outlet from the sanitary ware may be located below or above the socket. There are two ways out of this situation.
- You can use a corrugation or a sewer-weaving element with a socket made of plastic. Cut the desired size, put it between the socket and the toilet, and ordinary sealant will help strengthen such a connection.
- Or arm yourself with a special pipe in the shape of the letter S, and move the toilet bowl a little to the side - about 15 centimeters. As a rule, the size of the room allows this to be done. If this option does not suit you, and replacing the toilet is clearly not an option here, since you just bought a new one, you can make a kind of brick pedestal, thereby raising the product to the desired level in order to connect it to the socket.
Further connection of the toilet will be the final stage of work for you. You can start the system, check its reliability, the presence of leaks and some other problems.
Keep in mind that installing a toilet bowl with your own hands is not as difficult as it might seem. In fact, it is even more difficult to dismantle the toilet bowl in some cases, or to implement the installation of a tank on the toilet bowl. But you will complete many of these tasks based on useful recommendations on our portal.
Don't be afraid to do the hard work yourself. Even the usual instructions for installing a toilet bowl, which is attached to each plumbing product, will greatly simplify the task.
Of course, in some cases, it is extremely difficult to repair a toilet bowl yourself, there is not enough time, experience, certain knowledge, or just a tool. Then turning to specialists will not be shameful at all. Still, not everyone wants to deal with sewage, even if he knows how the toilet is replaced in just an hour.
Do-it-yourself home repair
We made sure that the information presented was as accessible as possible for perception and did not raise additional questions “what, how, why?”. Thanks to our site, you can improve your skill level, gradually gaining the skills to carry out repair work and arrange water supply, sewerage, heating, and gas supply. From the articles you will learn a lot of useful things about ventilation and air conditioning, you will find answers to questions about self-repair and installation of plumbing.
For those who, for some reason, are not going to do repairs with their own hands, it will be useful to familiarize themselves with the theory of construction and repair work. This will allow you to control the work of hired craftsmen and avoid deception on their part. At the same time, you can save a significant part of your money and ensure better and faster execution of repair or construction work!
Any questions? Use the feedback form. and we will try to solve them.
Changing a seat in an old toilet
In older toilets, it is sometimes difficult to reach the locking nut, so the household must have a socket wrench.
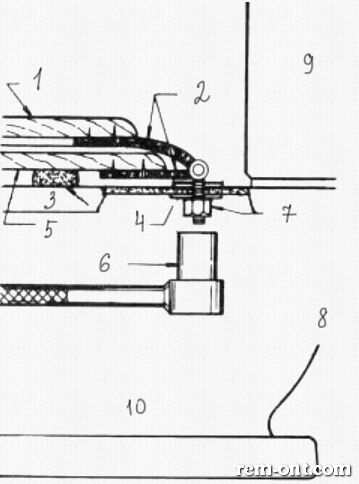
The seat in an old toilet is usually secured with a bolt located underneath. Such a bolt can be easily removed with a socket wrench, an ordinary wrench or trite pliers
- Plastic or wooden toilet lid.
- Iron hinge.
- Rubber gasket.
- Rubber or plastic washers.
- Seat.
- End key.
- Bolt with nut.
- Loosen the nut counterclockwise.
- Wash tank.
- Toilet.
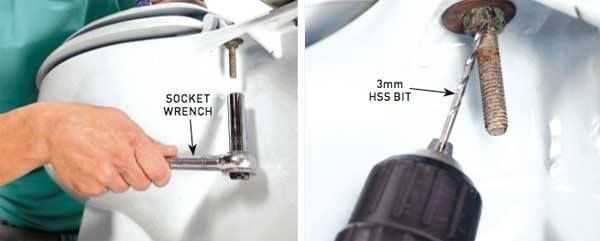
When replacing an old toilet seat, you will usually need a socket wrench.If you can't unscrew it, drill a 3 or 4 mm hole in the base of the nut to loosen the fastener and use the wrench again.
If there is no socket wrench - it does not matter, it is enough to use pliers. In old toilet bowls, the nut can “stick” and it is not so easy to unscrew it. It is enough to treat it with a special WD40 liquid or just pour it with ordinary oil. Wait about half an hour, after which the nut, as a rule, is unscrewed.
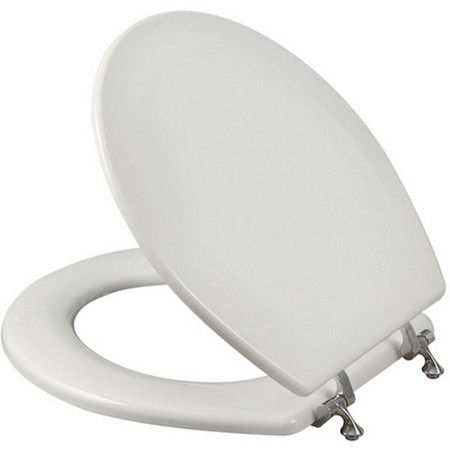
A conventional toilet seat with a secure metal mount. This will last much longer than the cheap plastic version.
Plastic seat mounts are cheap, but less reliable than metal.
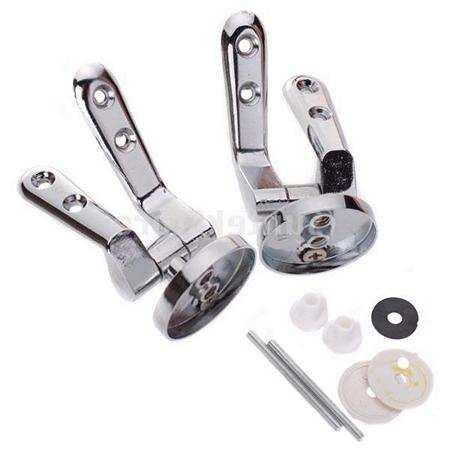
Fasteners for the toilet seat attachment mechanism can be purchased separately. Again, metal fasteners, as shown here in the photo, are much more reliable than plastic ones, but are quite inexpensive.
In a critical situation, the bolt has to be cut with a hacksaw. Carefully cut the part of the bolt above the washer. The faience toilet bowl is very easy to damage, so be extremely careful.
Installing a floor-mounted toilet
A significant part of their houses are equipped with wooden floors. Installing a toilet bowl for installation on the floor on a given surface usually has its own subtleties, and in most cases it begins with its preparation.
The floor must be reinforced, perfectly leveled and covered with a functional material such as linoleum. If the neck of the pipe is above the toilet outlet, then it will be necessary to provide for raising it.
As an elevation, pieces of timber and wide boards are perfect. However, if we have a concrete base, then for this building we will need a different material - cement and brick.
All wood used must be finished with drying oil and painted. So you will significantly increase its service life. In most cases, when developing a sewerage system in a privatized house, it is connected directly. A primitive cuff with a sealing ring is placed in the pipe, and a toilet outlet is installed in it. If this does not work out, then a plastic eccentric for the toilet bowl or a corrugated cuff is used.
The most primitive will be the connection to a local pump, the inlet of which is located at the required typical height
When the toilet is placed in its own place, it is important to first check its connection to the sewer. After marking, it is removed, and the necessary holes are made in the floor.
In most cases, fasteners are also included with plumbing fixtures.
It includes dowels, decorative washers and self-tapping screws. Then, using the level of the toilet, it is placed, if necessary, it is leveled, the gaps that have arisen are sealed with the help of the cement composition. Then, with the help of screws, the plumbing is securely fastened and connected to the tank.
What you need to know when buying a toilet
The main criteria that you should pay attention to when choosing a plumbing fixture are not only its model, brand and color, but also its dimensions. It is necessary to measure the distance from the sewer drain to the door to the toilet room before buying a toilet, and the result must be divided by 2
The result is the maximum size of the device that can be installed in this room.
The color and shape of the toilet bowl is chosen in accordance with the interior solution of the toilet room, it should match the design to the maximum. When purchasing plumbing, they certainly check its integrity and completeness. The existing mechanisms in it should work easily, without making creaking sounds.
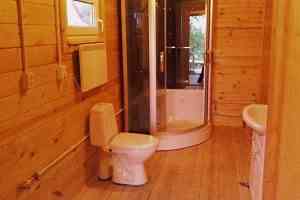
Do-it-yourself shower room for a wooden house
layout
Planning the space of a shower room in a wooden house begins with marks for installing a booth, washbasin, bidet and toilet. If desired, a washing machine can be placed in the same room.A shower cabin is traditionally mounted in a corner or against a wall. Consider where the hood will be located, placement elements. Connect sewer and water pipes.
When planning a shower room, the size of the room plays an important role. Do not install the toilet in front of the door, it does not look aesthetically pleasing. It is better if at the entrance the eye falls on the mirror, which creates the illusion of spaciousness and gives the room a more spectacular look. In a small shower, you should avoid piling up items - cosmetics, bathing and household items are best placed in hidden systems, and not placed on a table.
Tips for planning a small shower room:
The freer the floor, the larger the room seems
Therefore, when choosing plumbing, pay attention to hanging models of sinks. Instead of shelves, use niches, they visually increase the space
In order to save space in a niche, you can install a washing machine and hang a dryer or shelves above it.
When planning a large shower room, problems can arise no less than when arranging a limited space. If in a small room you need to carefully consider the use of every centimeter, then in a spacious room it is necessary to avoid the formation of empty zones.
How to decorate a large shower room so that it does not look empty:
Select a seating area with an armchair, a glass table. Place a large closet, chest of drawers or several cabinets. Make a green area with live plants.