Laying linoleum on a wooden floor
In order to properly put linoleum with your own hands on a wooden floor, it is important to adhere to the general procedure for working with this material. It consists of 3 items:
- preparation of the base - a wooden floor;
- laying and fixing linoleum;
- plinth finishing.
Reason: research and preparation One-piece linoleum sheets can be laid with your own hands on a wooden floor that does not have flaws. The good condition of the wooden floor base is determined by a number of indicators:
- the integrity of the boards (there are no rotten and damaged fragments);
- no cracks, gaps between the boards;
- no creaking, other extraneous sounds
- absence of deflections, protruding parts, protruding nail heads (self-tapping screws).
If the wooden floor does not have serious defects, it is enough to remove a layer of old paint and sand the surface. After that, the wood is primed and impregnated with a compound that protects the tree from decay and insect damage.
Some masters advise not to peel off the paint. With well-preserved boards, it becomes a means of protecting them from harmful effects under linoleum. If there are defects, their nature should be identified and eliminated before laying linoleum on a wooden floor surface. How to do it correctly, will show an informative video.
- If you find several rotten, damaged boards, you can carefully remove them and put new ones of the same thickness. If almost the entire base is damaged, it is removed and new floorboards are laid: A) a beam is placed on a concrete base (slab) at a distance of 40-50 cm. It performs the function of a lag. The thickness of the beam correlates with the parameters of the height of the room. We must be prepared for the fact that the floor will rise, and the ceiling will "fall". It is not necessary to take thick logs. Boards 50 mm thick can cope with their role; B) new floorboards are laid tightly on top, leaving a gap (1-1.5 cm) along the walls. The material is attached to the bars with nails or screws. Their hats are completely sunk into the wood. The recesses are sealed with wood putty or mounting foam. After the mixture has dried, the area is cleaned; C) you don’t need to do anything with planed boards, but you should walk along unplanned boards with an electric planer or scraping machine. This will allow you to further level the base; D) new floorboards are impregnated with protective agents. Under linoleum, this must be done; E) in some cases, a substrate or waterproofing sheet is placed under the artificial finish. Here you should focus on your own preferences and individual characteristics of the room. For example, in the bathroom, in the kitchen, waterproofing will not be superfluous.
- In the presence of scripts. cracks, the boards are hammered together, and the gaps are filled with thin wooden inserts or mounting foam (putty, adhesive bundle).
- Any protrusions are leveled with electric tools. The caps of the fasteners are sunk into the tree and masked with a building mixture.
The main requirement for preparing a wooden floor for linoleum is to make it absolutely even and smooth. Even a minor defect will lead to premature damage to the coating. To prevent this from happening, use plywood, chipboard, OSB. With their help, you can make the perfect base for laying linoleum.
Plywood, chipboard, OSB. attached to logs or old repaired boards. When fixing, leave a minimum gap between the sheets. These products are made from wood waste, so they also have a degree of expansion and mobility.
Step by step installation instructions
After preparing the wooden base of the floor and linoleum, they begin laying the finish coating.
- Expanded rolls of linoleum after exposure are smoothed from the middle to the edges.
- An allowance of 70 mm along the length and width of the linoleum strips allows you to cover the walls by 2-4 cm and make an overlap of the same size at the junction of the panels.
- Linoleum is cut along the walls, leaving a gap of about 5 mm. The overlap at the junction is cut in the middle.
- Cut the coating on the outer and inner corners of the room.
- Each canvas is folded to the middle.
- A layer of adhesive is applied to the released base of the floor with a notched trowel. For dispersion adhesive, a spatula with a tooth height of 0.6–0.7 mm is used, for bituminous mastic - 0.4–0.5 mm, for rubber compounds and synthetic resins - 0.3 mm.
- Glue is applied to the back of baseless linoleum.
- The same operation is carried out with the second side of the canvas.
- The laid panels are rolled with a special roller. You can put any sheet material and load with suitable items.
- When gluing, care must be taken to ensure that no air bubbles remain under the coating. It needs to be pushed out.
- In the places where the doorway trims are installed, linoleum is brought under them.
- At the bottom of the doorway, at the junction of the panels of the two rooms, a threshold is installed in the form of a smooth rail. So that the heads of the self-tapping screws do not go out, choose a nut model with an internal track for the screw heads.
- Dowels are inserted into the drilled holes in the wooden floor. Self-tapping screws are pushed into the threshold path with hats. Then, with a light tapping of a rubber hammer, the threshold is nailed so that the screws enter the dowels.
- A plinth is attached around the perimeter of the floor. It is installed so that there is a narrow gap between it and the linoleum.
- For better fixation of the joints of the panels, the seams are welded with a polymeric cord. For this, a special welding machine is used. It is a hair dryer to the nozzle from which the welded cord is fed.
- When laying the substrate, first glue it to the floor, and then glue the linoleum.
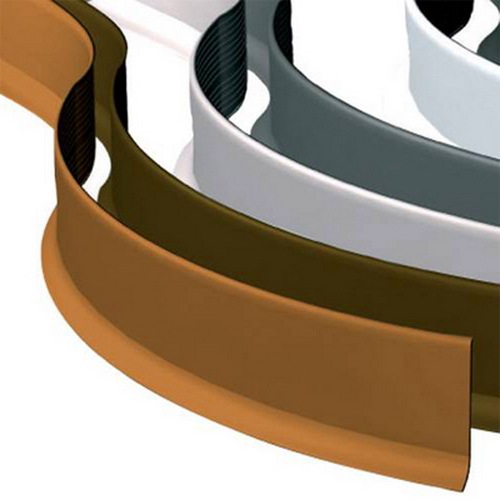
Kinds
Depending on the type of material from which it is made, the substrates are quite diverse. Each of them has its pros and cons, which will help determine which substrate for linoleum is better.
Jute
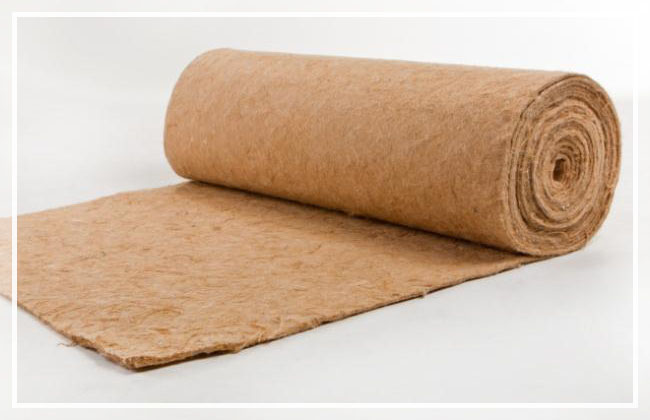 Jute backing
Such a substrate consists of jute fibers. Previously, only burlap and ropes were produced from plant fibers. Now jute fibers are used in the manufacture of building materials.
The jute backing, in addition to naturalness and environmental safety, has the ability to absorb moisture and remove it, while not letting it through and not getting wet. To prevent the appearance of mold and parasites, it is treated with special means. The main disadvantage of such a substrate is its high price. Therefore, it is rarely used.
Synthetic
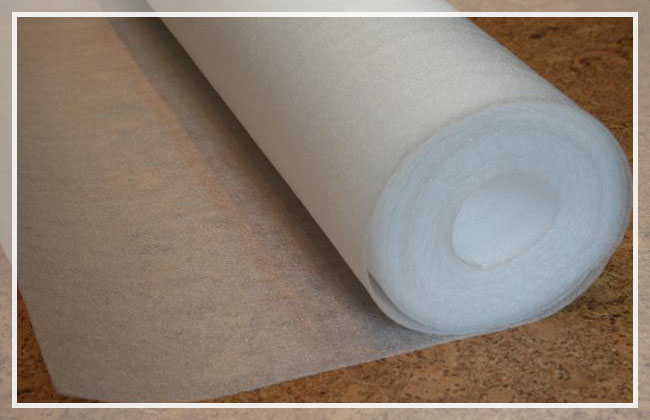 Synthetic floor underlay
In contrast to natural materials, substrates made of various synthetic materials act. Among them, foil is especially popular. It consists of two layers, interconnected with a special adhesive. The first layer is aluminum foil and the second layer is polyethylene foam or polystyrene.
The foil substrate is safe for health, has not only thermal insulation, but also waterproofing properties. Suitable for use in any premises.
natural
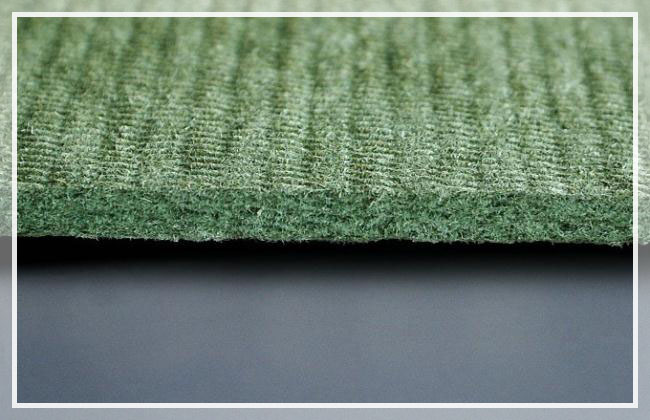 Coniferous substrate
For those who prefer natural materials, a novelty is offered on the market - a coniferous substrate. The manufacturing process is similar to the production of laminated flooring, but the wood fiber is loosely compressed. For its manufacture, coniferous wood is used.
The material has sound and heat insulating properties, but is fragile in use. Under the substrate on the concrete floor, you need to apply a plastic film to prevent moisture absorption.
Cork
Another type of natural layer is a cork substrate, made from crushed cork tree bark by pressing.
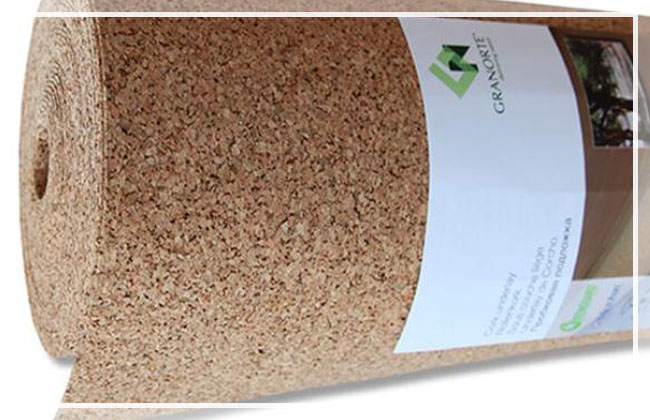 cork layer
Cork is an excellent material that is non-toxic, non-flammable, and has anti-static properties.
Among the disadvantages of such a material is the high cost and soft structure, which is subjected to punching by heavy objects.
It is important to know that the cork substrate under the linoleum should be of the maximum degree of rigidity.
Foamed
This type of material is quite common in production. The foamed substrate has good heat-insulating and noise-absorbing properties, an affordable price, but it is not recommended to use it under linoleum. Under it, the substrate is crushed and loses its properties.
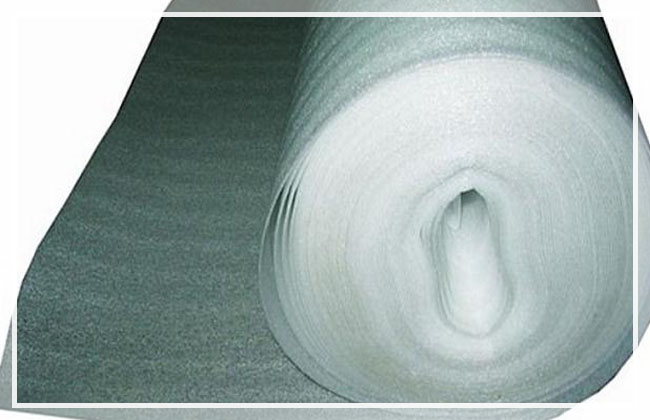 Good thermal insulator
Stages of preparing the floor for linoleum
Repair the wood floor, if necessary. If you have a normal wooden floor, the laying process will not be laborious. The general stages of work are:
- elimination of minor irregularities with a grinder;
- installation of additional strips or fasteners;
- puttying the seams between the floorboards, chips, previously narrow strips are inserted into large cracks;
- high-quality disguise of nails and screws, or rather their hats;
- final grinding of the working surface.
wood floor putty
This process can be simplified, for which it is necessary to level the difference between the floorboards with a planer and lay even sheets of plywood on them. It will become the optimal basis for laying linoleum.
It is also important to comply with certain requirements. In particular, the temperature in the room should not be lower than +18 degrees, the humidity level should not exceed 60%.
Varieties of linoleum
As mentioned above, linoleum is a versatile material, despite the fact that it is available to almost every customer. It is laid not only in residential buildings, but also in commercial ones. The material is resistant to stress, which allows it to be used in places with high traffic: offices, retail outlets, medical and educational institutions, etc.
Other positive qualities of linoleum:
- strong and wear-resistant structure;
- excellent water-repellent characteristics;
- elasticity, which greatly simplifies styling;
- ease of maintenance of the coating during operation;
- low cost.
It is worth noting that the cost is the determining factor when purchasing this material, since the price range is very wide and each of the buyers will be able to find a suitable variety.

According to the type used in the production of the basis of the material, the following categories of linoleum are distinguished:
- with jute fabric at the base;
- on wood resins;
- on crust flour;
- on limestone powder.
When considering how to properly put linoleum on the floor, it is necessary to take into account the raw materials used in the production of the working part of the coating (surface):
- Glyphthalic alkyd linoleum. This type of coating is made from both natural and synthetic materials. The main components in the production are: alkyd resins, pigments and various mineral additives. The difference between this material is a wide range of colors. The surface of the material can have both a uniform color and an original pattern. The following qualities are inherent in alkyd coating: improved thermal insulation and increased wear resistance. The negative side of the coating is low resistance to fracture when the material is bent.
- Polyvinyl chloride - as the name implies, it is made on the basis of polymers. This cover is the most popular. It is produced both monolithic (single-layer) and multi-layer. The disadvantage of this material is the decrease in its elasticity with decreasing temperature.
- Rubber linoleum - is made on the basis of pieces of rubber and bituminous material. Synthetic rubber is used as the surface layer. It is most popular to use this material in industrial enterprises, since it has the highest elasticity and water-repellent properties.
- Colloxylin linoleum - made from nitrocellulose. It has positive qualities: high elasticity and moisture resistance. This material has an aesthetic surface with original brilliance. In the photo and visual inspection, it looks very beautiful. The only drawback of the material is the fire hazard, which makes it impossible to use it in residential buildings.
If we talk about how to properly lay linoleum on the floor, then it is worth considering the wear resistance class of the material:
- household - directly for residential premises (lowest stability);
- commercial - has a maximum degree of stability and is ideally combined with rooms where there is increased traffic;
- semi-commercial - medium option, ideal for laying in office premises, small retail outlets, pharmacies, etc.
floor leveling
The best option and most often used for this is plywood. It can be glued onto liquid nails, parquet adhesives or water-based adhesives such as PVA or Bustilat. Can be nailed or screwed on. Holes for self-tapping screws must be countersunk with a cap-sized drill to drown them. It is advisable to drill plywood before tightening with a thin drill of 2-3 millimeters. This is done in order to, if necessary, loosen the fasteners if the lags rise during installation.
Plywood differs in the different composition of the resins used in its manufacture. Bakolized plywood of the FSB, BFS, BFV-1 brands is distinguished by high water-repellent properties and a density of 1000 kg/m2. It is used mainly for outdoor work, and it is not recommended to make a substrate out of it. It is expensive to use birch aviation plywood of the BP-A, BP-V, BS-1 brands. It is moisture resistant, above average and has a density of 500 kg/m2.
But building plywood of the FK brand, in which the veneer is glued together with the help of FKM brand urea resin, made on the basis of FBA melamine resins, is just right for leveling the floor. It is environmentally friendly and cheaper than others, has an average moisture resistance. FSF brand plywood is less environmentally friendly. Due to the use of phenolic resin, but it has increased moisture resistance.
There is also additional markings. H - not polished, Ш1 - sanded on one side and Ш2 - on both sides. In this case, the choice is a matter of cost savings. The thickness for choosing plywood is ¾ of the finish coat. The best option is 10 mm. The distance between the fasteners is 15-30 cm. This prevents the veneer from swelling.
Before installation, it is advisable to dry the plywood indoors in an upright position for two to three weeks. Cut it on a hard surface to avoid delamination of the veneer. The edges are cleaned with sandpaper from chips. During installation, you need to leave a distance of 8-10 mm from the wall, and 2-4 mm between the plates. The seams are puttied with mastic. After drying, they are polished with sandpaper. Before linoleum flooring, plywood is coated with hot drying oil or wood primer. To increase the strength, several layers of acrylic varnish can be applied. This is desirable, but not required. The appearance in this case is hidden, so it is cheaper to purchase plywood of the second or third grade.
Types of linoleum that are suitable for laying on wood
The classification of linoleum is carried out according to its strength characteristics. According to this criterion, he is assigned a class. Today you can buy several types of this flooring:
- household (class 21-23) - designed for rooms with a low level of operational loads, as it does not differ in increased strength and durability. Advantages of the coating: rich color range of decorative design, affordable cost;
- semi-commercial (class 31-34) - this material can be laid both in an ordinary apartment or house, and in an office, hospital, and other buildings with average operating loads. Advantages: the optimal balance between price and technical characteristics, when it comes to domestic premises;
- commercial (class 41-43) - the material is able to withstand increased operational loads and is most often found in shopping and exhibition centers, offices of large companies and similar buildings where there is a high traffic of people. Advantages: preservation of the original technical characteristics of the coating throughout the entire period of operation.
The following types of linoleum can be laid on a wooden floor, depending on the construction materials:
- polyvinyl chloride is a two-layer structure, where the top layer of PVC material performs a decorating and protective function. Foamed polymers or fabric are used as a substrate. Laying linoleum on a wooden floor of this type is simple, due to its plasticity and strength;
- alkyd - the top layer is made from alkyd resins and coloring polymers, can be made on a vegetable and synthetic basis. Advantages: resistance to abrasion, heat-insulating properties. Disadvantages: fragility when laying;
- rubber - the top layer is made of colored rubber, the bottom layer is made from a mixture of waste rubber and bitumen.
It can be laid in rooms with high humidity and increased operational loads.
No matter what type of flooring you choose, only the right installation can guarantee a flawless surface for many years to come.
A little about warm floors
Electric underfloor heating can be either water or electric. Infrared floor heating deserves special attention, as the most economical, but at the same time the most expensive device that allows you to heat rooms of any type. However, it is possible to use such technologies on a wooden surface only using a limited number of methods. It uses:
- electrical circuit. Represents metallized (amorphous) tapes using a carbon or bimetallic film;
- water floor. Suitable only for flooring devices in which all pipes are in cavities intended for them, consisting of extruded polystyrene foam.

The wood used as the main covering will not allow you to install any other systems and cover them with linoleum. Without a screed, they cannot be installed, and it has a considerable weight that the wooden coating cannot withstand. It is also worth noting that such a level will be at least seven centimeters. For small rooms, it is better not to install a screed at all. After installing the screed, the old doors can no longer fit into place, and they will have to be filed. In addition, peculiar steps will appear between the rooms, which hardly anyone will like.
Foundation preparation
Before laying linoleum on a wooden floor, it is necessary to level the base. This will avoid many problems in the future. The coating is characterized by high flexibility; over time, it will exactly repeat the outlines of the lower layer. At the same time, there are problems with the aesthetic and practical components. It is not very pleasant to walk on a surface that has tangible differences.
Not sure how to properly lay linoleum on a wooden floor? Start and carefully study the grounds.At this stage, you will need to notice all the cracks, cavities, gaps between the boards of the wooden flooring. It is worth checking the fixing of the elements of the subfloor. After all, no one wants to lay a new coating and find out that the boards creak under it.
 Use a special wood putty to fill cracks.
Well and qualitatively laid draft floor does not creak, all elements are securely fixed. Wood must not be rotten or damp
You should also pay attention to the heads of nails and screws. If they stick out of the plane, then there is a high probability of damage to the linoleum
It is worth taking a hammer or a screwdriver and walking across the entire width of the floor: drown the hats in the wood. Read more about floor squeak removal.
If the draft part contains damaged elements, they will have to be replaced. Irregularities are eliminated in several ways, depending on their scale. To remove small cracks, crevices and gaps, mastic is required. With small irregularities in the base, it will be enough to walk on it with a grinder or a hand planer. Read more about wood floor sanding.
 It is most convenient to grind small irregularities with the help of an angle grinder ("Bulgarian")
A more serious preparation of a wooden floor for linoleum involves the use of plywood. In this way, significant differences in height are eliminated: a completely even flooring under the flooring is obtained. Plywood should first be laid out on the floor. This is necessary in order to fit the sheets. At the edges, the layer is not brought to the walls by a few millimeters. The same rule applies to all sheets: there should be a small gap between them for thermal expansion.
Sheets are stacked. It resembles brickwork, where each subsequent row is offset from the previous one. Do-it-yourself plywood on the floor should be laid in two layers. Fastening is carried out on PVA glue. After it dries, additional fixation is used on the screws along the edges.
After completion of the work, the joints between the sheets are carefully polished, the cracks are puttied. Before laying the linoleum on the wooden floor, you will need to remove all the debris generated during the previous work. Read a detailed article about leveling the floor under linoleum.
 Plywood will help create a smooth and durable surface if the old floor is very uneven.
During the operation of the floor, plywood performs several tasks at once:
- additional sound insulation;
- additional thermal insulation;
- alignment;
- prevention of subsidence of the floor covering.
Is it possible to lay linoleum now? Of course yes.
Mounting Features
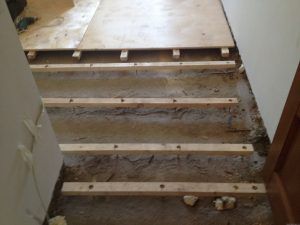 If the old wood covering is removed, then mount the logs before laying the plywood
Plywood under linoleum is laid on logs when the wooden covering is dismantled.
After removing the old flooring from the floor rail, the logs are left in a satisfactory condition for further use. Using a laser level, we check the upper edge of the lag for horizontality, and also measure the distance between each element for comparison with the dimensions of the cut sheets of the product.
If plywood sheets are laid on less than 2-3 logs, we increase the number of the latter, reducing the gaps between them. Between the lags we insert jumpers from the boards and fasten with self-tapping screws. Jumpers are installed one from the other at a distance of the size of the side of the plywood sheet.
The assembled base is checked for horizontality with an aluminum rule with a level. We protect the wooden frame from moisture using an antiseptic.
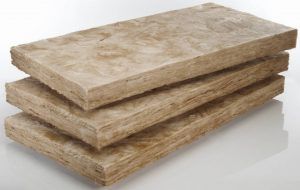 For thermal insulation and sound insulation of the floor between the lags, we lay stone wool slabs with films that protect the insulation from moisture. We fix the prepared sheets of the product with self-tapping screws to the frame.
How to lay plywood on a wooden floor when it is impractical to remove the coating.If defects are not found after checking the floor covering and the log, we use the base for laying the plywood subfloor.
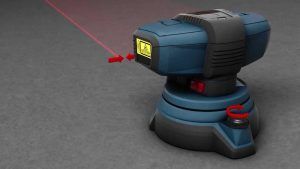 The level will help to check the correct assembly of the floor
We check the horizontal surface of the wooden floor using a laser level. We fix loosened boards with additional self-tapping screws. We stretch the warped floor slats with a planer, remove the unevenness of the coating. To close the gap between the rails, we use silicone sealant.
If the surface of the old floor is without horizontal deviations, cover the base with a primer. On the floor on a dried primer, we cover the floor with plywood. We lay the sheets of the product according to the previously described scheme, fixing the plates to the base with self-tapping screws.
An important point before laying plywood is to study the characteristics of the material attached in the table.
In order to choose the right products for the base under the linoleum coating, we understand the properties of the product, focusing on strength indicators, water resistance and the presence of glue and formaldehyde used in the manufacture. We find out who is the manufacturer of plywood and the availability of a certificate for products
We find out who the plywood manufacturer is and whether the product has a certificate.
Laying linoleum on a wooden floor
Usually a spatula with teeth, a roller or a regular paint brush is used. After the mixture is applied, the slab is not just laid, but fixed to the screws with steps of 40 centimeters. If panels with a thickness of 2 centimeters or more are used, you can not use glue.
After the adhesive mixture, the seams between the plates of the laid material are sealed. The same glue is used for this, or a specially purchased composition - “liquid nails”. Sealed and dried seams also need to be sanded. After that, you can start laying linoleum on the old wooden floor, which has acquired a decent look suitable for installation.
Those who do not want to level should consider buying a thick linoleum on an uneven floor, since when using it, minimal base defects can be neglected. But this does not mean that such material is a panacea for any distortion of the subfloor.
Bonding to the floor
In order to glue linoleum to the boards, you will need special glue, which can be bought at a building materials store. In addition to it, also stock up a pencil, roller, paint knife, spatula, silicone glue, ruler, masking tape. Prepare the linoleum itself, as well as baseboards, screws and a screwdriver.
The sequence of gluing the linoleum coating includes several steps. First you need to put linoleum on a wooden floor and mark it according to the size of the room. All the resulting excess must be cut off and removed, leaving stocks on the sides.
Now you can start gluing linoleum with your own hands. The material must be lifted with the base up, freeing up part of the room. The free surface of the floor is smeared with glue, which is applied with a wide spatula. Use glue according to the manufacturer's instructions
Pay special attention to the holding time of the glue before gluing the linoleum
If it is written that the glue after application to the floor must be aged for 30 minutes, then you must wait exactly half an hour. Strict adherence to the instructions on the label guarantees a good result and excellent quality of the flooring.
Laying linoleum on a wooden floor is accompanied by a constant smoothing of the material on the surface. First, it is recommended to smooth the glued part of the linoleum with your hand, and then walk along it with a roller to finally get rid of the air that has got inside.
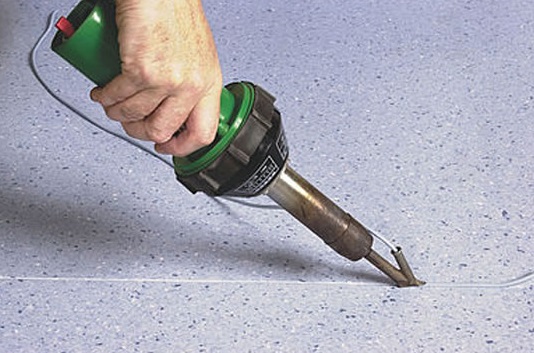 Seam welding allows you to increase the life of the material.
Similarly, the entire piece of linoleum is glued.At the joints, it is most convenient to use masking tape and silicone glue, which remains colorless after drying. On the sides of the joint, adhesive tape is first glued, then the glue itself is already applied. After the joints are well glued, the masking tape is removed. To make the joining of the seams the most reliable, you can use welding for the seams.
After the linoleum is glued to the wooden floor, and the glue itself has dried well, you can begin to install the skirting boards. The choice of plinth is chosen based on the preferences of the owner of the house. It can be a solid plinth made of wood or its equivalent made of plastic, which will allow you to hide the uneven walls and, if necessary, hide the wiring.
 The color scheme of the plinth and linoleum may be different. You can choose a skirting board to match the main flooring, or you can choose a lighter or darker version. The final decision will depend on the idea of \u200b\u200bthe interior of the room.
A plinth made of wood is attached to the wall with screws or nails; liquid nails are used for plastic. It is not recommended to attach the plinth to the linoleum itself, since when the coating shrinks, the plinth can move away from the wall, which will not look very nice.
It is necessary to lay linoleum on wooden floors very carefully, since it will be problematic to fix all the defects found later. Blisters on the floor are usually formed if the floor was not cleaned well or the adhesive was applied unevenly before laying. When gluing the material, the adhesive must be applied in a continuous way, and the linoleum itself should be well smoothed and pressed with a load.
To remove the bubble formed after gluing the coating, it is necessary to pierce the linoleum in this place with an awl and release all the remaining air from it. Then it is required to fill the glue inside through the hole with a syringe and press this place for a couple of days with a sandbag. Linoleum should straighten out and stick.
In damp rooms, linoleum can peel off. This can also happen due to poorly glued joints and water getting under the coating. The peeled off part of the linoleum sheet is folded, cleaned and dried. Then glue is applied again to the floor, and the linoleum is carefully smoothed and left under the load for several days.
Design Benefits
Infrared heating film has the following advantages:
- Product installation is fast. Moreover, you can carry out the procedure yourself.
- There is no need for a screed: the system can be placed directly under the floor covering.
- Opportunity to save money and usable floor space.
- Fire safety.
- Sufficiently high coating strength. Please note that even if one of the web elements is damaged, the system will still work.
- You can turn on and use such a warm floor immediately after installation.
 General view of the film underfloor heating
Despite the fact that manufacturers claim that the film is completely waterproof, it is still not always necessary to lay it in rooms subject to strong moisture influence. It's all about electrical contacts. Although good insulation can solve this problem.
Wooden base preparation
Before choosing a thermal floor and proceeding with its installation, it is necessary to carefully prepare the base.
First of all, we inspect the entire floor covering and check it under load to detect defects in the logs and individual wooden beams. If, as a result of the revision of the floor, deflections of the beams and unstable areas were revealed, then these moments need to be eliminated. To do this, the floor is opened and the damaged sections of the floor structure are replaced.
Further, it would be desirable to treat all wooden elements with a specialized antiseptic impregnation, which guarantees protection from pests.
Wide gaps between the floorboards can be eliminated by repositioning the beams, and narrow gaps can be sealed with a special putty designed for wood.
Next, all kinds of differences should be eliminated, for this you need to process the problem areas with a planer or, ideally, complete the processing of the wooden floor
This is a prerequisite for use, because a water-heated floor under linoleum is demanding on the evenness of the base, and for an infrared type of floor heating, this condition is the most important
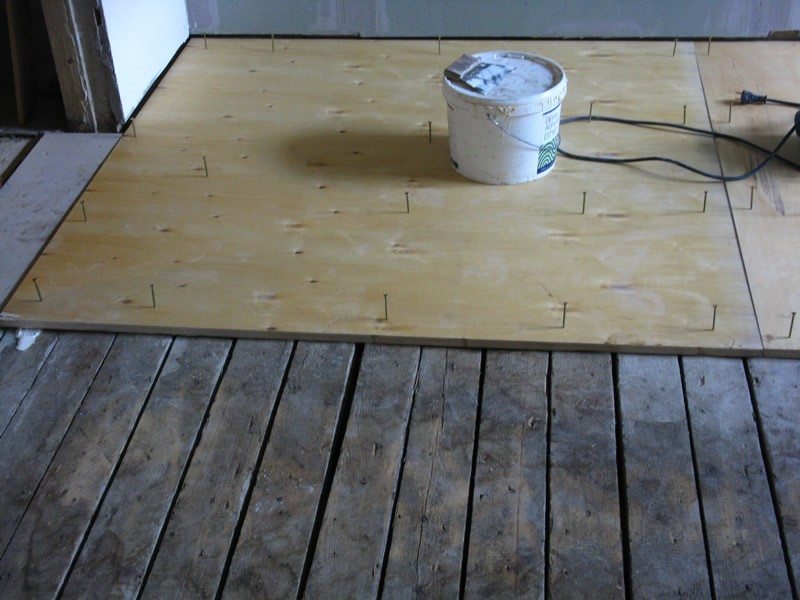
If scraping is not possible, and the surface needs to be leveled, then there is another option. In this case, plywood sheets are used. They are screwed to the floor using screws, leaving a distance of several millimeters between the sheets to ensure thermal expansion. Having completed the preparation, you can proceed to the next stage.
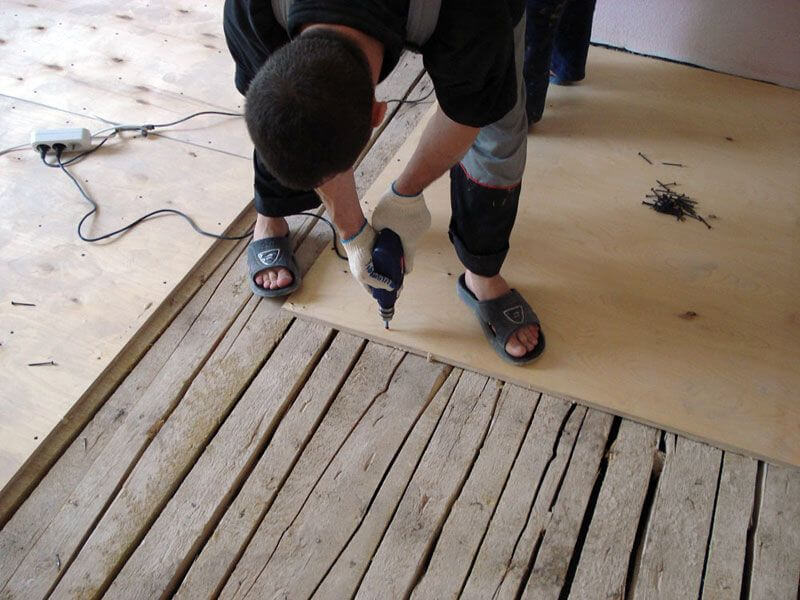 Floor covering with plywood sheets
Dry laying
This is done in this way:
- logs are installed in increments of 55 cm. The distance will depend on the size of the heat-insulating plates;
- rough flooring is done with the help of boards with which logs are knocked out;
- a waterproofing film is laid over the entire surface. She also needs to cover the lags. This will extend the life of the entire "pie";
- a heat-insulating layer is laid between the lags. The foil cover should be facing up. It is not worth covering the entire surface completely; a small distance should remain from the side of the walls;
- the mounting grid is laid between the lags and allows you to fix the cable used correctly;
- the rest of the heating elements are laid in parallel with respect to the located wooden bars. This forms loops through which the cable will be laid. It is fastened with clamps of different sizes;
- a temperature sensor must be installed between the loops, which then must be connected to the thermostat;
- after that, you can proceed with the installation of linoleum under warm electric floors. You can use fiberboard or other materials with similar characteristics. They are attached to self-tapping screws, after which you can lay linoleum. If there is a need, then for greater confidence when fixing the material, you can use double-sided construction tape.