The undeniable advantages of this method of heating
How is it different from traditional heating systems?
The fact is that conventional radiator batteries, installed in one place in the room, give off heat unevenly.
Being usually under the window, they cannot distribute the heat evenly throughout the room.
It goes up to the ceiling, without warming up the floor and opposite walls.
After analyzing this system in the infrared range, the experts came to the conclusion that heat spreads equally evenly in all directions, along the floor and along the walls.
The advantages of a warm baseboard heating system are as follows:
- Uniform distribution of heat throughout the room.
- Tangible space savings due to the location along the perimeter of the floor.
- Efficiency and indispensability in high-ceilinged rooms.
- Heating of a floor and walls evenly.
- Economy and maximum safety.
- Ideal for glazed areas.
- Prevents condensation on windows.
- By heating the walls, it prevents the formation of mold and mildew.
- Installation of the system is extremely simple.
- Thoughtful design and easy maintenance.
Of the manufacturers of such heating systems, one can especially single out the Austrian company Christine Prantl, which produces the best board warm plinth system, which has recently become increasingly popular in Russia.
How does this heating system work?
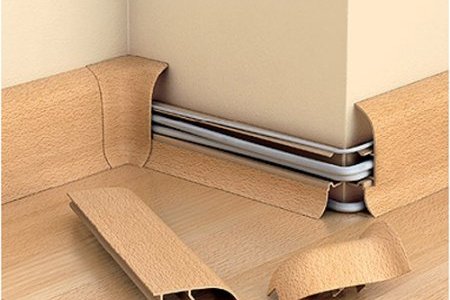
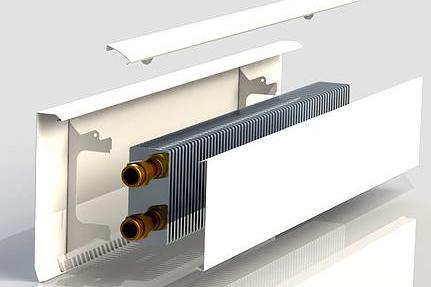
Warm plinth device
This system is mounted around the perimeter of the room, replacing the installation of a conventional floor plinth.
The principle of its operation is that the heated air, rising up, warms the entire area of the wall.
Then the wall, in turn, makes the return of this heat to the entire room. Due to the absence of strong convection, heat is distributed evenly from floor to ceiling.
Moreover, due to the slow rise of the heated air, the dust in the room does not rise.
This is very important, especially for allergy sufferers and people suffering from lung diseases. It is also perfect where there are a large number of windows or the room is almost completely glazed.
It is also perfect where there are a large number of windows or the room is almost completely glazed.
This type of heating is absolutely safe, so you can safely place any piece of furniture, a sofa, armchairs, cabinets, various equipment, including an LCD TV and a computer, next to this device.
Even curtains to the floor will not suffer at all, being in close proximity.
If you are the owner of a country house or cottage, then you will certainly encounter such a problem as dampness in the room. Moreover, it is quite difficult to “warm up” a house with the usual methods of floor insulation in a country house or outside the city, and not always possible.
By installing a warm baseboard system, you will realize all its advantages - significantly saving space, it will evenly heat the entire room, from floor to ceiling.
If your room has a large glass area, or it has a lot of windows, then such a system will be simply irreplaceable.
By creating a thermal screen, it will prevent condensation on the glass surface, will not disturb the overall harmony of the design of the room and save a lot of free space.
Warming up the walls throughout the area, it will create comfort and coziness in the room.
This system has even more advantages in rooms with a large area - sports halls, shops, hospitals, schools, museums, winter gardens, various cultural centers.
By heating such a large area evenly, the system will prevent dust and bacteria from rising into the air, which is important for rooms visited by a large number of people.
Calculation of homemade warm plinth
Installing a warm baseboard
The Internet is full of intricate formulas for calculating warm baseboards: how to calculate the diameter of the tube, how many radiator fins you need, at what speed water should flow through the tubes so that the temperature in the room reaches the coveted 20 ° ...
Do not bother yourself with these formulas. All the same, you will not find another suitable copper tube, except for a diameter of 16 mm. If you find 20 mm, put yourself a monument not made by hands.
Steel, aluminum tubes are easier to find, but their thermal conductivity is lower than that of copper ones, and your warm baseboard will be half as hot. And it won't heat up at all.
Warm plinth with a mesh-netting radiator
It is equally difficult to find a brass sheet: it is desirable, according to GOST 931-90
thickness 2.5-3.5 mm
Aluminum sheet for the box is easier to find. In extreme cases, you can adapt aluminum siding to assemble the box or carve out suitable parts from aluminum panels that go to finish billboards or light boxes.
Water will flow through the tube at the same speed as it flows in the heating system of your apartment - and no calculation will change anything.
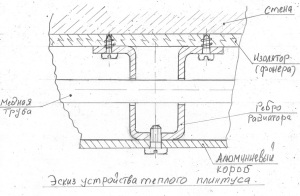
Warm plinth device
The lower part of the legs of this “P” must also be bent at a right angle outward: this is how you will make platforms for attaching the brackets to the wall (more precisely, to the strip of plywood that you previously stuffed onto the wall).
Thus, you get the initial data for the pattern: plate height - 16 cm; the width is: 12 cm (two thicknesses of the plinth) + 3 cm (width of the crossbar between the legs) + 6 cm (the total thickness of the two “bends” for attaching to the wall). Total - 21 cm.
Are there any other options for heating the balcony? will help you make your own underfloor heating on the balcony with water heating
Which underfloor heating for a balcony is better:? An analytical review on our website will help you solve this issue.
About the device of electric floor heating on the balcony
Preparation for the radiator fin of a warm plinth
You have a 16x21 cm plate. Draw horizontal and vertical axes of symmetry on it - it is best to use a compass-measuring needle for this.
Step back from the horizontal axis of symmetry 4 cm up and down and draw two more parallel lines.
Step back from the vertical axis of symmetry 4.5 cm to the right and left and draw two vertical lines. At the intersection points of these additional lines, you will get the centers of the holes through which the pipes will pass. They need to be drilled out.
Step back from the sides of the plate by 3 cm and draw two vertical lines at this distance. On them you will bend the bends for attaching the radiator to the wall.

This is how brass should be bent in a vise
Step back from the vertical axial 1.5 cm to the right and left and also draw two parallel lines: they will mark the boundaries of the “crossbar” of the letter “P”.
Important! Drywall doesn't hold screws well, screws, and any other fasteners we try to embed in it. Therefore, immediately, before installing the pipes, place a support under the brackets
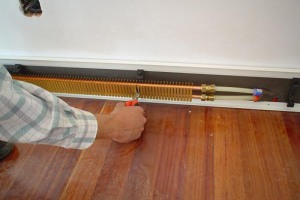
For example, a rail of suitable thickness. Fasten both tubes every 1.0-1.5 m with clamps using dowels, which should be driven into something more capital than drywall: a house wall, a bookmark in the lining of a balcony, etc.
loop loop
It's good to have fittings for this case. It is good to be able to competently make a tie-in into the central heating pipe. But, in principle, all this is the concern of a home plumber, and not a heat engineer.
In practice, it was possible to observe how heating systems were fed for years through an ordinary corrugated hose, and even through a rubber hose put on the flared end of a copper tube and tightened with a clamp.
Using the same fittings and hoses with which you connected your warm plinth to the heating system, loop its contour. That is, connect the "rear ends" of the copper tubes with a corrugated hose or in some other way so that water flows freely from one tube to another. And from that - back to the central heating system.
Important! Do not flatter yourself with the idea that you will be able to bend a copper tube at home with high quality. Theoretically, it must first be tightly filled with fine sand, plug the ends and bend, wrapping around a steel column of a certain radius
But in practice it is not realistic to fill a tube with a diameter of 16 mm and a length of 2 m tightly with sand. And when you try to wrap it around the metal leg of a stool or something like that, you will either break the tube, or doubt it so much that its throughput will decrease at the bend and, sooner or later, cracks will appear in this place and the system will start to leak. Therefore, loop the contour and stroke the corners (if you are laying the system around the entire perimeter of the room) with hoses, and not by bending the pipe.
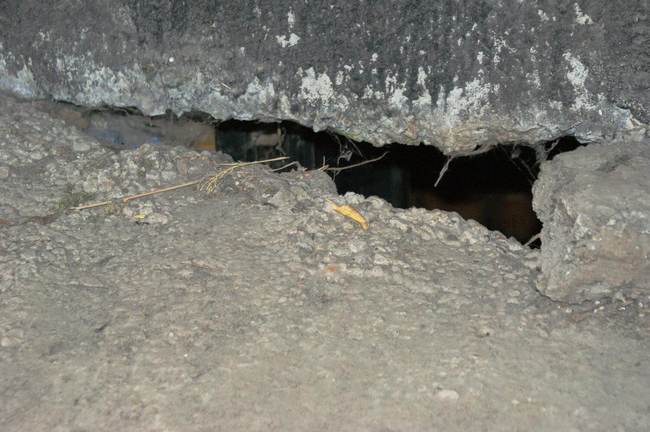
Aim big gap
Suitable sized pieces of brick, styrofoam, styrofoam, or plastic are ideal for filling the hole. If the parts are large, then they need to be broken or broken - small filling components guarantee that they will lie inside the hole as tightly as possible and carefully fill the cavity. Be careful that when filling the volume of the gap, you do not deform the existing hole and do not expand it.
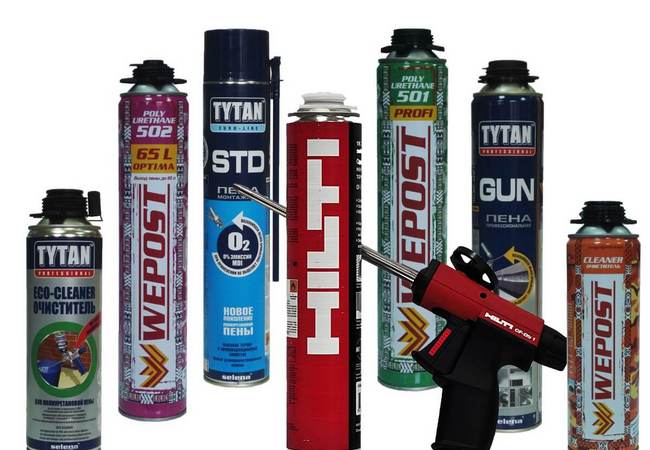
These materials will help you save expensive mounting foam, which should be poured into the gap after the previous materials. Practice shows that with the use of bricks or other fillers, only one bottle of mounting foam is required to restore even very large damage.
You should not fill it to the eyeballs, because it tends to expand several times. Fill the remaining space by about a third, in very severe cases - by half. If the layer turns out to be very large, then apply it not at once, but in parts, allowing the previous layer to fully expand and harden. This will reduce the risk of overfilling and subsequent foam tatters falling out, and as a result, it will save foam volume.
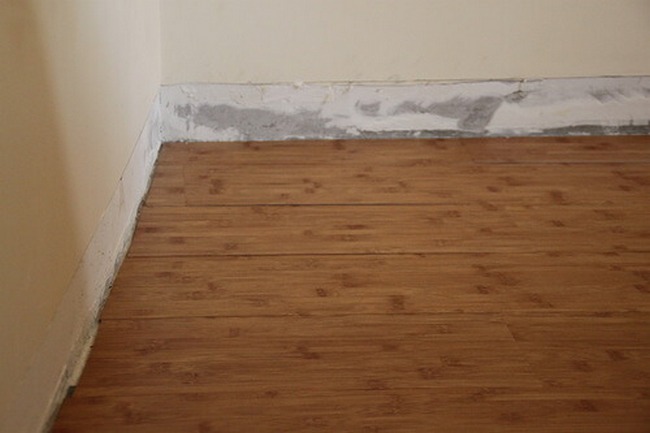
What to do if it blows from a corner in a panel house
The presence of drafts, the occurrence of a situation when cold comes from the wall or blows from under the plinth in a panel house - this is the first signal to start action! You should not wait for condensation to appear on the walls and it starts to freeze in winter, why wait for the appearance of a fungus under the ceiling or in the corners, on the floor, why live in conditions of high humidity, feeling the constant smell of dampness?
There is a very effective means of dealing with all of the above problems - sealing interpanel seams. Competently and conscientiously performed work on sealing the seams between the panels on the outer walls of the house will allow you to forget about the cold and dampness, drafts and fungus, and of course, colds, which are the result of a violation of the normal microclimate in the home.
Each apartment in a panel house has two horizontal, one or two vertical inter-panel seams, which, if their integrity is violated, can become the beginning of your problems. The lower seam collapsed - blowing on the floor in a panel house. The top one was damaged or spilled out - a wet spot formed under the ceiling, which eventually begins to darken and becomes the site of the appearance of the fungus. If the vertical seams have lost their qualities, then a draft and a feeling of cold air moving from the corners will appear.
If the process of destruction of interpanel seams has begun (and, unfortunately, it is inevitable, because nothing is eternal in the world), then you will have to repair all interpanel seams located next to your apartment in order not to call specialists several times.
Preparation for work
Sealing such gaps falls into the category of cosmetic repairs. Preparation depends on what decor elements your walls or floor are decorated with. If there is a plinth, it must be removed, the wallpaper removed, the paint layer cleaned and removed, and the whitewash washed off. In the latter case, you need to let the wall dry completely. Remove all dust and dirt that may interfere with the quality fixation of the embedding materials.
If the sealing takes place in a room where you do not plan to carry out a complete repair, then the wallpaper needs to be removed only partially, or try to carefully tear off the strip from the wall so that after the work is completed, glue it back, returning the wall to its original appearance. All surfaces that may get dirt during the repair process must be protected with film, paper and securely fixed - this will avoid additional costs when putting things in order. Such measures will keep the floor and walls from mounting foam, plaster and paint. Paper or newspapers should not be used if there is a lot of water in the workplace - it is useless as a protective material in this case.
Necessary materials
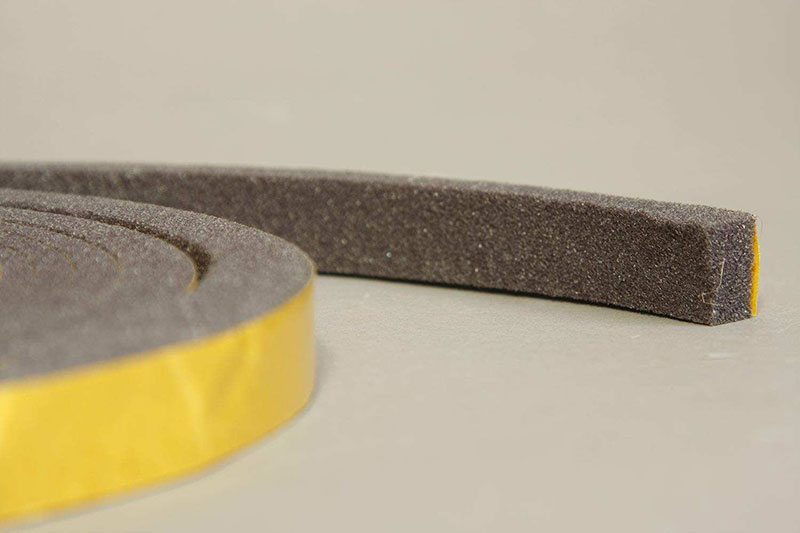
The range of insulating materials is quite diverse. All of them differ from each other in density and durability. Currently, the following door heaters are used:
Cardboard is the cheapest material. Possesses low heat-insulating property. And even its euphonious name "corrugated cardboard" does not save him, although the folded structure should be the best way to dispose of this;
Foam rubber is a pioneer among heaters. Flexible, holds its shape well and resists stress. It is easy to work with him. The only negative is that it absorbs moisture, gets wet and decomposes, which is why it is considered a short-lived material;
Izolon is an analogue of the previous substance, but has higher water-repellent properties. There are a large number of types that differ in thickness and density.
You should pay attention to its appearance, covered with foil. It has high thermal insulation, durable and elastic;
Styrofoam - a good option for warming the door leaf
It has good sound insulation, perfectly retains heat. It is easy to use - for its installation does not require specialized assistance, everything can be done by hand. In addition, he will delight you with his price. The disadvantage is its rapid flammability and the release of toxins during combustion;
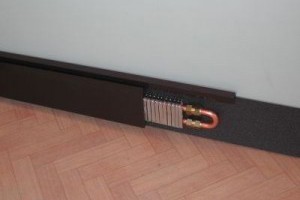
Warm plinth, photo gallery of do-it-yourself devices
An example of a homemade warm skirting board

Warm electric plinth - do it yourself
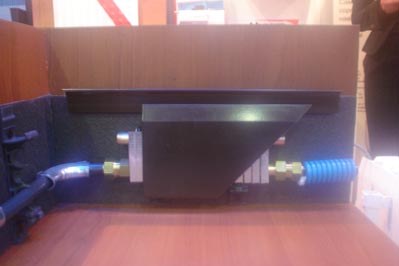
Connecting the baseboard heater to the heating system
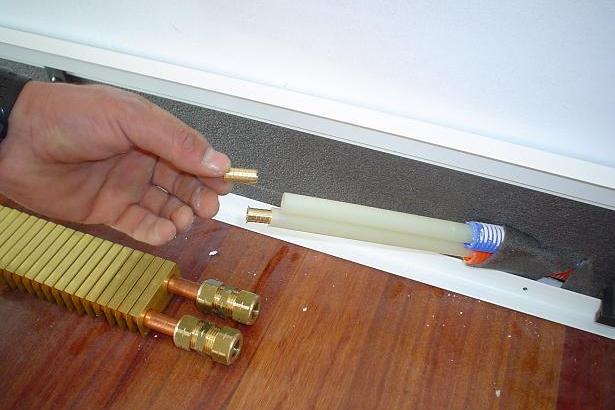
Connecting a baseboard heater using a union connection
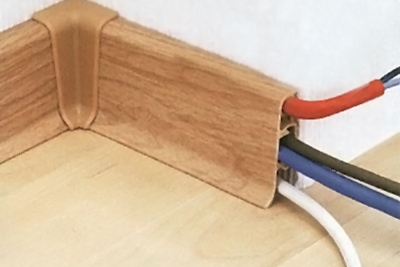
Warm plinth electric
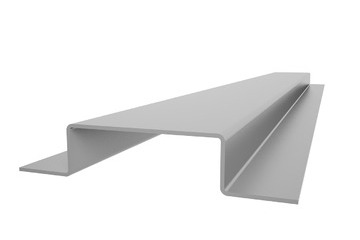
This profile is suitable for warm baseboard radiators.
Outlining corners with flexible tubes
Scheme of installation of a warm plinth
Bending a copper tube with a vise
Heating a room is an important task. Relatively recently, in a wide variety of heating methods, another interesting and very convenient one has appeared. This is a warm skirting board.
Installation of a warm electric plinth
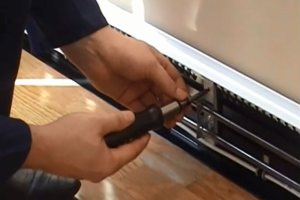
Installation of an electric baseboard heater
Much more difficult than water. Although in the network instructions, it seems that it is enough to put a heating element in a copper tube. But in fact, there are not so many people who could quite accurately stretch this same heating element through a long pipe with a diameter of 16 mm.
But the problems with the insulation and waterproofing of the device are much more complicated. A balcony, even glazed, is a place of high humidity. Short circuit, sparking, fire are much more likely here than in an ordinary room.
In any case, all threaded connections must be made using rubber gaskets, the radiator and copper pipes must not come into contact with the aluminum cladding, etc.
Therefore, it is better not to take risks and buy an electric plinth heater of branded production.They are not that expensive. And in the event of an emergency, at least there will be someone to file a claim for damages.
General scheme of the device
Baseboard heater device
Although, of course, people who build moonshine from generation to generation hardly need to be explained how to do something similar, but much easier. To begin with, let's just say that heating with a warm baseboard is done by two copper tubes through which hot water flows. To heighten the effect, radiator fins made of brass sheets are put on the tubes, and the whole structure is covered on three sides by an aluminum box.
Usually they try to fit a warm plinth in dimensions: 16 cm in height, 6 cm in width, and in length - as much as the perimeter of the room allows. And they place it in the same place as the most common plinth: along the walls along the floor.
Why not on the ceiling?
The article will tell you not only what kind of device it is, but also about the laws of physics on which the action of the baseboard heater is based
Because the installation of a warm plinth at the bottom of the walls requires complex physical laws that describe the convection of air flows along vertical surfaces (that is, walls) so that these walls warm up during the process of said convection and themselves become sources of infrared (thermal) radiation.
Rules for working with mounting foam
Two-thirds of cases still require the active use of mounting foam, even in small quantities
Therefore, it is important to figure out how to use it correctly. The recommendations are:
- Before filling the cavity, its surface must be slightly moistened with ordinary water. To do this, it is advisable to use a mechanical spray gun or a bottle with holes in the lid. This is done to better fix the foam inside the damage.
- When filling it is necessary to remember the ability of the foam to expand. In addition, wetting the surface will only enhance this effect. The foam must be applied carefully, carefully, little by little.
- Ideal working conditions with it are from five to twenty-five degrees Celsius. The cylinder must be heated in water with the appropriate temperature.
- Before use, the container with foam must be thoroughly shaken.
- Work should be carried out only in goggles and gloves - the foam is very caustic, it adheres firmly to all things and objects. In case of accidental contact with clean surfaces, it is recommended to remove the foam only after complete drying, and wipe off the foam that has not yet hardened with a special solvent.
- Hardened foam is removed with a sharp knife.
Dry insulation along the lags
The process is similar to the insulation of floors in an apartment on the ground floor of a wooden house, with the only difference being that in this version, the logs will have to be installed on a reinforced concrete base with your own hands.
Warming along the lags is carried out in this way:
The concrete base is cleaned of old coating, screed and debris.
The floor is waterproofed. To do this, you can use bituminous or polymer mixtures applied with a brush or roller, like paint. A less effective, but cheaper and faster way is to lay plastic wrap.
Wooden logs are installed a meter apart, no more, so that the floors do not sag. These logs can also be used as beacons for backfilling expanded clay
It is important to ensure that the upper edges of the lag are in the same plane.
The selected heat-insulating material is laid. The insulation should be mounted close to the lags, avoiding gaps.
The floor covering is formed from plywood, gypsum-fiber sheets or fiberboard
The thickness of this layer should be about one and a half centimeters. To do this, the material can be laid in two layers, so that the plates lie crosswise, and the joints do not match. Sheets are fastened with glue and self-tapping screws.
Any type of finish is applied.
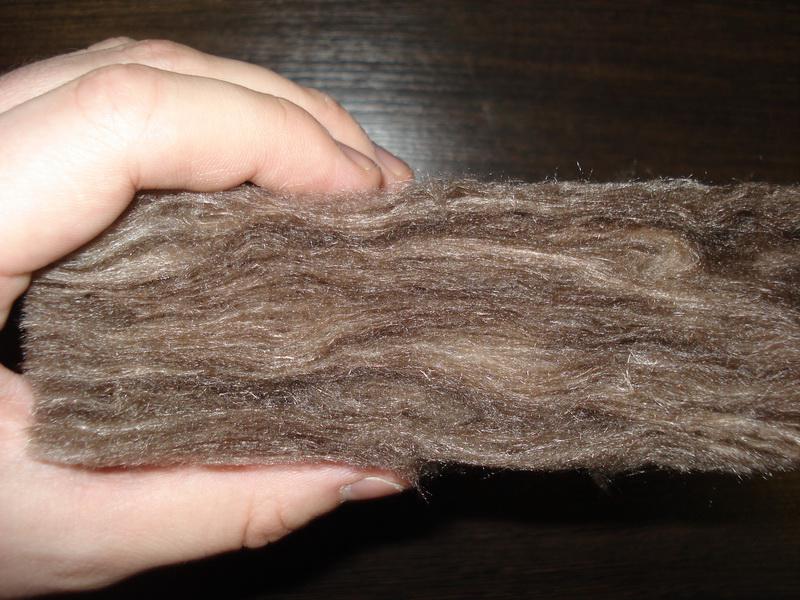
Target medium to small slit
The ideal option for filling such holes would be soft, plastic materials with a high density - tow or building felt.To prevent such materials from becoming a refuge for pests, they must be thoroughly impregnated with insecticidal substances before filling, formalin most often plays their role.
The material is rolled into small rolls, the diameter of which should be slightly larger than the size of the gap, and applied to the gap. Further, with the help of a small rubber or wooden hammer, the roll is gently but surely hammered into the hollow space of the damage. It is advisable to fill the void with a single piece of material, without small parts, so that unnecessary cavities do not form between them.
If the gap is so small that you can’t physically stuff the tow into it, then a soft spatula and plastic gypsum mortar will come to the rescue. The technology is simple - apply a strip of gypsum to the tip of the spatula and apply to the damage, then gently press. This will allow the mortar to fill the entire cavity and immediately fill the wall surface to minimize preparation for finishing.
To save the surrounding area from dirt, you can use self-adhesive construction fabric (which will not work if you already have wallpaper) or the above methods. After the gap is completely clogged, the formalin dries out - you can decorate the seam.
Blowing from the walls of a panel house, how to insulate
If you feel that it is blowing from the seams in a panel house, then you personally better not do anything, but immediately call in specialists who can inspect the external walls of your apartment and interpanel seams in the most conscientious and safe way. Looking out of the windows will help a little, and without insurance you will definitely not be able to inspect and see defects, cracks, destroyed places in the seams! Utility workers are also slow to come to your aid, and not because they don't want to. It's just that houses built at the same time begin to require repairs at the same time.
There are several ways to seal seams. The person who will perform the work will certainly tell you about them. Depending on the neglect of the situation, your wishes and possibilities, the optimal, in each case, option will be selected that will allow you to get the result and guarantee its preservation for a significant period.
Sealing the seams will save you not only from drafts and dampness, but will also help save money on heating the apartment due to energy saving.
To a specific question: “It is blowing from the wall, what should I do?” we will give you the same specific answer - seal interpanel seams. In 90% of cases, this will solve all problems and improve the quality of your life. Whom to entrust the work? Only professionals with extensive experience and the necessary permits for dangerous high-altitude work!
We are able to work conscientiously at any height and always bear responsibility for the result. Give us a call and we will provide you with a competent and non-binding consultation.
Therefore, it is extremely important that once such a problem is discovered, it should be fixed immediately. Carrying out the work will not take much effort and time, it involves following several stages:
- Determining the size of the gap - length and depth;
- Based on the scale of future work, the material with which the hole will be sealed is selected.
To seal very small gaps (about 1 cm), you can take mortars of putty, mounting gypsum or cement. Larger gaps (2-5 cm) must be filled with mounting foam. If the damage is much larger (from 5 cm or more), then you need to resort to more serious work and the use of other materials. Below is a consistent technology for eliminating gaps between the wall and the floor of any complexity.

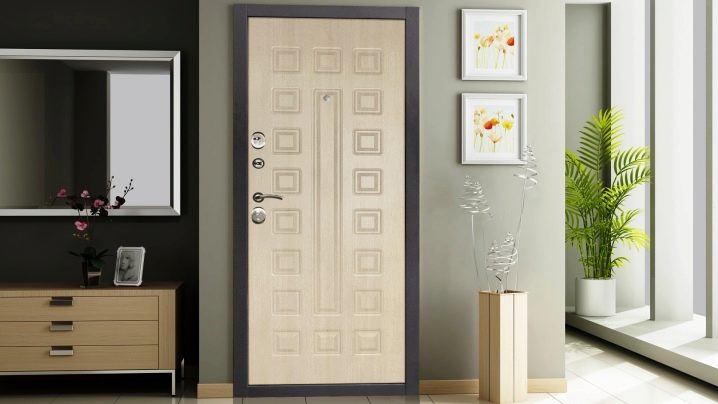
How to insulate the front door
The guarantee of future comfort depends on the chosen material, for the sake of which the insulation was started.And if a few decades ago only felt, foam rubber and dermantin were available, today the choice is much greater. And here is what the manufacturers offer:
- mineral wool;
- Styrofoam;
- Izolon;
- Styrofoam.
Mineral wool, like polystyrene, is most often taken as the basis for insulation for metal door panels. Both materials perfectly retain heat indoors and are not affected by microorganisms. Mineral wool is also worth noting because no rodents will spoil this insulation.
 Mineral wool absorbs moisture
But these materials have some restrictions on their use.
The use of isolon is more justified to achieve the goal of retaining heat. This material is made on the basis of foamed polyethylene, which gives it a minimum thermal conductivity. The advantages of the material include the fact that a canvas with a thickness of 10 - 15 mm will be enough for work. This allows you to maintain an attractive appearance of the door leaf, without thickening it and not making it bulky.
 Izolon has low thermal conductivity
Expanded polystyrene has excellent performance. A door insulated in this way will become a reliable and safe barrier between a warm house and a cold street. Among the advantages of expanded polystyrene, its incombustibility should be highlighted. When a flame occurs, it will gradually disappear on the surface of this material.
For inexpensive insulation, you can always use foam rubber. The material is convenient in all respects and will be a real find for a novice home master. Foam rubber will forgive the mistakes made and allow them to be painlessly corrected.
Mounting the seal
Installing frost-resistant insulation on the door leaf is only half the battle to eliminate the penetration of cold air into the living space. Even with the door closed, there is a small gap between it and the box, through which the cold will penetrate. Eliminating drafts is the next task for the home master.
To perform this work, you should choose the optimal type of seal. Today, manufacturers can offer the following types of this material:
- foam seals;
- Silicone seals;
- Rubber seals.
The first type of seal allows you to quickly and inexpensively solve the problem of drafts. It is ideal for the doorway of a building such as a summer house, where there is no great intensity of opening and closing doors.
 Foam seal - inexpensive, but also short-lived
The use of a silicone door seal will allow you to get rid of a draft for a longer time than a foam analog can do. The shape of the product guarantees a tight pressing of the canvas to the box, which will not allow air masses to move inside the room.
Having chosen the desired version of the seal, it remains only to install it in place. There are two main mounting options:
- With adhesive strip.
- With a harpoon in the groove.
The fastest way to install a new seal on the door is when using self-adhesive products. But this type cannot please with durability, so many experts recommend a harpoon mount in a groove.
It will be quite difficult to choose a small groove in a quarter without disassembling the boxes. Therefore, it is allowed to carefully nail the sealant with small carnations. Fastening must be done in the very corner of the quarter. This will allow the leaf to take its position in the door block without difficulty and provide reliable protection against drafts.
The front door is a kind of barrier between the street and the house. It protects us from uninvited guests and unnecessary noise. It can also serve as excellent thermal insulation. But this function may not be fully performed if the door is not insulated in a timely manner.