Price overview and popular brands
The cost of adhesives varies significantly and ranges from 65 to 500 rubles per unit. capacity, regardless of packaging (ml, kg). Dry mixes will cost much less than ready-made polyurethane adhesive.
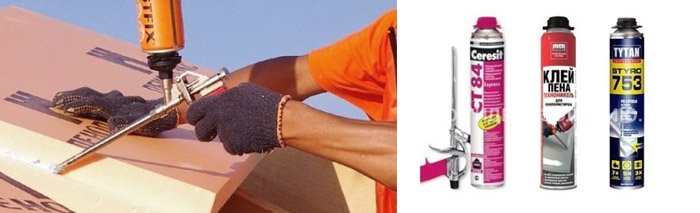 Popular brands of the brand Ceresit, Knauf, Isofix. External insulation with UNIS adhesives is a guarantee of quality and reliability. The budget option is a gypsum adhesive for dry rooms.
This is due to a number of factors:
- improved adhesion in formulations in the form of foam;
- instant results due to fast setting;
- no need to mix.
Another factor that determines the high price category of polyurethane adhesives is versatility: it is used to work on metal, concrete, wood.
The most popular is Insta-Stic polymer glue (500 rubles / unit). The analogues of Tytan STYRO 753, Teplofom are slightly inferior to it in properties. The cheapest is composite glue Moment (65 rubles / unit). Of the mineral mixtures, Ceresit (CT83) and Sarmat products are popular.
If you plan to work with different surfaces, it is better to use a universal material, a vivid example is Ceresit CT83, ALLFIX. It is used in work on concrete, wood, metal. For surface waterproofing, special compounds should be used, for example, T-Avangard-K.
Tips at work
Before you start gluing foam boards, you should thoroughly clean the surface with which you plan to work. Moreover, it is not enough to brush off the dust, it is also recommended to moisten the wall and floor (depending on where the insulation will be laid). Lack of pollution, dust will provide the improved coupling of materials. Before installing the plates, it is recommended to wait until the surface dries well.
 If boards are glued to polymer compositions, then a rather short curing time must be taken into account. Within 3-5 minutes, they tightly seize with a heater.
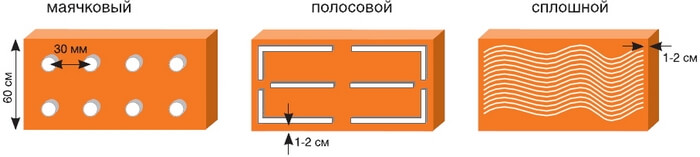
There are three ways to apply the adhesive on the penoplex:
- solid, while the adhesive covers a significant part of the surface of the plate;
- point - involves the application of the composition by separate points, the recommended distance between which is 30 m;
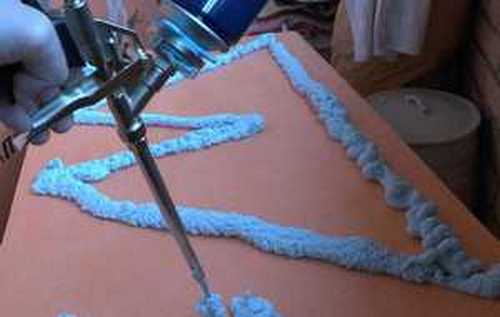
- method of interrupted strips, in this case, the glue lies in separate areas in narrow strips.
The principle of laying the material is the same for all surfaces: in work on concrete, wood or metal. After the composition has been applied to the insulation, it must be pressed tightly against the wall. Penokleks can be released after a while and take the next plate.
 The use of mounting foam as an alternative to glue is possible. But it is not applicable to all surfaces and works.
During operation, it is not always possible to ensure a tight joining of the material, which is usually caused by an uneven surface. But this is not critical, since all the cracks, depending on their size, are filled either with mounting foam of a special composition, or with foam plastic trimmings. Given the "capricious nature" of such a heater, foam for filling leaks should not contain aggressive substances from the list above.
If you are not attentive to the task of choosing an adhesive for laying foam plastic, as a result, the insulation may collapse under the influence of an aggressive environment, which is formed due to the reactions between the components of the adhesive mixture and thermal insulation. In the laying process, an important step is the high-quality cleaning of the surface of the floor, walls or ceiling, which affects the adhesion of materials.
The method of warming the base under underfloor heating
To put penoplex under a warm floor, you will need to go through a series of steps:
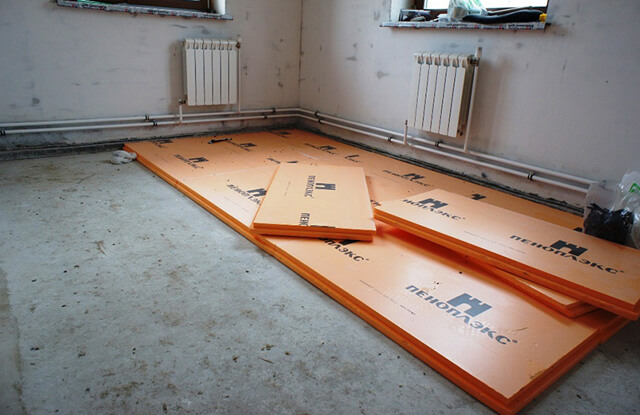
- The concrete base is pre-cleaned, dedusted and primed. On the walls mark the zero level of flooring.If necessary, the floor surface is additionally leveled with a cement screed. If the surface is perfectly flat, then you can start warming the concrete floor with foam plastic without a screed.
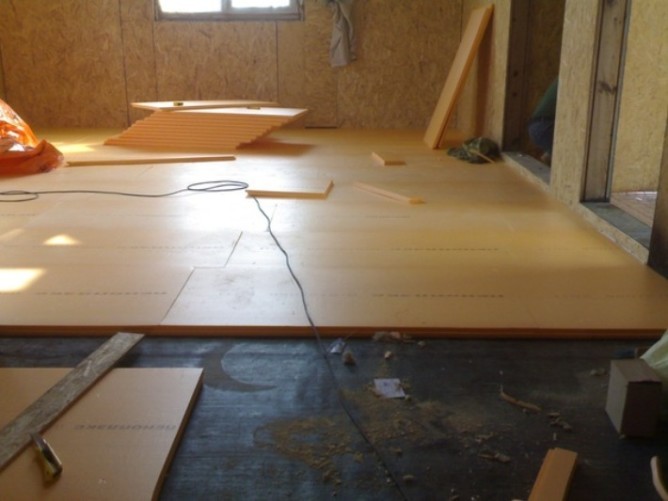
- Penoplex plates, lubricated with glue, are laid on the prepared surface and pressed. After that, the horizontality of the slab, and the slabs adjacent to it, is checked with a level. Laying is carried out apart, the seams are spaced from each other by half the width of the insulation plate.
- Moisture protection is provided by a layer of film, the joints of which are sealed with adhesive tape. The edges of the waterproofing lead to the walls, where a damper tape is attached.
- Equipment for underfloor heating is placed on top of the film, after which the screed is poured to the marking line. As soon as the subfloor dries, you can start laying the final coating.
Insulation on floor slabs
You will need to acquire the following tools and materials:
- building level;
- polymer putty;
- primer;
- moisture-repellent film;
- insulation;
- polyurethane adhesive;
- self leveling compound.
The sequence of work is as follows:
- First of all, the floor slabs are checked for flaws. Any protrusions, cracks, depressions must be eliminated. The protrusions can be knocked down with a puncher, and the cracks and pits are covered with polymer putty. If there are a lot of flaws, the base will have to be leveled with a self-leveling mixture. If the plates are in a normal condition, devoid of damage, you can limit yourself to garbage collection and dust removal.
- If the ceiling is not lower than the second floor, then the penoplex is laid directly on the ceiling, which is pre-treated with a primer mixture. If the ceiling is part of the basement or first floor, then it is advisable to lay the floor with a hydro-repellent film. It turns out that, based on the location of the overlap, it is either primed or covered with a protective layer of moisture insulation. In the latter case, the joints of the film must be glued with adhesive tape.
- On the wrong side of the insulation you need to apply a layer of glue, then attach it to the floor and press it down well. The position of each individual plate is checked with a building level, while simultaneously controlling the horizontality of adjacent pieces of insulation so that the surface is perfectly flat. The laying of each subsequent row of slabs is carried out with an offset of half the width of the segment so that the seams do not coincide.
- A layer of polyethylene film for waterproofing is laid on top of the insulation.
- On the waterproofing layer, you can pour a classic cement screed up to 5 cm thick, or a self-leveling compound. As soon as the screed is completely dry, you can start laying the final floor.
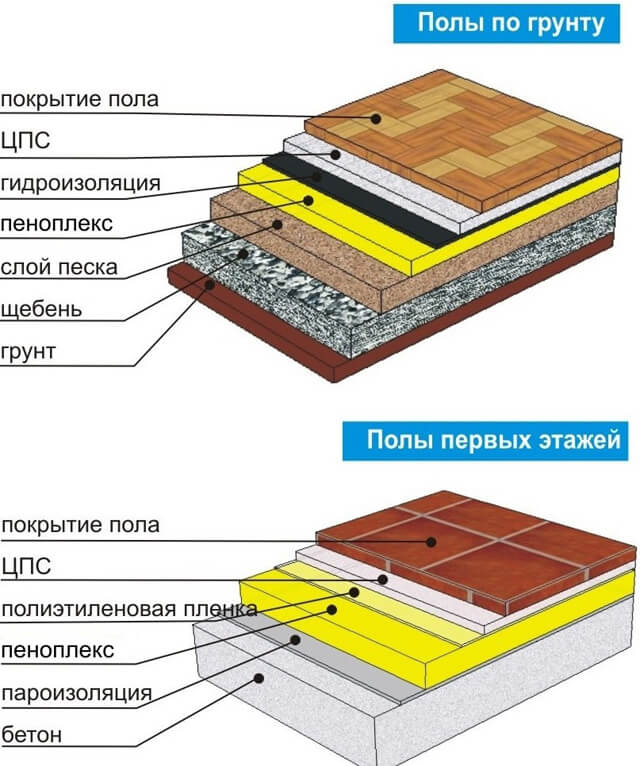
The use of penoplex directly on the ground
Firstly, it is necessary to level the ground, which will be used as a base, while the distance to the floor must be at least fifty centimeters.
The second step is filling the space with expanded clay, sand or gravel to a height of up to forty centimeters. In doing so, make sure that the horizontal position is maintained.
The third step is the laying of foam plastic, but at the beginning, the heat-insulating material should be checked for irregularities and chips, if found, they should be removed. The material must be at least five centimeters thick. When laying, press the sheets tightly against each other, without creating a gap, the joints are glued with special adhesive tape so that moisture does not get into them.
At the edges, the building is fenced with sheets of roofing material or polyethylene, the foam is also covered with these materials on top, then a layer of cement is mounted on them, and a metal mesh to strengthen it, while the thickness of the screed should be five centimeters.
Important! Remember that the screed must be strictly horizontal, otherwise, when laying the floor covering, you may encounter serious difficulties. What type of floor can be used:
What type of floor can be used:
- parquet board;
- laminate;
- linoleum;
- any kind of ceramic tiles;
- polymer coating;
- wooden boards;
Installation of the floor in the bath has its own specific features. So it is necessary to insulate the walls from the side flush with the floor, the concrete screed is installed at a certain angle, this is necessary for the unhindered flow of water, while the drain must also be isolated from air from outside. Polished boards are used as flooring in the baths, they are installed on logs in increments of fifty centimeters. When installing the floor in the bath room, the boards are laid with a gap of 5 millimeters so that water flows out.
Best Answers
Novosibirsk:
The tile must be laid on a RIGID base, which is the screed. Moisture-resistant drywall, even 12.5 mm thick, is a wall material. If you don’t want to mess around with wet work, do a dry screed using the Knauf system. But a rigid base under the tile is a prerequisite.
Alexander:
))))))))) No, of course, it's soft, all the seams will crack immediately
Nikolay Sorokin:
A tie is a must! It is a redistributing load and leveling the base element at the same time.
Michael:
if the drywall does not play, does not jump, then it is possible, but it is better to twist it in two layers and twist or glue it together, apart, and even better gypsum fiber
Benefits of penoplex
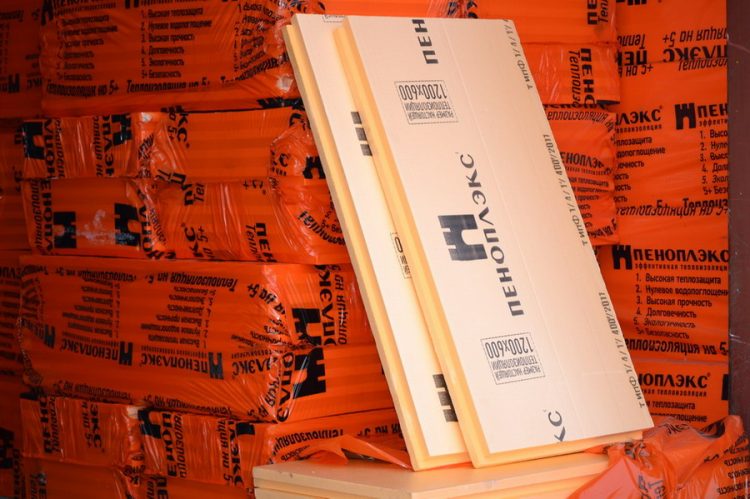
This insulation is available in the form of plates of various thicknesses. The standard plate width is 600 mm, length - 1200 mm and 2400 mm. The minimum sheet thickness is 20 mm, the maximum is 100 mm. Depending on the thickness, the package can contain from 4 to 20 foam sheets.
PENOPLEXCOMFORT is a unique brand of thermal insulation boards, which is ideal for thermal insulation of country houses or city apartments.
The main advantages of this heater include:
- zero water absorption;
- low thermal conductivity and vapor permeability;
- no harmful fumes;
- resistance to microorganisms;
- high strength.
Properly laid insulation will reliably protect the room from cold, noise, moisture penetration, and will create comfortable conditions even in the most severe frosts. Unfortunately, penoplex is not resistant to solvents and high temperatures, and also has a rather high cost. But, despite this, it is used very widely for floor insulation, gradually replacing mineral wool and polystyrene.
Calculation table of thermal insulation in various regions
Penoplex parameters table
Penoplex. Manufacturer's installation instructions
Features of work on the insulation of the floor with foam
Penoplex is a unique building material with the properties of foam and plastic. It is a product with a cellular structure of a closed type, which retains heat well.
From other heat insulators for the floor, the product differs in high density and rigidity. It is convenient to lay it to create a frameless floor covering. Often used in the following cases:
For laying on the ground, if there is no basement under it;
In high-rise buildings on floors or over concrete basements;
When creating self-leveling and warm floors of small thickness (film or in the form of mats);
On balconies and loggias;
For forming a floor on the ground during the construction of a bath.
It is not necessary to put penoplex on logs, because in this case its advantages in the form of density and moisture resistance do not play a role, and it is better to use cheaper products for thermal insulation.
The insulator goes on sale in the form of plates 0.6x1.2 m. The thickness of the foam for floor insulation in the house is 3-10 cm, depending on the climatic zones. If thermal insulation is carried out at the stage of building a house, the thickness of the samples is 3-5 cm, if not, 5-10 cm. The product goes on sale packed in a film of 10 pcs. included.
For floor insulation, it is recommended to use the following types of material:
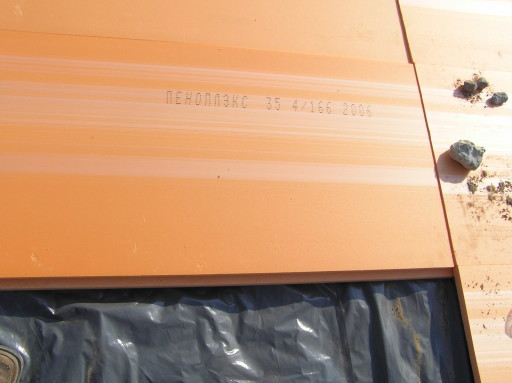
- Penoplex "Foundation" (or penoplex 35). It is not impregnated with flame retardant, so it should be used in cases where fire protection is not needed. The plates are quite rigid, but not designed for heavy loads.
Penoplex "Comfort" (or foam 31C). Insulation is considered universal and is designed for any type of room. It resists mechanical stress well.
Penoplex 45. Blocks from it are the strongest and can withstand considerable weight.
The technology of laying panels depends on the type of base and the characteristics of the operation of floor coverings. The design of the floor and the need for waterproofing is determined for each case separately.
How to insulate the floor with foam
Modern foam floor insulation is the best solution to this problem. Penoplex laying can be done independently. Large cash outlays are not required.
Reliable foam insulation is produced in sheets with a thickness of 2 to 10 cm. The width of the sheet is standard, 60 cm. The length of the sheet can be 1200 or 2400 mm. Such dimensions greatly facilitate the process of insulating the floor with penoplex. Each package contains from 4 to 20 sheets, depending on their thickness. The required amount of material can be calculated in advance, taking into account a small increase.
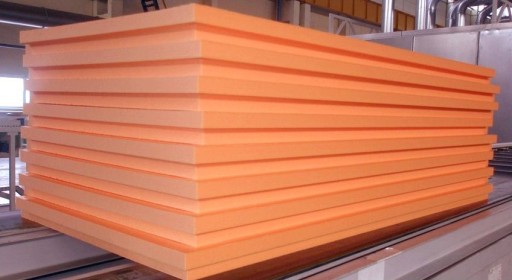
Foam insulation sheets
Penoplex has such advantages as:
- moisture resistance;
- low thermal conductivity;
- vapor tightness;
- soundproofing;
- inaccessibility to microorganisms;
- good indicators of thermal insulation;
- long term.
All these advantages fully compensate for the instability of this material to high temperatures and various solvents.
Advantages and disadvantages of foam floor insulation

The insulation has no competitors among sheet materials used for thermal insulation of floors, as it has the following advantages:
The degree of liquid absorption is close to zero, which allows it to be used for its intended purpose in wet rooms. After a long stay in water, the insulator absorbs only 0.5% of moisture from its weight.
Insulation of the floor with penoplex can be carried out at the stage of building a house and during its operation.
The material consists of chemically inert components that resist decay well. Thanks to these properties, its service life exceeds 50 years.
Insulation cells are very small (0.05-0.12 mm) and provide greater mechanical strength of the product.
Despite the high density, the boards are easy to process.
Extruded polystyrene foam can be laid on any base, even on the ground.
Sheets of convenient shape, dimensions are maintained with great accuracy, which facilitates installation work.
This is an environmentally friendly material that does not adversely affect humans.
Of the negative properties, the following can be distinguished:
- The product is afraid of sunlight, so it is stored in a dark place.
It is expensive compared to other insulators.
The material does not burn, but actively melts, so it is not recommended to use it in fire hazardous rooms.
Warming over the ground
To carry out the work we need:
- gravel or small gravel;
- sand and cement;
- building level and rule;
- ramming device;
- reinforcing mesh;
- metallized tape;
- moisture insulating material;
- metal beacons;
- alabaster;
- penoplex.
Work is performed in the following sequence:
If you plan to insulate the floor in a garage or other similar room that experiences heavy loads on the floor, a water-repellent material is laid on a sand cushion, a mesh of reinforcement and a concrete screed is made. In this case, the thickness of the screed will be greater and usually equals 5-10 cm. Then the foam is laid, but only after the concrete base has completely dried. Therefore, a foam screed with a device technology similar to that for residential premises will differ only in the thickness of the layer.
Expert answers
Stas Shabanov:
once one client had to insulate from the entrance. And so only glue extruded polystyrene foam 3 cm. for glue and dowels. Further a grid on spec. plaster and tile on top. We'll have to sacrifice the distance and buy a smaller bath.
Evgeny Sidorov:
Glue the bestyashka canvas and foam on the other side, with a glitter inside the bathroom, and then put moisture-resistant drywall on the dowels and then stick the tile, this is the most optimal option, in which the bathtub will decrease a little, but nothing more
Vadim Sadovnichy:
Representative (s otvet.mail /profile/id208881240/answers/all/) of the Astartek company, all reviews and links to the website avanta161 - the southern administrative district They wrote not the truth about Aktorm liquid thermal insulation (supposedly adhesion is worse) - an unconfirmed fact
AKTERM has never had poor adhesion! Adhesion at a high level, to concrete 0.37
Aleksandr Kuznetsov:
More than enough mushrooms
Andrey Sidorenko:
if something very heavy will be glued to foam, then it’s better to glue it! and if not, then mushrooms are enough!
Andrey Volkov:
Be sure to glue and nail with “fungi” And instead of foam plastic, it’s better to take facade foam plastic - it’s better to hold on to the mesh and putty Penoplex does not go under putty - it is very smooth
Kim:
There should be no space between the insulated surface and the insulation that communicates with the outside air. Or this space should be isolated from outside air.
Vladimir Petrov:
Fungi dostvtochno 5 pieces per sheet along the edges and in the center. And if there are gaps, foam it. And for plaster, attach the mesh, the plaster stays well
Stas Shabanov:
I would glue it and plant it on the "fungi". And if the penoplex is without grooves, then the seams with foam passed.
Sergey:
On mushrooms and foam. Gluing is mainly necessary in order to select the irregularities of the wall - creating “pills” of glue in the corners.
Josef Schweik:
Be sure to glue and glue must be of high quality. And fungi are just insurance against x ... in the work done and, in principle, you can do without them. I insulated the basement made of rubble stone with smooth foam plastic (I just glued it with the “Master” composition without any fungi). Penoplex was treated on both sides with a large emery cloth to roughen it. On top, I applied a reinforcing layer from the same “Master” along the grid and glued porcelain stoneware tiles. After 3 winters everything is dead and not a single tile has fallen off ...
Basic rules for laying penoplex
Reliable floor insulation with foam comes out, regardless of the base on which the material is laid. It can be a wooden or concrete floor, as well as a sand and gravel base. The main thing is to remember that the subfloor on which the penoplex is supposed to be laid must be perfectly leveled.
Wooden floor insulation
Insulation of a wooden floor with foam plastic is carried out on top of the boards. Boards must be in good condition. You need to prepare the following tools in advance:
- screwdriver;
- hammer;
- self-tapping screws;
- construction level;
- grinding attachment.
From the materials you will need:
- vapor barrier;
- plywood or chipboard;
- antiseptic primer.
First, skirting boards and finishing boards are dismantled. Then the logs are checked. Damaged sections of the log must be replaced. Next, the boards are laid. Their horizontalness is checked by the building level.
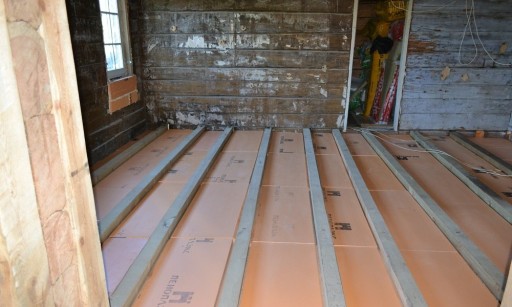
Insulation of a wooden floor with foam
After that, the floor surface must be leveled: the protrusions must be sanded and all recesses, grooves and cracks should be covered with wood putty. Then the boards are primed and dried. For porous boards, priming is carried out at least 2 times.
Foam boards are laid on the dried boards, pre-coated with special glue. The laying technology is simple: it is carried out apart, horizontalness is checked by a level. All voids between the plates are filled with mounting foam.The main thing is that in its composition there were no additives that destroy penoplex. For example, toluene.
Vapor barrier fabrics are overlapped over the foam plastic. The edges must be brought to the walls, so that they can be carefully trimmed later. The vapor barrier is covered with a layer of chipboard, plywood, etc. This material must be laid end-to-end, the seams must be shifted. The horizontal laying is checked by a level, irregularities are removed. The last layer is the floor finish.
To fill the space between the beams and joists of a wooden floor, it is better to use mineral wool or foam.
concrete floor insulation
In order to carry out the insulation of the concrete floor, you first need to remove the coating, dust and debris. Then you need to level the concrete surface. To do this, if necessary, a screed of cement and sand is made over the concrete. After complete drying of the screed, the foam boards are laid and covered with polyethylene or other waterproofing material.
Insulation of the concrete floor with foam
If there is a basement or basement under the concrete floor, the waterproofing should be laid over the screed, and then the foam should be laid. On top of the waterproofing material, 1 more screed is made: self-leveling or sand-cement.
Insulation of the loggia floor with penoplex is carried out in a similar way, since the concrete floor is most often its base. In order for the screed to dry properly and gain the necessary strength, all work is best done in the warm season. This will allow you to do without additional heating of the loggia in order to speed up the drying of the screed. In the next video you can see everything clearly (video 1 Insulation of the floor with penoplex)
Expert answers
Andrew ▒▒▒▒▒▒▒:
On the walls you can, but on the floor it will crack. On top of the foam, you need to put GVL, plywood or a screed with a mesh. And that the joints do not match.
Vladimir Ivanov:
Your tile will then dance.
Vladimir Vladimirovich:
you can put something if it's not a pity
Bella Spring ✿:
It is forbidden. Penoplex does not withstand this and the tile will crack.
Comte de Wall:
Cracks immediately. The base is wobbly and fragile.
NOT YET OLD:
Sergey almost correctly recommends. Waterproofing is always performed from the wet side - from the floor, in order to prevent capillary penetration of moisture into the screed and interfloor overlap. On a damp screed - wet on wet - with a spatula, waterproofing is applied - dry mixes -, then dried, primed and glued on the tile. If the floor is waterproofed, then screeded, then moisture will always be present in the screed - the smell of dampness and, over time, the destruction of the screed body. Well, if necessary, you can heat and soundproof the bathroom by laying penoplex on the floor to the screed.
Michael:
why? of course it is possible
Sasha Novikov:
it is possible, process but not necessarily, the screed is at least 3 centimeters. better than 5, be sure to put a net
Sergey Koltsov:
Everything depends on the situation. Waterproofing, screed with mesh primer and tiles. Believe experience in this work 8 years
Rost:
It is designed for this, unlike polystyrene! It is not necessary to process it with anything, lay it on the floor, and then you can pour a screed directly on top of it, if the screed is thin, then it is better to reinforce the met. mesh, and then do any floor! As for waterproofing, it depends on the room! If a bath is needed, then waterproofing is needed, along the slab, i.e. under the foam, and then under the tile, i.e., along the screed. Or just on the screed. If the kitchen, then see for yourself, in principle, it is not necessary to do waterproofing.
Prohibited components in the adhesive composition for penoplex
Using glue for fixing this type of thermal insulation, you must first pay attention to the composition of the mixture. The fact is that some components can provoke the destruction of the foam, which in turn contributes to the formation of cold bridges through which heat flows out
In order to safely glue such material, compositions containing the following components should be avoided:
- harmful compounds: formaldehyde, as well as derivatives (for example, an aqueous solution of formalin);
- solvent in any form;
- polyester and coal tar;
- combustible substances: kerosene, gasoline, etc.;
- benzene, toluene.
Despite the rather large number of restrictions when using adhesives, penoplex can still be glued without risk to the material, but for this it is recommended to choose special mixtures.
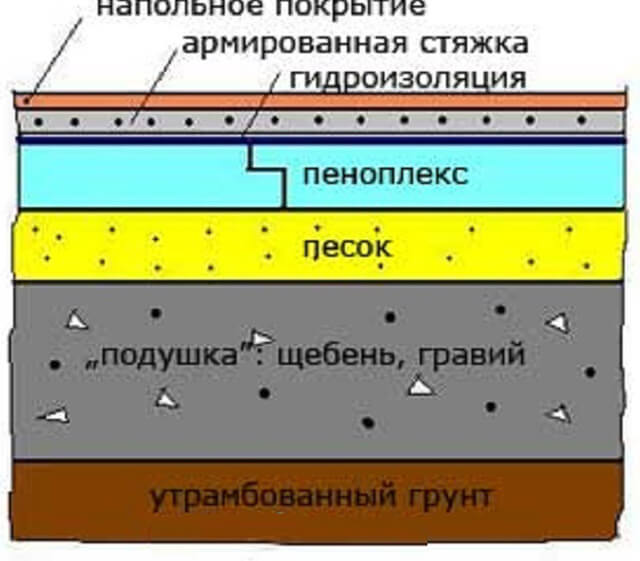
Insulation on the ground with foam
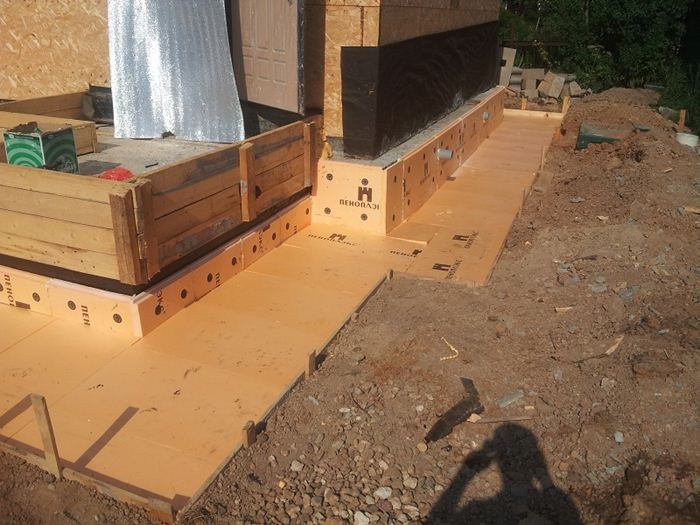
Penoplex is laid on the ground in the absence of a basement and a foundation slab. In this case, the ground level is made 0.5 m below the expected final floor covering.
For work you will need:
- crushed stone (fine) or gravel;
- sand;
- cement;
- reinforcing mesh;
- waterproofing;
- metallized adhesive tape;
- alabaster.
From the tools you need to prepare a building level, as a rule, beacons made of aluminum.
Under the foam layer you need to lay a vapor barrier
The soil must be leveled, compacted and dried. Gravel (crushed stone) is covered with a layer 0.3-0.4 m thick, leveled and compacted. On top of the resulting pillow, medium-grained sand or fine granite screenings are laid and leveled. The height of this layer is 0.1 m.
Penoplex plates, combining the docking grooves, are laid on top of the sand cushion. The joints are glued with metallic tape. When laying, you should move from the doorway deep into the room. Waterproofing is laid on top of the foam. Its strips are laid with an overlap of 10-12 cm. The joints of the strips are covered with adhesive tape.
The next layer is reinforcing mesh. It is placed at a height of not more than 25 mm. When laying, the rooms retreat from the walls by 2-3 cm. When insulating the floor with foam plastic under the screed, it is better to use a mixture of sand and cement. It is leveled with beacons and rules. A finished floor is laid on top of the dried screed.
Insulation of the balcony floor with heat insulators
The complex of works associated with thermal insulation can be done by hand.
- The floor surface is cleaned, cracks in the concrete, if any, are filled with sealant.
- Any waterproofing material is laid on the entire surface of the floor: glassine, special film, penofol. The latter itself is a heat-insulating material. You can also use liquid rubber. It is recommended to lay whole sheets of waterproofing, cutting to size on the spot, as a large number of joints leads to loss of insulation.
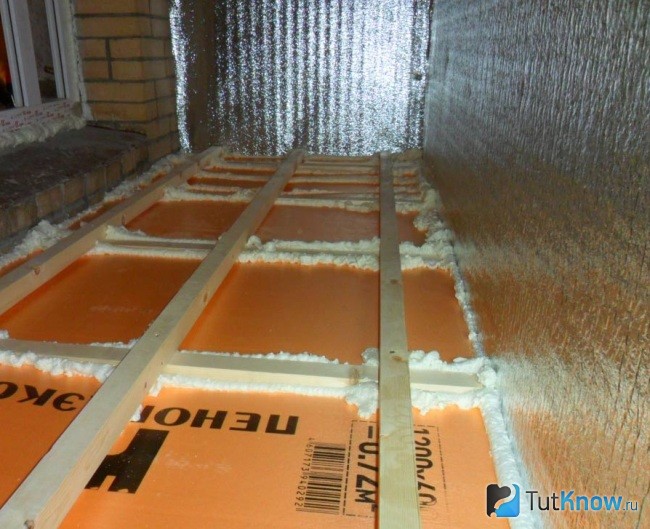
- Logs are made from a wooden beam with a section of 50 * 50 mm and treated with an antifungal compound.
- The bars are installed across the balcony in increments of 50-60 cm, fastened with self-tapping screws. The extreme logs are placed at a distance of 5–10 cm from the wall. The installed logs are shown in the photo.
- Insulation plates, about 50 mm thick, fit tightly between the lags. Slots are filled with mounting foam.
- Plinth installed.
- DPS boards or slabs are laid on the floor, as well as a waterproofing layer, if ceramic tiles are to be used as a facing material.
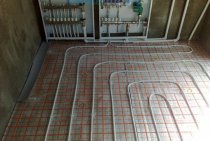
Insulation with a "warm floor" system
The process of installing a heating system is more complicated and lengthy. The system does not imply any restrictions for the facing material: wood, tiles, cork - you can use any.
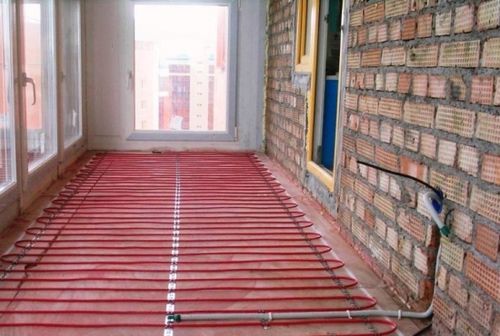
- Floor cleaning. In this case, the stage includes the removal of the old screed if it has become unusable.
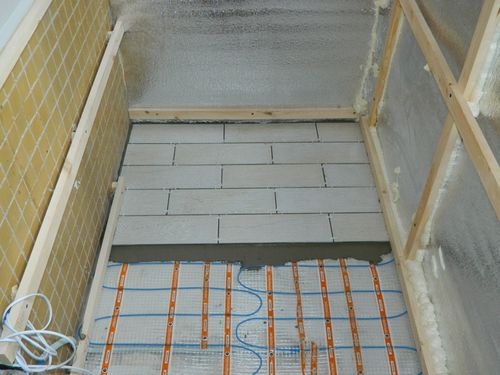
- A layer of insulation is laid on the floor surface - styrodur, penofol, fixed with glue. On top is a layer of foil to provide heat reflection. If the insulation is foil, you can do without a layer of reflective material.
- A metal mesh is laid on a layer of the same glue.
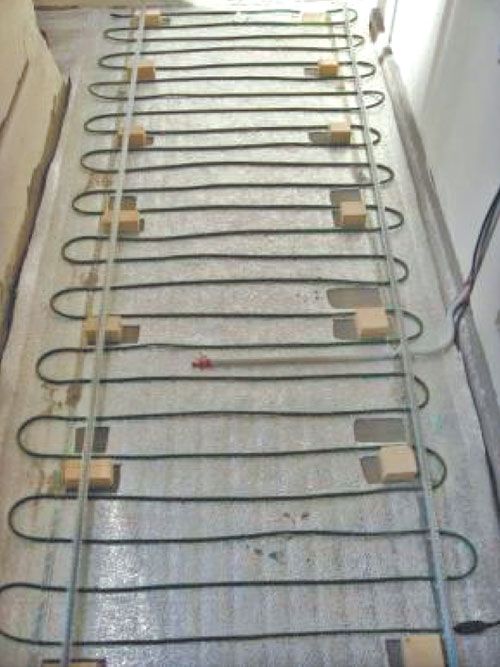
- Heating cables are placed on the floor surface in 10 cm increments.To ensure uniform placement, it is recommended to use mounting tape. Follow the instructions supplied with the heating system carefully. In the photo - the floor with heating cables.
- Between the turns of the cable there is a temperature sensor in the corrugation. The ends of the cable will be connected to the thermostat, as well as the temperature sensor.
- A concrete screed 4-5 cm thick is poured.
- Facing work, as well as the operation of the heating system, may only be started after the screed has completely dried.
What is penoplex
Penoplex is a modern material, it is based on polystyrene, which is foamed with the help of technological processing, and unlike its “relative” polystyrene, it consists of a homogeneous structure, as well as more dense and elastic. This material is highly demanded in the building materials market due to its excellent thermal insulation properties. Unlike foam, it is more durable, and at the same time also waterproof. Due to these properties, it is used for thermal insulation works of any premises.
The structure of the foam allows it to retain air, so it is always warm, this expands its scope in both heated and unheated buildings. Good results in the use of this material have been achieved when insulating the floors of balconies and loggias, as well as baths and the lower floors of houses and apartments. Many experts advise installing penoplex when installing a "warm floor".
The use of a heat insulator with certain characteristics depends on the place of application and purposes. When used to improve the thermal insulation properties of the floor, it is better to use foam with a greater thickness, and in some cases it is possible to lay the insulation one layer on top of another.
Important! The joints of the sheets of the lower level did not coincide with the joints of the upper layer. Some cases show that waterproofing layers can be glued together using a special adhesive.
Using these positions will help create the most effective thermal insulation layer.
Some cases show that waterproofing layers can be glued together using a special adhesive. Using these positions will help create the most effective thermal insulation layer.
Very often, foam plastic material is used in the construction of various objects, it is excellent for thermal insulation of floors installed directly on the ground or reinforced concrete slab, then the coating used as a floor is laid directly on it. Some use this product as an insulator in the construction of upper floors and various attics, which is not practical, since a material with lower thermal conductivity characteristics and, consequently, a lower price is quite suitable for these purposes.
The most appropriate is the use of penoplex in such cases:
- loggia insulation;
- thermal insulation of the balcony;
- installation of the bath floor;
- insulation of floors of various types in a private house or cottage;
- installation of "heat-insulated floors".
How to perform floor insulation with penoplex on your own. Use the following tips.
Always firmly adhere to the instructions for laying the penoplex, otherwise condensate will collect and the wind will “walk” in empty spaces, so that this does not happen, it is important to clearly fit one sheet, avoiding distortions and rolls to the other. Penoplex for the floor is successfully used on soil, concrete and wooden bases
How to insulate the floor with penoplex?