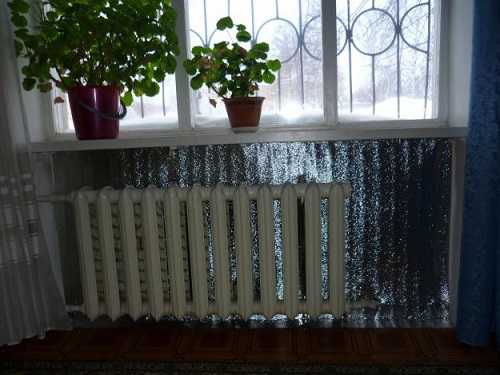
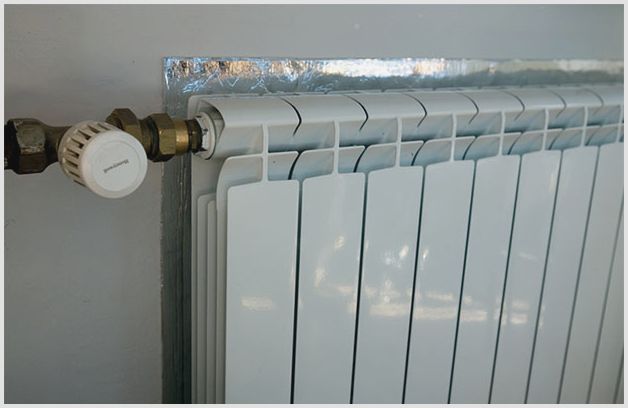
Heat reflective screen behind the heatsink
Often, apartment residents are faced with such a situation, the existing heating batteries seem to be hot, but the rooms are cold. Usually these batteries are installed in small niches under window openings and part of the heat from the battery is directed to heating the bricks of the outer wall. It turns out that the heat loss of the house increases. To correct this situation and let the flow of heat into the room, some kind of engineering solution is needed. For example, a heat-reflecting screen behind a heating radiator. This fact was verified by Russian scientists and they got a positive result.
This simple method, although long known, is not widely used. It will be more effective if your home has hot batteries. This is understandable, the amount of reflected heat is greater. I can’t name the exact percentage of the increase in heat in the room, it diverges in various sources, but they fulfill their goal, reducing heat loss.
Materials for manufacturing
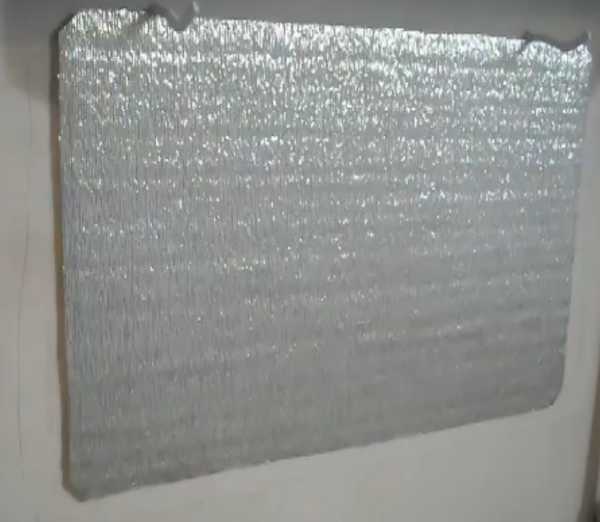
Such a heat-reflective screen behind the battery is usually made from materials that have a low degree of thermal conductivity. There are several such materials on the modern market. These are penofol, foil plastic and others. These materials are also good because, in addition to the foil, they have a layer of insulation. In order to achieve sealing of such a screen, it is necessary to glue all joints with metallized adhesive tape.
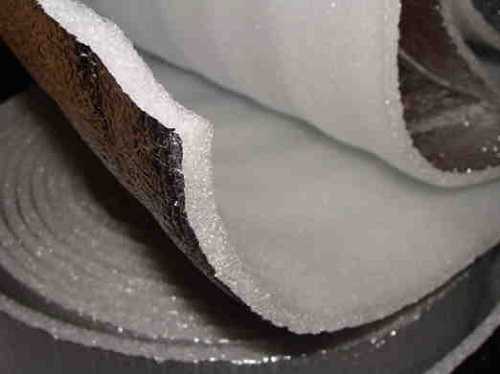
But these properties are possessed only by materials with metallized aluminum foil. The foil is the reflector. If metal sputtering is carried out by the so-called thermal method, then the thickness of the metal layer will be small and such material will not work as a screen. This must be remembered when buying material.
Also, a reflective screen for the battery can be made from plywood by attaching foil to it. A construction made of galvanized sheet is suitable.
In order for the heat-reflecting screens to work, there must be a gap of at least 3 centimeters between them and the heating radiator, otherwise convection is disturbed. Warm air will not circulate the way we want.
Functionality
By installing a heat-reflecting screen behind the radiator, near the outer wall, it is possible to increase the air temperature in the room by 2 degrees.
Reflective screens are installed according to the following rules:
- The thickness of the insulating layer must be at least 5 mm.
- The reflective side of the screen should be turned towards the battery.
If the screen does not have a self-adhesive layer, then you can attach it using staples of a construction stapler.
In addition to reflecting heat, such a screen can perform a vapor barrier function, that is, protect the wall from moisture penetration into it.
The size of such a reflective screen must be larger than heating radiator size. Of course, to install such a screen behind heating radiators, you do not need to contact any company, you can do it yourself.
The video shows how easy and quick it is to make reflective screens for radiators.
Expediency
Of course, in houses with central heating, reducing heat loss is not as important as in a private house. We have not yet learned how to control the heat consumed by each individual apartment, as we can measure water consumption. But we can feel the heat carried by the reflective screens behind the radiators.
Some skeptical people say that when installing such screens, the dew point shifts and mold forms on the walls. To begin with, I installed these reflective screens only for the winter period. For spring and autumn, when the weather is still quite warm outside, and the batteries are already working, I took them off. I did not specifically compare the temperature in the room by degrees, but it became warmer. There was no chill from the wall.I have been installing them behind radiators for three years now for warmth and comfort. Especially save during severe frosty, windy days. So I advise everyone. For what, in fact, this article was written.
Wooden screens
The simplest screen to manufacture is a panel in the form of a lattice of wooden slats fixed on a wooden frame. The position of the rails can be any - vertical, horizontal, diagonal.
If desired, you can make a cellular lattice by placing the slats at an angle to each other, and using two opposite layout directions. Moreover, the angle between them does not have to be right. But in order for the lattice to be flat, you will have to make grooves at the connection points, and, given the thickness of the rail and the manual manufacturing method, it will definitely not be easy to do everything.
Another type is the screen-blinds. Such a screen resembles classic wooden shutters-blinds on windows. In order for the slats in the frame to be at the same angle to the plane, the same parallel cuts are made on the side posts using a miter box. Since the thickness of the hacksaw blade for wood is less than the thickness of the rail, then two cuts are needed for each of them, and the excess must be removed with a narrow chisel.
Both the beam for the frame and the slats must be dry. Given the proximity of the screen to the battery, it is necessary that their own humidity is not higher than 12% (these are the general requirements for wood intended for carpentry). There is a simple home method for checking - if you try to tie thin chips into a knot, then it should break.
In the manufacture of both types of screen, each rail must be carefully sanded before attaching to the frame. After they are fixed in place, the grating is primed, coated in two layers with varnish, paint or enamel.
As a decorative finish, trims made of wood or MDF can be fixed around the perimeter of the frame. If these are wooden architraves, then they must be processed in the same way as the grate, but their finish does not have to be the same - the perimeter may be of a different shade.
When the battery is in a niche, the screen can either completely cover it, or hang on hooks, leaving small gaps at the top, bottom and sides.
When attaching the screen to the box, the side surfaces are sheathed with laminated fiberboard or chipboard. The ends of the skin may not be trimmed with a decorative edge if the screen trim covers them.
Another common type of wooden screen is the use of plywood as a panel. With the ability to work with a jigsaw, you can cut out an openwork lattice with any pattern transferred to the plywood surface using a stencil. The finishing treatment of such a panel does not differ from the lattice: grinding, priming and painting.
Important! When choosing chipboard or plywood for the screen, you need to pay attention to their class. For plywood, it should be E1, for chipboard - E0
What needs to be done to improve battery efficiency with a screen
The screen to some extent reduces heat removal from the surface of the battery. That is, the difference in the temperature of the coolant between the direct supply and the return will be less.
It is impossible to speak about an unambiguous deterioration in the convection rate due to the presence of a screen. Suffice it to give an example of electric convectors. in which the heating element is located in the housing in the form of a box with an inlet at the bottom and an outlet at the top. Such a device even improves convection, since the duct acts as a vertical duct, which increases the flow rate.
But what is good for convectors is not suitable for radiators. The battery works on both convection and radiation (radiation). And the screen absorbs some part of the infrared radiation, and some reflects back. And if the thermal energy absorbed by the screen creates conditions for secondary convection, then the reflected one heats the facade. This heat can be made to work for space heating.Even under normal conditions (without a screen), it is recommended to install a reflective plane behind the radiator, which returns infrared radiation from the inner surface of the battery into the room. Usually foil foam (or similar material) is used. When installing the screen, this recommendation is doubly relevant.
Manufacturing technology
Before proceeding with the manufacture of a battery fence, you should choose a suitable design: hinged or resting on the floor in the room.
Then a drawing is made, and tools with materials are selected.
Materials and tools
For manufacturing, you will need the following materials and tools:
- Chipboard sheet.
- Special edge for finishing with adhesive thermal layer on the back.
- Screws and corners made of metal.
- Stapler with staples or small nails with a hammer.
- Iron.
- Knife.
- Sandpaper.
Marking and measurements
First you need to mark the location on the wall and the necessary measurements. We mark the attachment points for placing the panel. We make a simple schematic drawing with important dimensions.
From chipboard we make four walls for the frame. You can buy already made parts. We connect the walls with each other using metal corners.
We make a lattice from the edge and fix its parts on the frame with the help of small nails and a furniture stapler. The length of the edging material is calculated by the formula L(edge length)=(a (product length)*b(width)*1.3)/c(edge width).
The holes on the grate must be of the same size, for this you need to make preliminary markings on the frame or a special template. On the front side, the grate must be heated with an iron at a high temperature. As a result of this procedure, the heated glue will connect the elements of the lattice at the intersections and give it greater rigidity.
The same edge must be used to finish the end parts of the frame. We apply the edge to the butt and smooth it with an iron. With a knife, cut off the protruding edges of the edge. The edges that stand out are polished with sandpaper.
Anchoring
If the screen is supposed to be located close to the wall, then we simply insert it. If a suspended version is planned, then a few more manipulations must be performed.
- In the frame, we make recesses at the points of docking with heating pipes. Then the decorative fence is put on the pipes with the help of special grooves.
- In the marked places you need to attach metal corners.
- Then we bend the edges of the corners 10 mm up and hang the panel made on the hooks obtained.
The enclosing screen is a great solution for various heating devices. If you do everything right and choose high-quality material, then you can create a wonderful element of decor yourself.
How does it warm
The transfer of heat from the battery to the room is carried out due to the flow of heated air - convection - and by radiation in the infrared (IR) range of electromagnetic radiation. The ratio of radiation and convection varies depending on the temperature of the hot water in the system, external conditions and the design of the radiator.
"Harmonic"
The old "cast iron" in autumn or mild winter warms mainly due to convection. With intensive heating (radiator temperature +50 degrees or more), infrared radiation gives a significant proportion of the heat flow into the room. Nowadays, in some regions, such a situation seems abstract and fantastic, but people of the older and middle generations remember how it was impossible to touch the batteries in a harsh winter.
profiled aluminum
Good screen for a heating radiator
Modern radiators operate in much the same way, but they are able to adapt to external conditions to some extent. If the air circulation in the channels is hindered by something (for example, a curtain), the heat flow in the metal mass is redistributed towards the front flat panels, and the radiator switches to heat radiation mode.This is achieved by precise numerical simulation of the radiator on powerful computers.
From this it is clear: the radiator screen must provide not only air circulation, but also the transmission of infrared radiation to the outside. This is achieved in two ways, see the next section.
According to convection, the conclusion is simple: the front panel of the correct screen should not be deaf or with rare small holes. A good screen is a battery grille, fairly sparse and with plenty of space above the heatsink (see picture on the right). But to ensure heat transfer that is not inferior to the regular one in free space, this is not enough.
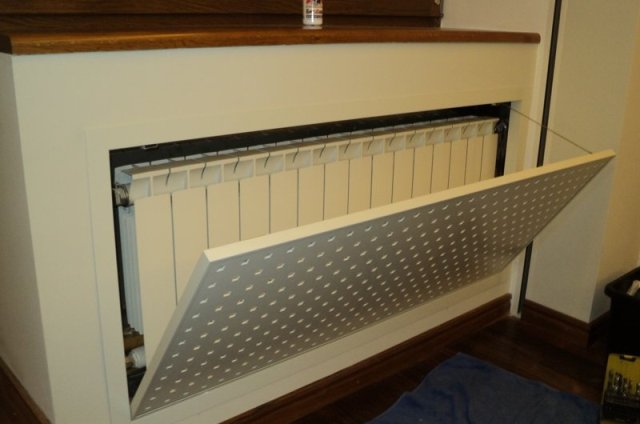
DIY screen for a heating battery
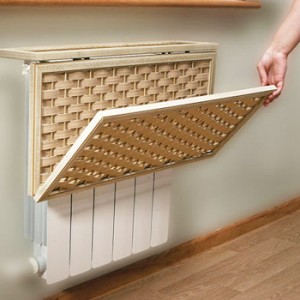 Today, few people can be surprised by design solutions for the design of heating radiators. Much less common are ordinary, unadorned and undecorated radiators. The main techniques for decorative design are creative coloring or a screen - an aesthetic coating that does not interfere with the movement of warm air. And if you learned about painting radiators and choosing odorless paint in our previous article, then here we will talk about how to make a screen for a heating battery with your own hands, with detailed photo and video instructions. How? Read on.
In addition to the fact that the screen performs a decorative function, it is impossible not to mention the rich functionality. On the one hand, it prevents the accumulation of dust in the sections of the radiator, where it is very difficult to get it. On the other hand, it protects children from injuries and burns. Some craftsmen manage to turn ordinary screens into transforming tables that recline if necessary. Often, small hooks are installed on such screens, which allows you to dry clothes in winter.
Important! A properly made screen does not prevent the movement of warm air from the radiator. It is noteworthy that such a decorative element can cover any type of radiators.
Although some of them, for example, design radiators, are exclusive in themselves, so they do not need additional decor. You can find out about such radiators in our article "Steel heating radiators"
It is noteworthy that such a decorative element can cover any kind of radiators. Although some of them, for example, design radiators, are exclusive in themselves, so they do not need additional decor. You can find out about such radiators in our article "Steel Heating Radiators".
Tags: thermal insulation
Comments 65
This is if it’s hard to stick wallpaper behind the battery, you can put such crap, it seems to close the hole, and you can also feel the “effect”
And I don’t even know, for the first time I glued it to my grandmother, it seems to me of little use, although I didn’t actually measure the temperature.
I don’t know about you, but in Moscow they go to glue them every year (in apartments, but I don’t need them) with the same crap and on the floors they also glue
Good topic, I enjoyed reading it.
The thermostatic faucet is installed incorrectly - it must be horizontal. And paste all the walls with such a screen, then the effect will be))))
Time will put everything in its place, it's a shame that we pour mud on each other. That in our country such “scream” happens on the radio about the fraternal people, what do you have ...
ps Cattle and degenerates are everywhere enough. Those who write "Dill" and "Wadding" probably found themselves and got stuck in their development at the level of the 5th grade.
On the contrary, I cover all the batteries with blankets all winter, the heat is unbearable)))
We have battery-powered regulators and pay for heat according to the meter, so we are thinking how we can save money.
Looks like you pay a penny, in my new apartment it was in a corner room of 8.7 sq.m. 2 batteries - one 7 sections the other 11 - as it turned out, they were building they were afraid that people would freeze, + a street wall with brickwork 1 meter long for sure.
The effect is no more than at the placebo level. The temperature in the room is, roughly speaking, the thermal energy that came from the batteries, minus the thermal energy that left, through the windows, the doors, the ventilation vents, including through the walls. That is, something like that, that sort of thing - in total it will be exactly the same, because the area of \u200b\u200bthe walls leading to the street and the number of other vents remain unchanged. Such Velcro worsens heat transfer with the wall in this particular place, but, firstly, this is a drop in the sea compared to the area of all the walls, and secondly, the wall in this place will warm up worse, i.e. cooler outside. As a result, the temperature difference will increase and heat transfer will stabilize at the same level. We do not consider the issue of aesthetics.
P.S. If you want the batteries to warm up better, put a fan on them. True, after that your neighbors will start to freeze 😉
Here Dmitry, thanks for the detailed and understandable answer)))
The effect is no more than at the placebo level. The temperature in the room is, roughly speaking, the thermal energy that came from the batteries, minus the thermal energy that left, through the windows, the doors, the ventilation vents, including through the walls. That is, something like that, that sort of thing - in total it will be exactly the same, because the area of \u200b\u200bthe walls leading to the street and the number of other vents remain unchanged. Such Velcro worsens heat transfer with the wall in this particular place, but, firstly, this is a drop in the sea compared to the area of all the walls, and secondly, the wall in this place will warm up worse, i.e. cooler outside. As a result, the temperature difference will increase and heat transfer will stabilize at the same level. We do not consider the issue of aesthetics.
P.S. If you want the batteries to warm up better, put a fan on them. True, after that your neighbors will start to freeze 😉
Great answer. I’ll just add that such things can be installed in houses made of organic materials (wood, etc.) to reduce the effect of battery heat on them. And so, undoubtedly, the wall in this place will become colder and at times when the battery does not work this cold will penetrate faster into the room.
On Bee metal batteries, they are not particularly needed, because. (even in the photo you can see) they have heat exchanger fins located towards the room and heat transfer is better than on cast iron, cool air passes from below and passing through the fins it comes out already warm from above. If you raise your hand, you can feel it. In the case of cast iron, the thing is POSSIBLY useful, because. cast iron ribs heat around themselves and, accordingly, the wall, but this does not cause heat loss in the room. Modern cast iron of poor quality, as practice has shown ... They put in a new one (by the manufacturer assembled a cast-iron battery) and after 2 - 2.5 years 3 ribs burst on the bottom, fortunately not in the heating season, this is so for information. And so I think such things are glued, so to speak, for complacency))) If the wall freezes through, then you need to deal with freezing, i.e. insulate the wall, look for "bridges" of cold and arrange. In practice, you will not feel the difference, maybe when taking temperature measurements, or some tests, you will see a difference of 2-3% no more. Usually there are problems with heat in the corner apartments of prefabricated houses or external walls, they only need to insulate and sort through all the joints of walls, floors, ceilings. There are no problems with this in brick houses and this “device” is useless))
Benefits of using decorative elements
Similar decorative elements are used for batteries for several reasons:
- Improving the aesthetic properties of the premises. For example, creating a beautiful accent in a room.
- Protective function against touching a hot battery. This is especially true if there are small children.
- Simplifies maintenance of radiators.
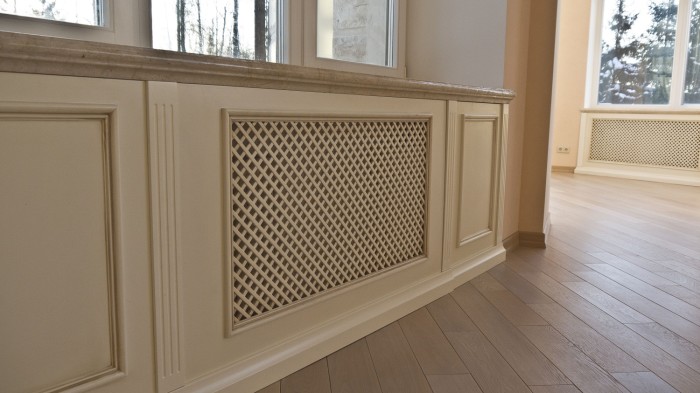
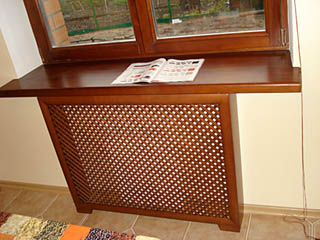
A multifunctional screen can be made in several versions:
- Flat - protects the battery located in a niche.
- A closed box is used when it is necessary to close the entire radiator.
- The hinged cover is designed to cover the radiator protruding from the windowsill.
glass screen
If wooden screens are well suited for traditional and rustic styles, and metal ones for industrial ones, then glass ones look great in modern interiors, such as high-tech. minimalism, fusion, pop art. It all depends on the decorative glass processing.
In principle, a self-adhesive film with large format printing can be ordered for the glass screen. And you can make a picture on a matte or transparent surface using sandblasting or chemical glass etching paste.
If you don’t want to bother with decorative processing, then glass with a matte surface or colored in bulk is on sale - you just need to order the right size, and you can process the edge yourself. The only condition is that the glass must be tempered.
The easiest way to mount the screen is to point-fix the glass to the wall in four places. To do this, use special fittings with remote mounting.
But there is one drawback - you need to drill holes in tempered glass, and this is difficult to do at home.
Therefore, it is better to use cold-rolled thin-walled pipe as the supporting structure of the screen. She (and fastenings for her and glass) are sold in stores selling everything necessary for making furniture. As a rule, such pipes and fittings are made chrome-plated, but you can order them to be painted in any shade from the RAL palette. Screen stands are fixed to the floor.
As an additional stop for the racks, two remote adjustable closed-type mounts (with a cap for the pipe) can be fixed to the wall. Glass is fixed between the racks on the clamps.
Design and physics
Recall from school: the best way to emit and absorb radiation is a completely black body. The outdoor screen should absorb the IR from the battery and then radiate it into the room. To do this, first, it must have good thermal conductivity so that the absorbed IR does not return back. Secondly, the darker it is, the better. How to decorate the battery from the outside is primarily a matter of taste; but the underside of the screen in any case should be painted black.
Let's explain with an example: Let's say the screen is black; IR absorption coefficient k = 0.8. It absorbs radiation on one side and radiates on both sides. The thermal conductivity of the screen material is also not infinite. The back radiation will additionally heat up the battery, it will radiate more strongly. The exact calculation is quite complicated, requiring knowledge of advanced mathematics, but the end result is simple: 1 divided by the square root of 2 is multiplied by the square of k. That is, 0.707x0.64 = 0.453 of the regular IR flow will go into the room.
This is already less than what an aluminum radiator with profiled channels will “pull out” with worse convection. With a bright screen, the heat transfer to the room will worsen even more. Where does the unused heat go? It goes into the return pipe, but you still pay for it. Can the matter be corrected? Yes, you can. First of all - additional thermal shielding from the wall.
How to do it yourself
First you need to decide on the desired design. If the heater is located in a niche, then you will have to make a screen in the form of a flat grate. It will be enough to choose a decorative panel according to the size of the niche and install it in it.
In most houses, the batteries are suspended under the windows on the wall. You have to choose between a hinged and attached box.
First you need to make a frame of wooden blocks. In width, it will be 8-10 cm wider than the battery (4-5 cm on each side). The height for the mounted version is the same 8-10 cm more, and for the attached screen, you will have to add 5 cm to the distance from the floor to the top of the battery. A gap of a couple of centimeters is also required between the radiator plane and the screen grille.All these indents are necessary for the free circulation of the air heated by the heater.
Based on these dimensions, the frame of the box is made. To form its side walls, you can use plywood, chipboard or board. The front side can be made of MDF sheet with holes in the form of any pattern or glass.
If you plan to use the top of the box as a shelf, then it is made from a solid board. Otherwise, you should choose the option with holes for the exit of heated air.
To fasten the parts of the box and strengthen the entire structure, metal corners and self-tapping screws are well suited. Then the front panel is nailed or screwed to the frame. To improve the view around its perimeter, a frame of small slats is stuffed.
If necessary, the sides are pasted over with self-adhesive wallpaper in the color of the front panel. And the slats and all wooden parts can be stained. It is better not to use oil paints and varnishes.
To attach the hinged screen, you will have to drill a couple of holes above the battery for dowels with hooks. And the attached analogue is simply moved to the wall.
This information should be enough to understand how to make a screen on the battery with your own hands. Further depends only on the presence of minimal skills in working with wood and the desire to do something on their own with their own hands. If you turn on your imagination, you can create a truly unique decorative screen on the radiator.
Heat-reflecting screen maximum effect at low costs
In many apartments and houses for housing, radiators are mounted under window openings. The section of the wall behind them always heats up the most intensely. Experts say that this part can be heated up to 35–40 °. In essence, expensive heat is spent on heating the wall outside the building in exchange for keeping the temperature in the room as high as possible.
Really solve the problem of heat loss in a primitive way - install a heat shield on a section of the wall right behind the radiator
Even greater heat losses are observed in variants when the radiator is installed in a niche. It is thinner than the surface of the walls. And this means that cool air enters the rooms through it in large quantities. Of course, it is impossible to reconcile with such a state of affairs. Yes, and no need. The problem of heat loss can be truly solved in a primitive and elegant way - by installing a heat shield on a section of the wall right behind the radiator.
The heat-reflecting device of interest to us not only stores heat. Moreover, it protects the batteries from penetration of dust and moisture particles from behind the wall (through small cracks). Visually heat-reflecting factory-made screens look nice. This allows them to embellish nondescript sections of the wall behind the heat supply radiators with their help.
DIY metal screen
As a panel for the screen, you can use a metal perforated sheet or perforated mesh. There are ready-made expanded metal meshes with anti-corrosion treatment (for steel) and enamel decorative coating. Such a mesh can be fixed on a wooden frame and used in the structures described above.
But metal has a serious advantage over wood - a high coefficient of thermal conductivity. This property allows you to make screens that rely directly on the battery. They even increase its heat transfer by increasing the surface area. Moreover, a battery with such a screen works better not only for radiation, but also for convection - just look at the ribbed heating elements of convectors.
For the frame, it is better to choose an aluminum corner, and for the screen panel, an aluminum sheet or perforated mesh. It is easier to work with them, and the thermal conductivity of aluminum is almost 5 times higher than that of steel.
To make a hinged metal screen is quite simple:
- Take two corners with a length equal to the sum of the height of the screen and the depth of the battery.
- Along the fold line on one of the walls of each corner, two opposite cuts are made with a total angle of 90 ° (45 ° for each relative to the edge of the corner). Moreover, the cuts must be made so that the uncut walls of the corners look at each other.
- Bend the corners in the shape of the letter G.
- Prepare a blank for the screen from a perforated sheet or perforated mesh. Its length is equal to the total length of the L-shaped corner.
- Three corners are made with a size equal to the width of the screen.
- The screen blank is bent and fastened to the L-shaped corners with screws and nuts with washers (in specially drilled holes in the corners). It is better to drill holes in place - so that they fall into the perforation of the sheet or into the grid cell.
- On the inside of the mesh, three corners are fixed in the corner and along the edges, which act as stiffeners.
- Paint the outer part of the L-shaped corners.
In order for such a screen to be in a stable position, a pair of dowels with straight hooks can be fixed in the wall, and holes can be drilled in the short parts of the L-shaped corners.
Installation of films for radiators is a simple sequence of actions
From a technological point of view, the foil behind the heating battery is installed without any difficulty. You will do all the work efficiently and quickly if you listen to some advice.
First, do not purchase matte metallized material. Use only polished foil.
Second, don't buy films with double-sided films. One air gap is enough to ensure high-quality heat reflection.
Thirdly, leave a gap of about 1.5–2 cm on both sides of the insulator layer. It is necessary to obtain the optimal thermal resistance of the reflector (1.15 sq.m*°C/W).
Prepare liquid nails or a standard adhesive used for wallpaper installation, as well as directly reflective foil, and proceed with its installation. The procedure is the following. First, carefully measure the dimensions of the wall areas where you plan to install the screen, or niches.
The parameters of the film must correspond to the projection of the radiator on the wall. Add another 10% to the result. In this case, the heat reflective potential of the foil will be slightly larger. Some masters say that extra centimeters are not needed.
The effect of them will be insignificant, but the edges of the screen sticking out from behind the radiator will greatly spoil the aesthetics of the room. See for yourself, choose the option that suits you personally.
Then make sure there is a gap of at least 1.5 cm between the heater and the film you will be installing. When there is not enough free space, you will have to adjust the radiator suspension to provide the missing centimeters.
Next, remove the radiator. Mark the places where its mounting brackets are located. Dismantle them. Examine the brick or concrete masonry of the wall surface.
In the presence of cracks, cracks, other defects, plaster them (or putty). Align the wall, stick the screen (coated with a wallpaper or polymer composition on its reverse side).
Instead of glue, as noted, it is allowed to use liquid nails. In some cases, it is allowed to use staplers or small nails to fasten the foil (if they enter the wall material without any problems and are firmly held in it). Carefully return the suspensions to their place and install the battery.
In addition, we will give some useful recommendations to home craftsmen who mount heat-reflecting products for the first time. If during the installation of the screen you damaged its outer coating, the cut point can be masked with LAMS or LAS films.
They are made of foil and do not reduce the efficiency of heat reflection. Do not try to find screens that are too thick.Practice shows that five centimeters is quite enough for high-quality heat savings in the house.
Recommendations for the installation process
- Installing a heat-reflecting screen behind the battery is technologically simple, but will be done faster and better if you consider the following practical recommendations:
- the maximum effect when using penofol and similar materials is achieved with an air gap of 15-20 mm on both sides of the insulating layer. In this case, the thermal resistance of the insulating structure is achieved up to 1.1-1.2 (m∙°C)/W. Installation is carried out on wooden slats, and the foam must be with double-sided foil (type B);
- in most cases, one air gap is enough to equip a reflector screen for batteries - between the radiator and the insulating material. Double-sided foiling is optional in this case;
- when choosing a reflector, it should be taken into account that the foil should be polished (not matte).
Heat-reflecting screen behind the radiator
Hello dear readers! Such an energy-efficient measure as installing a heat-reflecting screen behind a radiator is technically simple when installing a radiator, and at the same time allows you to save up to 5-10 percent of the amount of heat for space heating. Another thing is that there are few places where this is actually done.
I think they just don't think about it, don't pay attention. I have hardly seen buildings use this energy-saving technique.
But a certain percentage of the heat generated by radiators goes through the wall of the building to the street, instead of staying in the house.
Indeed, when the internal air of the room is heated, the area of \u200b\u200bthe wall behind the heating radiator also heats up. And it is in this area that heat losses occur, since the temperature of the inner wall surface behind the radiator is higher than the temperatures of other wall surfaces.
To eliminate this undesirable phenomenon, you can install heat-reflecting screens behind heating devices. This is usually done with a heat reflective film. It can be a heat-insulating film, such as Stizol, Tepofol, or the like. Now quite a lot of types of foil reflective insulation are produced.
With the help of such a film, the thermal resistance to heat transfer of the wall behind the heater increases, and heat radiation is reflected from the radiator back into the room. The reflective layer of thermal insulation must necessarily face the heat source. The size of the protective screen should be slightly larger than the size of the heater.
When installing the heat-insulating film, it is also necessary to pay attention to the geometric arrangement of the radiators relative to the wall. To increase the useful area of the room, it is desirable to install radiators in niches under window openings.
But accordingly, if you mount a radiator in such a niche, then the wall thickness decreases, and this must be taken into account. The layer of thermal insulation in this case increases. It is also necessary to look at the method of connecting radiators.
It is known that it is better to connect heaters in a one-sided (side) scheme, or in a diagonal scheme. A one-way connection is when the upper and lower pipes of only one side of the radiator are involved, a diagonal connection - the inlet pipe is mounted to the upper pipe of the radiator on one side, and the outlet pipe to the lower pipe of the heater on the other side. The implementation of an energy-saving measure to install heat-reflecting screens behind radiators allows, albeit slightly, to save heat in the house.
What do you think about the installation of protective screens?