Autonomous heaters
What to do if there is no central heating and gas in the garage, and the frequency of your visits to the premises does not allow organizing a scheme with a solid fuel boiler?
In this case, it would be quite logical to use electricity for heating.
Oil radiator
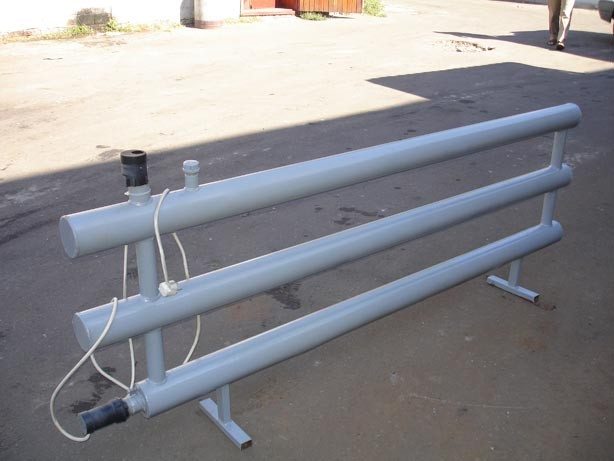
The simplest homemade oil cooler is a welded register already familiar to us with several modifications.
- There are no welds for connecting to the piping.
- The register, as a rule, is made portable, which implies the presence of legs.
- Jumpers between sections are present on both sides. Their diameter is made somewhat larger than when assembling a register for water heating. The instruction is related to the fact that natural convection implies a minimum hydraulic pressure, and if so, the hydraulic resistance should also be minimal.
- A heating element or several parallel connected heating elements are installed at the end of the lower section.
- Oil acts as a heat carrier. Ideally - transformer, but even working out will do.
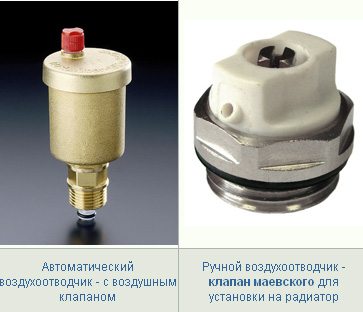
- The register is supplied with a small open expansion tank. As an option, the oil is not added a little to the top of the register, and the weld on its upper section is equipped with an automatic air vent.
car radiator heater
Another interesting solution is a homemade garage heater from a radiator.
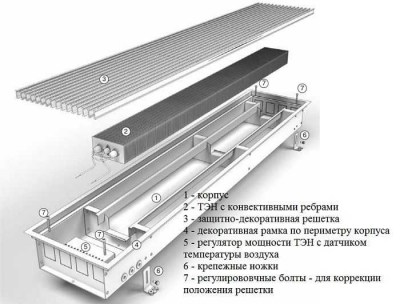
Numbered on the diagram:
- Radiator.
- Expansion tank.
- Forced blower fan.
- A casing that protects the fan blades.
- Water pump.
- Pipe for oil supply.
- Actuator.
- Fan drive belt.
- Electric motor.
- Frame stand.
- Drain tap.
- Block of heating elements.
- Blinds to adjust the direction of the air flow.
- Partially clogged radiator tubes are not a hindrance. They will miss the oil.
- Optimum motor performance - 300 - 500 watts at 1500 rpm.
- To heat the oil, heating elements with a total capacity of up to 3 kW are used. It is better to provide for stepwise power adjustment by switching them on separately.

- Due to the small diameter of the radiator tubes, it is not worth using mining in this design. Suitable transformer oil or antifreeze A-40.
- The most efficient operation of the heater will be at an oil temperature of about 80C. The temperature is regulated by the selection of the power of the heating elements and the fan speed.
Mounting process
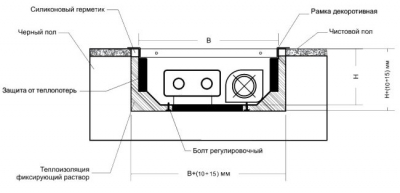
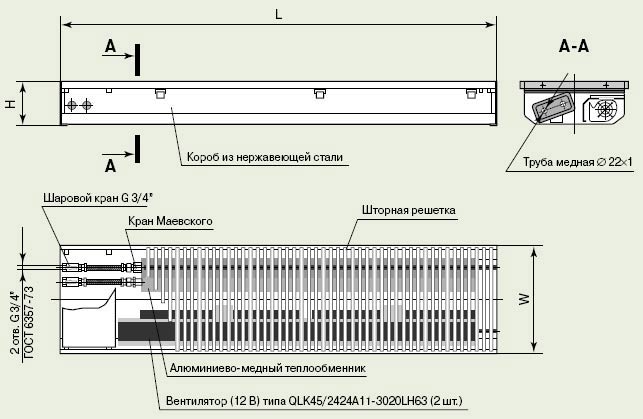
Dimensions of the underfloor convection heater and niche for it.
If you want to do the installation of a floor convector with your own hands, we recommend that you consider a place for its installation even at the stage of building construction - it will be easier to organize a niche of a suitable depth. And the niche itself should be 1-1.5 cm larger (on each side) than the metal box of the device
. At the same time, it is necessary to ensure that the upper part, where the decorative grille will be located, is on the same level with the future flooring.
After the niche is ready, you can proceed with the installation of equipment. We fix the box of the floor convector with the help of the fasteners included in the kit. We check the correct installation using the building level - the heater should be located in the niche evenly, without distortions. Further installation involves connecting to a heating system or electrical network - for this, plastic pipes, flexible hoses or metal pipes of a suitable diameter are used.
If you are installing a water convector, provide thin shallow niches for laying pipes / hoses. When installing an electrical appliance, we recommend laying the connecting wires in cable channels or pipes so that they can be replaced without problems. We recommend wrapping the supply pipes with heat carrier in thermal insulation.
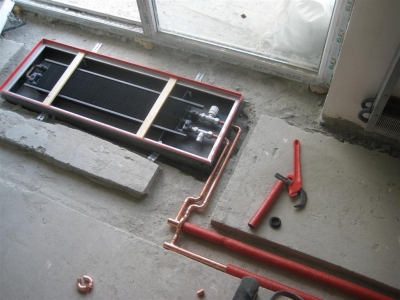
Pipes for the radiator will also be filled with screed.
At the next stage, we fill in a concrete screed - our installation of a floor convector with our own hands is nearing completion. The result of this stage should be a draft floor, with a metal box protruding from it somewhat. Next, we produce the final leveling of the floor, proceed to laying the flooring. At the last stage, we place a decorative lattice over the box - it is best to choose it in the same tone as the color of the floors.
Do-it-yourself installation of floor convectors is complicated by the fact that you need to choose the right size of the niche - so that the metal case of the device is located at the correct depth
. Recommendations on this issue can be found in the technical data sheets. Worst of all, if you have to carry out installation in an already built house - it’s not a fact that it will be possible to hollow out a niche in the subfloor, as this may affect its strength. In this case, it will be necessary to increase the height of the subfloor in all rooms.
Caring for installed floor convectors is very simple - just remove the decorative grille and remove the dust accumulated inside. Do not use aggressive detergents for this.
Installation work
Installation instructions for water heaters are simple and consist in connecting to a heating pipeline. Floor models are installed at the same time as the floor, wall or skirting models can be installed at any time.
The installation process includes the wiring of electrical cables, coolant supply circuits, the installation of a niche for the unit box, which must be flush with the finished floor. It is better to entrust this work to qualified specialists.
Depending on the purpose, the heating water convector can perform 2 functions:
- heat the room - the device is installed away from window openings;
- create an air barrier to cold air in the window area - a heater opposite the window at a distance of 20 to 30 cm.
Faultless heating is achieved by observing the mandatory conditions during installation:
-
The supply / removal of heat carriers is carried out from rigid or flexible connections and stopcocks
(included).
- The convector niche must have such a depth that the decorative cover of the appliance is flush with the finished floor
. -
Permissible gaps for the width and height of the convector from 10 to 15 mm
. -
With adjusting bolts, the water heating convector is aligned horizontally and fixed
. -
Gaps are insulated and sealed with special material
. -
After installing the finished floor, connect the piping
(electrical is required if there is a built-in fan). -
Seal the remaining gaps with sealant / finishing material, turn on the device and cover with a grill
.
The installation of wall and baseboard heaters does not have so many nuances and consists in connecting the object to the water supply network, and this is easy to do with your own hands.
Before working with a wall heater, you need to remove the battery, then proceed directly to the installation.
- Instead of radiator plugs, screw two couplings with a similar diameter to the liner - usually 20 mm.
- Fix the convector on the brackets and align its thread axes with the axes of the spurs.
- Wind up the threads on the heater, drive the couplings on them to the stop and tighten the locknuts.
- To avoid water hammer, when starting the riser, open the valves slowly.
Radiators for water heating
First, we examine radiators designed for operation in central and autonomous heating circuits.
Register
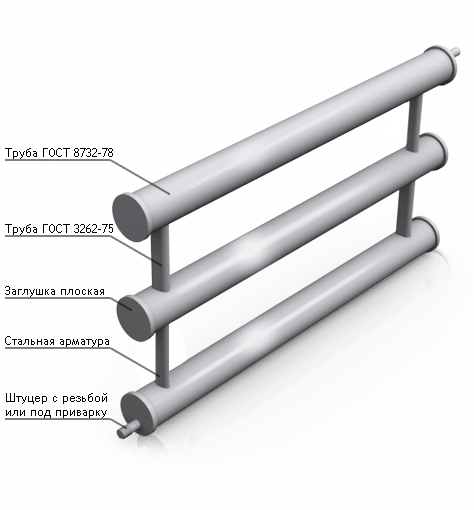
The simplest and most affordable home-made heating radiators are made from pipes of large (100 - 250 mm) diameter, muffled at the ends and connected by jumpers.These devices - the so-called registers - have a large internal volume and, accordingly, a significant thermal inertia, which makes them an ideal solution for systems with solid fuel boilers.
How to make a simple horizontal register?
-
Pipes are cut into segments of 1.5 - 4 meters
(depending on the expected length of the register). -
Holes for jumpers are drilled or burned with a gas cutter in them.
. An important point: the configuration of the jumpers should create a closed circuit inside the device, excluding stagnation of the coolant in dead ends. -
Pipes are connected by jumpers
- pipes of size DN20 - DN32. -
Pipe sections of the same length are welded parallel to the jumpers, but already welded to blank walls
. They will give the structure rigidity. -
The ends are muffled with bottoms cut from a steel sheet 4-5 mm thick
. -
Branch pipes are welded into the lower and upper sections
, which will later connect the register with the eyeliner.
In most cases, an ordinary round water and gas pipe is used as register sections. It is attractive for its low price per linear meter and maximum tensile strength with a minimum wall thickness, which is ensured by a round section.
However, sometimes you can also find home-made heating radiators from a profile pipe - square or rectangular. Its advantages are the relative compactness of the register and a slightly larger surface area with the same cross-sectional area.
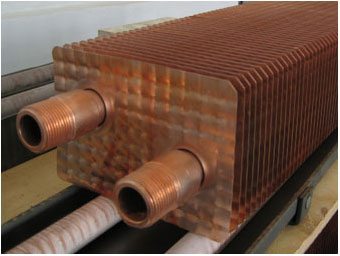
Convector
The simplest convector is a coil of pipe with plates pressed onto it, increasing the notorious heat exchange surface. The most accessible material is steel. Homes - new buildings often act as sources of ready-made convectors for garage owners: the owners of apartments in them massively change the heaters installed by the builders for sectional radiators that are more attractive in appearance and have a greater heat transfer.
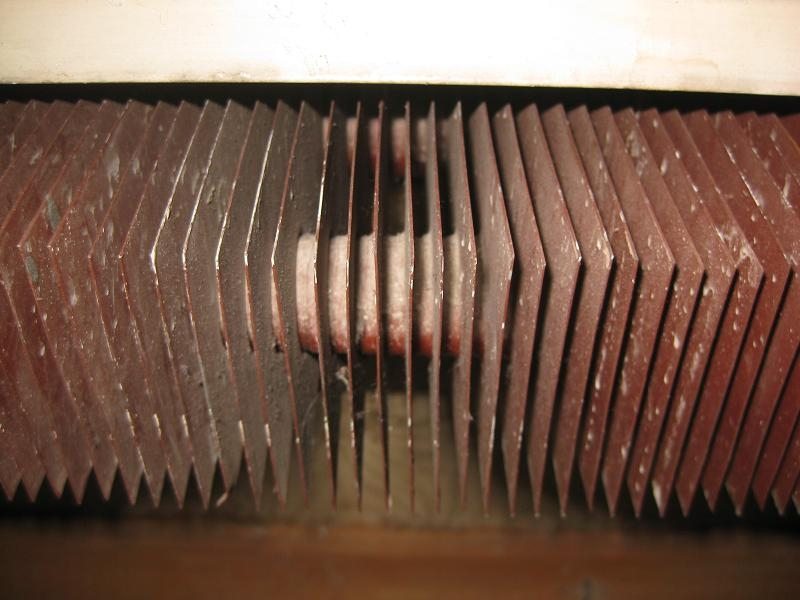
However, steel has a serious drawback - low thermal conductivity. In order not to be unfounded, we will give the values \u200b\u200bof thermal conductivity for three metals, most often used in the manufacture of heating appliances.
Obviously, when creating a convector, it is beneficial to use non-ferrous metals: their thermal conductivity will dramatically increase heat transfer, making the heating of the fins more uniform.
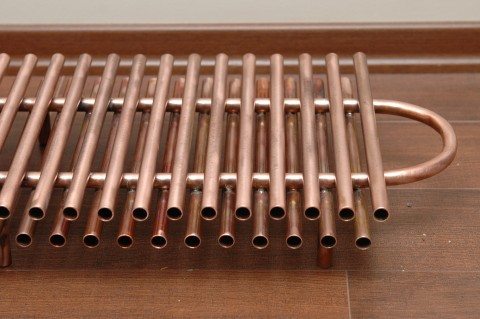
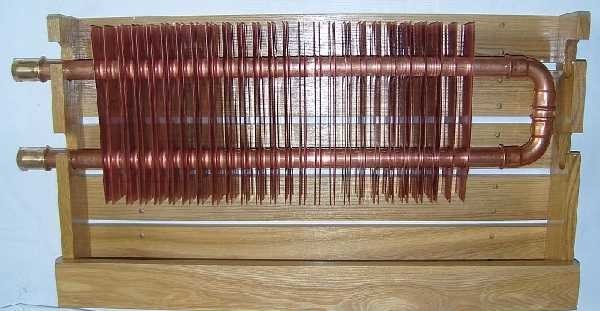
Home-made copper heating radiators are all kinds of designs based on and plates - copper and aluminum. Aluminum fins are much more affordable than copper fins; some difference in heat transfer is compensated by its increased area.
To assemble the convector, solder intended for copper water pipes is most often used; somewhat rarer plates.
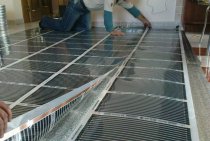
Installation of radiators in a niche
We are considering the simplest convector built into the floor. This is a convector with natural circulation. The niche for the convector built into the floor is already ready, we proceed to the installation of the heat exchanger.
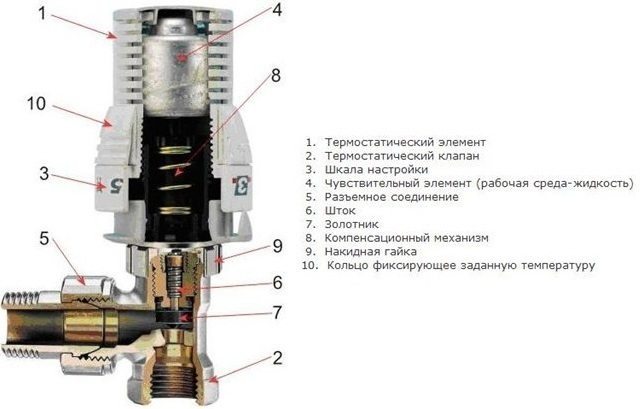
The coolant moves through a two-pipe heating system. It is supplied with one pipe, it is removed from the radiator with the second pipe. A thermostat with a Mayevsky tap is placed at the input, and a shut-off valve is placed at the output. Everything is the same as when installing radiators on a wall, only in a horizontal plane.
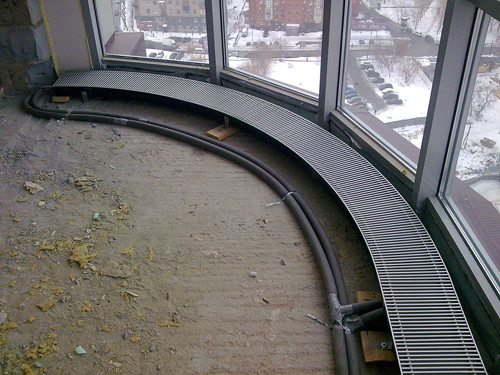
Since the opportunity to install high-quality double-glazed windows has appeared in the Russian regions, a fashion has arisen for French balconies. The only drawback of full-height windows is the inability to put radiators under them to remove the cold bridge. They were replaced by floor convectors. These are heating devices that operate on the principle of circulation, taking in cold air and giving warm air back into the room. Convection can be carried out naturally or forced - with the help of a fan.
- It is justified to use a floor system convector if you plan to install panoramic windows and glass doors.
- When there is no room for radiators in the apartment.
- If the flooring is wooden, because it does not allow the installation of underfloor heating (it has high thermal insulation properties).
- These devices are also appropriate in rooms where humidity is high, for example, in swimming pools.
Battery Disadvantages
Due to the characteristics of the devices (they are walked on), dust (sometimes dirt) collects in them, and you need to get rid of it in time, otherwise it starts to circulate along with the air. From this point of view, a convector built into the floor is considered less environmentally friendly than a radiator hanging on the wall.
Design features
Externally, the unit is a rectangular solid body covered with a grate. The floor version looks like a small bench, the wall version is a panel of small thickness, and the built-in ones can be seen thanks only to the lattice.
The classic casing is made of stainless steel. But, taking into account the design features of the premises and the wishes of customers, the body can be made of wood, marble chips or MDF panels.

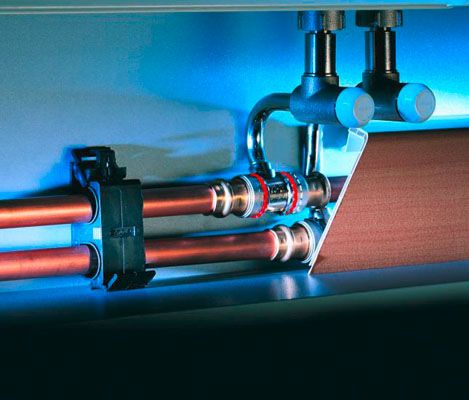
Ascetic on the outside, inside the water heating convectors are more complicated. Their "heart" is considered to be a heat exchanger, which is a flat copper or a pipe in the form of a coil. Lamellas are attached to it perpendicularly by a tight fit.
The place of their connection with the pipe should exclude the slightest gaps that reduce heat transfer. For the manufacture of plates, copper is most often used, there may be options from steel and aluminum, the main thing is that the thermal conductivity is at its best.
Connection to the riser or the central pipeline is carried out through special threaded entries inside, which are located at the end of the device or on the side. Modern heating water convectors are equipped with tap valves or manual / automatic valves to release excess air, which impairs heat transfer.
If an electronic thermostat/thermostat is included, it will control the operating rhythm of the appliance. The heating process periodically stops when the set temperature is reached and starts again when the air cools down.
To enhance air circulation, a fan is used, which is either already built-in, or it will have to be bought in addition. This useful addition (1-2 pieces) is found only in.
How does convection help keep you warm?
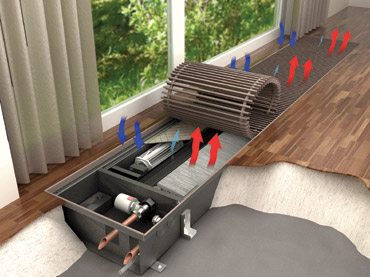
Unlike conventional batteries that warm the air by radiating heat from their surfaces, water heating convectors operate differently. They mix air masses, replacing warm air with cold air and creating a pleasant atmosphere. At the same time, dryness and a specific unpleasant smell of burnt dust are not felt.
Hot water from the heating system enters the heat exchanger and heats the plates. Given the thermal conductivity of the material used, as mentioned above, the parts heat up very quickly. Through the holes in the lattice, warm masses rise unhindered, displaced by cold ones.
The built-in fan stimulates this process, and after a few minutes you can already feel the result. At the same time, the efficiency increases to 95%, which makes it appropriate to use water convectors in spacious rooms with large window and door openings.
In accordance with the requirements of GOST 20849-94, water heating convectors must have the first integral property - tightness and strength, which is checked by a test water pressure of 1.5 MPa. The heating elements and casing must be coated with an anti-corrosion heat-resistant compound.
Among other things, a water heating convector is relatively inexpensive, given its growing popularity. Installation by specialists of wall, floor or plinth construction will cost you almost half as much as underfloor.This price is justified by the complexity of the preliminary work on arranging a niche in the raised floor.
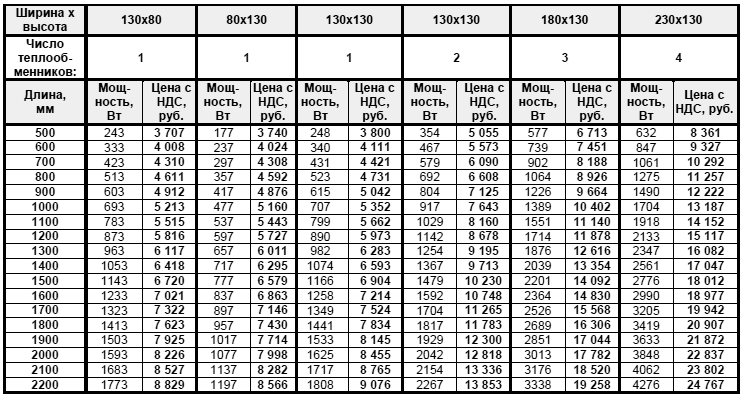
Brief description of typical convectors
For water heaters, their technical characteristics are important; it is on their basis that a specific model of the heater is selected. The characteristics of most typical convectors are within the following limits:
The characteristics of most typical convectors are within the following limits:
- the maximum allowable pressure during operation is 16 bar;
- crimping - 25 atm;
- water temperature can reach 130 °C;
- maximum case heating - 60 °C;
- the heat exchanger can be 4 or 6-row;
- the volume of water in the heat exchanger is 0.7–0.9 l;
- throughput per hour from 90 to 170 l;
- power from 100 to 200 kW;
- weight ranges from 14 to 21 kg.
Purpose of floor convectors
The installation of floor convectors is justified if there are elements in the room that form heat losses. These include:
- Glass doors "to the floor";
- Entrance areas to the loggia with windows and thin doors;
- Exits to the terraces;
- Panoramic windows (stained-glass windows).
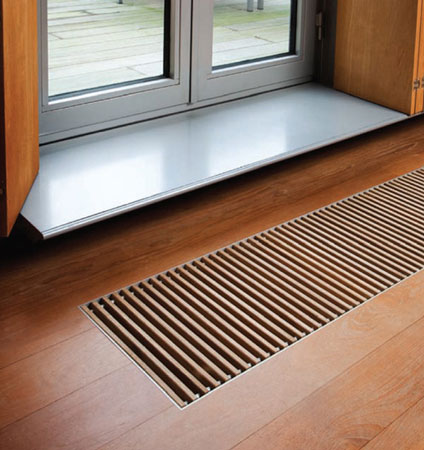
A decorative grille is the only thing that gives out an underfloor convection heater.
With a sufficiently small ratio between the area of windows and the area of \u200b\u200bfloors, significant heat losses occur
. In addition, from the giant glazing blows an unpleasant cold. The problem is partially solved by installing triple-glazed windows, but they are very expensive. Therefore, we boldly buy floor convectors and proceed to their installation with our own hands.
These heaters are compact, but require niches that are suitable in depth for their installation. Metal boxes (cases) of convectors are installed here, after which they are fixed using special fasteners. From above, all this is closed with a decorative grill - this is just a brief instruction so that you have a general idea of \u200b\u200bdo-it-yourself installation.
What are convectors
According to the principle of working with energy carriers, there is a wide choice of such equipment. But now most convectors sold in stores have an electric heater. There are models that run on gas - gas convectors.
Electric convectors are best suited for heating apartments, as they are compact in size. It is more profitable to operate convector heating of a summer house or a country house, creating it on the basis of gas convectors - gas is much cheaper. Of course, subject to the presence of gas in the house.
According to the installation method, convectors can be divided into:
- floor;
- Wall mounted;
- Mounted in the floor or plinth.
- Floor convectors are installed on the floor, they can have wheels for moving along the floor surface, or they can be rigidly installed, without the possibility of movement. A photo with a floor convector is just below.
- Wall convectors for heating are mounted directly on the wall using special brackets.
- The third type of convectors can be installed in the floor or in the floor plinth.
Selection of convectors
Installing a floor convector can seem like a rather complicated process. Therefore, we will describe everything step by step, starting with the choice of equipment. In front of panoramic windows or in front of the entrance area, we can install electric or water heaters - it all depends on the type of main heating in the building.
Electric floor convectors operate on a 220 volt network and are designed to heat households that are not connected to gas mains. In their design, most often, fans of one design or another (axial or tangential) are already provided. The disadvantage of electrical appliances is their high energy consumption, but in some situations they are indispensable. But for their connection, only wires are needed.
Electric convectors can also be used in gasified buildings, where it is difficult to lay water heating to the place of their installation.
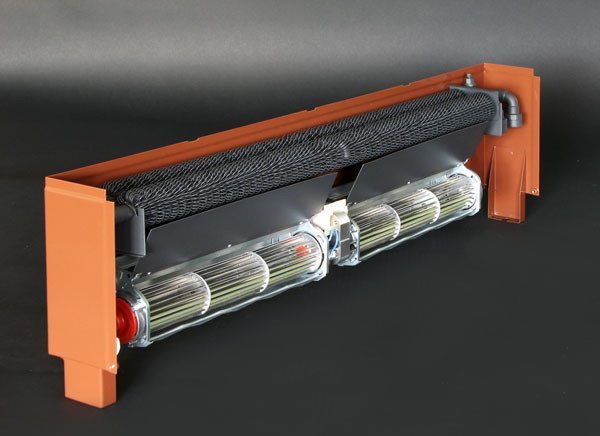
The device of the water convector installed in the floor.
Water convectors have a similar design - there are heat exchangers connected to the heating system. For this, metal or plastic tubes are used, which require a certain skill for their laying. In this regard, electric floor convectors win - for their installation and connection, only wires of a suitable section are needed
.
When planning the installation of a floor convector, pay attention to choosing a model with forced convection. These devices have the following advantages:
- Higher warm-up rate;
- Increased efficiency in rooms with a ceiling height of 3 meters;
- Efficient removal of moisture from the entire surface of the glazing.
By choosing floor convectors with low-noise fans, you can increase the heating efficiency and prevent the source of noise.
Conclusion
We hope that a few ideas proposed to the reader's attention will help him organize the heating of utility rooms at minimal cost. Additional information, as usual, can be found in the video in this article. Success in creative work!
Consumption ecology. Manor: Among the various ways of heating a house, convector rightfully occupies not the last place. Its main advantages are that when using this method, it is not necessary to create a complex design of the heating system, and pipes and expensive water-heating boilers are not required.
Among the various ways of heating a house, convector rightfully occupies not the last place. Its main advantages are that when using this method, it is not necessary to create a complex design of the heating system, and pipes and expensive water-heating boilers are not required.
Let's try to figure out what convector heating is. As the name implies, this is a method of heating a room, which is based on air convection in the room itself.
From the laws of physics, it follows that when heated, warm air rises, and cold air goes down.
Thus, there is a natural circulation of air and gradual heating of the room. It is this type of heating that is quite simple, but at the same time an effective way of heating.
Results
Convector heating is a very good option for space heating. Convectors can be recommended for installation both in small apartments and in large country houses. They have good performance and efficiency.
Water heating radiators, or simply batteries used in centralized heating systems, distribute heat throughout the rooms according to the principle of passive convection. This approach is not very rational in terms of heat loss, especially if the battery is in the corner of the room.
For this reason, there are convection radiators equipped with a fan that improve the distribution of heat throughout the room, accelerating the circulation of air between the sections of the battery.
In this master class, I will show you how to pump an ordinary battery to a convector one with your own hands.
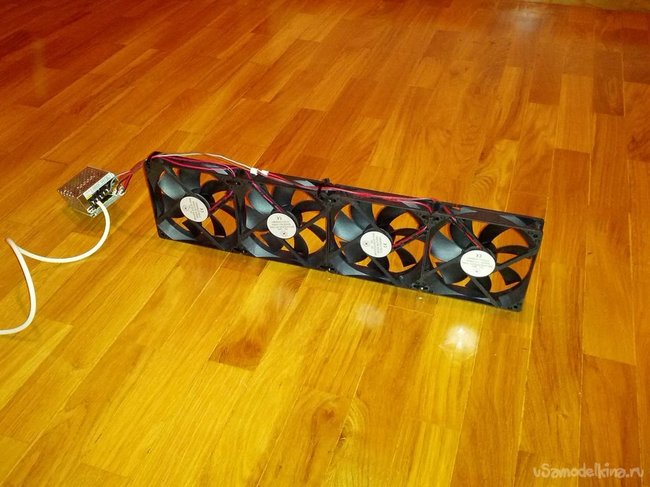
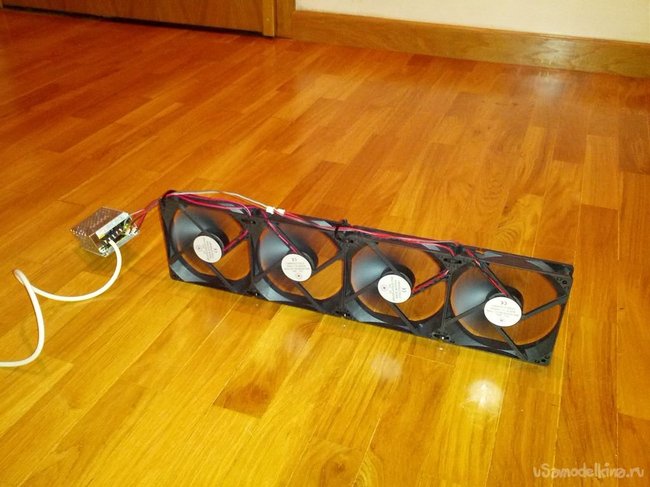
Step 1: Fan Assembly
I took 4 fans Brushless DC Cooling Fan 7 Blade 24V 120mmx120mx25mm
.
This type of fan is very quiet and was well sized for my battery. A connection of 4 such fans is enough for my pipe in length.
Fan specifications: - 7 plastic blades - speed 1600 rotations per minute - airflow 58 cc ft/min. - noise 38 dB. - power supply: direct current 24V, 0.20A
These fans cost me 1200 rubles with delivery. Structural strength is provided by cable ties that go through holes in the corner of each fan and tie them together.
Step 2: Connecting the wires
The fans use standard 2-pin connectors like motherboards. They hold copper cables well. You can also combine the 2 connectors with a small piece of cable by inserting one into the back of the second.
This will help reduce the number of cables connecting the fans to the power supply. The power supply is connected by a 2-wire AC cable on one side and DC cables from the fans on the other.
The photo does not show the switch and the standard plug on the end of the AC cable. I took the power supply like this - 24V Universal Regulated Switching 25W Power Supply
.
Step 3: Checking the operation of the fans
I connected the fans and checked their operation before installing under the battery.
Step 4: Legs and other finishing touches
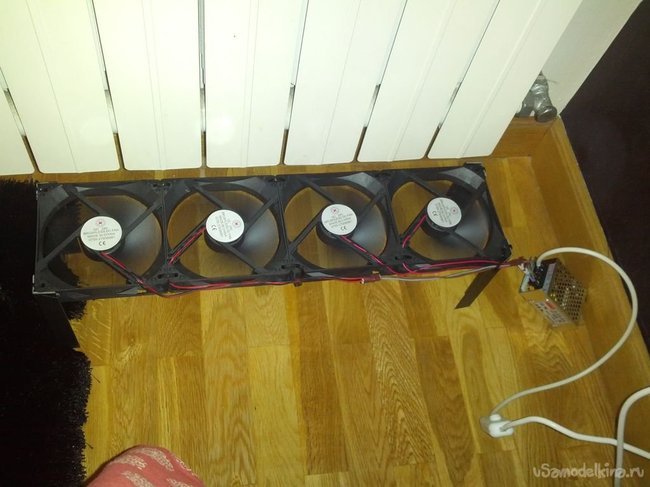
I supplied my fans with 4 legs from a corner cut into 15 cm pieces. Then I just put the section under the battery. As a result, I got an excellent distribution of heat throughout the room, using almost silent fans, consuming a total of 24 watts:
Fans: 4*0.2A*24V=19.2W- power consumption: 80% of total supply- total power: 19.2/80%=24W
This is how I upgraded my standard hot water heater to a convection radiator.