If the sewer in the apartment has leaked, this problem must be addressed immediately. But not everyone can afford to call a good master, and someone wants to try to handle it himself. It happens that constant cleaning of pipes does not work due to their advanced age or the wrong angle of inclination. Problems may be different, but the solution is the same - iterate over the entire system.

If you do not have the required experience, installing a sewer in an apartment will be a serious test. The slightest oversight can end badly, so you should think carefully before you get to work yourself. If you still decide, carefully follow all the instructions to achieve the expected result.
Stages of installation of sewerage in the apartment
Charting
Before going to the store and starting work, be sure to draw a diagram of the installation of all equipment. If the sewer system is working properly, it is enough to simply redraw what is already there. If the arrangement of elements, material or diameter change, ask a specialist to check the circuit, it will cost less than correcting errors in an already mounted system.

The wrong angle of inclination of the pipes leads to a rapid clogging of the sewer. Many people mistakenly think that the larger this parameter, the better all waste flows. But for the system to work properly, it is necessary to create a self-cleaning effect so that liquid sewage is washed away by more solid ones. The thinner the diameter, the greater the angle of inclination should be. To create the desired angle, make a vertical pipe segment to the desired level. A few specific values:

More information to correctly select the desired diameter for each segment.

There are a few details to consider:
- The angle in the horizontal plane should not exceed 120 degrees.
- The rigid supply for the siphon should not be more than 1.5 m, and the corrugated 0.8 m.
- Mandatory elements on the diagram: the location of the central riser, all fittings and bends, indications of dimensions and location relative to the walls.
- If the pipes pass through rooms other than the bathroom and kitchen, draw them too.
- To connect the washing machine and dishwasher, you do not need to observe the angle of inclination, since water is removed from these appliances with additional effort.
- It is better to avoid right angles, because of them blockages will occur more often.
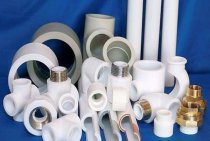
Buying the necessary parts
Pay attention to the type of plastic from which the pipes are made. Three types are especially popular now.
- Polyethylene. Cheap, but it is not completely sealed and does not tolerate high temperatures well. We do not recommend using it.

- PVC. Withstands temperatures up to 80 degrees. It can be cleaned only with ultrasound and a plunger, but it is inexpensive and has low hydraulic resistance.

- Polyisopropylene. Durable and heat resistant. Can be cleaned with a cable and any chemicals, except for alkali and acid concentrates.
When working, plastic pipes are noisy, so think about insulation in advance. For polyisopropylene, any neutral sealant is suitable, and for PVC, only silicone is used.
Choose pipes of the right length so that you do not cut them later. Sometimes it is even worth changing the scheme to save time and materials.
Preparing for installation
To avoid trouble during the dismantling and installation of the sewer system, do all of the following.
- Warn upstairs and downstairs neighbors not to use the toilet and water.
- Arrange to turn off the riser taps in the basement.
- Cover the walls and floor of the toilet or bath with polyethylene.
- Choose clothes that you don't mind throwing away.
- Fix the riser at the top. It is recommended to mount 2 half-clamps on anchors with a diameter of more than 12 mm.
- When working with plumbing, there is always a lot of dirt, so stock up on garbage bags.
First try on the pipes, pay attention to any difficult places to install, draw up a work plan. Mark the pipe connections and anchors on the walls to make it easier to mount the system.
Try to assemble the entire pipeline by simply joining its parts together. Cut the pipes to the desired length, leaving 10-15 mm to spare on the free side. Use a miter box and a hacksaw, keep a 90 degree angle, otherwise you will not achieve complete tightness.

Dismantling
When replacing plastic pipes with new ones made of the same material, they can simply be removed. If you need to dismantle cast iron, you will have to use a diamond-coated grinder. Professionals sometimes use a hammer, but with a large amount of work, you will spend a lot of time with such a tool. First, the pipes are disconnected from the walls and the plumbing is removed, while indicating the location of the bathtub, sink and other items with a pencil. Before starting work, do not forget to turn off the water and warn the neighbors.
If you are dismantling with a hammer, you need to apply strong blows to the protruding parts in order to split and loosen them. Use safety goggles or cover your eyes as pieces of cast iron can damage your eyes.
When cutting cast iron, be sure to wear a respirator, as the resulting dust is very harmful to health.

It is necessary to start dismantling the pipeline from the "tee", the junction of the apartment sewer with the riser.
- Disconnect the pipes leading to the "tee".
- Make a neat cut 10 cm from the riser. Be sure to use a grinder or a hacksaw, as you can damage important parts of the riser with a hammer. Sometimes it is not possible to remove the "tee" the first time. If it does not give in, make a second cut. Insert wedge, chisel or flathead screwdriver. Then strike gently and accurately. Gradually loosen the pipe. In especially difficult cases, it will be necessary to heat the junction with the riser.
- Clear the bell of all excess. This will allow you to install a new adjustable pipe with high quality.
- Disassemble the remaining pipeline.
- Plug all holes with rags. If everything is done carefully, you can turn on the water in the house.
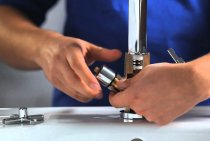
Installation
It is customary to start work from the riser and connect the pipes to the toilet, bathroom and other plumbing at the end.
- Install the cast iron to plastic adapter. The principle of installation depends on the design of the cuff.

- Insert the first section into the cuff and check if everything is in place.
- Apply a thin layer of sealant to the inside of the fitting and outside of the pipe to be connected. Unlike rubber gaskets, plastic ones also need to be processed. Wrap the joint with polyethylene. Then level the sealant layer with a brush or piece of cloth. To keep the pipes well, you first need to insert them to the full stop, and then push them back 10-15 mm.
- Assemble the entire system, the toilet is installed last.

- Check for leaks.
Conclusion
Do-it-yourself sewerage in an apartment is not as simple as it might seem to someone. Try to start by just drawing up a diagram. If you are not confident in your abilities, do not get down to business. Correcting mistakes will cost more than calling a professional. If you decide to do all the work yourself, we hope that the above tips will be useful to you.