Repair in an apartment is rarely complete without replacing elements such as electrical, television and telephone sockets. In terms of connection complexity, a telephone socket is a simpler element than an electrical one.

At the same time, installation work is much safer, since there is no life-threatening voltage in this device. Of course, this does not mean that you should not follow the rules of elementary electrical safety, because in standby mode the voltage between the wires of the telephone line is about 60 V. You should also take into account the fact that disconnecting the telephone line is much more difficult than part of the power wiring. Another unpleasant moment is the appearance of a voltage of 120 V in the circuit at the moment a call arrives at the installed telephone from any subscriber.
To understand how to connect a telephone socket, you should carefully consider its internal structure and the procedure for installing this device.
Installation of a telephone socket

Installing a telephone socket involves the following sequence of actions:
- Disassemble the body. To do this, unscrew the bolt that secures the cover to the body with a screwdriver.
- If this product is intended for indoor installation, the installation box must be installed for it beforehand. To do this, a hole is drilled in the wall using a special crown worn on a drill. Further, a cable is connected to this hole (it is better to give preference to a four-wire cable), which is released from the junction box by about 15 cm. box. It is also worth mentioning that the correct laying of the telephone wire must be carried out in the wall under a layer of plaster, while its intersection or location near power cables is not allowed.
- How to properly connect the telephone cable to the socket? Remove the insulation 5 mm from the edges of the conductors of the telephone line wire. For this, a special tool or the most ordinary knife can be used. If the installation of the outlet is carried out by professionals, then they crimp the end of each core with the installation of a special terminal on it.
- The telephone cable is connected to those terminals of the telephone socket to which the red and green conductors are connected. The connection diagram may differ depending on the type of connector used in this unit. However, color marking in most cases is respected. In this case, the red color of the conductor insulation means that a minus must be connected to it, and green provides for the connection of a plus. To determine which of the line wires is a plus and which is a minus, you can resort to using an ordinary tester. As a rule, when connecting modern telephone sets, polarity is not important. However, when installing the outlet, the trial and error method is usually used: if the phone does not work, then you need to change the polarity.
- Assemble the socket housing.
- Perform a phone test.
If this simple sequence of actions has been performed correctly, then connecting the telephone socket is not difficult.
Wire selection
To carry out the wiring of the line according to the layout of telephone sets in the apartment, use the TRP 2 × 0.4 or 2 × 0.4 wire, which has two separate copper cores covered with polyvinyl chloride (PVC) insulation. A feature of this cable, commonly called "noodles", is the presence of a dividing strip between its cores.It is very convenient to drive small nails into this strip to secure the wire to the surface.
Types of telephone sockets
Despite the widespread unification of plug connectors used to connect telephones, there are still several varieties of telephone sockets.
- Soviet-style socket (RTSHK-4).
Currently, such models are becoming less common, but they are still used. These devices are used in conjunction with older models of phones. They are a socket with 4 knife-type contacts and a plastic tongue (key).

- This is a single or double socket (RJ11). It is one of the most common types of these devices. Uses a two-wire connection. It can be used to connect home or office phones. In this case, to connect this socket to the line wires of the telephone line, contacts marked with numbers 2 and 3 (green and red) are used.
")
- Connector 6P2C. (RJ12 standard). Can be produced in single or double version. Most often, these sockets are used to connect mini-PBXs in offices.
- (RJ14 standard). Such a product can be used to connect two telephone lines or four-wire telephone sets. However, since most apartments have only one line, its wires are connected to the middle terminals (numbers 2 and 3) of such an outlet.
- 6P6S (RJ25). Has three pairs of contacts. Its acquisition is not advisable for installation in a private apartment, which has only one line with a two-wire telephone. If you still have to install such a device, then the wires are connected to the upper terminals (3 and 4 numbers).
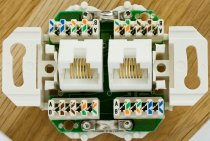
- 8P8C (RJ45). An eight-wire connector used to build local area networks.
Since the listed connectors can be used in sockets of different standards (the main thing is that the number of wires in the connection matches), there is considerable confusion in the names of connectors and socket models.
To install several telephones connected to each other, you can use the parallel connection of sockets. To do this, in each connection that is present in one device, you should connect the wire of the same name from the neighboring one.