Wallpapering is an easy and cheap way to update the finishes in any room. But even such a simple task can turn into torment if you do not know all its subtleties. Anyone who plans to glue vinyl wallpaper will have to figure out where to apply the glue - on the canvas or on the wall - what tool to use, how to prepare the surface and how to finish hard-to-reach areas. All this is in our article.

Features of gluing vinyl wallpaper depending on the base material
Vinyl-coated wallpapers can have a paper or non-woven base. Not only the characteristics of the coating, but also the principles of gluing depend on the substrate material.
What you need to know about non-woven vinyl wallpaper:
- The adhesive mixture is impregnated with a wall, not a canvas, which simplifies the workflow.
- Such a substrate is much stronger than paper, has high wear resistance, can hide small bumps and cracks on the walls.
- The disadvantages of wallpaper on non-woven fabric include the rigidity of the material. The low plasticity of the panels does not allow fast and efficient trimming of convex sections.
The nuances of working with paper-based vinyl wallpaper:
- Glue is applied not only to the surface of the wall, but also to the canvases themselves.
- The material stretches well, with its help you can quickly paste over protruding surfaces, such as niches, columns or corners.
- The disadvantages of vinyl wallpaper on a paper backing include the possibility of breaking the fibers from a slight mechanical impact, increased glue consumption.

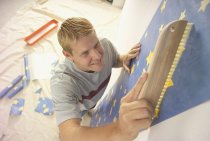
Tools and materials for work
For high-quality finishing work, in addition to vinyl wallpaper and adhesive composition, you will need the following tools and materials:
- Paint brush or soft bristle roller - for applying primer to the base and glue to the wallpaper or wall.
- Rubber rollers. A tool with a wide working surface is used to smooth the canvases, a narrow one - for high-quality joining of joints.
- Ruler, plumb line, building level, square and pencil - for marking.
- Masking tape - to protect individual elements from the ingress of adhesive composition.
- Plastic spatula - to remove air bubbles and excess glue.
- Sharp stationery knife and scissors - for cutting strips.
- Wide metal spatula - for cutting canvases near the ceiling and floor.
- Container for adhesive mixture.

Advice! To speed up the work, use glue with an indicator that makes it easy to control the uniformity of applying the mixture to the surface of the walls or canvas.
Surface preparation
Before sticking vinyl wallpaper, the following operations must be carried out:
- remove the housings of switches and sockets, after de-energizing the room, seal the sections with masking tape;
- remove protruding fasteners (dowels, screws, nails);
- clean the surface of the old coating;
- repair irregularities with plaster or putty;
- apply a deep penetration primer to the base and wait for it to dry.

Wallpaper can be glued only on dry and clean walls. Checking the dryness of the base is quite simple. To do this, take a small piece of plastic film 50 × 50 centimeters and fix it with adhesive tape on the wall so that an airtight space forms inside. A day later, the polyethylene is checked. The drops that have come out indicate that the wall has not dried out.
All the nuances of preparing concrete surfaces for wallpapering are described in detail here.
Step-by-step instructions for processing a plasterboard wall or ceiling before pasting with wallpaper can be found in this article.
Important! It is necessary to level surfaces under wide meter-long wallpapers especially carefully, even with small differences there may be problems with joining adjacent strips.
Making markup
After the preparatory stage, marking is carried out, which allows you to correctly position the canvases on the surface. Mark the walls with a long ruler, chalk and a plumb line.
- The first line is combined with the edge of the window, gradually moving to the left along the perimeter of the room.
- Further lines are applied taking into account the width of the wallpaper.
- From the window to the left side, markings are made to the corner of the wall with a doorway, numbering each of the sections.
- Next, the lines are applied to the right from the window to the door.

Preparing wallpaper for sticking
Before carrying out the main work, roll materials are cut into strips, the length of which corresponds to the height of the wall plus a margin of 5–10 centimeters. For greater accuracy, the height of the room is checked in different places. If the dimensions match, several strips are cut, the total width of which allows you to cover the entire plane of the wall.
If the ceiling height in the room is not the same, each subsequent strip is cut off after gluing the previous one, or each section between the marking lines is carefully measured before cutting.
During the preparation of strips with a pattern, the coincidence of the pattern is monitored. To do this, you need to combine adjacent canvases so that the elements of the image are joined in the correct order. The finished strips are stacked on top of each other in the desired sequence.

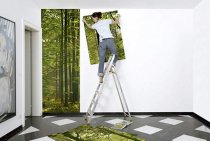
We glue vinyl wallpaper: step by step instructions
Work on pasting the wall with vinyl wallpaper is carried out in the following sequence:
- We dilute the glue according to the instructions on the package. The finished solution should have a uniform consistency without clots and lumps.
- We tightly close the windows in the room, turn off the air conditioners and fans.
- We spread glue on a paper-based wallpaper or on a wall if the material is glued on non-woven fabric. In the first case, we fold the canvases with an “envelope” - the edges are aligned with the middle of the strip, and wait 5-10 minutes until the paper layer is saturated with glue. Vinyl on a non-woven base is glued immediately after coating a section of the wall slightly larger than the width of the wallpaper.
- We apply the prepared strips to the base along the drawn line, joining adjacent elements, taking into account the pattern.
- With a rubber roller, we smooth the canvas from the middle to the edges, getting rid of bubbles and achieving a perfect fit of the material to the surface. We remove the protruding adhesive residues with a piece of foam rubber or a clean cloth.
- After drying, the edges of the wallpaper are pressed with a wide metal spatula and cut with a sharp clerical knife.

How to glue wallpaper near window and door openings?
The process of wallpapering near openings causes difficulties for inexperienced craftsmen. The canvases must be joined so that their edges do not fall on the corners of the window or door opening.
If the door is located in the corner of the room, the discrepancy between the patterns on the wallpaper will remain invisible. If the door structure is located in the center of the room, the pattern should be combined both before and after the opening.
- The last canvas is glued in such a way that it can cover the casing.
- Then the limiting decorative element is fixed and the hanging part of the canvas is cut off with a sharp knife.
- Next, the wallpaper is smoothed at the joints, as well as between the wall and the casing.
- A short piece is glued at the top of the door, following the sequence of the pattern.

The procedure for gluing near window openings:
- The strip is glued so that it covers the slope.
- At the edges, several horizontal cuts are made that will allow you to bend the wallpaper downhill.
- The edges of the canvases are trimmed along the border of the opening.
- After sticking one of the side strips, short cuts of wallpaper are fixed on the upper and lower parts of the opening.
- After that, proceed to finish the other side of the opening.

Advice. Before wallpapering the second side of the window, apply an additional marking line. This makes it easier to achieve the correct vertical position of the canvas.
How to glue wallpaper in corners and hard-to-reach places?
There are two methods for gluing canvases in the corner of the room: overlap and butt with trimming.
- In the first case, we glue the strip, making an overlap on another wall 1–2 centimeters. Next, we draw a marking line across the width of the roll on a perpendicular wall and fix the second canvas in such a way that its edge runs strictly along the corner of the room and does not step onto another plane. After that, the wallpaper is gently rolled with a roller.
- The undercut overlapping method is used to fix heavy vinyl wallpaper with a large pattern. The technology for carrying out the work is at first similar to the previous method, but at the junction point the second sheet does not need to be coated with glue. Next, we take a long rule and a sharp clerical knife. We make an even cut, bend the edge of the roll material, apply glue and roll this area with a roller.

In hard-to-reach places behind heating radiators, wallpaper is wound up from behind. After fixing in the desired position, the canvas is rolled with a narrow roller with a long handle.
In places where sockets or switches are located, roll materials are glued on top of the boxes, then cross-shaped cuts are made with a knife. The resulting triangular tails are bent, cut off all that is superfluous, the socket housings are put in place.

Gluing borders
The gluing of the border or frame starts from inconspicuous areas, since at this point the elements will be combined. Usually, decorative items are fixed in the upper part around the entire perimeter of the room.
When combining two types of canvases horizontally, the border is glued at a certain height relative to the floor. In this case, markings are applied to the walls with a pencil and a building level: it is impossible to focus on the edges of the joined wallpaper. The upper part of the decorative element is fixed along a pre-drawn line, after which the border is smoothed with a roller, the remaining glue is removed with a soft cloth or sponge. In the places where the tape joins, an incision is made with a sharp knife, the canvas is smoothed.

The subtleties of sticking vinyl wallpaper, trimming rules and some useful tricks are clearly demonstrated in the video.