The plasterboard walls and ceiling are quite even. And it often seems that this is enough for further finishing. However, upon closer examination, it turns out that the surface is far from ideal: there are many joints, seams, in some places there are notches, sharpening screws, etc. Proper preparation of drywall for wallpapering, which is carried out in stages and will take more than 1 day, will remove all these flaws and to make sure that the final finish looks perfect and does not show defects over time.

Drywall creates an almost flat surface. However, it still needs to be puttied for two reasons:
- The seams and places where self-tapping screws are screwed in without a layer of putty will be visible under the wallpaper, even if they are puttied separately.
- If you stick wallpaper on an unprepared drywall surface, it will be impossible to remove them later without damaging the top layer of sheets.
Drywall primer
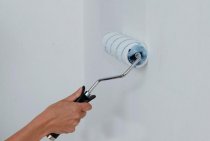
In order for the putty to lay down evenly and stick well, you need paint the walls with a primer. The same tool will prevent the appearance of fungus and mold on the sheets.
The primer is applied with a brush (in the corners, in the area of joints, niches, on curly elements) or with a roller (on a smooth and even surface). Consumption depends on the composition used. As a rule, all the rules are prescribed in the instructions. The soil is applied generously, then allowed to dry.
Only clean tools should be used. Otherwise, grains of sand or small pebbles may stick to the wall, and this will complicate the putty process.

Joint putty
Farther close up the joints. Understanding how to prepare drywall walls for wallpapering, you need to understand that this is the most crucial moment. If the seams are poorly puttied, there will be bumps and pits on the wall, which looks very ugly. The depressions will be noticeable even under the wallpaper.
To do this, you will need the following tools and materials:
- putty knife;
- mesh-serpyanka;
- special putty for seams;
- container for working solution.
Work progress:
- The edges of the sheets are chamfered at the factory at an angle of 45 degrees. If the drywall is cut off, you need to chamfer before installing the sheet with a special planer or after installation with a sharp construction knife.
- Under the putty, the joints are especially carefully treated with a primer, which must dry completely.
- First, putty is bred according to the instructions. Then the working solution is applied along the entire length of the joint, carefully making sure that the gap is filled.
- Also, the solution is applied 5 cm to the left and to the right of the joint. Then, a serpentine mesh or paper tape is laid on top of the first layer, which will reinforce the joint. The mesh must be laid so that it lies flat and fits snugly against the surface of the drywall. Then the next layer of putty is applied over the mesh, leveling it to get a flat surface without bumps.

Grid or tape can also be used to process internal corners, especially if the walls do not converge clearly perpendicular to each other. In order for the angle to be clear, the mesh must be carefully pressed with a spatula. If this is not done, the corner will be rounded.
Checking self-tapping screws
During the processing of the joints, they check how the self-tapping screws are screwed. Their caps should be recessed into the surface of the sheet by about 1 mm. If the heads rise above the surface, then they need to be deepened. To do this, they are simply tightened with a Phillips screwdriver or a screwdriver.
Finding out if the hat is recessed enough is simple: just run a spatula along the wall. If the tool does not cling to the screws, then they are tightened correctly.
The fastening points of the self-tapping screws are covered with a thin layer of putty with crosswise movements, so as to level the surface.

Outside corner processing
Drywall is a rather fragile material. The outer corners are especially susceptible to destruction: chips often appear on them. To prevent this from happening, you need to reinforce them, but a simple sickle mesh will not be enough for this. For external corners, a special perforated aluminum corner is used.
For work you will need:
- putty;
- putty knife;
- perforated corner;
- level;
- putty container.
Sequence of work:
- A layer of putty putty is applied to the corner and a perforated corner is carefully placed against it.
- The aluminum product is carefully pressed into the wall. When pressed, the solution will protrude through the perforation. excess building mixture is collected with a spatula.
- The level checks how even the corner is. If necessary, it is trimmed, pressed by the level or rule itself. The aluminum corner should stand up straight and not stand out on a common plane.
- When the putty hardens, the final leveling is carried out: the corner is rubbed with mortar, the perforation is filled with mortar, and the plane is leveled.

Drywall putty
Now proceed to the finishing putty drywall. For work, it is advisable to use 2 spatulas: small and large (up to 50 cm):
- The mixture is scooped up with a smaller tool and evenly distributed over a wider one.
- With a large spatula, apply the solution to the wall and smear it with a thin layer.
It's better to start from the corner. It is recommended to level the second wall in the same corner only after the mortar has set on the already treated wall. This will reduce the risk of damage to the leveled coating on the finished side.
After all the walls are puttied, you need to let the mortar dry. It will take at least a day to dry.

Grinding
This is the final leveling stage. To carry out the work you will need a special grater with an emery net.
Attention! At this stage, protective equipment is required: a respirator, goggles and gloves. When grouting, a lot of dust is generated, small particles of putty fly off, which can get into the eyes or respiratory tract. The mesh can scratch your hands, so it is advisable to work with gloves.
A grater is passed over all irregularities: waves, mounds, lumps of mortar, adherent particles. It is important here not to overdo it and not peel off the putty to drywall. Internal corners require special attention, as there is a risk of leaving grooves from the grater on the adjacent wall.

Primer
The final step of the step-by-step instructions for preparation of drywall for wallpaper - priming the puttied surface. As a primer for wallpaper, you can use a special mixture, or you can dilute wallpaper glue to a more liquid consistency and treat the surface with it. The purpose of this layer is to ensure better adhesion of the wallpaper to the walls and to strengthen the putty layer.
The base is primed in the same way as described above: the corners are smeared with a brush, and the walls themselves with a roller. Then the surface is dried. And only after that we can assume that the preparation of walls made of drywall for wallpaper is completed.