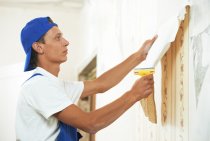
Having leveled the walls in the apartment with the help of drywall, many are wondering: is it necessary to putty drywall before wallpapering? After all, drywall sheets have a fairly flat surface on which the wallpaper will stick without any problems. But if you try to understand this topic in more detail, you will understand that plasterboard putty under the wallpaper will help to avoid many unpleasant moments.

Why do I need to putty drywall before wallpapering?
Drywall plastering is necessary for several reasons:
- A wall sheathed with drywall sheets will still not be perfectly smooth. The joints of the sheets and the attachment points with screws will be visible under the wallpaper, especially if they are thin and light enough.
- During the installation or operation of drywall walls, which is a rather fragile material, various damages can occur. All of them will also clearly appear under the wallpaper.
- It is necessary to putty the wall completely. There is a temptation to process only the joints and attachment points, but you do not need to succumb to it. Yes, it's faster and easier, but if you want to change the wallpaper? Without additional surface treatment, they will stick tightly to drywall. You will have to glue new wallpaper on the old one or change the drywall base after trying to remove the old wallpaper. Puttying and priming drywall will help to avoid these problems.

Preparation for putty
Before puttingty drywall under the wallpaper, the surface must be prepared.
- At the initial stage, debris and dust should be removed from the sheets.
- Check if the screws are screwed in correctly. The protruding fasteners must be tightened using a screwdriver.
Attention! If the self-tapping screw is screwed in too deeply, more than half the thickness of the sheet, then you will have to unscrew it completely. A new self-tapping screw must be screwed into the wall at a distance of at least 5 cm from the remaining empty hole.
- To identify defects in the wall, it is necessary to draw a wide spatula along it. It should slide smoothly. Detected deep dents or scratches on the wall are sealed even before applying the main layer of putty.
- Before puttying, the wall must be primed. The primer, preferably water-based, is applied with a roller in one coat and allowed to dry. Acrylic primer for drywall under wallpaper will not cause warping of the drywall sheet, and after drying, it will provide reliable adhesion to the applied putty.

Usually drywall sheets have a chamfer along the edges. If it is missing, it is necessary to cut them with a knife at an angle of 45 degrees. The chamfer is needed for better processing of the joints, the putty layer on them should be thicker.
- Also, all joints must be glued with a reinforced sickle mesh. It should be pressed a little into the recess, positioned so that the seam runs exactly in the middle of the tape.
Putty joints
First of all, all the joints of the sheets should be puttied.
For work, it is advisable to use narrow and wide spatulas. It is convenient to apply putty on the seam with narrow ones, and level it with wide ones.
Work is carried out from top to bottom. The composition should fill the seam completely, even protrude a little, since the putty shrinks when dried. After the walls treated in this way dry, the excess can be removed by grinding. If it is not possible to fill the seams in one layer, it is necessary to allow the composition to dry, and only then repeat the operation.

Putty corners
How to putty the corners of drywall? This is one of the most difficult stages, which involves the preparation of plasterboard structures for wallpapering. Walls can form internal and external corners and are treated differently.

To remove external corners, special elements are used. These are perforated corners made of plastic or aluminum. The former are used in the processing of curved corners, such as arches. With the help of rigid aluminum corners, right angles are displayed.
- The corner is applied to the wall at the attachment point and circled with a pencil.
- Drywall is cut with a knife slightly wider than the resulting contour, at a distance of 3 mm from the marking lines.
- With a chisel, a groove is selected for the corner, which should also be slightly larger than the thickness of the latter.

- The resulting recess in the wall is coated with glue or putty, and then a corner is pressed into it. At the same time, it should sink a little compared to the general level of the wall.
- The solution that has come out through the perforation of the corner is leveled, and after drying, the corner is puttied flush with the wall.
The process is quite lengthy, but while one corner dries, you can do the rest.
Preparing drywall for wallpapering also includes the processing of internal corners.
- Like seams, at the initial stage they are glued with reinforcing tape.
- The sides of the corner are puttied alternately, using a special corner spatula.

Processing of GKL attachment points
When attaching drywall sheets, a large number of self-tapping screws are used. The depressions formed in the places of their attachment must also be leveled.
Tip: it is advisable to take care of the attachment points in parallel with the processing of corners and seams: during these processes, there is always a small excess of material that can be used to seal the self-tapping screws.
In this case, putty should be applied with movements crosswise, this will help to achieve a smooth surface better and faster.
Plastering the entire surface of the plasterboard wall
In the future, the entire surface of the wall is covered with a thin layer of putty.
Some professionals advise diluting the putty mixture to a more liquid state and using a brush to apply.
After drying, the leveled surface is checked, for which you can use the building level. When applying putty on the wall, it should be remembered that protrusions are preferable to depressions, as they are easily removed by grinding.
The processing of drywall ends before wallpapering by grinding and priming the resulting surface:
- The protrusions, sags and irregularities formed during the puttying process can be removed with fine sandpaper or trimming the reinforcing tape.
- Then the surface must be cleaned of dust and coated with a primer.
After the primer has dried, you can proceed to the finishing stage of finishing - to glue the wallpaper.

Wallpapering on plasterboard covered with putty is very easy and gives a guaranteed high-quality result. And most importantly, with the subsequent change of wallpaper, you will avoid headaches, thinking about how to remove the old wallpaper coating - canvases are removed from the puttied surface without much effort.