Alignment of walls for tiles surface preparation
In fact, everything is not so difficult - preparing the walls for laying tiles does not require serious professional skills. If a bathroom is taken into development, then we remove the old plumbing and arm ourselves with a hammer and a chisel - it is necessary to knock down the old tile. Of course, we must not forget about the safety of performing such work, therefore, we are taking certain measures:
After all the tiles are removed from the surface of the walls, we get rid of the remnants of the tile adhesive with the same chisel. It should be noted that this work refers to the initial stage of surface preparation.
The verticality of the walls and the correctness of the angles
So, we need a perfectly flat wall surface, how to make it so? First, we determine the quality of the plaster. If its main ingredients are sand and cement, and it itself is swollen in some places and disappears, then again you will have to use a chisel and a hammer. Nothing can be done, it is necessary to clean the surface to the brickwork. If the resulting wall area is strong enough, then you can begin to determine the geometric parameters.
For measurements, you will need a plumb line, which, in fact, is a simple device consisting of a heavy weight attached to a cord. We use the body kit to check the verticality of the walls. This procedure is performed as follows: the cord is unwound to the height of the room and fixed under the ceiling close to the wall - we determine how far the wall goes to the side. In the case when the deviations exceed a few millimeters, then it will not be possible to do without leveling the wall surface by plastering.
A tile is not a wallpaper and a littered corner simply cannot be pulled out in the right direction. If you skip the stage of leveling the walls, then after laying a whole row of tiles to the ceiling, at the exit you can find that a gap has formed a few centimeters wide, and you can’t close this with anything.
The next operation is to measure the mutual perpendicularity of all walls. If the angle is not equal to the cherished 90 0, then you will also have to plaster
Here, perhaps, it is worth explaining the importance of this circumstance. The thing is that if there is supposed to be a washing machine in the corner, then there will be no special problems, although one side of it will closely adjoin the wall, and the other will stand at a decent distance
But if a bathroom is located in a crooked corner according to the project, then a gap will form, which will constantly let water through.
Now it remains to check the walls for the presence of concavities and bulges. Here you need to use the water level
It is very important that it be at least 1 m long. If as a result minor deviations are found (a couple of millimeters per 1 linear meter), then it is also better to get away from them by leveling the surface
Wall alignment
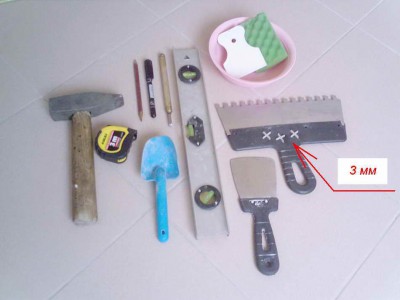
To do this job, you will need the following set of tools:
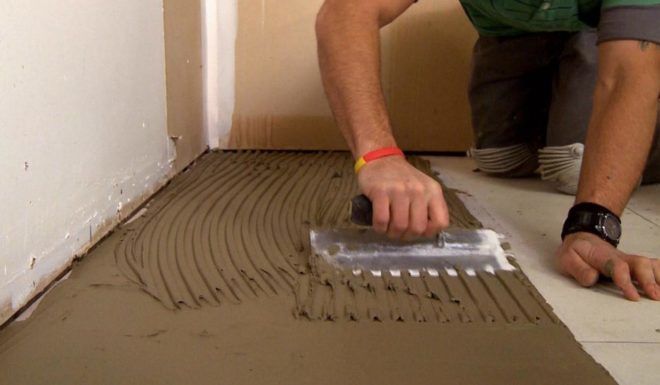
If the preparation of walls for tiles will be carried out using a sand-cement mortar, then it is thrown onto a small section of the wall and, using a grater, disperses it in a circular motion until an even layer is obtained. If a solution based on special ready-made dry mixes is used as a working material, then with a large spatula we simply apply it to an area equal to the length of the spatula. And then, slightly pressing, we stretch along the surface of the wall. The result should also be a uniform layer. In the process, do not forget to control the evenness of the wall with a water level.
floor leveling
In the presence of a concrete floor, you can use a special building mixture or a solution of cement with sand. The use of the second option involves a process similar to conventional plastering.
But if you opt for a building mixture, then you need to know the technology of work. It will not be difficult to prepare such a solution, since the manufacturer prints instructions on the correct batch on each label. In the same place, according to the standard, the thickness of the layer that can be put in the bathroom on the floor is indicated, and how long it will take to dry. If the concrete surface has pores, cracks, joints and gaps, then you need to think about waterproofing. In order for the mixture and the base to adhere well to each other, a primer is used, which initially treats the floor surface.
The next step is drawing the level around the entire perimeter of the room. This can be done using a water building level. Its design is a thin hose with graduated flasks attached to it. The measuring principle is built on the basis of communicating vessels, that is, the flasks are filled with water and set around the perimeter. To carry out high-quality measurements, it is better to perform them together with a partner, one of whom will be marking on the wall, and the second will align with the markings of the flask. Further, the obtained points are connected by a ruler into one solid line.
The resulting horizontals serve as the basis for the installation of pendulum rails. After that, the surface is filled with the resulting solution.
If air bubbles begin to form, they can be removed with a spiked roller. The direction to follow when leveling the floor is from the far wall to the door.
But in old houses, wood was often placed on the floor. The complexity of such a coating lies in the fact that the wood does not have a rigid structure, which means that it will be difficult to lay tiles on the floor. If floor tiles are placed on old and rotten boards, they will crack very quickly.
Therefore, first of all, you need to take care of replacing old boards with new ones, the thickness of which should be at least 2.5 cm. You should not forget about protection against fungus, mold and decay. To do this, it is necessary to carry out an autopsy with special solutions. Again, you need a layer of waterproofing under the tiles on the floor in the bathroom.
Alignment of wooden floors occurs with the help of the same building mixture. But before pouring the surface, a construction mesh is attached with nails or pieces of brick at a distance of 5 mm. Only after that it is covered on top with the selected mixture. The average drying time of such a floor is 28-30 days, after which it will be possible to carry out further work.
Preparatory work
The main thing is to ensure that before laying the wall surface is smooth, without cracks and dry. To do this, do the following.
- Clean the wall from the previous finish, remove all residues and construction debris.
- If the walls are uneven or have many cracks, be sure to plaster or putty them. Tile on the vertical likes a flat surface.
- Prime the wall well - optimally - with a special deep penetration primer or concrete contact. It is advisable to apply the primer twice.
- If this is a bathroom, do not forget about waterproofing (it is better to use cement-polymer putty for tiled walls).
- We hope that you have also already decided on all the plumbing, communication pipes, etc., installed them in the room.
In order not to get confused - in general, the general scheme of prepared walls for tiles looks like this.
- Wall base (we assume that it is already puttied).
- Deep penetration primer.
- If necessary, waterproofing with different sealing pads and insulated joints.
- Glue layer.
- Tile.
Beginner's Guide
 The process of laying ceramics on the walls is not the most difficult type of repair work, which even "beginners" in repair can easily handle on their own.
How many rows can be laid on the wall at one time
Subject to properly selected glue and the use of a metal profile that fixes the first row, as well as plastic crosses, the number of rows is not limited. Good glue sets in 15-30 minutes. After this time, you should not be afraid that the rows will crawl down.
How to properly lay tiles in the bathroom on the walls: laying the corner on the wall
 Laying walls at the junction, in the place of the protruding corner, causes difficulties for many inexperienced craftsmen. More often, such places are located in the bathroom - communications are hidden behind them.
There are three main ways to work in these zones:
-
90 angle position
°
. This is the simplest way, in which the elements are placed at an angle of 90 ° to each other. When one cut is left open and grouting is necessary, which makes the results of the work less aesthetically pleasing than with other methods. -
Edge trimming
. The cut of the tile is grinded with a grinder or with a tile cutter up to 45 °, after which they are combined with each other. -
Using trims
. Trims are special plastic profiles with a protruding part in the center, which are placed at the corners and covered with tiles. -
Using tiles in the form of an angle
. The easiest way. When using it, further laying is carried out from the edge of the corner tile.
How to start laying the first row: rules
 Laying the first row is a crucial moment, since it is he who is a kind of guideline for all subsequent ones.
When working with the first row on the wall, marks are made along the upper cut of the tile located below all.
Using a level, these marks are connected in a straight line throughout the entire fastener section, and a metal profile or rail is fixed on it, which will keep the material from sliding to the bottom.
What you need to know to lay tiles on a concrete wall evenly
In order for the ceramics to lie flat on the concrete wall, it is necessary to carefully measure the surface. If there are no pronounced differences, concrete contact is used to give additional roughness. Sometimes plastering is required.
Is it possible to lay tiles from top to bottom
This method of laying is unacceptable, since there is no possibility of fixing the fixing profile and the lower rows will slide under the weight of the upper ones.
Quality materials to get the job done
When choosing products for rough cladding, please note that not every material is suitable for this. The tile for rough should be durable, with a low-porous structure, have a sufficiently high heat resistance, its thickness should be about 10 mm.
It is necessary to select tiles taking into account not only the appearance, but also the purpose of the building.
Tile laying tools.
For example, in order to finish a rough one, it is necessary to pay attention to the thermal and technical parameters of the room, as well as to the combination with the interior of the house. It is worth noting that a fairly popular product today is ordinary tiles, which are used in rooms such as bathrooms, showers and kitchens.
But what is the best tile to work with? To make a choice, read its composition, it should not contain polymer compounds. Remember that tiles must be chosen in small sizes, since a huge material can crack and crumble from a rough
It is worth noting that a fairly popular product today is ordinary tiles, which are used in rooms such as bathrooms, showers and kitchens. But what is the best tile to work with? To make a choice, read its composition, it should not contain polymer compounds.Remember that the tile must be chosen in small sizes, since the huge material can crack and crumble from the rough.
After purchasing the materials, you can begin to work. Before facing the surface of a rough, do not forget to get rid of the previous plaster. It must be removed completely (from the very base). In addition, the old clay still needs to be removed from the seams. As a rule, the seams are cleaned to a depth of about 15 mm. During this work, you can use a grinder and an abrasive wheel.
Once you have prepared the surface for tiling, attach the reinforcing mesh. For competent fixing on the rough mesh, hammer nails into the inter-brick seams. Instead of nails, you can use self-tapping screws. Just keep in mind that they need to be installed directly into the bricks.
Description of cast iron floor tiles
Cast iron tiles are one of the best materials for building industrial floors. Today, industrial floors are understood not only as floors of directly industrial buildings - production workshops of plants and factories, but also all kinds of floors that can withstand significant loads, both physical and chemical, thermal, abrasive.
Depending on the design requirements for the purpose and load of industrial floors, in addition to the usual ones, specific ones can also be used. An example of this is cast iron tile floors in public buildings, which must be resistant to foot traffic, have an aesthetic appearance and be easy to clean.
Cast iron floor tiles, unlike other materials, are not subject to corrosion, and due to the properties of cast iron, they become stronger every year. Unlike concrete and polymer tiles, cast iron tiles are easy to install and can be reused in the future.
It can be difficult, and sometimes simply impossible, to select and buy floors for industrial buildings that meet all the necessary requirements. Therefore, sometimes in separate areas of even one room, several options for industrial flooring are used.
Traditionally, cast iron floor tiles are used in the following cases:
- laying cast iron floor tiles in industrial buildings
- line floors at high temperatures (100-1400 ° C)
- when exposed to shock, mechanical loads
- floors made of cast-iron slabs are indispensable in production or warehouses, when transport on a metal track or movement of loads of a very large mass occurs on the floor
When laying cast iron slabs, two common methods can be distinguished:
The technology of laying cast-iron slabs on mortar:
1. The back side of the tile has stiffening ribs and triangular spikes for better adhesion to the mortar.2. The tiles are laid on a mortar layer 4-45 mm thick, the mortar is spread in a strip of 6-10 tiles.3. The plates are laid along the cord and upset with a vibrator or a hammer weighing 2-3 kg (the tiles are upset with a hammer on a wooden bar, which is laid on several plates).
Technology of laying cast iron slabs on sand:
1. The edge plates along the perimeter are laid on the mortar.2. The remaining slabs are laid on a layer of sand and rolled with rollers weighing up to 3 tons or upset with rammers.
What and how to drill a tile
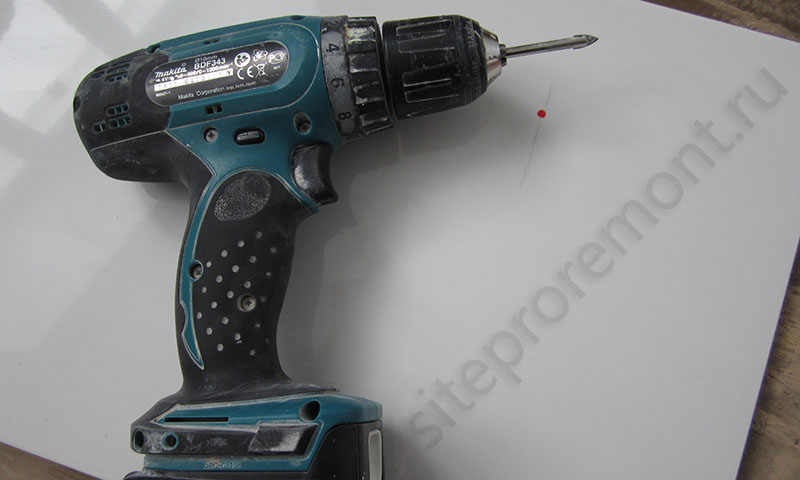
Without this operation, you almost certainly can not do. The holes can be very different: for a self-tapping screw, a socket, outlets for water and sewer pipes ... To drill holes of small diameter (a few millimeters), special swept-shaped ceramic drills are used.
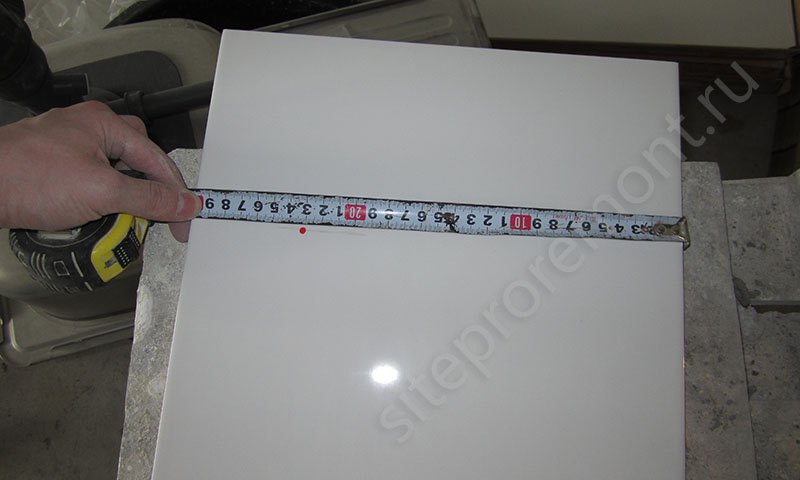
Before you drill a tile, you need to very carefully mark the location of the hole on it. Using a tape measure or a square, transfer to its coordinates of the desired place:
You need to drill at low speeds, water is used for cooling. Such holes can be made when the tiles have already been laid. Let's say if we decide to hang a hanger.First, we drill a hole, and then we drill into the wall with a perforator. Moreover, the diameter of the hole in the tile should be slightly larger than the diameter of the drill for the perforator. And in no case do not drill through the tile - you will zakotsa, one hundred percent!
Here I am drilling a hole for attaching a heated towel rail:

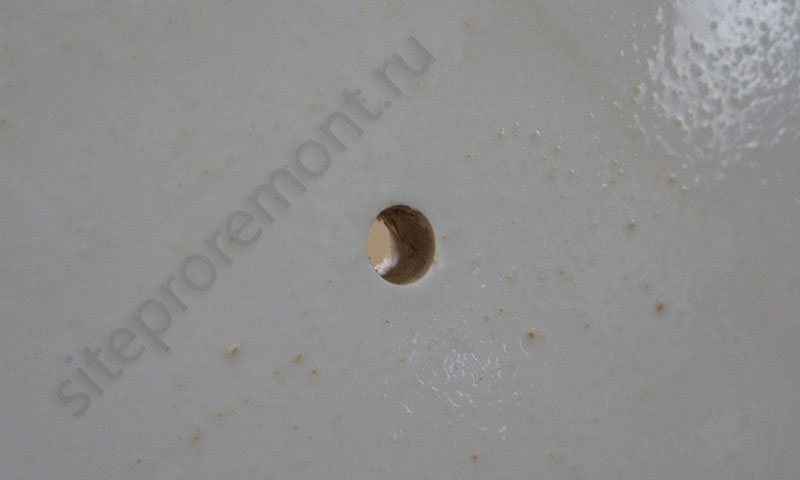
The very principle of drilling is the same: we find the coordinates of the center of the pipe, transfer them to the tile, load a crown of the desired diameter into a screwdriver or drill. We rest the drill (it always enters the tile first) at a given point, it cuts into the thickness of the tile, and then the rough edge of the crown takes over. We cool the whole thing again with plain water.
It may happen that the hole hits two or even four tiles at once. In this case, we wipe cold sweat from our foreheads, take a sheet of plywood or drywall, tiles that we will drill, crosses for them. We lay them out on a sheet, put crosses between them, we do everything as if they were already glued to the wall. We fix them to the sheet with masking tape, around the perimeter and among themselves. They must be sealed tightly. Then we already transfer the center of the hole to these tiles and carefully begin to drill. By the way, if the tip of the drill “walks”, you can stick the same adhesive tape on the right place, the drill will no longer slide on it. Yes, and the likelihood of chips of glaze will be smaller.
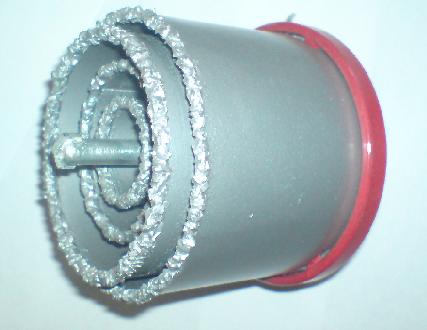
It is quite another thing to drill holes of large diameter, for example, under the sewer for the toilet. Keep validol on hand, just in case. Everything is serious here. The most common way to cut such holes is to use a special hacksaw blade coated with tungsten carbide.
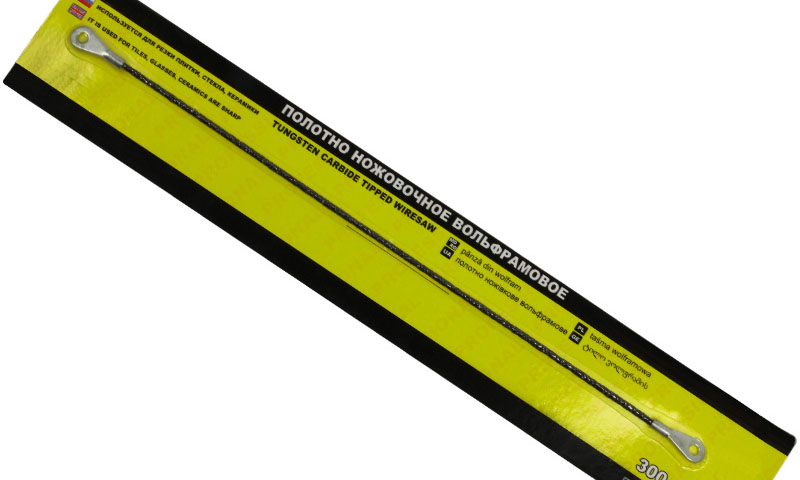
The canvas has a round shape in section, which allows you to cut holes of any configuration. This method is best for beginners. If the hole falls on several tiles, then you can cut it right away, if it fits in one - you will first need to cut a small hole near the outer border of the large one. And only then work with the canvas.
Some bite the tile with wire cutters, someone uses a grinder (that's where it's really tough), and then again works with wire cutters. Options - a lot. But the first one is the easiest.
Tip 5 How to lay ceramic tiles on the walls
Ceramic tiles are a decorative element that is very often used for wall cladding in a bathroom or kitchen. The process of laying this material is quite complex and has its own characteristics. Having studied them, you can easily make high-quality wall cladding yourself and at the same time save money.

- - ceramic tile;
- - plastic crosses for separating tiles;
- - wooden slats;
- - putty;
- - paint rail;
- - primer;
- - wooden ruler;
- - a simple pencil;
- - Master OK;
- - glue;
- - grout for seams;
- - dry rag;
- - wet sponge
First of all, prepare the wall on which you plan to lay the tiles well. Clean it from the old coating, as well as from dust and dirt. After that, check if the walls. To do this, vertically attach a special rail to them. If the surface deviates from it even by 5 mm, be sure to start leveling.
This can be done with putty. Using a special paint strip, apply it to the wall with a two-centimeter layer and wait until it dries. Repeat if necessary. In order for the adhesion of the adhesive to the surface to be better, it is recommended to prime the wall.
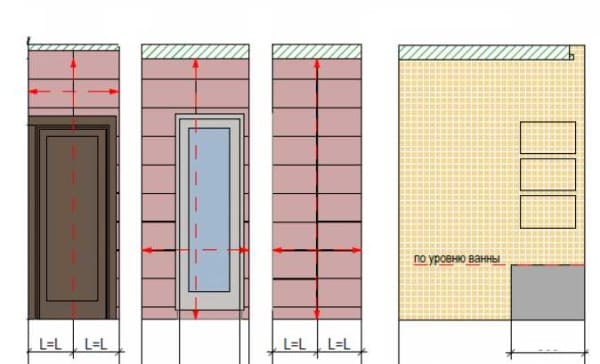
To make installation easier, mark the surface walls. Make a ruler out of a two-meter wooden lath. To do this, lay out all the tiles in rows on the floor and insert crosses between them. Place the ruler in such a way that its edge coincides with the edge of the first tile. Mark each tile on the ruler with a simple pencil. Measure Width walls and find its center point.
Place the ruler horizontally so that one of the marks coincides with this point. This will make it possible to determine how many whole tiles will fit on the wall. If you notice that the last tile of each row only fits halfway or even less, move the center dot a little. Move the ruler one division and after that put a new mark in the middle of the division. Flip the ruler upright and draw a line.
After that, mark the horizontal lines. Nail wooden slats to the wall, which will act as guides. Place the ruler on the vertical line so that it touches the floor and mark the top notch. After that, move it to the ceiling and you will see that the marked point does not coincide with the division. Measure the distance between them and divide it by 2. This will be the size of the cut tile, ideally it should be at least half the tile.
Keep the ruler parallel to the floor and move it until the division lines up with the dot. Mark the edge of the ruler and draw a horizontal line through the mark. Nail the first wooden lath along it, and the second - parallel to the vertical line. When the markup is done, proceed to laying the tiles.
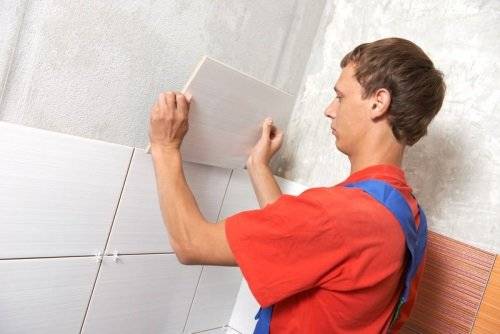
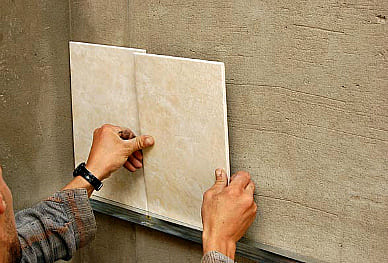
Start from the bottom corner formed by the slats. Using a trowel, apply a small amount of glue to a small area. Smooth it out, and then make horizontal furrows with the serrated side. Take the first tile and place it against the corner, pressing it firmly against the battens and the wall. Make sure that when you press the glue does not go too far beyond the edges. Lay the rest of the tiles in the same way. dividing it among themselves with plastic crosses.
Wait until the glue dries well, remove the crosses and start grouting. It is applied diagonally and, as it were, rubbed into the seams between the tiles. When the grout dries, use a dry cloth to clean the tile. If traces of grout remain in some places, use a damp sponge and then wipe the tile dry.
how to properly lay tiles on a wall
Preparation we collect tools, process the surface
In order to work, you will need:
- tile adhesive;
- grout for seams;
- profile;
- building level;
- tile cutter;
- roulette;
- marking pencil;
- notched trowel for glue;
- rubber - for grouting;
- plastic tile crosses.
If you are going to tile in the bathroom and make additional holes for pipes or sockets, you will need a drill and a diamond core bit. Do not forget about gloves and a protective coat, because. during the procedure, you can get dirty. Start the event with . There is no need to neglect this stage - its quality will determine how convenient it will be to glue the tiles, and the quality of fixing the ceramics on the surface. First you need to remove the old coating:
- Oil-based paint is removed with Betonokontakta
- we process the wall with a tool, then we make small notches and remove the paint with a chisel or a metal spatula. Alternatively, you can use a grinder with a special nozzle in the form of a brush - this is also suitable for peeling off old wallpaper. - We remove the old tile with a hammer with a chisel or a perforator. The first method is suitable for small areas, the second is more appropriate to use on large surfaces.
- The water emulsion is easily washed off with water. If you are dealing with in the bathroom, then here you will have to remove the material, which contains water-repellent components. Use the oil paint removal method.
- Washable vinyl or non-woven wallpaper is removed in three steps. First, the surface is treated with a needle roller, then wetted with water using a rag or soft roller, aged for 20 minutes.After the wallpaper sheets are saturated with moisture, it is easy to peel them off by picking up the corner at the junction and pulling it towards you. Be sure to remove any remaining pieces of paper with a spatula.
The smoother the cleaned surface, the more aesthetically pleasing the ceramics glued to it will look, and the longer it will last. Noticeable bumps, cracks and other irregularities must be eliminated. Since we are gluing tiles - heavy material - we will use a reinforcing mesh and putty Rotband
. The cover is installed in steps:
- 1.
prime the wall, apply putty on it with a thin layer up to 15 mm; - 2.
carefully glue the mesh, spread over the entire surface, align, smoothing out the folds; - 3.
wait for complete drying, it will depend on the temperature and humidity of the room - the material should brighten; - 4.
apply a second layer Rotband
, closing the grid with it, wait again until the coating dries; - 5.
clean the surface with sandpaper if there are bumps on it.
It is necessary to glue the tile on the surface treated with a primer. If you skip this step, then the concrete wall will easily absorb moisture from the adhesive, and this will complicate the process. The primer material acts as an antiseptic - it will prevent the appearance of mold and fungus. This is true for the bathroom and the bathroom, where it is humid all the time. Apply the primer to the wall correctly - with a paint brush or a soft roller in a thin layer. Depending on the type, the solution dries completely from half an hour to 12 hours - see the information on the package.
Step 1. Surface preparation
In order for the tiled surface to be perfectly flat and durable, it is necessary to properly prepare the surface. Under no circumstances should you rely on the fact that small unevenness in the floor or wall can be closed by using more mortar under the tile. A high-quality result can only be achieved when the entire material is laid on a uniformly small layer of adhesive.
Before laying tiles on the floor, a screed must be formed. In the bathroom and toilet, a waterproofing layer is necessarily formed. The screed can be made both dry and wet, adhering to the appropriate technologies. It is best to lay tiles on a concrete base, that is, on a wet screed. If the old coating is being replaced, then it is completely dismantled and the surface is leveled with cement mortar.
In order to tile the walls with tiles, it is necessary to get rid of all the old coating and plaster the walls with the obligatory reinforcement with construction mesh. The best way to do this is with beacons. It is not worth using putty, as well as achieving a perfectly smooth surface, this can impair the adhesion of the adhesive.
All skirting boards, trims on the doorway and sills are dismantled. The prepared surface must be cleaned of dust, dirt and primed.
Grout
Not earlier than one day later, you can start grouting the tile joints. For this:
- Very carefully clean the seams of any debris, dust, glue residue;
- Dilute the grout in water, mixing it thoroughly (but not liquid, you need to achieve a thick consistency);
- Gently apply the grout to the tile at the seams, as if pressing it inward. To do this, it is better to use a rubber spatula, which is recommended to be held at an angle of 45 degrees to the plane of work. Then remove the excess grout with a spatula;
- In the process of work, periodically (after 15-20 minutes) carefully remove excess grout. Wash the seams with clean water and a damp, well-wrung rag or sponge. Sometimes the grout is washed a day after it has completely dried;
- If you have a bathroom, then after the grout has completely dried, the seams can still be treated with a special sealant.

We also want to invite you to watch a useful video from the master of his craft:
That's all. As you can see, the work is painstaking and requires attention, but if you have the desire and follow the laying rules, everything can be done “perfectly well”, delighting the family and guests with new beautiful tiles. We wish you a successful home renovation!
Surface preparation
The technology used to lay new tiles on top of old ones is somewhat different from the traditional one. The difference lies in the fact that the tile coating on which the adhesive is applied must be rough. To achieve this effect, you can use the following methods:
- Removing the top glossy layer. In the absence of it, nothing will interfere with the clutch.
- If it is difficult to completely remove the glazed coating, notches can be applied to the previously laid tile.
- In some cases, the best option is to apply a good primer to the surface of the old coating.
 Applying a primer on top of the tile will help to do the job better.
All options are not high-tech processes. To carry out all this is quite within the power of everyone. If the first two methods are not suitable due to the large amount of dust during work, the third method is perfect.
It, unlike the first two, will require certain investments, since a good primer composition is not cheap. In any case, such surface preparation will improve the adhesion of the already laid tile to the new surface.