Modern finishing materials amaze with an abundance of decorative properties. This is especially true for photo wallpapers, which seem to be transferred to distant lands, to fabulous meadows, other planets, and endless ocean expanses. Such a presence effect is possible only if such wallpaper is glued correctly, otherwise uneven joints, distortions, air bubbles, folds will spoil the whole impression. We offer you to figure out how to glue photo wallpapers without errors.

Sticking photo wallpapers on the wall with your own hands is a simple procedure, but it requires extreme accuracy and care.
Features and nuances of gluing different types of photo wallpaper
According to the material of manufacture, wallpaper can be divided into several types, and the process of gluing each of them to the wall has its own nuances.
Paper
Paper photowall-paper can be one - and two-layer. Due to the increased strength, it is quite easy to work with the latter, but single-layer canvases made of paper are very capricious in the process of unfolding and gluing, they are easily torn and form folds. We work with them very carefully.
The time of impregnation with the adhesive mass of paper wallpaper with a photographic image is 3–7 minutes. If you overdo it, there is a risk that the canvas will get wet. The thinnest single-layer wallpaper must be attached to the surface immediately after smearing them with glue, otherwise they will tear.
After drying, all the flaws in the surface of the base will be visible through such photo wallpapers, so it must be prepared as carefully as possible. But paper canvases are undemanding to glue.

Vinyl medium density photo wallpaper
Such canvases have a smooth or foamed coating, are resistant to moisture and abrasion.

The composition of the adhesive and the method of its application to the wall is selected based on the basis of the photo wallpaper - non-woven or paper.
- When choosing a paper-based material, the adhesive is applied to the wall and canvas 5–10 minutes before gluing.
- When working with non-woven wallpaper, the adhesive composition is applied only to the wall. For a better grip, you can smear the edges of the canvases from the wrong side.

Non-woven murals
One of the most common options with an attractive appearance and affordable cost. The wrong side of such products is similar to paper, the front cover is easy to clean, so they are suitable for kitchens. Resistant to abrasion and mechanical damage, in their texture most often imitate plaster.

When gluing non-woven wallpaper, the adhesive composition is not applied to the canvas, but directly to the base.
Non-woven wallpaper glued to the wall tends to hold the surface together; when a new house shrinks, they will prevent cracking of the plaster.

Fabric murals
The most dense type of material made from natural textile fibers (linen, silk, cotton). For gluing, you need a certain skill, so as not to spoil an expensive product, it is better to seek help from specialists.

Canvas with 3D effect
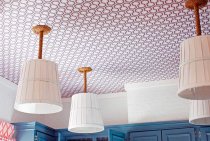
Separately, we highlight 3D photo wallpapers that help to visually expand the space and create the effect of presence. Especially such coverage is appropriate in small rooms. They are usually glued over the entire surface of the wall, which allows you to achieve the desired result. To create such wallpapers, a non-woven base is used, so they are unpretentious in maintenance and durable.

Before gluing, the surface must be carefully prepared: level and treat with a primer. The connections of the strips should be done very carefully so as not to violate the integrity of the pattern.

What is required for gluing photo wallpapers?
Tools and materials for gluing photo canvas:
- The wallpaper itself. Before ordering them, carefully measure the wall, determine the location, size, theme of the picture.An ill-considered choice can lead to additional costs for the purchase of new material.
- adhesive composition. It is selected based on the type of wallpaper purchased. Before buying, check the correct choice with a sales assistant in a specialized store. Pay attention to its colors so that the glued pattern is not spoiled by the eye-catching stains of the adhesive composition.
- Stationery knife. It will help to trim the bumps, cut off the protruding ends of the wallpaper.
- Several brushes. Use small brushes to glue the joints, large ones to apply the composition to the main part of the canvas.
- Simple pencil. Required for marking on the wallpaper and on the wall.
- Level. It will help to identify the correct proportions of vertical and horizontal lines.
- Ruler. Used to draw the borders of parts of a picture.
- Pure matter. It will come in handy if the adhesive composition goes beyond the edges of the glued photo wallpaper.
- Rubber roller. With him in his hands, you need to walk along the pasted wallpaper, correctly distributing them over the surface of the wall, expelling air bubbles.

The process of wallpapering with a photo image
The rules for gluing photo wallpapers are usually indicated on the packaging. However, in case the instructions offered by the manufacturer are not clear, we offer a step-by-step lesson:
- We decide on the wall where the wallpaper will be attached.
Note! Non-woven and vinyl canvases will hide minor imperfections in the base surface.
- We carefully prepare the selected wall, clean it from the previous finish, remove all cracks, chips and large irregularities. To give greater brightness to the pattern, we paint the base with white water-based paint.
Important! The temperature in the room before, after and during the pasting of the wall must be maintained at 25 °C.
- We carefully examine the purchased photo wallpaper to make sure that all parts of the picture match, correspond to the declared dimensions.
- We mark the wall in advance, marking on it the places of the future location of each of the fragments.
It is customary to start marking from the part of the image that will be closest to the window.
- We apply adhesive on the inside of each fragment. We leave the strips for some time for impregnation (on average, 10 minutes is enough). If non-woven wallpaper or non-woven vinyl is glued, the adhesive is applied to the wall surface.
- According to the markup made in advance, we paste fragments of the canvas.
- We smooth the applied pattern with a rubber roller.

- When gluing with an overlap, carefully remove the excess parts.
- Cut out the "windows" for the sockets.
- When it is provided for by the instructions, we apply a protective composition.
If there are parts of the above process that you don't understand, watch the following video tutorial:
The master on the video reveals several professional tricks that are sure to come in handy when pasting walls with photo wallpapers on your own. If, nevertheless, there are fears that it will not be possible to perform the work flawlessly with your own hands, we recommend that you check with professionals how much it costs to paste wallpaper with a photo image. Most likely, the announced amount will not be so great, especially in comparison with the opportunity to get a magnificent interior.