A wallpapered ceiling is a worthy budget alternative to expensive stretch and suspended structures. A popular, effective and convenient option for sticking is vinyl wallpaper. The variety of their texture and color solutions allows you to embody almost any design idea for interior design and give the room a finished look. Gluing vinyl wallpaper to the ceiling is quite simple, and you can even do this work alone, but only if an important condition is met, which we will discuss below.

The nuances of sticking vinyl wallpaper: the main secret
Vinyl wallpaper is a polyvinyl chloride film applied to a non-woven or paper base. Due to their top layer, they are much stronger and more convenient to use than paper ones, which is especially important in such a complex and time-consuming process as ceiling decoration.
But even these wallpapers, thickly smeared with glue, will be inconvenient to lift and apply to the ceiling. The correct choice of material will help to solve the problem and facilitate our work:
- The paper-based wallpapering technology involves applying glue to the canvas itself, which in the case of the ceiling will complicate our lives.
- Vinyl coatings on a non-woven backing have an advantage: when they are glued, only the surface of the ceiling or wall is smeared with the composition. The remaining dry sheet weighs less and does not stretch when fitted. For this reason, it is the canvases on non-woven fabric that most often have a meter width.
-

- Backing Paper: Applying Glue to Wallpaper
-
- On non-woven fabric: adhesive coating of the ceiling surface
An important conclusion: for the ceiling it is better to choose non-woven wallpaper. Material on a paper backing can be preferred only in one case: when canvases with a pattern suitable for the interior are on sale only in this version.
Ceiling preparation
Like all surfaces for finishing, the ceiling is pre-prepared as follows:
- The old coating is completely removed. You can read about how to remove different types of material - wallpaper, paint, plaster - here.
- The surface is carefully inspected, problem areas are put in order.
- If necessary, the joints of the walls and ceiling are aligned, the angle between which should be 90 °.
Note! With a sufficient height of the room, the best option for leveling the surface and corners is plasterboard ceiling lining.
- At the final stage, the surface is puttied, cleaned with sandpaper and primed to improve adhesion. The sequence of preparing drywall for wallpapering is described in detail here.

Advice! If during the inspection foci of mold or fungus were found, such places are additionally covered with an antiseptic.
Cooking Tools
The necessary equipment should be prepared in advance, since working with vinyl sheets requires speed and a closed space, without air flow. The list of necessary tools and fixtures is as follows:
- Sharp construction (clerical) knife.
- Roulette and pencil.
- Wallpaper glue.
Important! When choosing an adhesive, give preference to a special composition containing an antibacterial component. Vinyl wallpapers do not “breathe”, therefore, a favorable environment for the reproduction of microorganisms is formed behind them.
- Paint brushes for applying adhesive.
- Rubber roller for leveling foam patterned sheets or plastic spatula for smooth material.
- Rag or soft sponge.
- Stepladder (table).

Room preparation
Vinyl wallpaper is a demanding finishing material, when working with which it is important to withstand harsh temperature and humidity conditions.
- When gluing vinyl strips, you need to act quickly, so it is better to completely free the room from furniture.
- Then keep the temperature optimal for working with vinyl (22–25 °С) indoors for 24 hours.
- Before you start pasting, you need to de-energize the room.
Advice. If the room is too hot and dry, this will disrupt the drying of the coating. Water containers placed in the corners will help to humidify the air, and in the heating season - wet towels on batteries.
Calculations and markup
Gluing wallpaper on the ceiling is more difficult than on the wall, only because more physical effort is applied. The sequence of actions when gluing vinyl sheets is as follows:
- The direction of the stripes is determined. To make the joints as invisible as possible, the strips are glued towards the window from the opposite wall.
Note! If there are two or more windows on different walls in a room, it is recommended to follow the path of reducing the number of joints, i.e., place wallpaper sheets along a wider wall.
- The dimensions of the room are measured and strips of the desired length are cut with a margin of up to 10 cm each (depending on the footage of the wallpaper in the roll). "Tails" when gluing are brought to the wall, and after drying, they are carefully cut off.

Important! If the pattern does not require joining, you can cut the entire tube into strips at once. In the case when the elements of the image must be combined, each next piece is measured after being applied to the already cut strip.
- Since vinyl wallpapers are glued only end-to-end, it is recommended to mark the surface of the ceiling and strictly follow the drawn lines during work.

Sticking vinyl wallpaper on the ceiling: step by step instructions
When the preparatory work is completed, we act depending on the type of canvas chosen.
For non-woven base:
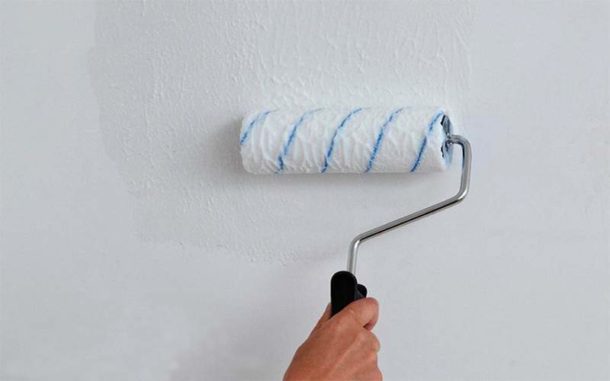
- The adhesive solution is evenly applied to the ceiling.
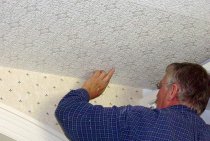
- Immediately, until the glue has dried, a dry vinyl sheet is applied, carefully leveled with a spatula or roller from the center to the edges.
- Excess glue is removed with a soft sponge or rags.

Note! When diluting wallpaper paste, you must strictly follow the instructions, carefully observing the proportions, the time of infusion and the method of dilution. An indicator of the quality of the finished solution is the absence of a sharp unpleasant odor.
For wallpaper on paper basis:
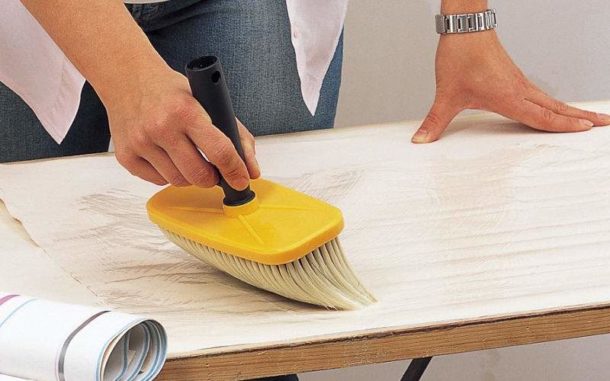
- A strip of material is spread on a table or floor with a pattern down.
- Glue is thickly applied to the canvas.
- The sheet is folded in half with the combination of the oiled surface or "accordion", the time indicated on the roll label is noted.
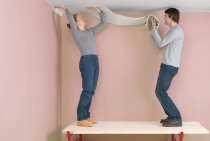
- The canvas is carefully applied to the ceiling along the marking line. With this type of wallpaper, you can’t do without an assistant who will support the free edge of the canvas.
- Air is expelled from under the coating with the movements of a roller or spatula.

Important! Vinyl wallpaper can stretch when wet, so you need to handle it carefully, and apply the glue in the same amount to each strip so that the joints are even.
Further, regardless of the type of wallpaper, we proceed as follows:
- The joints of the strips are additionally coated and ironed with a roller for maximum grip.

- After completion of work, without changing the microclimate in the room, the wallpaper is left to dry for at least a day.
Note! Possible defects in work at height are noticeable only from below, after gluing each strip it is better to go down and evaluate the quality.
Important! If used wallpaper for painting, then before painting, wait for the ceiling to dry completely.
The most difficult thing is to lift and attach the wallpaper to the ceiling so that it does not tear, wrinkle or stretch. To understand how best to do this, the training video will help.