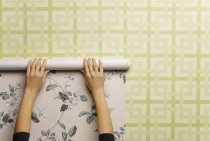
Wallpaper on the ceiling is beautiful and original, especially if the canvases have an interesting pattern or texture. That's just gluing the ceiling surface may not be the easiest thing to do. But when it comes to interlining, the task is greatly simplified. With it, you can save time and effort on rough preparation. And the gluing process itself will pleasantly surprise those who are used to paper canvases with its simplicity. Let's find out how to properly glue non-woven wallpaper on the ceiling with an assistant and alone.

The nuances of working with interlining
Non-woven fabrics compare favorably with similar finishing materials in some properties that greatly simplify working with them. So, non-woven wallpaper:
- do not stretch and do not form bubbles;
- tolerate repeated staining without losing quality;
- able to hide small irregularities in the ceiling;
- do not tear like paper ones, it is easier to glue them than vinyl ones;
- suitable for all types of ceilings;
- glued end-to-end, as a result of the seams are practically invisible;
- they do not need to be coated with glue, which only processes the surface to be glued, while the canvases are applied to it dry.

Note! Non-woven wallpaper is sometimes confused with vinyl, therefore, various harmful properties are attributed to them. In fact, non-woven fabric is as environmentally friendly and vapor permeable as paper, but it is more durable. 70% of its composition is cellulose fibers.
Necessary tools and materials
To qualitatively glue wallpaper on the ceiling, you will need:
- carpenter's pencil;
- roulette;
- metal ruler;
- wallpaper knife;
- square;
- scissors;
- construction mixer or wooden stick;
- plastic and metal spatulas;
- brush;
- brush;
- paint bath;
- rollers: paint and wallpaper for processing joints.

For non-woven wallpaper, starch glue with methylcellulose is needed, which is characterized by plasticity and bond strength. For the ceiling, it is prepared 10-15% thicker than for the walls.
Ceiling preparation
This stage includes the following steps:
- First of all, it is necessary to turn off the power supply of the apartment on the switchboard and remove the chandelier.
- With a brush with metal bristles or a spatula, wallpaper, paint, peeling plaster are removed. Whitewash must be washed off completely - to the ceiling base. If there are stains, you need to get rid of them. Learn more about how to remove old coatings - here.
- With minor defects, you can limit yourself to putty, with serious deformations, you can not do without plaster leveling. About how to close up rustications (seams between plates) and cracks on the surface, it is written in this article.
- Then the ceiling should be primed. It is better to choose an acrylic-based composition.

Between the completion of this work and the start of wallpapering according to technology, a break is required for the surface to dry.
Tip: with significant irregularities on the ceiling, it is better to prefer drywall installation Less time and effort will be spent.
Marking: along or across?
To stick wallpaper without distortions, the ceiling must first be marked. In which direction the stripes will be directed depends on the goals set by the hosts.
- If everything needs to be done extremely simply, saving time and effort, it is optimal to glue the wallpaper along a short wall. It is easier to work with small panels.
- With the task of making the joints invisible, the wallpaper should be placed perpendicular to the window - in the direction in which sunlight falls into the room.
- When it is necessary to minimize the number of wallpaper seams, stripes are placed along a long wall.
The issue of orientation must be decided in advance and only after that a guide should be drawn along which the first wallpaper strip will be pasted.

Strip cutting
Non-woven wallpaper can be glued directly from the roll, but when decorating the ceiling, pre-cutting the required number of sheets would be a better option. Their number is calculated based on the size of the ceiling, the width and length of the wallpaper rolls. Allowances for both sides (5-6 cm) and rapport are also taken into account.
For cutting you will need a sharpened knife. The prepared canvases are numbered and folded in the desired sequence.
Sticker Order
The technology for gluing non-woven fabrics to the ceiling is as follows:
- Glue is applied to the ceiling with a roller. It is necessary to ensure that the entire surface where the first strip will be pasted is evenly covered with it. At the joints with the walls use a brush.

- The wallpaper panel, rolled up into a loose roll, leans with its edge against the ceiling and is straightened with a plastic spatula strictly parallel to the wall. If you are afraid of making a mistake, you can make a small overlap on the wall or baguettes. Subsequently, it is cut off with a sharp blade.

- Carefully rolling out the roll, the canvas is straightened and laid on the ceiling without squeezing out the glue from under it. While there is a lot of glue under the wallpaper, the canvas can be trimmed if necessary. When the strip is glued, smoothing movements begin to distill excess glue and air bubbles.

Important! There should be no drafts in the room - the main enemies of freshly glued wallpaper.
- Then the wallpaper is carefully cut. A spatula or ruler is pressed into the corner between the baseboard and the ceiling with pressure, the excess is removed with a wallpaper knife.
- When sticking the following panels, check their joining. If an error occurs, non-woven wallpaper goes towards the master - they can always be pulled up.
- The joint is rolled with a plastic roller.

- At the location of the chandelier, a cross-shaped incision is made, a wire is threaded through it and the wallpaper is firmly pressed to the surface.
Tip: it is advisable to paste over the entire ceiling at a time: it will be possible to correct the docking lines before the wallpaper is firmly attached.
Painted ceiling
When the pasted wallpaper is guaranteed to dry, you can start painting them. Suitable for this purpose:
- water emulsion;
- latex paints;
- water-dispersion paint materials.
Painted in two layers: the first is applied perpendicular to the wall with a window, the second - parallel to it. With this method, stripes on the ceiling are not formed. All ceiling decor is installed in advance and painted at the same time as the wallpaper.

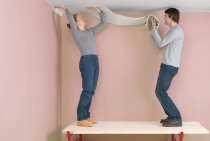
Is it possible to paste over the ceiling with interlining alone?
Usually, helpers are looking for wallpapering on the ceiling. Indeed, it is extremely difficult to cope with paper or vinyl wallpaper on your own, but interlining makes it possible even when the wallpaper is glued to the ceiling.
There are a lot of videos on YouTube devoted to sticking non-woven wallpaper without assistants, in which people share their experience on how to wallpaper the ceiling with their own hands. And not ordinary, but wide, meter format. When applying glue, an assistant is by and large not needed, as well as when cutting wallpaper. It is quite possible for one person to attach the beginning of the roll to the ceiling and gradually roll it out, smoothing the glued surface with a roller with the other hand.
Cost of work
The price of gluing non-woven fabric is low: 2 times lower than for paper and vinyl sheets. Approximate prices for Moscow - 120-170 rubles / sq. m. m. Pasting the ceiling is a more laborious process compared to the walls, so the price will increase by about 50%. In addition, it should be borne in mind that surface preparation works - dismantling of coatings, leveling, priming - are not included in this amount and are paid separately.