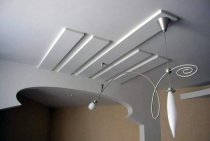
Due to its versatility, drywall has long acquired the status of an indispensable material when performing finishing work. People are accustomed to using it when leveling walls and building various architectural forms in rooms, since gypsum board is plastic and holds the shape it is given well. Do-it-yourself installation of drywall on the ceiling allows apartment owners to improve the sound insulation and thermal insulation of the room, as well as make the ceiling decoration completely unique.

Drywall - environmentally friendly material, absolutely harmless to humans, so it can be used in any room, including a nursery and a bedroom.
The need to create a ceiling drawing
Before proceeding with the installation work, you need to decide what type of suspended structure you will install. In apartment buildings, the height of the ceilings does not always allow the construction of structures consisting of several levels. You need to be prepared for the fact that even two levels will make the room 10 cm lower.
Therefore, it is better to first create your own design project, and only then proceed to the preparation of materials.
- The drawing is made to scale.
- It marks all the elements of communications, heating system.

- The layout of the fastening systems is drawn.
- Places for fixing drywall sheets are marked.
- The distance between the lamps is measured and the place of their installation is indicated. In this case, it must be taken into account that the standard built-in ceiling lamp has a height of at least 9 cm.
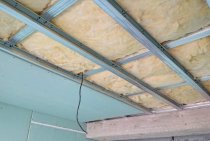
- In the case of laying under drywall sheets, heat and soundproof boards it is necessary to indicate their size and exact location. Mineral wool is placed in cells along the frame after its installation, clinging to suspensions.

What is needed for installation
To carry out installation work, you will need a certain set of materials and tools.
- Guide profile - UD, which is located in the corners and places where the ceiling meets the walls.
- The main ceiling profile - CD, is located around the entire perimeter of the ceiling, in increments of 40 cm.
- Fasteners for the main profile - CD hangers and spacers, make it possible to lower the ceiling covering 10–12 cm below the floor slab.
- Drywall sheets, which are selected in accordance with the purpose of the room in which the structure will be installed. Simple GCRs are gray, and moisture resistant ones are green. It must be remembered that for the installation of drywall on the ceiling, sheets with a thickness of 8–9.5 cm are taken.
- Sealing tape, used to improve sound insulation when installing the frame.
- Levels - laser and bubble - as well as a masking thread for precise marking of lines.
- Seam putty, acrylic primer and reinforcing tape will be needed to seal the seams in the last stage of finishing work.
- Perforator, electric drill and electric screwdriver.
- Self-tapping screws for metal, self-tapping screws with a washer and dowel-nails are all necessary fasteners.
- Roulette, spatula, hammer, knife-cutter.

Profile framing assembly
Installation work is carried out in the following order:
- It is necessary to find the lowest corner in the room, for this the height of the room is measured in all corners. How this is done, you can see on the video.
- According to this angle, the horizontal is measured and marked with a level. If the line is drawn correctly, then the end of the line will come to its beginning. If it is necessary to lower the level of the drywall construction below, the required distance recedes from the lowest point of the ceiling.
- Along the line, every 40 cm, holes are drilled for attaching dowels and guide (UD) profiles are installed.

- The video clearly shows how parallel lines are drawn on the ceiling at a distance of 60 cm, holes are drilled for mounting systems and then suspensions are fixed. It is better to pre-calculate the attachment points of the suspensions so that they match the dimensions of the plasterboard parts.
- The main profiles (CD) are inserted into the guide profiles and mounted on suspended structures to the ceiling.
- If there is a need to dock the GKL, then secondary profiles are attached to the main profiles, this process can be viewed on the video.
- When assembling the frame, constant use of the level is required so that the base is perfectly flat.
- After the installation of the frame is completed, the wiring for the future lighting system is laid in it. In the places marked on the drawing, the ends of the wires are displayed for further attachment of fixtures to them.

The process of installing plasterboard on the ceiling and sealing the seams
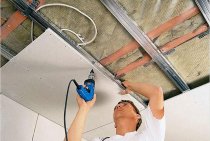
If the drywall construction has a complex shape or the installation is being performed for the first time, then it is better to assemble the ceiling with an assistant.
Before work, the material must be kept in the room where the installation will be carried out for at least 2 days. The sheet can only be stored in a horizontal position.
GKL installation on the ceiling is as follows
- The end sheets are hemmed. To do this, 2-3 cm recede from the wall.
- The next row is staggered in relation to the first. This is clearly seen in the image and video.

- Self-tapping screws are screwed into drywall parts at a distance of 20 cm, while the screw head should be slightly recessed into the sheet.
- The joints should not come closer to the outer corners of the ceiling than 10 cm.
After completion of the installation of sheets on the ceiling, it is necessary to dilute a special putty and seal all seams near the wall, joints and caps of self-tapping screws. When the seams are dry, they stick a sickle on them and putty again. This is done to eliminate the likelihood of cracks on the ceiling in the future.
Further, the surface of the suspended ceiling is puttied in the usual way. The final layer is performed to prepare the surface for fine finishing work.
Price
Installation of GKL on the ceiling in one layer will cost an average of 450-600 rubles / m2 in Moscow and St. Petersburg, although some companies offer cheaper services. Fastening drywall in 2 layers - 600–700 rubles / m2.