A plasterboard ceiling is the best solution for those who want to tidy up the ceiling surface on their own, but are not eager to mess with plaster or buy an expensive heat gun for a stretch PVC sheet. Let's find out how to make a false ceiling from plasterboard sheets and get acquainted with the instructions explaining in detail how to fix drywall to the ceiling correctly.

When should you choose drywall?
Suspended ceilings made of plasterboard sheets will be the right choice if:
- the work needs to be done quickly and with a minimum of effort - installing a plasterboard ceiling is much easier for a beginner than plastering, besides, you do not have to wait for each layer of mortar to dry;
- it is necessary to hide wires and communications;
- you want to use spotlights;
- it is required to make sound or heat insulation - it is convenient to hide any insulating material behind the drywall on the ceiling;
- there is a need for a perfectly flat ceiling surface in the absence of skills in working with plaster.

If you are already seriously thinking about how to make a drywall ceiling, take into account some of its disadvantages:
- Like any false ceiling, it will reduce the height of the room.
- Plasterboard ceiling sheathing involves the mandatory use of tools such as a puncher, a screwdriver, as well as a laser or water level.
- Cracks may appear at the joints of the GKL over time.
- Aligning the ceiling with drywall cannot be done alone.

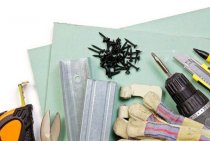
Work materials
Before we begin to figure out how to make a drywall ceiling, let's find out what needs to be prepared before starting installation. We will need:
- GKL sheets thickness from 8.5 to 9 mm. If you plan to make a false ceiling in the kitchen or bathroom, then you need to choose a moisture-resistant material - GKLV.
- Ceiling profiles (PP or CD) 60 X 27 mm.
- Ceiling guides (PNP or UD) 28 X 27 mm.
- Dowels and screws, anchors.
- Special hangers.
- Cross-shaped fasteners for connecting perpendicularly joined profiles - "crabs".
- Sealing self-adhesive tape for a snug fit of the frame.

You can also make a suspended ceiling from GVL - gypsum fiber sheets, which are durable and non-combustible, but in this case, reinforced profiles will be required, since this material has a fairly large weight.
Tools
How to sheathe the ceiling with drywall using the available tools? The minimum you need:
- roulette;
- laser level or hydraulic level;
- pencil;
- perforator;
- screwdriver;
- hammer;
- knife for cutting sheets;
- metal scissors;
- marking cord.

If we are talking about how to make a false ceiling from start to finish, you need to remember about the tools and materials for its processing and puttying, which include:
- spatulas;
- grinding mesh;
- mesh grater;
- serpyanka tape for joints;
- putty;
- primer.
Preparing for installation
Before you start leveling the ceiling with drywall, you must:
- Completely complete the work on leveling the walls in the room: in the places where the profile is attached, the surface must be absolutely flat.
- Make a design sketch for an accurate calculation of the amount of materials (profiles, sheets, self-tapping screws, fasteners). The scheme of the plasterboard ceiling frame with a calculated step between the elements of the crate will help to avoid a situation where the edge of the sheet does not match the profile, and it cannot be fixed.
- Eliminate base surface defects. Despite the fact that drywall ceilings will hide it, this step is necessary to prevent the old coating from crumbling.Before attaching the profile to the ceiling, repair cracks, clean crumbling areas, apply a deep penetration primer.

Finishing the room is done after the suspended ceilings are installed.
markup
Installation of a plasterboard ceiling is unthinkable without preliminary marking. The goal is a perfectly flat horizontal line, perpendicular to the floor and running along the perimeter of the entire room. It will serve as a guideline for setting the start profile. To correctly markup, you must:
- Decide on the height of the plasterboard ceiling. For a design with spotlights, the surface will have to be lowered by at least 8 cm, if they are not used, a gap of 4-5 cm will suffice.
- Find the lowest point of the base ceiling surface. To do this, you need to measure the height of the ceiling in all corners and in the center of the room. The smallest height is marked on one of the walls with a tape measure and a pencil, then the distance is laid off from it, by which the plasterboard ceiling will be lowered.
- The resulting height is transferred to each wall, the points are connected by a horizontal line using a chopping cord.

When marking the surface for a plasterboard ceiling, it is much more convenient to use a laser level.
For marking under the main profiles for a plasterboard ceiling, you need to consider 2 points:
- The edge profiles should be at a distance of 20–25 cm from the walls.
- Step between profiles - 40 cm.
Hangers can be placed at a distance of 50 cm from each other, extreme - 25 cm from the walls. To mark the anchor points, attach the hangers to the ceiling and mark 2 points for each.
Frame mounting technology
The installation of the frame begins with the installation of guide profiles:
- The guide is applied with the lower edge to the line, marks for dowels are made through the holes in the profile.
If there are no holes on the edges of the profiles, you need to step back from its ends by 10 cm and make them yourself.
- Holes are drilled with a perforator.
- A sealing tape is glued to the profile, it is fixed with dowels on the wall.
The false ceiling is fixed with the help of hangers, also pasted over with sealing tape, fixed with anchors.

The carrier bars are fixed on the hangers, the ends of which are inserted into the guides. After fixing the profiles on both sides on the hangers, their free ends are bent.
If the length of the profiles is not enough, you need to use special extensions designed to connect two strips.

If you are making a false ceiling in a bathroom or corridor, following these instructions will be enough. Suspended ceilings for the kitchen, living room or bedroom, that is, for larger areas, will require the installation of additional transverse profiles, to which the short sides of the GKL sheets will need to be attached. Perpendicularly joined profiles are fixed with the help of "crabs". The result should be a lattice frame.

Sheathing the frame with drywall
Before sheathing the ceiling, you need to take care of the communications. The wires are placed in a corrugated pipe, wiring is carried out for lighting fixtures.
GKL sheets are cut out on the floor in a horizontal position, holes for lamps are cut out.
Is it possible to install drywall on the ceiling yourself? Yes, but only when using a lift, without special devices, only the frame can be assembled alone. It is most convenient to level the ceiling with drywall with the participation of 3 people: one must submit the sheet, two must accept it, lift it and apply it to the frame.

The prepared sheets are applied to the frame in such a way that their edges are joined in the center of the profiles, and screwed with self-tapping screws:
- the distance from the edge of the sheet to the attachment point is 1–1.5 cm;
- the gap between the screws is 10–15 cm;
- screwing depth - 0.5 cm (from the edge of the sheet to the cap).

Important points to consider when fixing drywall to the ceiling:
- There should be a chamfer on the edge of the sheets at the joints, if not, you need to do it yourself with a knife or a special planer. The sheets should fit snugly enough to each other, the gap between them should be from 1 to 2 cm.
- Since some of the drywall sheets will most likely need to be cut, when deciding how to sheathe the ceiling, it's best to start by securing whole sheets. When this part of the work is done, you can more accurately determine the size of the cut sheet.
- A small gap of 0.5–1 cm must be left between the sheathing and the wall.

putty
After the suspended ceilings are installed, it remains only to finish them. First of all, it is performed puttying plasterboard according to standard technology, the same for all types of plasterboard structures:
- The joints are closed with reinforcing tape.
- Seams and points of entry of self-tapping screws are puttied.
- After the putty has dried, the seams are rubbed with a special mesh, the entire surface of the plasterboard ceiling is primed, and finishing putty is applied to it in a thin layer.
After the putty has dried, it must be sanded. Then the plasterboard ceiling is primed again and painted or wallpapered.
Now you know how to make a false ceiling from plasterboard sheets. This process should not cause you any particular difficulties, if you strictly follow the instructions, everything will definitely work out.