Drywall finishing is an excellent option for leveling walls, especially when they have significant irregularities. But due to the characteristics of the material, which is separate sheets that are joined together, immediately after installation, the surface cannot be perfectly smooth and uniform. For sealing and leveling the joints of the plasterboard, corners and seams at the attachment points, a mandatory drywall putty is required.

The method of processing joints is selected depending on which decorative material will be used for decorative finishing: wallpaper, paint or tile. Usually, do-it-yourself plasterboard puttying includes several successive steps:
- GKL primer;
- leveling the surface and sealing the seams;
- starting putty;
- finishing putty;
- grinding.
The choice of putty for drywall
Ideal for preparation drywall For a fine finish, you will need two types of putty: finish and start, although you can use a universal mixture. The starting one is needed for sealing the seams, the finishing one is for the final leveling of the coating.
Tip: when choosing a putty, give preference to dry mixes. They are less demanding on storage conditions and can be used in doses.
Ready putty mixtures, depending on the composition and properties, are divided into several types.
Gypsum putty
Advantages:
- is the most common and optimal option;
- consists of natural material;
- practically does not shrink;
- dries quickly;
- easy to level;
- diluted with water.
Flaws:
- has low water resistance;
- from changes in humidity can crack;
- not suitable for rooms with high humidity.
cement putty
Advantages:
- excellent water resistance;
- perfectly tolerates temperature changes;
- Suitable for wet areas such as bathrooms.
Flaws:
- strong shrinkage;
- the formation of microcracks after drying;
- high consumption due to the need to make more layers.
Polymer putty
Advantages:
- suitable for any premises;
- creates a smooth surface - an excellent option for finishing;
- does not shrink;
- low consumption.
Flaws:
- High price.
Tip: if you are going to glue tiles or wallpaper on drywall, you can choose a more budgetary putty mix.
Materials and tools
Puttying plasterboard walls does not require a large number of expensive tools. For work you will need:
- special serpyanka tape for reinforcing seams;
- primer;
- a pallet or other container for a primer;
- putty starting and finishing;
- roller or wide brush;
- wide and narrow spatulas (30-35cm and 12-15cm);
- construction mixer or electric drill with a nozzle;
- abrasive mesh and sandpaper;
- container for the preparation of putty.
GKL primer
Some people skip the priming step, but it is better to give it due attention. Primer allows you to increase the durability of the GCR, creating a protective film on the coating. During the subsequent wallpapering of the walls, the primed drywall will not absorb the wallpaper paste.
Surface priming occurs as follows:
- The walls are prepared - cleaned of dust and any contaminants. It is acceptable to use a damp sponge.
- The roller is dipped into the prepared solution poured into the tray. The primer should be evenly distributed over its surface.
- The entire surface of drywall is primed. The primer must be applied evenly, avoiding streaks.
- Particular attention should be paid to the joints.
Be careful! Do not use alkyd primers, they deform and destroy the top layer of GKL.
Preparing the wall for plastering
After the primer dries, care must be taken to ensure a smooth surface of the wall. Self-tapping screws on which drywall sheets are attached should not stick out and at the same time should not be strongly recessed into the wall.
Tip: if the self-tapping screw is deepened too much, it must be removed and a longer screw screwed in its place so that the cap is flush with the surface.
Next, you need to make sure that at the joints of the GKL there is no detachment of paper from the gypsum layer. If such defects are found, the exfoliated material should be cut with a knife. The wrinkle that remains on the surface must be rubbed with sandpaper. If there are large chips at the seams, they will have to be primed and sealed with a special adhesive. The following work can be carried out only after it has dried.

In the event that there is no factory edge along the edges of the sheets, you will have to do it yourself. To do this, using a sharp knife, it is necessary to cut the edges at an angle of 45 degrees. This is necessary to ensure the reliability of the reinforcement of the seams.
The final stage of preparation will be gluing reinforcing tape to the corners and seams so that the seams run strictly along its center. Avoid unevenness when gluing it.

Wall puttying
The technology that guarantees the final result of drywall puttying must be strictly observed at all stages.
Dilute dry putty better in small portions, as it dries quickly. It is no longer possible to add water to a dried mixture. Calculate the volume of putty for half an hour of work.
We close the joints of the plasterboard
For rough leveling of the surface, a starting putty is used, which has a coarse-grained structure. It is not suitable for finishing.
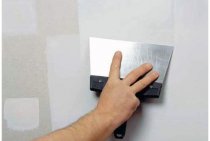
You can work with spatulas or a trowel with a grater, but for drywall it is better to use the first option. One spatula takes the solution, with the other it is applied to the surface. You need to start from the middle of the seam, gradually moving up and down.
For high-quality reinforcement of the joint, putty is applied with a spatula along the seam so that it evenly and completely fills it with mortar. It is very important to ensure that bumps, roughness and streaks do not appear in the process. It is very difficult to remove them after drying, moreover, during their removal, the sheet itself can be damaged.
In places of seams due to shrinkage, several layers of putty may be needed. After each application, clean the surface with an abrasive mesh or sandpaper.
Putting putty on self-tapping screws
To hide the screws, there is a trick: apply putty crosswise to fill the grooves of the hats. Then their heads will completely hide under a layer of putty. For this part of the work, use a small spatula.
We putty the corners
Puttying drywall in the corners has its own specifics. To evenly remove both sides of the corner, take your time and do the work in two stages:
- putty the first side of the corner in the usual way, be sure to wait for it to dry;
- apply the composition to the second side of the corner.
For strength, glue aluminum building corners on external corners, slopes of doors, windows and fix them with starting putty.

We work with the entire surface of the wall
After sealing the joints and screws, at least a day should pass. Then these places are processed with sandpaper until smooth. Medium-grained paper works best.
Wait for the mixture to dry completely and prime the seams again. Once the primer is dry, make sure the wall is level, thoroughly sanded, and completely dry.
Important! To achieve a high-quality result, after each stage of work, wait for the composition to dry completely.
Finishing or final putty consists in applying a special composition intended for these purposes. This putty has a white color and a pleasant fine-grained structure.
To get a thin and even layer, you need to apply the composition with sweeping movements, observing a uniform pressure of the spatula. Scratches should be avoided, small protrusions can be smoothed out later.

There is an opinion that when preparing drywall for wallpaper, finishing putty can not be applied, they will hold well anyway. But the fact is that when you want to change them, it will be extremely difficult to remove them, and in order not to damage the GKL, you will have to glue new wallpapers on the old ones.