A plasterboard partition with a door is the best solution to the problem of zoning space in a room, especially relevant for studio apartments. Massive brick walls are a thing of the past: cheap and lightweight drywall, the range of applications of which starts with leveling walls and ends with the construction of complex ceiling structures of the most incredible shapes, will allow you to create a partition with your own hands with minimal time and effort.

A few words in favor of drywall
Drywall constructions have a whole list of undeniable advantages. Here are some of them:
- Lightness - drywall will not create a large load on the interfloor ceiling in a multi-storey building.
- Environmentally friendly - the material does not contain harmful chemicals.
- Fire resistance - drywall contains asbestos fiber, which prevents it from igniting.
- Hiding communications - the wiring fits perfectly inside the frame.
- Free choice of wall thickness and configuration.
- Good soundproofing.
- Ease of dismantling.
- Nice price.

Necessary tools and materials
In order to make a plasterboard partition with your own hands, you will need:
- laser level or spirit level, plumb;
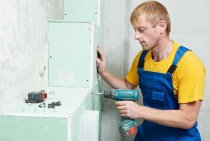
- screwdriver and screws;
- scissors for cutting metal, a knife for drywall;
- roulette and corner;
- planer with an inclined blade.

List of materials:
- High-quality metal profiles made of sufficiently thick steel - guides (uw) and carriers (cw). The ideal profile thickness is 75 mm. A profile with a thickness of 50 mm will not provide sufficient structural reliability, a 100 mm one will increase the thickness of the partition, which may be undesirable for reasons of space saving.
- Drywall. The type of GKL can be any: ordinary, moisture resistant, fire resistant. The choice will depend on the operating conditions.
- Wooden beams according to the size of the bearing profiles to reinforce the doorway.
- Fasteners: dowels, metal screws with a diameter of 3.5 mm and a length of 8.5 mm for connecting profiles, drywall screws with a diameter of 3.5 mm and a length of 25 mm.
Before starting work, you should calculate the amount of drywall required. To do this, you need to calculate the area of \u200b\u200bthe partition (2 sides), taking into account the doorway (stock in case of damage to the sheet).
We collect the frame for the partition
When creating a partition with your own hands, follow the following sequence of actions:
- Mark on the floor with a tape measure the location of the future partition. Using the level, continue it on the walls and ceiling.
- Focusing on the markings, fix the uw guide profiles on the floor, and then on the ceiling with the walls, which will serve as a support for the vertical posts. Depending on the coating material for fastening, you will need dowel-nails or self-tapping screws, the step between which will be 30–50 cm.
- Cut the load-bearing profiles to size, insert them into the lower and upper guides along the perimeter of the entire partition and securely fix them with self-tapping screws. There should be 3 racks per sheet of drywall: if the width of the drywall is 120 centimeters, the step between the profiles will be 60 cm.

- To increase the strength of the structure, a drywall doorway requires a gypsum plasterboard joint in the center, and not along the edge, so we begin the installation of load-bearing profiles with two racks that limit it. To further strengthen the opening, wooden bars must be inserted into these extreme racks.
Important! The drywall doorway should be 2 cm wider than the door frame.
- In a strictly horizontal position, install the upper jumper from the guide profile above the opening, which should be 1–1.5 cm above the edge of the future door block.The approximate height of its location will be 2.1 m.

- For the junction of the GKL in the right place above the opening, install a trim of the vertical carrier profile.
Tip: in order for the installation of the door into the plasterboard partition with your own hands to be successful, you need to prevent the structure from being skewed. When mounting each frame element, do not forget to control its position with a level and a plumb line, check the correctness of the angles with a square.
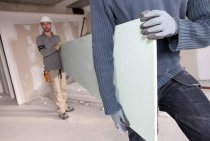
Frame sheathing
- First, sheathe one side of the partition. The height of each sheet must be taken 1 centimeter less than the height of the frame rack. Sheets should be fastened with self-tapping screws every 15-20 centimeters. The sheet of drywall should recede from the floor by 1 centimeter, you can use stands to maintain this gap.
Tip: cutting out a doorway is especially difficult, so it is best to screw the entire sheet and only then cut, focusing on the frame.
- Take care of laying communications. Attach the electrical wiring placed in the fire safety corrugation to the frame.
- Time to make sound and heat insulation: reinforce a material that combines the functions of a heater and a sound insulator, such as mineral wool, between the walls of the racks.
- Treat all wooden parts with an antiseptic.
- Sheathe the frame with drywall on the other side.
- At the final stage, using a drill and a crown, you need to make holes for switches and sockets and bring the wires out.

Important! Drywall sheets should be joined in the middle of the profile, and above the door, the drywall at the joint should not coincide with the edge of the vertical post.
Some subtleties of working with drywall
When creating a drywall partition with your own hands, use the following tips:
- The correct fastening of each sheet can be checked with a spirit level.
- Cut sheets during operation with a drywall knife, then chamfer along the cut edge with a special planer with an inclined blade. If there is no such planer, this can be done with an ordinary sharp knife.
- When drywall is laid with your own hands in two layers, the sheets are overlapped.
- Whole sheets must be fastened from the middle to the edges. This will make it possible to make the cut pieces invisible.
- Fixing sheets must start from the ceiling.
- Self-tapping screws should be "drowned" in the sheet by 1-2 mm.

- All joints of drywall and self-tapping screws are puttied.
- To prevent gypsum dust from irritating the mucous membranes of the eyes and nasopharynx, you should use a respirator. Also take care of high-quality ventilation in the room.
Installing the door in the opening
Installing a door in a plasterboard partition is usually done after all the finishing work has been completed.

- Insert the assembled door frame into the opening, set it strictly according to the level and fix it with wedges.
- Fix the box by screwing the screws into the profile through the pre-drilled holes.
- After making sure once again that the box is in the correct position, fill the gaps between it and the opening with polyurethane-based mounting foam.
Tip: so that the mounting foam does not deform the box during expansion, wedge it with jumpers.
- After the foam dries, cut off the excess.
- After a day, when the foam finally hardens, you can mount the door leaf.
For installation in a GKL partition, it is best to choose an interior door with a light weight. Accordion doors and sliding structures are perfect for these purposes, an additional advantage of which is space saving.