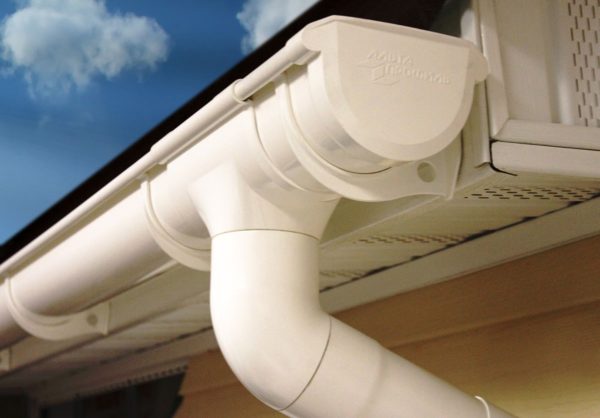
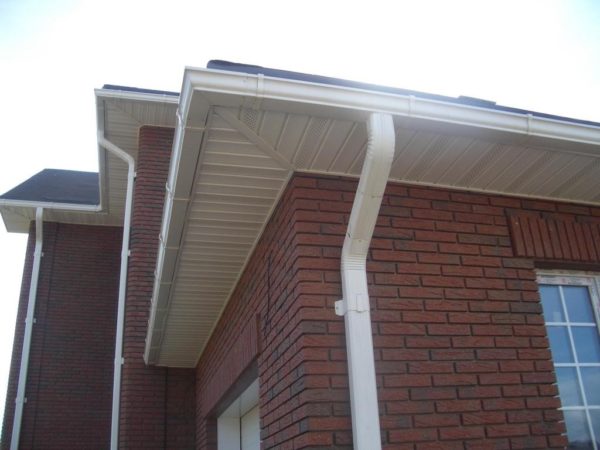
Installation of gutters
Before installing the horizontal part of the drain, which is a series-connected gutters, you need to measure the total length of the eaves and mark the places where the brackets will be fixed. The distance between the brackets should not be more than 60 centimeters. If you have doubts about the strength of the plastic gutter structure, then the fasteners can be placed even after 30 centimeters, this will make the system even more durable and will not allow it to collapse in heavy rain or a lot of snow.
Then you need to determine the angle of inclination of the horizontal part of the system. To do this, you need to determine the position of the first and last brackets, and then stretch the cord between them. Following this, you need to make markings for fixing the remaining brackets, observing the interval of their placement.
The installation process of the gutter should begin from their edges, at the same time it must be taken into account that the vertical part of the drain pipe should be no further than 15 centimeters from the nearest mount.
Advantages of PVC over metal for drainage systems
Gutters for roofs of houses are made from various materials:
- polyvinyl chloride;
- steel with anti-corrosion galvanization;
- metal coated with polymers;
- copper;
The choice of a plastic base for a drain is more optimal for several reasons, the main of which are: lower load on the structure of the house and lower cost.
Many people believe that metal is much stronger and more reliable than PVC, but modern technology creates a modified and reinforced plastic that can work properly in constantly changing weather conditions. Companies with their own production, including Alta Profile, add modifiers to the composition of polyvinyl chloride, which seriously increase the stability of the plastic. The advantages of plastic gutters Alta profile are many:
Wide temperature range. Plastic parts are specially designed to withstand large drops.
This is very important for the climate of Russia, when the heat is suffocating in summer, and the frost in winter is crackling and penetrating. PVC from the company Alta profile retains its qualities from minus to plus 50 degrees Celsius
Important. You can be sure that in the summer the drain will not melt, and in the winter it will not burst
High strength characteristics. Naturally, PVC is inferior to metal in this regard, but this technological material easily withstands the loads that are placed on the drain during operation. If you install all the details of the system correctly, then the plastic drain will not be afraid of heavy melted snow falling from the roof in the spring.
Durability. In this indicator, polyvinyl chloride outperforms metal - if under atmospheric conditions, with regular contact with water, metal parts, even galvanized, last about 7-8 years, plastic drain - about 25 years.
Low weight of the entire structure
This is important because the greater the load on the load-bearing walls and foundation of the house, the faster they collapse. Given the weight of the entire roof (rafter system, roofing material), it makes sense to choose a drainage system made of plastic
Tightness. For a quality drainage system, this is of high importance. The absence of leaks protects against the ingress of liquid on the walls, the foundation of the building. Alta Profile creates systems with effective insulation of parts - all elements of the drain have rubber seals that prevent the flow of water even through minimal gaps.Special sealants are also used, which additionally protect against water.
Excellent conductivity. Plastic pipes have a smooth surface, which prevents the occurrence of blockages - leaves and other small debris, simply do not stick to the inner walls.
Attention. The surface is so smooth that even the ice is not able to catch on
Low noise level. PVC is made in such a way that it is well soundproofed and does not create noise when removing precipitation from the roof. This is an obvious advantage over metal gutters.
Easy installation. The whole design of the drainage system is logical. When buying an Alta profile kit, the consumer receives detailed instructions to install the system on the roof with their own hands.
Great look. A gutter is not just an impersonal mechanism for removing precipitation from the roof, now it is a design element that makes the house more beautiful.
What is important, it does not set off the architecture of the building, but emphasizes all the advantageous places. In addition to functionality, the system adds neatness and style to any home.
Low cost. This indicator is important for most Russian families, especially when building their own house, when the costs are already high. Plastic gutters Alta profile is an opportunity to purchase quality products at an adequate cost.
Description of the elements of the drainage system
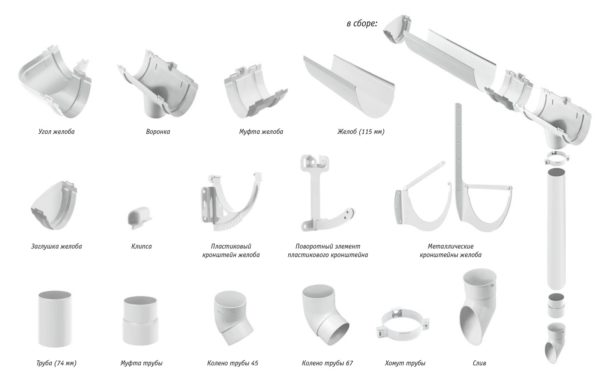
Before describing the installation process on the roof, you should find out what the drainage system generally consists of.
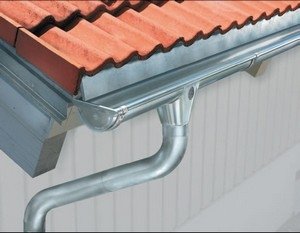
Gutters and pipes. They are necessary for the collection, removal of precipitation. Gutters are installed at the edge of the eaves so that water from the roof gets on them. They are mounted with a slight slope so that the liquid does not linger, but moves towards the pipes. Alpha profile produces these parts with a length of 3 m or 4 m. The pipe diameter is 8 or 10 cm.
Water funnels. This part, which connects the chute to the pipe, directs the liquid down. There are two types:
- internal funnels;
- external funnels.
The difference between them is that the installation of the former is more difficult - they are installed directly into the roofs (if they are sloping or straight). If the roof is pitched under a fairly steep slope, gutters with external funnels are mounted along its perimeter, which remove precipitation.
Attention. Pitched roofs are accepted in Russia, therefore systems with external funnels are used in the field of private housing construction. knees
They are used to connect funnels and pipes, they are designed to ensure high-quality drainage, because they are made at an angle of 45 degrees. There are also parts with an angle of 72 degrees
knees. They are used to connect funnels and pipes, they are designed to ensure high-quality drainage, because they are made at an angle of 45 degrees. There are also parts with an angle of 72 degrees.
At the edges of the roof, where the direction changes, corner gutters are used, most often with a right angle.
Protective grilles and plugs. The former protect pipes and gutters from getting large debris into them, which can create an obstacle to removing precipitation from the roof, the latter are attached from the edges of the gutters to isolate the system.
At the bottom of the pipe, for more convenient removal of liquid, drain outlets are mounted - being at an angle, they drain water from the roof away from the foundation.
Brackets, clamps, couplings for attaching parts to the roof and walls of the house.
The most common mistakes in the installation of drainage systems
 When installing the drainage system yourself, you must carefully adhere to the technical recommendations at each stage.
This will help you avoid common mistakes:
- the distance between the brackets should not exceed 60 cm in order to avoid deflections at the maximum load on the drainage system;
- it is impossible to pinch the pipe with clamps in order to give it the opportunity to expand or contract under the influence of ambient temperature;
- if the geometry of the house contains internal corners, in which a drain pipe can be located, which is rather difficult to maintain and carry out preventive measures in the future, and there is a possibility of redistributing water flows from the roof, then it is better to avoid installing it inside and transfer it to external corners or place it in the middle .
The presence of a drain ensures the drainage of water from the roof, protects the facade of the walls, but the final withdrawal of water can be provided by the arrangement of a system such as a storm sewer.
Mounting brackets
The correct answer to the question of how to properly fix gutters depends entirely on the type of system and the properties of the building itself. During the construction of the drainage system, the following installation options are used :
- Mounting brackets in a horizontal plane on the roofing frontal board is used in the case of using plastic gutters.
- In the absence of a frontal board, the gutter is fastened to the rafter legs. If it is impossible to carry out this method, special brackets are used, adjustable in height of the studs.
- Quite often, installation is carried out with fastening to the bottom of the flooring or roof sheathing.
- The downpipe is fixed to the wall with clamps (plastic or galvanized).
The choice of mounting clamps is carried out taking into account the following requirements :
- fastening the clamp to the wall must be carried out with hardware with a working length of at least 50 mm;
- the depth of fastening should be selected taking into account the heat-insulating layer of the wall;
- there must be a gap between the wall and the pipe.
You should be aware that when tightening the clamps, you need to leave a gap of 1 millimeter for possible thermal expansion of the downpipe due to changes in ambient temperature.
Fastening gutters to walls and roofs
During the construction of the roof, special attention should be paid to the drainage of water, for the purpose of which a drainage system is installed. Its main purpose is to protect the roof, facade and foundation from excessive water ingress.
The drainage system is fastened with clamps, which are attached to the wall with dowels. In most cases, the pitched roof of the building is equipped with a drain. It consists of the following components:
- gutters;
- drainpipes;
- funnel;
- additional accessories.
Gutters are classified according to the shape and material of manufacture. According to the shape of the gutter, they distinguish :
According to the material of manufacture :
In addition, they can have a very wide variety of colors, which allows you to choose the most harmonious option in each individual case.
During the calculations, the shape of the gutter must be taken into account, since it determines the usable area and, accordingly, the throughput. In addition, the material from which it will be made is taken into account, plastic elements during operation at low temperatures are very fragile and unreliable.
For this reason, the choice of these parameters should be approached very wisely.

Construction forms
The easiest way is to make a gutter with your own hands from painted or galvanized metal sheets. You can give it a rectangular or semicircular shape.
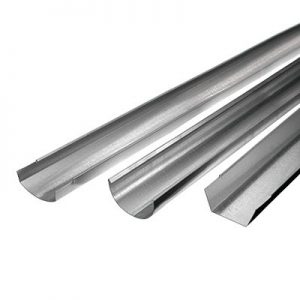 Most often, round gutters are installed.
You can make a semi-circular shape with a rolling tool by cutting a piece of galvanized pipe. First you need to cut the metal sheet of the desired size. To give sufficient rigidity and structural strength, its edges should be bent and connected with planks.
Similarly, you can make round pipes with your own hands. At the edges of the sheet should be bent (make folds). Then connect, and then bend with a mallet. A rectangular pipe can be made using a bending machine or a simple rail. The elements of the gutter system, made professionally, look beautiful.They can be purchased and installed with your own hands.
The resulting gutters with a slight slope are mounted around the perimeter of the roof and fixed. Connectors cut from a steel sheet are used at the joints of the gutters.
The procedure for installing downpipes made of polymer
To install a plastic pipe system for a drain, you need to perform work divided into several stages:
- Initially, it must be taken into account that the installation of the drainage system must be carried out at a certain angle with a slope in the direction of flow in order to exclude the possibility of water stagnation.
- Details of fastenings of the drainage system must be mounted during the construction process of the building.
- Directly during the installation of the system, gutters for the drain are first laid, connected to each other and funnels are installed to collect water. Covers are installed at the ends of the gutters.
- After completing this step, the vertical part of the downpipe is installed to the catchment funnel.
- The vertical section of the drain pipe is attached to the wall on pre-installed brackets.
Features of installing a water drainage system
The gutter is fixed to the building and the roof using special brackets. As a rule, the rule is accepted, according to which the gutter is fastened every meter
When calculating downpipes, take into account the fact that every 10 meters of the gutters must be equipped with one downpipe with a diameter of 100 mm. It is very useful to know the area of \u200b\u200bthe roof, and even better its projection
This is due to the fact that a roof with an area of 100 m 2 with a slope of 30 ° will receive more precipitation than the same roof with a slope of 45 °. It has long been established by specialists in the construction industry that every 100 m 2 of a roof projection must be equipped with one downpipe with a diameter of 100 mm.
Downpipes are also fastened with clamps, only of a slightly different type than for gutters. Very often, buildings and structures have a complex roof structure that requires additional installation of downpipes. In this regard, when calculating the drainage system, experts take into account the presence of gables, ledges, bay windows and other architectural features.
 One of the cheapest options for a modern gutter system is galvanized steel systems. They have good performance properties and long service life. The main advantage that distinguishes them from plastic systems is the preservation of all mechanical characteristics, regardless of the ambient temperature. Another important advantage is their low price and ease of installation. This makes it possible, even for people with average incomes, to independently equip themselves with a high-quality and inexpensive drainage system.
Especially often the question arises of how to fix the galvanized drain to the building. This can be done very simply with the help of special galvanized clamps and brackets available on the market. One of the design features of galvanized systems is the presence of a protective polymer layer under the paint. When this polymer coating is deformed, corrosion will spread very quickly throughout the damaged area. In this regard, during the operation and installation of galvanized elements, it is prohibited to use sharp objects and tools, as well as to carry out excessive bends and other operations that are dangerous for the polymer coating.
When choosing the color and texture of the drain, special attention should be paid to the color of the roof and facade of the building. The drainage system must harmoniously fit into the design of the structure and not spoil the facade with its appearance.
Otherwise, the drain should be hidden from the back of the house, which will be the best solution if it is impossible to choose the right color.When using soft tiles, experts recommend installing a plastic gutter system. This is due to the presence of a layer of mineral chips with abrasive properties. With large flows of water, it is washed into the drain, scratching the surface of the gutter, funnel and pipes, and this, accordingly, can lead to damage to the polymer coating and the development of corrosion.
Installation of gutters
To install the gutters of the drainage system, perform the following steps in sequence :
- according to the results of measuring the total length of the cornice, the need for gutters is calculated;
- the need for consumables is calculated in order to fix the drain to the roof;
- make markings for the installation of fasteners of the elements of the drain;
- install brackets on pre-designated places, taking into account the necessary slope of the gutters towards the funnels;
- fasten gutters to the roof using pre-installed brackets.
It is important to know that in order to carry out high-quality markup, you must have the following tool: a tape measure at least 3 meters long, a skein of thread, a level, a pencil
What are drainage systems made from?
Nowadays, the most popular materials for the production of gutters are plastic and metal. Each of these materials has a number of undeniable advantages and several disadvantages.
In the near past, gutter systems were made exclusively from one material - galvanized steel. It was widely used not only for the production of pipes and drainage systems, but also for the manufacture of roofing. Despite this, in recent years, galvanized steel in the construction market has increasingly been replaced by plastic structures.
The use of plastic products in the installation of drainage systems has several advantages. For example, the polymer can be molded into almost any color shape. This makes it possible, with the help of downpipes, not only to preserve the structure of the building from undesirable moisture effects, but also to implement any design ideas.
The designer himself can choose those plastic drainpipes that are best suited for the appearance of your home and will not stand out from the general background. Another important advantage of a drainage system made from polymers is their production in ready-made kits that can be easily assembled without the help of specialists.
It should be borne in mind that any ready-made set is usually more expensive than all the elements separately. You can save on this if you do not purchase ready-made structures, but make your own drainage system by choosing gutters and plastic pipes from the widest range in the construction markets.
One way or another, you need to know that a clear disadvantage of plastic drains is a weak level of resistance to regular frost and defrosting. It is necessary to think over the design of the plastic drainage system in such a way that the water in it does not stagnate and, most importantly, does not freeze in the winter. During winter thaws, snow melting can often be observed, while at night it is still quite cold in winter.
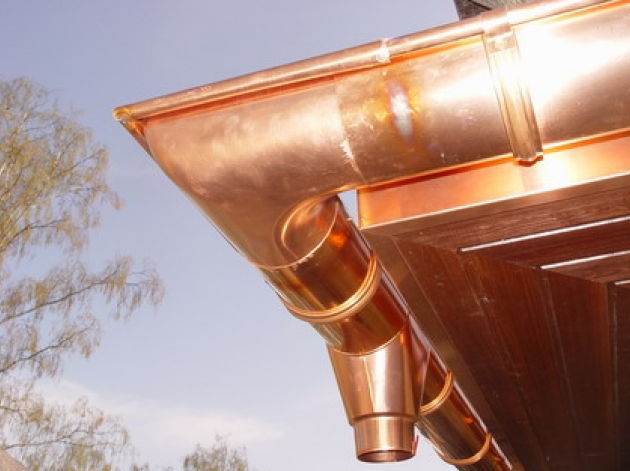
This can damage the polymer pipes and lead to the formation of cracks in them. Of course, in addition to the plastic systems that have become widespread in recent years, drainpipes can be made of other materials. There are gutters made of copper or other alloys on the market. However, often these designs are quite expensive and can seriously affect your budget.
With all this, the majority of Russians still choose a galvanized steel drainage system, due to their reliability and simplicity. Now an alternative solution has appeared on the market - metal structures coated with a polymer. They combine all the advantages of the two materials, excluding mutual disadvantages. But this could not but affect the cost of the product, these pipes are about 2-3 times more expensive than usual ones.
Drains from plastic bottles
It is not difficult to make a drain from plastic bottles with your own hands. From the point of view of aesthetics, such a system will be inferior to those made from purchased elements and even from plastic sewer pipes, however, in terms of functionality, home-made gutters meet all the requirements.
According to the masters, bottles with a capacity of 2 liters are best suited for these purposes, although containers of 1.5 liters can also be used. The neck and bottom are cut in such a way that an even cylinder of the maximum possible length is formed. After that, the cylinders are cut in half and overlapped with each other. Fixation is provided using pieces of wire or a stapler. For vertical pipelines, the bottles are cut so that the cylinders have a narrowing on one side. By inserting the cylinders into each other with the help of the narrowed sides, a pipe is obtained. Funnels can be made from cut necks. Gutters from plastic bottles are attached to building elements using wire rings.
 Scheme for the manufacture of drains from bottles
Horizontal gutters for additional rigidity can be installed on a wooden board pre-attached to the roof.
General rules for installing a drainage system
 In order for the drainage system to work effectively, certain rules and factors must be observed.
These factors and rules include:
- accounting for annual precipitation for a given area;
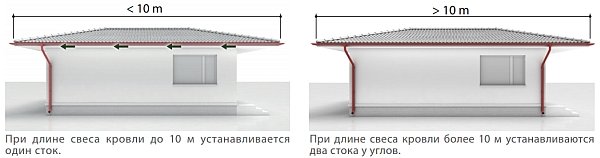
- architectural and geometric features of the building, the roof on which the drain is mounted. So, if the distance between the extreme points of the roof (overhangs) does not exceed 10 m, then it is enough to install only 1 pipe to organize a drain. For larger distances, more than 1 will be required, which can be installed not only at the extreme points.
- the material from which the roof and walls of the facade are made;
- taking into account the characteristics of the material of the elements of the drain.
In addition, it is necessary to design a drainage system or make a drawing. This will allow you to correctly calculate the materials for installation, as well as identify the features of the drain at the initial stage.
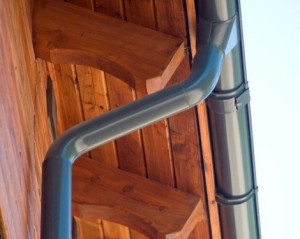
Fixing the drainpipe to the wall
Drainage systems are needed to collect melt and rain water from the entire roof, thereby protecting the surface of the roof and walls of the building from premature destruction. When installing a drainage system, you will definitely come across such a thing as fixing downpipes to the wall. The reliability of your entire gutter design will depend on the correct fastening.
Why do we need grips in the drainage system?
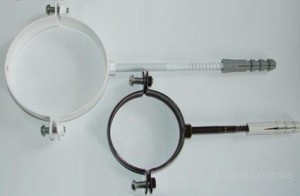
 Drainpipe grips are the key elements for securing a gutter system. This element is mounted with a pin in the wall of the building, and pipes are installed there. It is intended to ensure reliability when installing vertical elements of the drainage system and the grip should not allow pipes to deviate to the sides under the influence of wind and other power loads.To prevent rusting, the pins must be made of galvanized steel or coated with an anti-corrosion compound. Drain pipes are installed at a distance from the wall from 30 to 35 centimeters. Convenient bolted connections provide easy and quick installation of pipes. Grips are of three types:
- pin grip. Designed for fastening drain pipes to brick and concrete buildings;
- grip hardware. It is intended for installation of pipes on wooden constructions;
- Universal grip. It can be attached to both wooden and brick houses. It is also used for buildings made of sandwich panels.
For installation, you will need to know the diameter of the drainpipe and the depth that is enough to attach the tong pin.
Why do we need clamps in the drainage system?
 Clamps are used to attach drain pipes to the walls of the house. This is another name for the same grip. Clamps are made of metal-reinforced plastic or metal. Metal clamps are attached with one long hardware, and plastic fixtures have two attachment points. When choosing clamps, the following points should be considered:
Also read: Why water pipes hum
- the depth of fastening of the hardware, which should be at least 50-70 mm;
- the distance between the front wall and the pipe, since it is forbidden to attach the pipe close to the wall of the house;
- the thickness of the insulation layer on the facade of the building.
Important advice! You should never fasten the clamp in such a way that its hardware is in the insulation layer, this is a very unreliable fastening!
Rules for fixing the drainage system to the wall
 During installation, you must adhere to the following recommendations:
- pipes are mounted from top to bottom:
- in the wall of the house you need to make holes for attaching the pins to which the clamps are fixed;
- fasteners for downpipes are mounted at a certain slope;
When building a new home, fasteners are installed during construction.
- when installing the clamps, you need to make sure that they do not cover the pipe very tightly, especially for a plastic drain, otherwise the plastic will expand or shrink with temperature changes, and cracks will appear on the pipes.
- Fixing the drainpipe to the wall. Clamps for fastening
- Fixing a plastic pipe to a wall
- Fixing sewer pipes to the wall
Mounting brackets
The correct answer to the question of how to properly fix gutters depends entirely on the type of system and the properties of the building itself. During the construction of the drainage system, the following installation options are used :
- Mounting brackets in a horizontal plane on the roofing frontal board is used in the case of using plastic gutters.
- In the absence of a frontal board, the gutter is fastened to the rafter legs. If it is impossible to carry out this method, special brackets are used, adjustable in height of the studs.
- Quite often, installation is carried out with fastening to the bottom of the flooring or roof sheathing.
- The downpipe is fixed to the wall with clamps (plastic or galvanized).
The choice of mounting clamps is carried out taking into account the following requirements :
- fastening the clamp to the wall must be carried out with hardware with a working length of at least 50 mm;
- the depth of fastening should be selected taking into account the heat-insulating layer of the wall;
- there must be a gap between the wall and the pipe.
You should be aware that when tightening the clamps, you need to leave a gap of 1 millimeter for possible thermal expansion of the downpipe due to changes in ambient temperature.
Downspout fixture
The installation algorithm for drainpipes has already been described many times on various forums and construction sites. You can use the method of mounting the pipe "from the top", or you can use the "from the bottom" option.Let's start in more detail with the first method of installing a drain.
- Initially, it is necessary to determine the place of fixation of the uppermost fastener of the vertical part of the drainpipe. Be sure to take into account the dimension of the pipe elbow and the width of the overhang of the roof eaves. In a situation where the water intake funnel on the gutter is located quite far from the wall, it is recommended to make a bend on the vertical part of the downpipe, which can bring it closer to the wall. For this, finished parts are usually used - elbows with different angles and short pipe sections.
- It is necessary to fix the vertical part of the drain pipe no closer than 5 centimeters from the outer surface of the wall of the house. In this case, the bracket is initially installed on the upper section. Already from it, using a plumb line, a vertical line is marked along which the fasteners for the remaining sections of the drain will be located. The distance between the brackets on the vertical part should be about a meter.
- After installing the brackets, install a branch that will supply water from the gutter through the catchment funnel to the vertical part of the pipe.
At the end, you can proceed with the installation of this section of the drain. After fastening the vertical part at the bottom of the system, install the water outlet elbow
It is worth paying attention to the fact that the junction of the pipe and the outlet must be attached to the wall using a separate bracket. In some cases, the answer is not installed at the bottom of the pipe, and the pipe sends water directly to the storm sewer
Now consider the option of installing a drainage system according to the “bottom-up” principle.
- Initially, holes must be drilled in the wall for mounting the brackets.
- Marks are attached to the lower clamps (parts of the pipe with a cut corner).
- After the previous steps have been taken, you can proceed with the installation of the remaining links. Each part is attached with a separate clamp. If some section of the pipe is quite long, then special clamps should be installed for it. According to the rules, the interval between the clamps should be no more than 180 centimeters.
Manufacturers usually include all the parts that may be needed when performing the work with the sets of drainage systems. A manual is always attached to the design, after reading which you can understand how to properly install this particular type of drain. Models from different manufacturers may be mounted differently.
You may find it useful:
Choosing the location of drains and the necessary tool for installing a drainage system
The choice of a place for water drains is influenced by the length of the roof overhang. If the roof overhang is up to 10 meters long, one drain must be installed, with a roof length exceeding 10 meters, two drains are used.
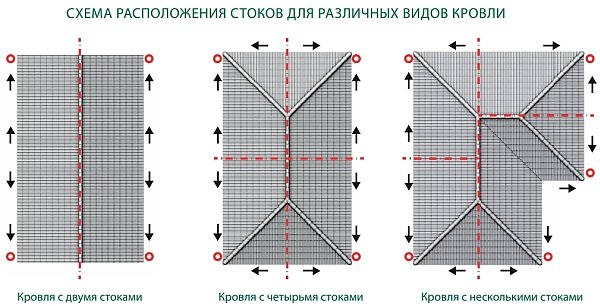
The location and installation of drains depends on the type of roof, and for proper installation with your own hands, you can use the diagram below.
To install a gutter with your own hands, you will need the following tool :
- spirit level (hydraulic level);
- hook bending tool;
- rope, tape measure, pencil;
- hacksaw for metal;
- rivet pliers;
- cordless drill or screwdriver;
- metal and rubber hammer;
- ticks;
- metal scissors.
Installation instructions for the drainage system
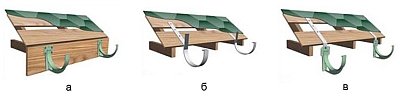
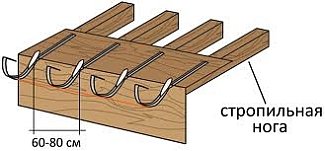
- Installation of the drainage system begins with the installation of hooks. Basically, they come in three types: short, adjustable and long. They can be attached to the bottom board of the batten, to the rafter or on top of the rafter. For each of the cases, different types of hooks are used.
- Calculate the angle of inclination of the hooks. The recommended slope must be 2-3 mm/m. Hooks are placed side by side, numbered and mark the fold line. Further, using a tool for bending the hooks, they are bent according to the markup.
- The installation of the first gutter hook is carried out in such a way that the distance between the imaginary continuation of the roof and the outer side of the gutter is 20 - 25 mm.
- Hooks are mounted at a distance of 0.8 - 0.9 meters with an inclination angle of 2-3 mm / m relative to the horizon. The installation starts from the edge of the eaves from where the slope relative to the horizon will go. The first and last hooks should be at a distance of 100 - 150 mm from the edge of the roof edge.
If the hooks are installed not on the frontal board, but on the rafter or on the last bar of the batten, then grooves are made to align the surfaces of the hooks with the surface of the rafter or batten.
- If it is necessary to make a hole in the gutter for the funnel, then mark the desired place with a pencil and cut a hole with a hacksaw. With the help of pliers, the funnel is given the necessary shape, and the burrs are removed. The place where the metal is cut is treated with a special paint to prevent corrosion.
The funnel is first attached to the outer bend of the gutter, and the fixing clamps are clamped from the inside. Next, the plug is installed on the end of the gutter using a rubber hammer or manual pressing. The assembled structure is installed on the hooks by pressing on each hook.
If possible, elements such as: funnel, end caps and corners should be installed before the final installation of the gutter on the roof.!
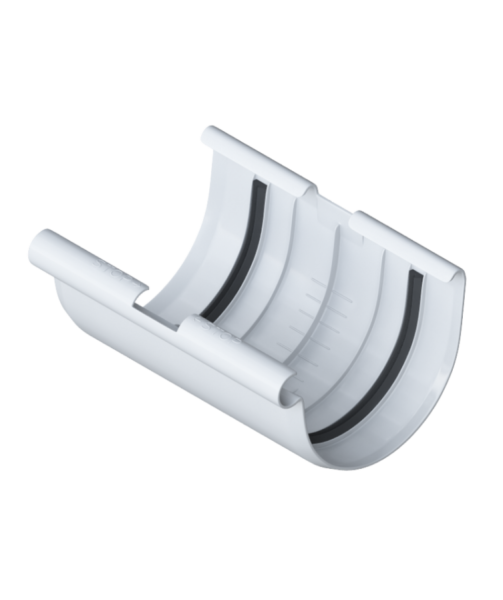
- The connection of the gutters occurs with the help of connecting locks. To do this, a gap of 2-3 mm is left between the ends of the parts to be joined. Sealant is applied to the rubber gasket in the form of three lines: one is applied in the center, the rest on the sides. The back of the lock is attached to the inner sides of the gutters. Next, the lock is pressed towards the outside to ensure a snug fit of the gasket to the gutters. Snap the lock and fix it by bending the clamping terminals. Residues of sealant must be removed.
- When installing internal or external corner elements, between the ends to be joined, it is also necessary to make a gap of 2-3 mm and connect using clamping locks, as indicated in the instructions above.
- Installation of drains takes place in previously designated places. For fastening pipes to the walls, clamps are used, which are fixed with dowels. The distance between the clamps should not exceed two meters. The pipe must be at least 40 mm from the wall. Pipe cutting must be done with a hacksaw.
If it is necessary to connect two elbows, then measure the distance between the ends of the pipes. 100 mm is added to the obtained value (in this case, “a”) for the connecting pipe to enter the ends of the elbows (50 mm for each elbow).
The drain finish elbow is fixed to the pipe with rivets. The distance from the edge of the drain pipe to the ground must not exceed 300 mm. This completes the plumbing installation.
We bring to your attention a video that will help you understand all the nuances of installation.
This manual describes the main stages of installing a gutter with your own hands. In each specific case, it is necessary to ask the supplier for instructions, since each manufacturer has slightly different installation of gutters.
Fastening gutters to walls and roofs
During the construction of the roof, special attention should be paid to the drainage of water, for the purpose of which a drainage system is installed. Its main purpose is to protect the roof, facade and foundation from excessive water ingress.
The drainage system is fastened with clamps, which are attached to the wall with dowels. In most cases, the pitched roof of the building is equipped with a drain. It consists of the following components:
- gutters;
- drainpipes;
- funnel;
- additional accessories.
Gutters are classified according to the shape and material of manufacture. According to the shape of the gutter, they distinguish :
According to the material of manufacture :
In addition, they can have a very wide variety of colors, which allows you to choose the most harmonious option in each individual case.
During the calculations, the shape of the gutter must be taken into account, since it determines the usable area and, accordingly, the throughput. In addition, the material from which it will be made is taken into account, plastic elements during operation at low temperatures are very fragile and unreliable.
For this reason, the choice of these parameters should be approached very wisely.