Pipes left in plain sight are not the best addition to the bathroom interior. In order for the room to have a neat and complete look, communications must be hidden. Moreover, it is desirable to do this in such a way as to have access to pipe connections, valves, meters and filters. The best solution to this problem would be the manufacture of a box. Consider how to make a pipe box in the bathroom from plastic panels.

Advantages of a plastic box
The structure for masking pipes can be made of plastic or drywall. Each of these options is good in its own way, but in terms of practicality, the plastic box is in the lead. It has many undeniable advantages:
- Possibility of quick disassembly without damaging the material. This property of a plastic construction is especially true for pipes joined with fittings and threaded connections, which are not immune from leaks. After the liquidation of a breakdown or scheduled maintenance of the pipes, the box is easily assembled back.
- No need for further finishing. Plastic panels themselves are already a finishing decorative material, unlike drywall, which requires final processing.

- Deformation resistance and ease of repair. The plastic used to make the panels is strong and flexible, so it's less likely to break than tiles that can be accidentally broken. Even if one panel is damaged, it is easy to replace it with a new one without damaging the entire structure.
- Moisture resistance. PVC is not afraid of water, does not rot, nothing will happen to the box, even if it is installed close to the bathtub or gets wet due to condensate that forms on the pipes.
- Ease of installation. The installation of the box will take only a few hours and will not require the use of expensive or specific tools.
- Affordable price. Plastic panels for bathrooms are one of the most inexpensive finishing materials.
- Spaciousness and compactness. Due to the small thickness of the panels, the plastic construction is very roomy and does not take up much extra space in the bathroom, which is especially important for a small room.
The plastic box is very practical: it can be disassembled and reassembled as many times as necessary.
Preparatory work
Before proceeding with the assembly of the box, you need to carry out several preliminary activities.
- Examine all the pipes that will be hidden. Eliminate defects while communications are in sight. If a new pipeline is being installed along the way, try to keep the number of connections to a minimum.

- Decide what kind of box in the bathroom will have. It can hide only a small area where the pipes pass, or take up a fairly large area. The advantage of the first option is to save material and no need to sacrifice free space. When choosing a more voluminous modification, additional space inside the structure can be adapted for storing things.
Tip: if you are going tile the walls, then it will be more convenient to first make a box. It will hide part of the floor, and you won't have to lay tiles in this place.
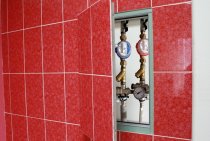
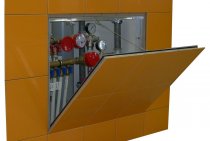
- Take the necessary measurements and make a drawing of the box. At this stage, provide such important additional elements as hatches for access to meters, valves and unreliable connections.
- Calculate the amount of material needed with a small margin.
It will be more convenient to dock the panels horizontally. In the vertical version, to ensure the rigidity of the structure, it will be necessary to mount additional transverse frame bars every 40 cm.
Necessary materials
To make a plastic box you will need:
- metal profiles for UD and CD frame;
- polymer panels;

- silicone sealant;
- plinths made of PVC for masking joints;
- inspection hatches-doors;
- self-tapping screws;
- sharp construction knife.
Making a box frame
Follow the instructions below when installing the frame structure.
- On the walls adjacent to the corner, install guides (UD profiles) that will set the dimensions of the box. Don't forget to use the level. To fasten the supporting profiles to the wall, use euro screws and dowels. If the surface is tiled, you can take metal screws 2.5 centimeters long and 3.5 millimeters in diameter. They are twisted into the seams between the tiles.
Tip: To save space in the bathroom, install the profiles closer to the pipes. The minimum distance is 3 centimeters.
- If the pipes run horizontally, place the profile parallel to the floor and fix it on it.
- Start forming the outer corner. From two UD profiles, twist the corner post. Direct their shelves in different directions at a right angle and connect them with small screws - “fleas”.

- Cut the carrier profile CD into pieces, the length of which will correspond to the dimensions of the structure. Fasten the corner stiffener to the wall. Insert the finished pieces of the profile with one end into the guide installed at the first stage, with the other into the stiffener. Thus, both parts of the corner are connected to the profile.
- Every 50 centimeters, add jumpers, which are necessary for the subsequent fastening of PVC panels.
- The second corner profile is attached in a similar way to another wall.

We sheathe the frame with PVC panels
After the supporting structure is ready, you can proceed to its sheathing. You need to do this in the following sequence:
- Install the start profile. Carefully, avoiding deformation, fix it with the help of "fleas" on the installed rail.
- Measure a strip of plastic panel to the desired length, cut it with a sharp knife.
- Fix one panel in the starting profile, attach the second to the corner profile and install it to the other plane of the box. To connect, use all the same "fleas", or "bugs".
- Assemble the other side of the box in the same way. Fix the starting profile on the last plastic panel, then fix it. If you do this with silicone, you can ensure that you can easily dismantle it in the future in case of an emergency.
- Cut inspection holes in those places where you need unhindered access to important pipeline elements: taps, meters and joints. Using silicone sealant, fix special hatches in the holes.

- The last step will be the installation of plastic skirting boards at the joints of the panels with each other, as well as with the floor, walls and ceiling.
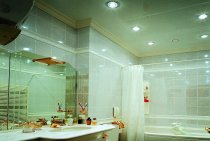
The piping box in the bathroom is ready. With the right color of the panels, it looks neat and harmonious even in combination with tiled finishes.