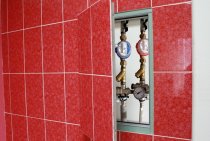
Why do we need inspection hatches for the bathroom and toilet? Equipping these premises it is impossible to do without summing up communications. Of course, the bath and toilet are places of individual use, but exposed pipes and hanging wiring "cut" the eye and significantly spoil the interior. Therefore, all plumbing connections are usually hidden under the facing material. It is impossible to completely block access to communications: you need to regularly write off meter readings and carry out maintenance. This opportunity is provided by sanitary hatches for the bathroom and toilet, the dimensions of which provide unhindered access to pipes and meters. In fact, these are decorative doors that do not stand out from the overall interior of the bathroom. The dimensions of these elements are standard, only the versions differ. Let's analyze in detail all the features of these plumbing products.

Varieties
Hatches for toilet and bathroom are presented on the market in four modifications. The key differences lie in the way the outer door opens. Let's look at each category in detail.
- Swing. This is a fairly practical, and therefore common design. Such plumbing hatches can be installed independently, without involving specialists. The product is a hinged door, which is fixed with suction cups or a locking handle with a rotary mechanism. Suitable for decorating with ceramic tiles and plastic panels.

- Sliding. Used for installation in confined spaces where swing doors cannot be used. When pressed, the hatch moves forward and to the side. It uses a magnetic locking mechanism. To open such an inspection hatch, special suction cups are used (included). Suitable for all types of tiles or bathroom mosaics.

- Pressure. This is a plumbing invisible hatch that opens with a simple click on the outer panel. The design uses a spring mechanism, which, when pressed, folds the door forward. Looks organically with any options for finishing the bathroom.

- Folding. Here, when you press the door, it leans back at an angle of 45 degrees, fixing on a chain with carabiners. This is usually enough to conduct a scheduled inspection of communications or write off meter readings. If you need to provide full access, for example, when carrying out repair work, the carabiners snap off and the hatch retracts to the side.

Installation methods
Hatches for the bathroom and toilet are classified according to the floor, ceiling and wall installation method. The basic requirements for products depend on this. For example, skylights are usually made of lightweight plastic or aluminum alloy to prevent accidental opening under their own weight. Such models are practically not used in residential premises, they are equipped with bathrooms of commercial buildings and industrial enterprises.
For floor structures, the strength of the frame and the outer door is mandatory. For their manufacture, steel is usually used that can withstand high loads. Models are optimally suited for country houses and cottages, providing access to basements with installed communications.

In apartment buildings, wall hatches made of aluminum, metal or plastic are often installed. Such models are easy to install and practical to use. Please note that such hatches can completely merge with the finish of the bath or toilet, or vice versa emphasize their presence.In the first case, the door is finished with a material similar to the general interior design, in the second case, the emphasis is on contrast. For example, if the bathroom is finished with white tiles, the hatch is made black.
Dimensions
Plumbing hatches are square or rectangular. Dimensions are usually standard, and do not depend on the design features and materials of execution.
Typical dimensions look like this:
- 100x100 mm.
- 150x150 mm.
- 150x200 mm.
- 200x200 mm.
- 200x250 mm.
- 200x300 mm.
- 250x300 mm.
- 250x400 mm.
- 300x300 mm.
- 300x400 mm.
- 400x500 mm.
- 400x600 mm.
The planting depth for all products is 35 millimeters.
Considering that the given dimensions may not meet the necessary requirements, some companies manufacture plumbing hatches according to individual sizes. For example, for the arrangement of a large communication hub, where repair and maintenance work is carried out by two specialists. Production time varies from 3 to 6 days, the cost of such products differs significantly from standard models.
Installation
You can install plumbing doors for the bathroom and toilet with your own hands. It is enough to make a little effort and follow the manufacturer's instructions exactly. Here is an approximate installation scheme, divided into several stages.
- Preparatory work. To begin, arrange plumbing cabinet. This is usually done at the place where the meters are installed. On this cabinet you need to install a frame for attaching a decorative hatch. If the basis of the box is drywall, the frame is fastened with self-tapping screws to the box. In the case when the cabinet is equipped in a brick or concrete niche, the frame is fastened with dowel-nails, the gaps between the frame and the wall are eliminated with mounting foam. Please note that when using mounting foam, the door is disconnected from the frame for 24 hours, this is how long it takes for the sealant to harden. Then the hatch is put in place, the locking mechanism and hinges are debugged.
- Facing. Finishing sanitary hatches is carried out simultaneously with wall cladding. In this case, it is worth considering the ratio of the size of the door and tiles. Usually a multiple number of tiles is used, or the hatch is closed with one decorative element. To ensure reliable adhesion of the door to the tile, you will need to pre-prime the surface. Liquid nails are used to glue the tiles. For high-quality fixation, the adhesive is applied to 50% of the area of the interlocking surfaces. The adhesive must not fill the space between the frame and the door. After facing, it will take several hours for the glue to harden, after which you can proceed to the next stage of work.
- Finishing. Unlike other walls, plumbing hatches do not overwrite. The edges of the door are pasted over with sanitary tape, leaving a small gap. The remaining free space is filled with silicone sealant, while leveling the applied layer. Then the adhesive tape is removed and the sealant is left for two days until completely dry. After that, an incision is made along the perimeter with a construction knife.
Helpful Hints
The arrangement of the bathroom is a rather complicated and painstaking work. Therefore, it is necessary to install plumbing hatches for the bathroom and toilet correctly, so as not to alter the door later, spoiling the lining of the room. We advise you to pay attention to the following nuances:
- When choosing a product, please note that the hatches are horizontal and vertical orientation. Therefore, before buying, it is necessary to make appropriate measurements.
- Be sure to use a level when installing.
- Given that the dimensions of the hatches for the bathroom and toilet are different, small structures can be installed as a whole, overall ones are usually disassembled into their component parts.
- When finishing with ceramic tiles, the lining is done directly under the door, leaving the bottom row for last.This trick will help to avoid distortions and fit all the decor elements in size.
These simple tips will help make the hatch in the bathroom or toilet less noticeable without spoiling the overall interior of the bathroom.