Overhaul of an apartment is rarely complete without such a procedure as leveling the walls. Even new buildings, not to mention old houses, do not differ in the ideal geometry of the premises. If a couple of decades ago this was not given due attention, today even walls are a prerequisite for quality repairs. At first glance, this is a complicated operation, but with patience, accuracy and following the step-by-step instructions, even a beginner is able to handle it.

Wall Leveling Methods
To align the curved walls in the apartment, you can choose one of two main methods:
- applying a plaster mixture;
- plasterboard lining.
Both methods have their advantages and disadvantages.
Pros of plastering
Plaster leveling technology has been used for a long time. Gypsum or cement-based mixtures are used.
The main advantage of plastering is the minimal reduction in the volume of the room.
Other important advantages of the method:
- You can plaster walls in any room, regardless of its purpose and internal microclimate.
- The material perfectly holds tiles and other finishing coatings.
- If necessary, partial leveling is applied with the application of the solution only in the required place.

Minuses
When choosing a leveling method, it must be borne in mind that the plastering method also has significant disadvantages:
- Plaster mixtures are recommended to level the walls with minor differences. Otherwise, it will be necessary to apply too large a layer of material, and this is expensive, time consuming and laborious.
- Plastering requires specific skills. A beginner will have to work them out during the repair process.
- The applied mortar must dry before finishing, which takes at least a week (time depends on the thickness of the layer).
Note! The whole process of plastering is accompanied by the formation of a large amount of dirt and dust. You will have to take furniture out of the room and cover already finished surfaces with a film to protect them from contamination.
Pros of leveling drywall
Due to the inconvenience of working with plaster today, most ordinary people prefer to level curved walls with drywall. Its use has the following advantages:
- It allows you to relatively easily and quickly fix the flaws of even a very curved wall.
- Drywall can be used to level walls made of any material: brick, concrete, gas blocks, wood. Plaster does not have sufficient adhesion to all surfaces.
- When using the frame method, it is possible to additionally insulate the walls or improve their soundproofing properties.

Minuses
Disadvantages of using drywall:
- Reducing the interior space.
- GKL does not tolerate prolonged contact with water. Even moisture-resistant drywall eventually loses its properties in such an environment.
- Careful preparation is required before finishing. This includes reinforcing the seams with a sickle mesh or paper tape and sealing them with putty, priming, puttying and grouting the plasterboard surface.
It's important to know! With insufficient quality processing of seams and violation of technology, cracks often appear at the joints of sheets.
Plaster leveling
Before leveling the walls yourself, it is advisable to find out the prices for this service from professionals. It is possible that the cost of plastering is not so high and it makes no sense to mess with them yourself, risking wasting time without achieving the desired result. In addition, specialists have the opportunity to apply a mechanical method of applying a plaster composition, which is practically inaccessible to a single master. By the way, machine plastering will cost 30–40% cheaper than manual plastering.Approximate prices for work in Moscow and St. Petersburg. - at the end of the article.

To avoid unpleasant surprises and get the desired result when contacting professional builders, it is important to draw up a contract correctly. It prescribes not only the price, but also the tolerances in accordance with GOST when performing work on leveling the walls. When drawing up a contract, you can rely on the requirements of SNiP 3.04.01-87.
If you decide to edit the walls yourself, then at the first stage you should assess the scale of the work ahead:
- If the irregularities of the wall do not exceed 5 mm, then it is quite possible to get by with one putty.
- Differences up to 5 cm can be leveled with both gypsum and cement plaster mixture.
- The layer of cement-based plaster can be up to 10 cm when using reinforcing mesh.

The use of plaster based on gypsum is also limited by the microclimate of the room: it cannot be used in rooms with high humidity, such as bathrooms, toilets and even kitchens.
- If the wall is completely curved, then a very large layer of plaster may be required. In this case, a more economical way would be to use a drywall frame structure.
It is important to choose a quality dry mix from a well-known leader for work. The firm "Knauf" has proved itself well in the Russian market. Gypsum plaster "Rotband" of its production is ideal for apartment renovation in terms of price / quality ratio.
Foundation preparation
To perform plastering with high quality, preparatory work is carried out:
- From the base plane remove elements of the previous finish: wallpaper, poorly fixed sections of old plaster, knock down ledges.
- De-energize and then disassemble the sockets. The wires are hidden in strobes or enclosed in cable channels.
- All elements that served to fasten suspended structures are removed from the wall: nails, screws, hooks.
- Deep cracks are expanded with a chisel, filled with cement mortar, and then sealed with putty.
- The entire surface of the wall is cleaned of dirt and dust.

Primer
A mandatory operation is carried out to improve the adhesion of the solution to the wall. It is recommended to use a deep penetration primer with antiseptic properties: it will not only strengthen the base and improve adhesion, but also prevent the appearance of mold or fungus.
Secret from the pros. Has proven to be excellent primer "Concrete-contact" with quartz sand. However, it must be remembered that it is used only under gypsum plaster. It is not suitable for the subsequent application of cement mortar, since, due to the properties of this material, it only impairs adhesion.
The composition is applied in a continuous layer with a roller. It is better to smear the corner with a brush, it is more convenient.

The primer is applied in two layers. Between their application, be sure to pause to dry the composition. Its period is indicated by the manufacturer on the packaging.
Displaying beacons
Wall plastering is recommended to be carried out using lighthouses. Their role is most often played by a metal profile having a T-shaped section. You can also use wooden slats. This is the easiest way, which does not cause any particular difficulties even for beginners.

Beacons are mounted on the wall, pressing them into sketched "cakes" of cement or gypsum mortar. Until he grabs, align the profiles with a level so that they are in the same plane.
It is important to choose the right distance between the beacons: the rule should move freely in the vertical direction, resting its edges on two adjacent profiles.
For the convenience of leveling the mixture, the extreme beacons are not fixed at the corners of the room, but retreat from them at least 30 cm.
Plastering process
Taking the right tool, the plastering operations are performed in stages:
- In the container, guided by the manufacturer's recommendations, the mixture is diluted.For mixing, a construction mixer or a drill with a special nozzle is used.
Plaster, especially gypsum, hardens fairly quickly. Therefore, you should not knead a large volume at once: it is difficult to work with a thickened solution, and part of it may simply disappear.
- With a spatula or trowel, plaster is thrown between two lighthouses so that it protrudes slightly above their surface.

- The most responsible and time-consuming stage: as a rule, the plaster is leveled from the bottom up, pressing it tightly with your hands to the beacons. At the same time, smooth turns of the tool are made to the right and to the left, evenly distributing the mixture over the entire volume to be filled.
- If small depressions remain on the surface, then the solution is carefully added to them and smoothed out with a spatula.
- So, step by step, they fill all the niches between the lighthouses with plaster.

- After letting the solution grab, take out the profiles or slats that serve as beacons. After that, the holes from them are leveled and smoothed with a grater.
Some craftsmen prefer to leave beacons in the wall, covering them on top with a thin layer of the mixture.
All stages of applying plaster are shown in detail in the training video.
A complete walkthrough can be found here.
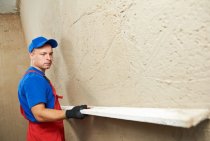
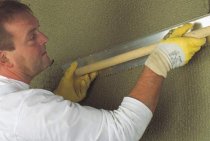
Alignment of walls under the rule (visual alignment)
Often it is not at all necessary to plaster the entire surface of the wall. It is much more effective to simply align problem areas in the form of depressions. The advantages of this method are significant savings in time and material.
Particular attention when leveling "by eye" is given to visually significant places. These are corners, doorways, wall and ceiling joints. The rest of the plane is aligned to the rule: it is pressed against the wall, and with its help, the places of the depressions are determined. After filling them with plaster, the rule is to remove the excess. And so on until the tool is adjacent to the plane without gaps.

As a result, even if the wall has a slight slope, it is almost impossible to notice. All decorative elements, such as skirting boards or baguettes, are perfectly even.
The visual leveling method is quite complex and is usually used by experienced builders.
After completion of plastering, the surface is treated with finishing putty and polished.
A step-by-step method for leveling plaster without beacons is painted here.
How to align the walls in the apartment with drywall
Due to the complexity, plaster alignment is increasingly losing its position to GKL. It is used for those surfaces where too much plaster is required or its use is completely impossible. For example, if we are talking about a wooden frame.
Drywall is mounted in a frame and frameless way. Each of them has its own scope and technology.
Installation of drywall frame method
It is advisable to mount the crate in case of significant curvature of the walls, and also if it is planned, along with leveling, to insulate the room or increase its sound insulation. Wires are hidden in the space under the drywall surface, enclosing them in fireproof corrugations or cable channels.

The alignment technology is as follows:
- Minimal surface preparation is carried out: wallpaper and poorly adhering parts of the old coating are removed.
- A line is drawn on the ceiling, indicating the outer edge of the future wall surface.
- With the help of a plumb line, it is transferred to the floor.
- On the surfaces, the places of vertical racks and the attachment points of direct suspensions are marked, which serve to adjust their position. Racks are placed in increments of 60 cm: so each sheet of drywall will be fixed on three racks - two are located at the edges, and the third is in the middle. Suspension mounting pitch - 60 cm.
frame designed so that the joints of drywall sheets are located on the surface of the profile.
- A damper tape is glued to the guides, after which they are attached to the ceiling and floor with dowel-nails in increments of 30–40 cm.
- Holes are drilled in the wall and suspensions are attached with dowels.

- Mounted vertical racks. They are cut off 1–2 cm less than the distance between the floor and the ceiling, inserted into the guides and fixed with metal screws. Some masters prefer to use a cutter for this purpose.
- By controlling the position of each rack with a level, it is fixed on direct suspensions with self-tapping screws. The protruding parts of the suspensions are bent to the sides.
- If necessary, horizontal jumpers are mounted. They are required in places of horizontal joints of the skin elements. In addition, jumpers will add rigidity to the frame.

- GCR is cut into pieces of the desired shape and size. Holes are drilled for sockets and switches, at the joints, chamfers are made with a planer at an angle of 45˚.
- Drywall elements are screwed to the frame with self-tapping screws in increments of 25–30 cm. The screw heads are slightly recessed deep into the material.
Very useful for this operation. special bit for screwdriverdesigned for fixing drywall. It will not allow you to wrap the self-tapping screw too deeply and wash the surface of the GKL.
Detailed instructions for assembling the frame, installing drywall and pre-finishing - in this article.
GKL fastening on glue
It is used if the wall is relatively flat. Installation of drywall is faster and easier than with the frame method, but requires careful surface preparation.

The order of work is as follows:
- The wall is cleared of the old coating. Cracks expand and are sealed with a repair mortar, the protrusions go astray.
- A layer of deep penetration primer with antiseptic properties is applied to the entire base surface.
- Sheets of drywall are cut.
- GKL is attached to a special glue. It is not necessary to lubricate the entire surface with it: it is enough to draw strips around the perimeter and make a few "cakes" inside it.
- The fragment is pressed against the wall. After adjusting its position with a level, it is held for about a minute until the adhesive mixture sets.

The most crucial moment is the installation of the first element of the skin: it is on it that all subsequent ones will be aligned.
- This is how drywall fragments are successively glued. To reduce the load and prevent the sheets from slipping, a rail is screwed from below. It will hold the fragments in place until the glue dries and provides a secure grip. After that, the rail is dismantled and this place is covered with a plinth.
Read more about the options for attaching plasterboard to glue with different curvature of the walls, read here.
Finishing GKL
Before finishing, for example, wallpapering, the plasterboard surface is finished:
- The seams are glued with a reinforcing mesh and sealed with putty.
- After it dries, grouting is carried out using fine sandpaper.
- At the final stage, the surface is primed in two layers, applying the second after the first has completely dried.
- Then the entire surface is puttied. This must be done for painting, it is very desirable for wallpaper, but putty is not required before gluing tiles or decorative stone.
Leveling prices
To decide whether to do the work yourself or turn to the masters, it is useful to get acquainted with the prices for leveling from professionals.
Average cost per sq. m.:
- Plaster without beacons - 350 rubles. in Moscow, 250–300 rubles. in St. Petersburg.
- Plastering on lighthouses - 450 rubles. in the capital, 420 rubles. in St. Petersburg.
- Plastering on beacons in a mechanized way - 250 rubles. in Moscow, 200 in St. Petersburg.

- Leveling with drywall with a frame in 1 layer / in 2 layers - 360/450 rubles. in Moscow, 300/250 rubles. in the northern capital.
Note! The price does not include related work - priming, puttying, sealing joints of gypsum boards and other services. As a rule, they are all considered and paid separately.
If you still decide to do the work yourself, detailed instructions, videos and photos will help you align the walls correctly, saving a decent amount and feeling like a real master. Happy repair!