The widespread use of drywall as a finishing material is due not only to its outstanding technical characteristics, but also to a wide range of work performed. With the help of drywall, you can not only level walls and ceilings, but also transform the room by creating a variety of partitions, niches or arches. The key to a successful job is a high-quality and properly mounted frame for drywall. It is easy to install even with your own hands.

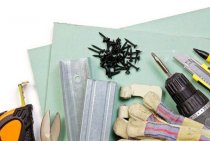
Materials used for mounting the frame
A person who first decided to build a frame from drywall profile, it may well confuse the different designation of profiles that can be found in different sources, as well as a large assortment of mounting hardware offered by the building materials market. You should not be afraid here: it is not so difficult to figure out the purpose of metal profiles, and from the whole variety of fasteners, only a small part is required for installation.

Types of metal profiles:
- Guides. In the marking they have the designation UD or PN. They lay the foundation for the entire structure, it is with them that the construction of the frame begins.
- Rack-mounted. They are denoted by combinations of CW or PS. They are inserted into the guides and form vertical racks to which drywall sheets are attached when leveling the walls.
- Ceiling. A drywall sheet is attached to such metal profiles, which have the abbreviation CD or PP, when leveling the ceiling. They are inserted into special ceiling guides, which have combinations of the letters UD or PNP in the designation.
- There are also arched and corner models of profiles. The need for their use is determined by the nature of the structure being built.

To fix the frame on the wall or ceiling, as well as to fasten its elements together, several types of fasteners are used.
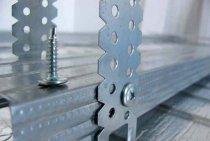
- To lengthen the metal profile to the desired size, a simple connector is used, and to reinforce the intersections of the profiles, its cruciform variety, called the "crab", is useful. When leveling the ceiling, a two-level “crab” is used to securely fix the lower level profile to the ceiling.
- Additional fastening to the ceiling or wall is provided by direct or anchor hangers. With their help, all structural elements are displayed in one common plane.
- The suspensions and guide profiles are fastened with dowels with a diameter of 6 mm, the profiles are fastened together with self-tapping screws. Installation of drywall on the installed frame is carried out using self-tapping screws with a diameter of 3.5 and a length of 25 mm. It is preferable to use galvanized steel hardware.

Ceiling frame assembly
If planned leveling with plasterboard walls and ceilings premises, then you should start with the latter. It is rare that a room can boast perfectly right angles. In this case, after leveling the walls, the sheets on the ceiling will have to be quite laboriously adjusted to the desired geometric parameters. If you start from the ceiling, then all the gaps between the drywall sheets and the wall will later close when the walls are leveled.

Markup nuances
Marking is one of the most important stages in the construction of the frame structure. To correctly choose the distance between it and the ceiling, you must first determine the height of the fixtures built into the ceiling. This distance is laid off from the lowest point of the ceiling, and then, using the level, the installation sites of the ceiling guide profiles are marked along the entire perimeter of the room.
Ceiling profiles are marked at a distance of 600 mm from each other.Thus, having done the markup with our own hands, we will end up with a grid of squares with a side of 60 cm on the ceiling.

Before mounting the frame with your own hands, you should finish working with communications, which will subsequently be located behind the drywall. It will be correct to stretch all the wires in advance, install sockets and other elements. It is better to leave the wiring under the lamps with a margin of 10-15 cm, so it will be much more convenient to connect them.
Installation progress
- Using the applied markings, a ceiling guide profile is mounted to the walls around the entire perimeter of the room.
- A dowel hole is drilled in the middle of the side of each marked square and a direct suspension is installed. Thus, we will get a step of additional fastenings of the metal profile to the ceiling with a size of 600 mm.
In the process of marking the frame for both the ceiling and the walls, it is necessary to take into account the prerequisite: all joints of drywall sheets must be located on the profile.
- We insert ceiling profiles into the PNP profiles and fix them at the junction with self-tapping screws.

Since the geometry of rooms in apartments often leaves much to be desired, it is better to measure the length of each element separately, reducing the distance between the walls by 2–3 cm.
- Having cut transverse jumpers 60 cm long with a grinder or scissors for metal, we also fasten them with self-tapping screws. The places of the cross-shaped connection of metal profiles are reinforced with the help of a “crab”.
- The resulting frame with the help of suspensions is displayed in a single plane. To do this, a level is applied to each profile, and after the necessary adjustment, the position of the ceiling profile is fixed with the help of suspensions. Their antennae are bent with pliers and fastened with screws to the profile at the required distance from the ceiling.
Assembling the frame for drywall on the wall
How to make a frame for drywall when leveling a wall? The general principles remain unchanged, only some nuances change.
- Having determined the distance between the wall and the structure being erected, having completed all communications, a line is drawn on the ceiling along which the guide profile will be attached. Using a plumb line, an identical line is also reproduced on the floor.
- Having fixed the guide profiles, they proceed to the marking of the horizontal racks. They should be spaced in 600 mm increments so that each sheet of drywall is fixed on three posts. One will be located in the middle of the sheet, and on the two extreme there will be a joint with other sheets.

- After marking and installing direct suspensions along it, the horizontal racks are inserted into the guides and fixed with self-tapping screws.
- Horizontal cross members are mounted in the same way. After their fastening, the entire structure is aligned in one plane, for which the level and direct suspensions are again used. A “crab” connector is applied to the places of crossing of metal profiles.
Installation is much more complicated if there are windows on the wall to be leveled. In this case, first of all, horizontal racks are attached on both sides of the window, and further marking of the profiles with a step of 60 cm is carried out from them.
At erection of partitions special attention should be paid to the doorway. It must be strengthened by inserting a wooden beam into the profiles that form the perimeter of the door frame.

Tip: since the partition frame will not be attached to the wall, its cells should be smaller than on the wall or ceiling. It is recommended to form them from squares with a side of 40 cm. This will achieve the necessary rigidity of the partition.
The greatest difficulties can arise when building frames for niches with your own hands. In this case, it will be necessary to combine the elements of the wall and ceiling mounting profiles.In addition, it is necessary to have good spatial thinking. But the device and the general principles of fastening and fixing metal profiles remain unchanged.