In the process of repairing or redevelopment of an apartment, the question inevitably arises of the reconstruction and modernization of old walls, the construction of new partitions or arrangement of the ceiling. An excellent solution in this case would be the use of drywall. It is easy to work with this material. Difficulties can only be caused by the installation of the profile to which the GKL sheets are attached, but you can easily handle it with your own hands without the involvement of outside help, if you know how to do this part of the work correctly.

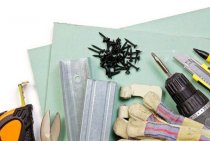
Tool
For work you will need:
- Building level and plumb.
- Roulette and chop cord.
- Perforator and screwdriver.
- Metal shears and pliers.
- Hammer and screwdriver.
- Utility knife and marker.
The list of tools can be supplemented with some professional accessories, the presence of which is not necessary for simple installation: they can be replaced with a simpler tool.

The use of a cutter when assembling a frame from a profile can not only reduce the number of self-tapping screws in the joined parts of the structure. The use of such a docking will avoid differences between the heads of the screws and the surface, which is especially important on the plane, which will subsequently be sewn up with drywall.
Materials for work
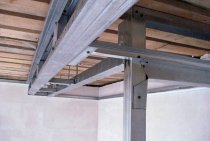
Now it is rare to find a drywall frame made of wooden bars, because the tree loses its properties over time, and changes in temperature or humidity can cause material deformation. For work on the manufacture of the frame, metal profiles are used, which are more durable and do an excellent job of creating multi-level structures. When installing a frame structure with your own hands, even a non-professional master can independently calculate the number of necessary elements.

Profile views
Before starting the design, it is worth deciding on the types and purpose of the profiles.
- The UD guide profile is used to define the plane of future structures and to interface between several planes in complex elements.
- The carrier profile CD is intended for further installation of drywall and is designed for the loads created by finishing materials.
- Reinforced profiles UW and CW are similar in purpose and differ in large size. Suitable for making plasterboard partitions between rooms.

Fasteners
Connecting and fastening elements are also needed, thanks to which the whole structure acquires additional rigidity.
- The straight CD connector is used to connect two load-bearing profiles into one structural element.
- The cross-shaped CD-connector is designed for transverse mounting of load-bearing racks in a single-level construction.
- A two-level CD-connector is necessary in case of fastening elements located at different levels.
- The U-shaped bracket is used to fasten the supporting profiles to the surface of the wall or ceiling at the required distance.

These are just the main connecting elements, manufacturers present a much larger assortment designed for a specific type of fastening, for example, for a multi-level ceiling frame, there are various suspensions that allow you to create complex planes that can withstand drywall sheets with your own hands.
Additional materials
To fix the structural elements, it is necessary to ensure the availability of consumables and auxiliary materials. These include:
- Sealing tape for guide elements. It is a strip of foamed polyethylene with an adhesive applied, serves as an insulating layer between the base and the part to be fixed.
- Impact dowels with a minimum size of 6 x 40, which are designed to install the structure.
- Self-tapping screws for metal, which are used to connect racks and fasteners to each other.

If there are door or similar openings in the structure, they must be reinforced to meet the strength requirements. The easiest way to do this with your own hands is with the help of a wooden beam, which must be inserted into the profile framing the opening and secured with self-tapping screws in increments of 20 cm.
Create a design sketch
Before the start of the construction phase, a sketch of the future structure should be prepared. Such an event will determine the amount of material needed and, accordingly, the cost of the upcoming work. For such calculations, it is necessary to know some design features and requirements for the placement of elements.
- The distance between the guides is calculated based on the width of the drywall sheet, which is 120 cm. They are installed in increments of 40 cm for increased load (ceiling, etc.) or 60 cm under normal conditions (wall sheathing).
- Suspensions should be placed at a distance of 50 cm, and in case of increased requirements for strength or in places where complex nodes are located, their additional installation is possible.

Surface marking
To continue work, it is necessary to transfer the markup from the preliminary sketch to the surface.
- You should start by determining the curvature of the sides of the room. The distance between opposite walls can vary by several centimeters, and when marking, one should focus on obtaining right angles with minimal loss of space. Having decided on the initial line on the floor, you can begin to transfer the markings to the walls and ceiling.
- To transfer lines to the wall, you can use a plumb line, with which you should mark a clear vertical line. In such cases, the presence of a laser level can greatly simplify the work, although with the help of a plumb line you can achieve good accuracy.

The process of marking under the profile can also be facilitated with a masking cord. In this case, the cord is held at the points of the beginning and end of the line, then pulled back a little, released, as a result of which the necessary markup is obtained.
- The next step on the plane between the walls is to mark the vertical lines. A distance of 60 cm between them is the most optimal, subsequently a guide profile will be installed here.
- Then, on the marked vertical lines in a checkerboard pattern with a step of 50 cm, places are allocated for the mounting suspension. The application of such markings will completely prepare the surface for further installation and greatly facilitate the work.
When marking for the execution of work on the arrangement of the ceiling, the first task will be to beat off the horizontal level, which can be done using the simplest hydraulic level or a laser level. When marking the ceiling, it should be noted that the distance between the ceiling guide system and the lowest point of the ceiling must be at least 4 cm.
In the process of marking with your own hands, it should be remembered that such work does not show the final size of the room, and in order to determine the future area, it is necessary to take into account the thickness of the drywall sheet.
Assembly
The frame assembly process is as follows:
- The guide profiles are mounted first, which, if necessary, are pre-cut. Before attaching to the profile at the points of contact with the base, a sealing tape is glued, which will provide proper heat and sound insulation between the surface and structural elements.

Installation of the profile structure is carried out using a puncher and driven dowels in increments of 50 cm; in such a structure there should be no tension that could lead to deformation and cracking of drywall.
- In the case of a false wall or false ceiling further, suspensions are attached to the previously marked places, necessary for fixing the bearing racks, which are installed at marks with a distance of 40 cm.
The design is designed in such a way that the drywall sheet is attached to three profiles (one in the center and two along the edges), occupying space up to the middle of the rack.
- When creating a partition, there are no suspensions and the bearing profiles are installed in a frame structure consisting of guides.
- In the manufacture of various niches or other complex shapes, connecting elements are used to achieve the required level of frame reliability. The installation of such elements is based on the expediency of their use.
- If it is necessary to obtain curvilinear shapes, cuts are made in the side stiffening ribs of the profile to give the product the desired shape.
The process of installing a profile for drywall does not apply to work of increased complexity. To do it yourself, you only need to know the principles of assembling such structures.