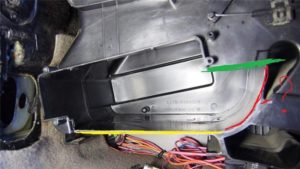
How to get to the damper
To see where the central heater flap is located, you will need to partially disassemble the dashboard, specifically, unscrew the beard. This is the place on where the heater switches are located.
Progress:
- Remove the ashtray.
- Squeeze out 2 plugs located next to the emergency button.
- Remove all control knobs.
- Unscrew the 2 screws of the center console and carefully pull it out, while prying it in place of the latches.
- Disconnect all wires.
- Now you can freely reach the damper.
- Replace the damper or its drive components.
Very often, the cause of a malfunction can be a broken damper drive mount. If the situation is not critical, then you can simply glue the part that has fallen off with superglue.
There are times when the valve actuator mount breaks off due to an undeveloped cable that falls very tight. In this case, it must be developed manually, after which this problem should not arise.

Why does the stove blow cold air in a Lada Kalina car
Breakdowns are common not only to old, but also to new cars. Some owners of Lada cars notice that the stove blows cold air, Kalina may also be prone to this problem. This can happen for many reasons.
Regardless of this, it is better not to delay the repair. Here, as in the human body, one small disturbance can set off a chain reaction. You can deal with such a breakdown yourself or in a service station.
Attention to every detail
A technical malfunction is easier to prevent than to spend time and money on fixing it later.
In order not to have to repair the stove on the Lada (it will be Kalina or Vesta - it doesn’t matter), you need to carefully monitor the technical condition of the car:
- every morning at the parking lot of Kalina, it is necessary to check for dark spots, indicating an antifreeze leak;
- inspect the system hoses for leaks;
- if any are found, then it is necessary to immediately change the tank cap;
- daily inspection of the stove radiator;
- if the stove blows cold air, then the cause should be sought in the increased consumption of coolant.
Daily health checks of the vehicle will help to avoid many problems.
If the radiator valve is loose or the coolant reservoir is leaking, within a short time the problem will spread further at an alarming rate.
The first result will be a breakdown of the vehicle's computer. Such a malfunction does not apply to the warranty, so the repair of the heater and the replacement of the computer will fall entirely on the shoulders of the motorist. A small rearrangement of the on-board computer will help reduce the risk of such troubles with Kalina:
- carefully dismantle the lining;
- unscrew 2 screws;
- gently squeeze the computer towards you;
- place it on a shelf near the glove compartment;
- wiring harnesses do not need to be disconnected;
- fix the computer in a new place;
- re-grounding is not carried out.
If everything is done correctly, then in the future Lada Kalina will not be left without an on-board computer, even in the face of an unexpected malfunction. The main thing is that the driver is convinced of the reliability of the fasteners after the rearrangement.
Technical specifics of recovery
In most cases, the repair of the heater takes a little time. If Lada Kalina requires one, then if you have the necessary tools, you can do everything yourself.
In order to solve the problem with the stove on Kalina, you must perform the following sequence of actions:
- drain all coolant;
- remove the air filter (stove damper is not removed);
- the brake and gas pedal is dismantled for a more convenient replacement of the radiator;
- in some cases it is necessary to dismantle the steering structure assembly;
- the battery is removed together with the stand;
- remove the air duct;
- carefully unscrew the hose from the radiator;
- the interior heating hose is dismantled.
To save time in the future, it is necessary to fix the position of the parts in space. This will allow not to delay the repair of the Kalina heater. In some cases, the above algorithm does not work fully. The fault here is the individual characteristics of the vehicle. In this case, it is not worth hurrying, as well as starting to use brute force.
Experienced drivers recommend removing more parts and components of the vehicle, which will ultimately allow the replacement of the radiator and grille.
Regardless of the complexity of the repair, it is necessary to make sure that the coolant has been properly drained and then refilled. Any drips and leaks can negatively affect the technical condition of the iron horse.
During repairs, the car owner may find wear on some parts of the car. In this case, they should be replaced.
Firstly, it will eliminate the risk of re-repair. It is impossible to predict exactly when the car will begin to feel bad. Secondly, the high-quality work of the vehicle saves time and money that the driver would spend on a visit to the service station.
Some Helpful Tips
Any car owner who has to carry out work to replace the radiator of the heating system or repair it, wonders about the reason for the failure of the unit
It is important to consider 2 factors that allow you to extend the life of the continuous operation of the device
- It is necessary to replace the air filter of the system in a timely manner. A clogged radiator is more likely to fail. There is a set period for periodic replacement, but you can do it more often, for example, change the filter after winter operation and at the end of the summer season.
- Change the coolant in a timely manner. Such an operation should be carried out every 60 thousand kilometers. Accumulating wear products destroy the light metal of the radiator, depriving it of tightness. Many car owners believe that periodically adding antifreeze to the system, they will not have to change the unit. However, corrosion products continue to accumulate, damaging not only the heater core, but the engine as a whole.
The actual issue is the use of high-quality antifreeze. You should buy it from trusted sellers and do not use water in the cooling system.
The operation of any car involves not only the maintenance and repair of parts and systems that ensure its movement. Auxiliary devices play an important role in the operation of the car. And in the event of a failure of the radiator of the cooling system, not only the microclimate in the car is disturbed, but it also becomes unsafe to drive it due to fogging of the windows.
In winter, it’s not as warm in my ashtray as it should be. At the same time, the fan works normally, judging by the air flow. The thermostat is most likely working, since the temperature of the engine reaches one hundred and ten, and the radiator fan turns on at the same time. The heater radiator could not be clogged three years, I think. What else can be sinned? Air lock? I have never had any gurgling sounds anywhere.
I decided to feel the plastic lever of the heater damper. Sitting on the driver's seat, I crouched down and grabbed this lever with my right hand. He extended his left hand to the base of the windshield in order to feel the temperature of the air flow from the airflow slots. At the same time, my ear turned out to be at the deflectors above the beard. My observation: When pressing on the lever, the sound in the deflectors changed. And the air became warmer. Not that the air became fiery. Of course not. But the hand felt the difference.


Now I need to figure out how to solve this problem. I don’t like the options that I saw on the drive, when rubber bands, springs were made. , does anyone have any ideas? Or has anyone gone through this stage before?
Yesterday, after work, I prikolhozil the first available spring.
Method for checking the stove on Lada Kalina
The whole procedure is carried out on a running engine.
- We move the temperature control knob of the control unit to the extreme position (blue zone).
- Smoothly switch the fan speed from the first to the fourth speed.
- We monitor the intensity of incoming air, outgoing and air duct. With each speed, its flow must increase.
 If the Kalina stove still does not work, we check the operability of the fuse, marked F5 in the diagram. Together with him, we check the power circuit. If the fan does not work at any speed or its intensity does not change linearly, it is worth checking the switch and additional resistor. If there is insufficient air flow, the cabin air filter must be replaced.
After everything described, we proceed to check the heater dampers. For this:
- We move the temperature regulator to the extreme position (blue zone), set the fan speed to maximum.
- We rotate the damper control knob on the block, at the same time we control changes in the direction of the air coming out of them.
If the air flow does not change its direction, this indicates a malfunction in the mechanical part of the heater control unit. For example, the thrust has flown off or, due to a breakdown of the roller, it does not wind onto it, or the damper has simply jammed. At 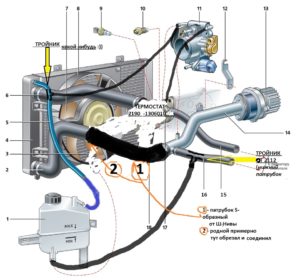 installed climate control, it is worth checking the operability of the micromotor reducer of the damper of the ventilation unit, air conditioning and heater. For this:
- warm up the engine to operating temperature;
- the temperature controller is transferred to the extreme red zone;
- we control the presence of warm or hot air flow from the air ducts.
If the temperature of the air flow has remained unchanged, the operability of the mechanical part of the heater control should be checked. When using climate control, we carry out the above operations. We also check the health of the engine cooling system.
In conclusion, we note that if you are not confident in your abilities and capabilities, it is better to send the car for diagnostics to trained specialists, because any mistake you make leads to the replacement of the entire unit or system, which will hit the family budget hard!
The air stove Lada Kalina is considered one of the best in terms of heat in the VAZ family, but far from the most reliable in operation. Problems begin almost in a car dealership, as many motorists talk about. But most of the problems are completely solvable, and often even without the involvement of car service specialists.
How to diagnose the heating system in Kalina
Before a diagnostic event, you will need to carefully study the diagram. Checking should only be done while the engine is running.
- The temperature regulator located on the control unit in the passenger compartment is set in the leftmost position. We activate the fan and observe the hot air entering the cabin through the deflectors. By gradually shifting the handle to the right until it stops, we reach the exit of a cold air stream.
- The speed test should be started by setting the appropriate knob to the minimum speed position. If the fan and its control module are in good order, then the force of the air jet should increase as the handle is moved to subsequent positions (and so on up to the 4th speed mode, corresponding to the maximum speed).
- Checking shutters. Here, the temperature level control is shifted to the maximum to the left position. We move the fan speed switch to the position corresponding to the 4th speed.The check itself is reduced to the smooth movement of the damper regulator between the extreme positions. This should be done in order to feel the correction of the flow direction. By transferring the temperature mode regulator to various positions, we observe a change in the degree of heating of the incoming air.
Assembly
We return the brake pedal to its place. To do this will interfere with emphasis. so it must be brought to the side and this will return the pedal to its rightful place. If the stop is bent forward, then after returning the pedal to its place, straighten the stop with pliers.
After connecting the pedal to the stem, do not forget to install the lock plate.
Also do not forget to put, connect and be sure to adjust the brake pedal sensor:
Don't forget to connect and adjust the brake pedal sensor. Stoplights should light up already at weak pressing a pedal.
Also, install the gas pedal bracket in place and the pedal itself on it. which must be fixed on the bracket with a locking plate.
Perhaps everything is in the cabin, now we move on to the engine compartment. Do not forget to replace the steering rod and screw the thermal protection into place (if you unscrewed it):
Put the air filter in place. duct. then the platform for the battery and the battery itself.
So, everything is assembled, it remains to fill in antifreeze and drive the airlock out of the stove. Before pouring antifreeze, make sure that all hoses are put in place and all clamps on them are tightened, including the throttle assembly heating hose.
Frankly, after pouring antifreeze and checking the cooling system, at first I was a little depressed by the fact that the stove did not heat up again. In desperation, I added gas and noticed that at high speeds the air from the stove was much hotter. Then it dawned on me: there is an air lock in the system. Air accumulates at the highest point (I have it in the hoses) and does not allow the antifreeze to circulate normally through the stove.
I expelled the air from the system in the same way as I have been doing it for 7 years. It is enough just to drive at high speeds (3-4 thousand rpm) and the flow of antifreeze will break the air plug into bubbles and then take them to the expansion tank. Keep an eye on the level of antifreeze and make sure that the cork of the expansion tank lets air in well. and then the air congestion is not terrible for you.
That, perhaps, is all, dear readers! I sincerely hope that this article will help you replace the stove radiator and you will no longer have problems with this unit. I wish that the stove in your car works perfectly, never leaks, and even in severe frost, it will be warm and cozy in your car!
I put the standard radiator according to the reverse scheme on December 5, 2015. I have been driving with it for almost a month, the New Year is on the nose, so far I am very pleased with the stove))
What if you flip the regular radiator
So, friends, with the advent of cold weather, I noticed that the stove heats up rather weakly, and at a temperature outside of -10 ° C, the windows thawed only after 30-40 minutes of heavy traffic. It was impossible to drive like that, and in the next thaw, I decided to start a third (hopefully the last) replacement of the stove radiator.
By this time, I came to the understanding that enough experiments and still need to put the native stove radiator from Kalina. perfect size and shape. Moreover, before installation, it must be carefully sealed with foam rubber so that the air from the fan passes through the radiator plates, and not past it.
At that moment, I did not yet know how I would install a regular radiator, but I still did not intend to cut out the air ducts or disassemble the dashboard. It seemed to me that there should be some simpler and more logical way to install a regular radiator. Having bought new pipes and a stove radiator from Kalina in advance (650 rubles), I removed the installed radiator from a gazelle and tried to put a regular radiator in its place. As expected, the fittings rested against the partition of the engine compartment, so the regular radiator could not be pushed into the niche even half of its length.
After dismantling the radiator from the gazelle, I began to think about how to install a regular radiator without breaking anything. I twisted, turned the radiator, put it this way and that, and suddenly an idea came to my mind: what if I turn the heater radiator with fittings not to the motor, but to the driver's side?

Although the idea was bold, it was viable, so after 4 hours hot air was already blowing from the heating system deflectors. Now, let's look from beginning to end the whole process of replacing the stove on Kalina using the radiator reverse method. Let's start by making a list of everything we need.
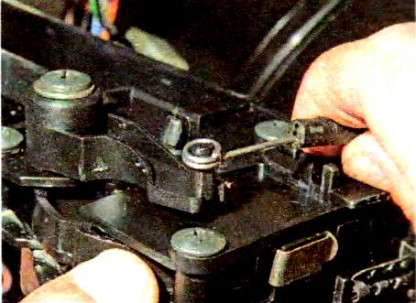
How to adjust the heater damper on the Lada Kalina
- The first step is to adjust the heater valve.
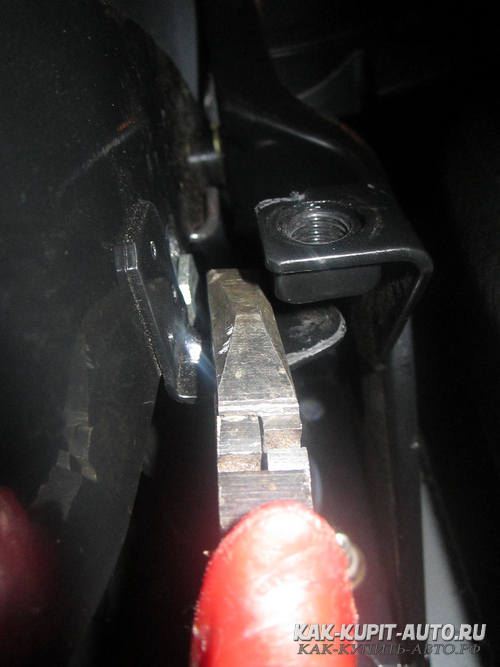
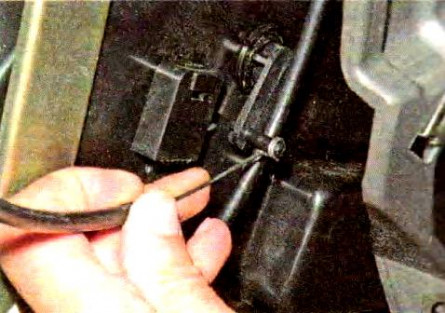
- Remove the bracket that holds the cable sheath to the faucet body.
- Remove cable from faucet lever.
- Open the faucet to the maximum.
- Unhook the cable from the lever block.
- Remove the old cable.
- The tap may not be closed at all in the future.
If you do not like the method described above, then you can use another one:
- Adjust the length of the sheath and cable so that in the extreme right position of the lever on the block, the valve opens completely.
- Fix the cable, located in this state, with a latch.
- Then proceed directly to the adjustment of the heater damper.
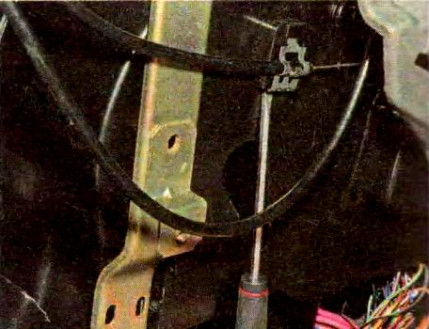
- Remove the bracket that holds the cable sheath on the heater body and feel for the galvanized yellow lever located on the left.
- Pull the lever towards you - this will be the maximum open state.
- Adjust the length of the cable so that in the right position of the long lever on the lever block, the valve is opened to the maximum.
- Fix.
- Do not forget that with the help of one lever both dampers are simultaneously controlled: both the crane and the large one.
Definitely, the heater in Lada Kalina heats much better than in.
But the incorrect operation of the heater dampers, unfortunately, is a very common "disease" of Lada Kalina. Therefore, after the purchase, try to prepare in advance for the heating season, especially since you can do it yourself quickly and easily.
With the onset of cold weather, every motorist tries to create comfortable and warm conditions for staying in the cabin of his car, because no one wants to freeze. But if warm air does not enter, it should be determined what this may be due to. In this article we will consider the repair of the Lada Kalina stove control.
The principle of operation of the stove is supply and exhaust. The air masses in the car are heated with the help of a special fluid that simultaneously cools the engine.
The principle of operation of the heater is that the liquid heats the radiator, in which heat exchange takes place, and the heated air enters the passenger compartment through air ducts.
How to change the radiator
 The operation is very laborious, for which a car service will charge you a round sum. But there is another, slightly barbaric, but fast and widely practiced way. The scheme of work is as follows:
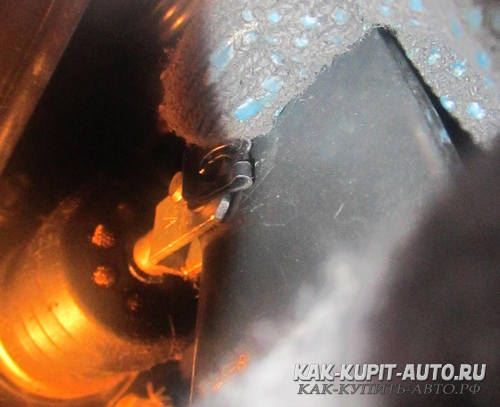
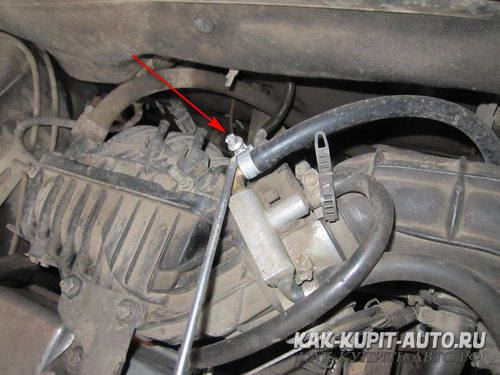
- Drain antifreeze, disconnect and remove the battery, then disconnect the hoses from the stove pipes.
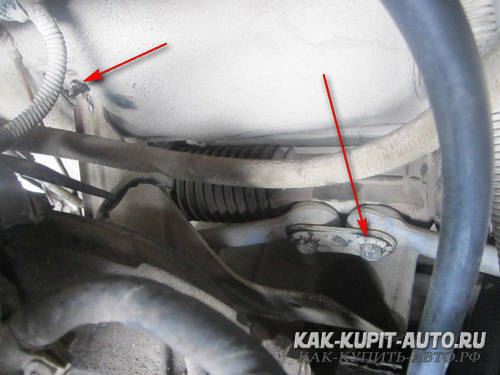
- Unscrew the nut located near the fittings in the engine compartment. She holds a steel plate that will interfere with the dismantling of the heater.
- Remove the gas pedal and pull out the steel axle of the brake pedal. Unscrew the decorative, and behind it the plastic panel covering the stove radiator.
- To remove it, cut an opening in the plastic frame to allow the radiator to be pulled out towards the driver.
- Install new element and assemble in reverse order. The cut opening can be sealed with plastic and decorated in any suitable way.
When performing an operation, it is worth moving the controller located directly under the stove to another location. Antifreeze dripping from it can damage sensitive electronics. Also, with the radiator removed, it is easy to change a faulty heater tap or gearmotor, because they will be accessible. The gearbox is a single unit with a damper position sensor and also changes entirely.
What is the damper responsible for?
During the operation of the motor in the cooling system, the heated liquid moves through, while it heats the air passing through it.The volume of air passing through the radiator and outside it is controlled by the main damper of the stove. Depending on how the temperature control knob is located on the dashboard, the amount of incoming air will depend.
You can distribute the movement of air throughout the cabin by turning the handle that regulates the position of the damper. But there are cases when the damper is stuck and it is impossible to properly regulate the flow of heat into the interior of Kalina.
If the matter is only in the valve, then the situation can be corrected quite simply by pulling up its cable. If after these actions the situation has not changed for the better, then you need to conduct a visual diagnosis of the state of the mechanism and perform a number of simple actions.
Common faults
The stove itself on Kalina is well conceived, but due to the poor quality of the manufacturing of elements and parts, various troubles constantly happen to it. Even the latest models with climate control have different “diseases”. The list of the most common faults is as follows:
- the heater core is leaking;
- jamming or not fully opening the damper of the stove;
- failure of the fan or control unit;
- breakdown of the motor reducer;
- the temperature sensor or the heater resistor has become unusable;
- the cabin filter is clogged.
To find out where this or that element of the heating system is located, it is worth looking into the instruction manual, there is always a corresponding diagram there.
The design of the Kalina stove without climate control is such that the air sucked in by the fan passes through the air filter and enters the heater radiator. There it is heated and fed to different areas of the cabin through adjustable grilles and openings. The dampers are controlled and the fan speeds are switched manually. Such a heating system is more reliable, since it does not have any electronics.
On Lada Kalina with climate control, the dampers are controlled by a gearmotor at the command of the electronic unit. The latter receives signals from a temperature sensor located in the passenger compartment and reacts accordingly to changes in the microclimate. The controller interacts with both the heater and the air conditioner.
Tools and materials for Kalina stove repair
Necessarily:
- Two screwdrivers: Phillips and flat (for unscrewing the clamps)
- ratchet
- Heads for 7 and 8 (for unscrewing the clamps)
- Heads for 10, 13
- Long head 10 (5 cm long)
- Keys for 10, 13
- Long pliers or pliers (to break out old radiator fittings)
- Metal file (carefully cut off the fittings of the new radiator)
- Sharp knife (for cutting foam rubber)
- Established radiator stove Kalina 11183
- 3 meters reinforced hose, inner diameter 20 mm
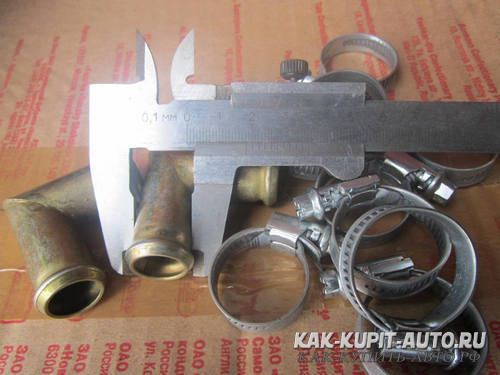
- Two corners from tubes (D=18-20 mm, size 50x50 mm)
- Foam rubber 5 and 15 mm thick
Desirable:
- Lighting: carrying lamp or lantern
- A piece of coolant drain hose + adapter tube
- Pliers (for loosening hard-to-reach clamps)
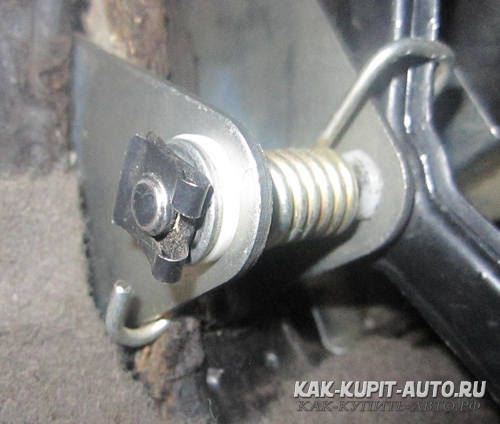
I draw your attention, dear readers, that two tubular corners with a diameter of 18-20 mm (according to the diameter of the hose) with a size of 50x50 mm are absolutely necessary for repair. which will turn the fluid flow from the fittings up (in the photo they are on the right):
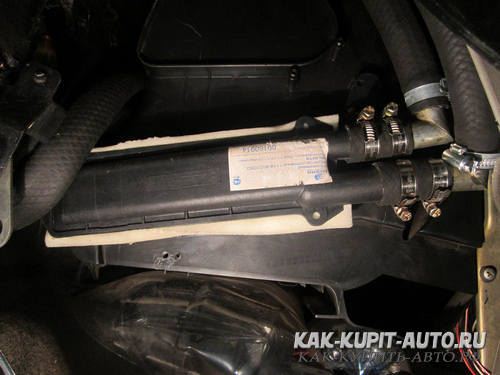
You can try to do without these corners. but in this case, the hoses will be strongly bent and possibly. antifreeze will not be able to circulate freely through them. In addition, in places of fractures, the load inevitably increases, therefore, the risk of leaks increases, which are extremely undesirable in the passenger compartment.
I bought corners for 50 rubles. in the spare parts store for GAZ. At the same time I grabbed a handful of clamps of a suitable size
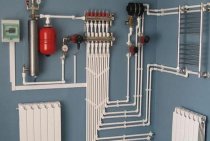
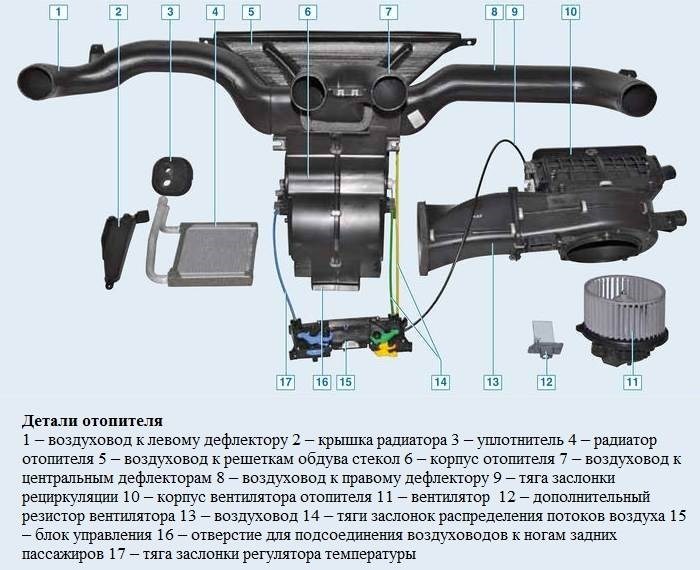
The composition of the heating system
The principle of operation of the heater in Lada Kalina is very simple. It is built on a supply and exhaust scheme. The heater circuit contains:
- cabin air filter;
- air ducts;
- heater radiator;
- electric fan;
- air flow control module and fan operation modes.
The interior stove device looks exactly like this, but is located behind the dashboard and only the system controls are present on its front surface in the Lada Kalina cabin. A running engine generates heat, which is removed from it by the cooling system. This circuit includes a heating radiator. The circulating fluid heats the honeycombs, from which the warm flow is directed into the passenger compartment by means of a fan. Adjustment of the required temperature, strength and direction of the air jet is carried out by means of the handles and dampers present in the cabin. Sometimes damper adjustment is required.
The air taken from the external environment initially passes through the intake element located on the hood at the bottom line of the Lada Kalina windshield. Further, the air rushes to the filtering component and is supplied through the fan into the cabin space.
The fan is capable of operating in 4 different speed modes. The adjustment is carried out by means of the corresponding knob on the tidy, and the switching itself is possible due to the presence of a resistor block in the control module.
Replacement of control rods for ventilation and interior heating
Remove the instrument panel cover.
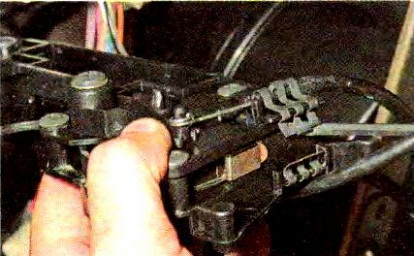
With a slotted screwdriver, we squeeze the spring holder of the shell of the thrust of the air temperature controller and remove the holder
We remove the thrust from the lever of the air temperature regulator.
Using a slotted screwdriver, we press the spring holder of the shell of the air temperature regulator rod from the heater body and remove the holder.
Remove the air temperature control rod from the lever on the heater housing.
We install a new thrust of the air temperature regulator in the reverse order
The sequence of operations for replacing the switch rods with the operating mode of the fan and the air distribution regulator is similar.
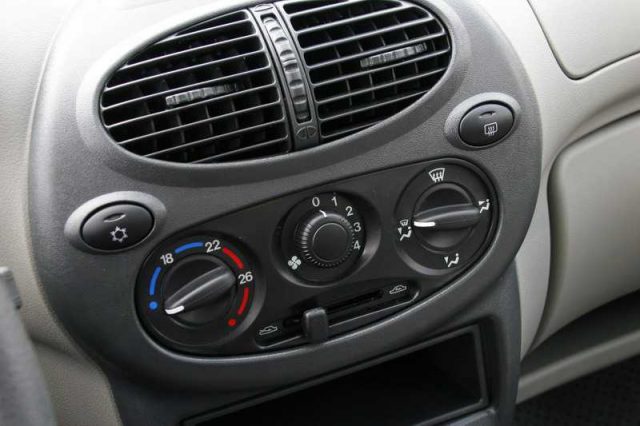
Lada-Kalina is equipped with either a heating and ventilation unit (top picture) or climate control (bottom picture).
The heating and ventilation unit is used to create a comfortable air temperature in the car interior, the value of which is regulated by the control unit for the ventilation and heating system, but at the same time it cannot provide a temperature in the cabin lower than the outside air temperature.
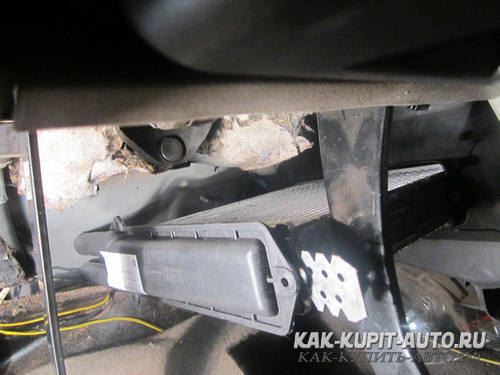
There is an air filter in the air intake box, which cleans the air entering the car interior from dust, pollen, soot, and small insects. The filter must be replaced every 15,000 km (or sooner if the operating conditions are severe).
-
switch 1
— controls the fan operation mode (0 — fan off, 4 — maximum rotation speed); -
switch 2
- controls the operating mode of the stove and air conditioner (in the variant version); -
handle 3
- controls the air recirculation damper (leftmost position - supply of outside air to the passenger compartment, extreme right position - recirculation mode of the air in the passenger compartment - this mode is not recommended to be used for a long time); -
switch 4
- controls the distribution of air supply in the passenger compartment:-
vertical position up
- air enters the windshield and the nozzles for blowing the windows of the front doors; -
vertical down
- air enters the lower part of the cabin, into the zones of the legs of the driver and passengers; -
horizontal position right
- air enters through the side and central nozzles into the upper part of the car to blow the driver and passengers; -
horizontal position left
- air enters the lower part of the cabin, into the areas of the legs of the driver and passengers, onto the windshield and the nozzles for blowing the windows of the front doors.
-
vertical position up
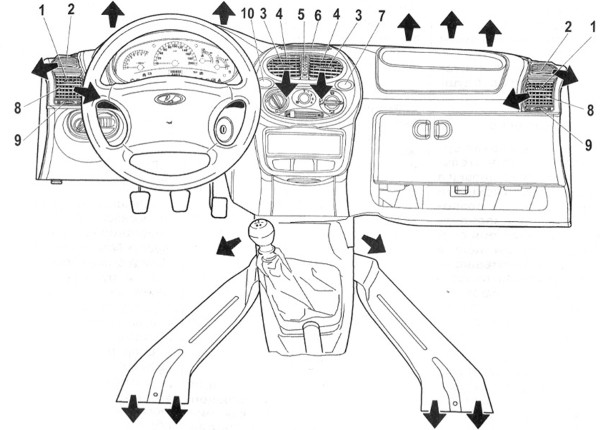
The levers 9 and 5 of the damper drive regulate the intensity of the air supply through the side (8) and central (4) nozzles by changing the position of the dampers (up to their complete closure). The levers 1 and 3 of the guide vanes of the side and center nozzles change the direction of the air flow.
Ventilation (unheated air supply) of the passenger compartment
:
- set switch 2 to the extreme left position (blue dot on the control unit) - the heating stove tap is completely closed;
- set switch 4 to the horizontal right position;
- open nozzles 4 and 8, turn lever 5 on the central nozzle down, and lever 9 to the right on the left side nozzle and to the left on the right side nozzle;
- switch 1 of the heater fan operation mode set to the desired mode;
- in case of fogging of the windshield, set the switch 4 to the vertical position upwards.
Preventing glasses from fogging up
:
- set switch 4 to the vertical position upwards;
- switch 1 of the heater fan operation modes to position "2".
Quick interior warm-up
:
- set switch 2 to the extreme right position (red dot) - the tap of the heating stove is fully open;
- set switch 4 to the horizontal position to the right;
- switch 1 of the operating modes of the heater fan set to position "3";
- open the side and center nozzles.
Ensuring a comfortable temperature in the cabin
:
- set switch 2 to the desired position (desired temperature);
- set switch 4 to a horizontal position to the left;
- using switch 1 of the operation mode of the interior heater fan, select the required intensity of warm air supply to the passenger compartment.
When the heating system is operating in the maximum mode, it is not recommended to open the windows of the car interior.