infrared floor
This is the easiest and most affordable way to warm the floors in the bathroom. The system consists of an infrared film. This system is laid on a concrete screed, attached to it with glue. Ceramic tiles are immediately glued on top. In this case, it will not be the air that will be heated, but the coating, in this case ceramic tiles. The tile will heat up partly from electrical elements and partly from infrared radiation. The temperature on the surface will be about 26 degrees. When laying the room itself heats up a little. Only the floor remains warm. You can make a warm floor in the bathroom within one day. You can not invite specialists, but after reading the instructions, spread the film with your own hands. If we compare the energy consumption, then the infrared system is more economical than the electric one. Savings occur due to the fact that there is no concrete screed above this system. These systems are also equipped with thermostats.
Laying electric underfloor heating in the bathroom
There are two types of electric floor heating depending on the design: heating cable and heating mat.
Do-it-yourself cable installation:
- Design and layout is in progress. The location of the thermostat, sensor and cable laying scheme is marked on the wall;
- A heater with a heat-reflecting foil is laid on the rough base, which should be on top after laying;
- A steel reinforcing mesh is laid to which the cable is attached. Instead of a grid, you can make special guides;
- The cable is laid according to the given scheme. Most often, the "snail" or "snake" scheme is chosen, there are more complex modifications of the cable layout;
- A sensor temperature controller is mounted on the wall;
- Turn on the equipment to check the work;
- Provided that all the elements are working, you can start pouring the cement-sand screed;
- Finishing coating is laid;
- The system is put into operation after the screed has completely dried.
 Installing a heating mat is an easier way, since there is no need to pour a screed to install such a heater.
Do-it-yourself installation of a heating mat:
- The thermostat is placed on the base. If the mat is not on an adhesive basis, then it is fixed with adhesive tape;
- The cable is connected to the thermostat;
- The adhesive mixture is applied directly to the mat with the heating cable and the tiles are laid.
A feature of the electric floor in the bathroom is that it is necessary to clearly calculate where the plumbing and furniture will be.
A cable is not laid under them, but it is important that a person, standing near a washbasin or toilet, feels warm in his legs
Pros and cons of the underfloor heating system on the walls
Before considering the negative aspects of such heating options, one should recall the principle of their operation, which in itself is a big “minus”. Many people know that heat in a room is distributed according to the principle of convection or radiation. The peculiarity of the first option is that the heated air immediately goes to the ceiling, and the thermal cure diverges from the source of twenty centimeters to a maximum, after which air convection comes into force.
Now let's imagine what happens to the heat if the wall is the main or even the only source of heating. Naturally, a twenty-centimeter space will be heated, after which the heat will rise up, warming the floor to the neighbors. Simply put, it will be cool above your floor, hot near the ceiling, acceptable in the center of the room.In a word, the atmosphere in the room will not be very comfortable. Many will say in this case that there are heating radiators. Yes, there are, but in this case, the installation of a warm floor on the wall completely loses its meaning. You can use this option to dry wet walls, but the pleasure will be very doubtful at the cost of spending. It will be better to perform high-quality sealing of interpanel seams.
With regard to other disadvantages that are inherent in heating systems built into walls, the following can be said:
- it is not recommended to arrange furniture near heated walls. It will not only be an obstacle to the spread of heat, but it will also begin to dry out, reducing the operational period;
- on the wall in which the heating system is mounted, you cannot hang pictures or a TV - there is a chance that the installed mounts will damage the heating elements of the heating. But this question can be thought out in advance, at the stage of system installation;
- large losses of thermal energy await you. Everything is simple here - the system heats the wall, on the back of which there is cold outdoor air;
- there is another negative feature - the dew point, which will begin to shift deeper into the wall. In winter, moisture will accumulate in the form of condensate, which will entail two problems - freezing and the development of fungus. The cycle "freeze - thaw" will be an unambiguous cause of premature destruction of the walls;
- built-in electrical systems will definitely consume a lot of energy;
- wall finishing will serve you much less than during normal operation. The wallpaper will begin to peel off, cracks will appear on the surface of the plaster layer.
In contrast to what has been said, only two positive points can be put forward:
- since the heating will be vertical, dust will not spread much throughout the room;
- laying the heating system in the wall will free up additional space in the room.
 Warm floor on the wall has a number of disadvantages
In a word, if there is an idea to arrange wall insulation with a floor heating system, it is recommended to carefully weigh all the features and consult with specialists.
Features of two-pipe circuit wiring
The two-pipe system is represented by several varieties. They have a different scheme for connecting heating batteries in a private house, and the vector of movement of the coolant.
In small private houses, the following types of two-pipe heating systems are used: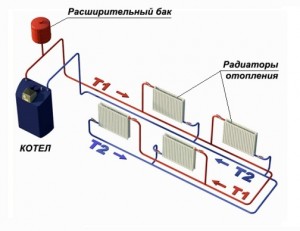
Brief characteristics of two-pipe systems
Dead-end system - the entire pipeline network consists of two arms (branches) one by one is supplied, and the coolant is returned through the other arm. The movement of water occurs in opposite directions.
 Associated two-pipe system - the reverse shoulder serves as a continuation of the supply shoulder (branches), i.e. the system is looped. Such a scheme for connecting heating in a private house is deservedly popular.
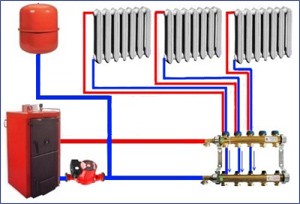
Collector - the most expensive wiring scheme for heating a private house due to the need to lay pipes to each battery, and their laying is hidden.
Open "gravity" two-pipe system
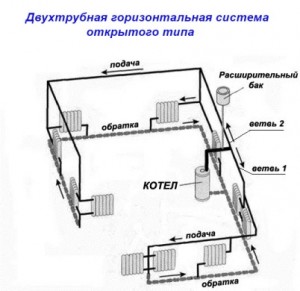 Consider the introduced heating in a private house with your own hands; a two-pipe open scheme is selected and an open tank is installed at the top of the circuit. The pressure depends on the height of the tank, which determines the speed of movement of the liquid in the “gravity-flowing” system. The main advantage of a two-pipe system is that water flows to the radiators at the same temperature, and a clear separation of pipelines into supply and return lines facilitates control automation.
For the successful operation of the "gravity" system during installation, a slope of 3-5 mm / m is provided. Due to gravity, a heating system of any type can operate if the necessary conditions are created - the slope of the heating medium supply lines for natural circulation.It must be taken into account that the "gravity" system can only work with an open expansion tank.
Closed two-pipe system
Steam heating is being installed in a private house; the scheme is chosen closed, and its appearance depends on the number of storeys of the building. If the house is one-story, then two branches of the pipeline are laid - the supply and the "return", and already heating devices are connected to them in parallel.
And in order to mount the heating of a two-story private house with your own hands, the wiring diagrams must contain the required number of fluid supply branches. One branch of the collector should power the batteries of the upper floor, the second arm feeds the batteries of the lower floor. The water that has given up its heat is returned to the boiler through the "return". A closed system must have a circulation pump to create pressure.
Finishing nuances
Remember that because of the built-in heating system, decorative finishing materials. Applied to the walls, they will be used less. For example, wallpaper on a wall that has an electrical system built in can fall off after a few months. And if the heating is built into the walls of the bathroom, it is necessary to carefully choose the adhesive composition so that after the first season the tiles do not crumble. Only drywall material can inspire peace of mind with regard to finishing - nothing happens to it.
So, it remains only to decide whether there is a need to arrange wall heating and choose the right system.

- Content:
- Can IR floor heating be mounted on a wall or ceiling?
- How to fix a film warm floor to the wall
- How to lay infrared thermal film on the ceiling
- How can I cover the IR film on top
- Which is better, infrared floor, wall or ceiling heating
Conventional heating systems use the principle of heating the surrounding air by radiating thermal energy. Unlike them, infrared floors heat the surface of any solid objects, and excess heat is transferred to the air masses in the room. This is what allows you to lay a film warm floor on a wall or ceiling, without reducing productivity and heat efficiency.
How to fix a film warm floor to the wall
Self-laying infrared floor heating on the ceiling or walls, although different from installing the film on the floor, requires only minimal technical skills.
The installation process is carried out taking into account the following recommendations:
- The strips are mounted vertically, not horizontally.
- The wire is connected on top of the film.
- The base must be pre-leveled and dry.
The rest of the work is carried out as follows:
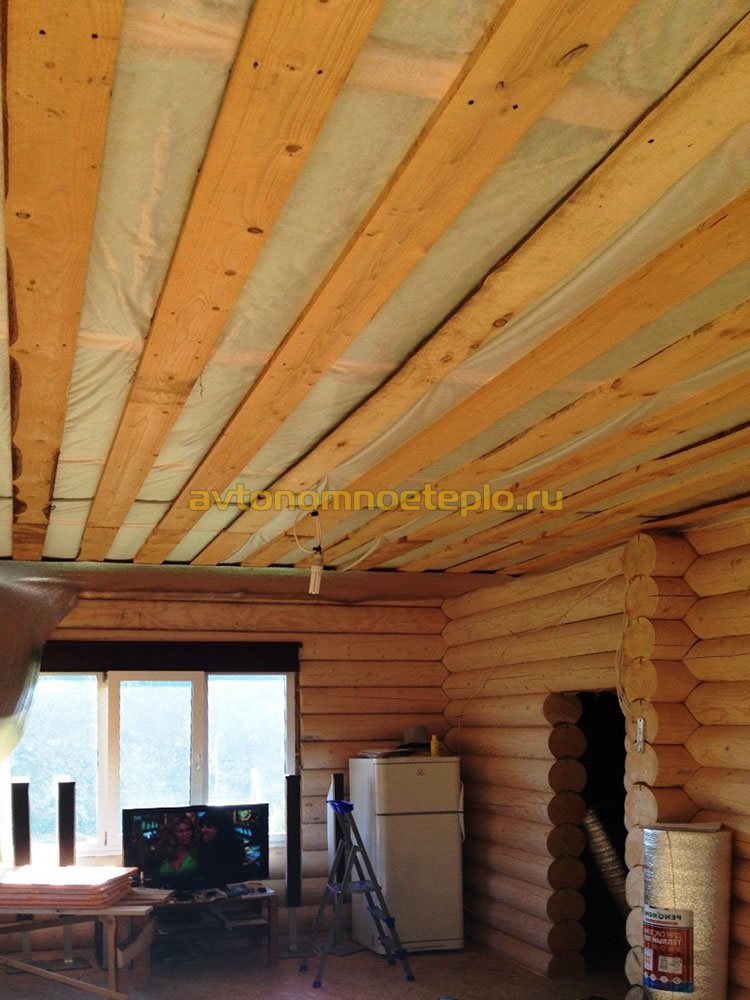
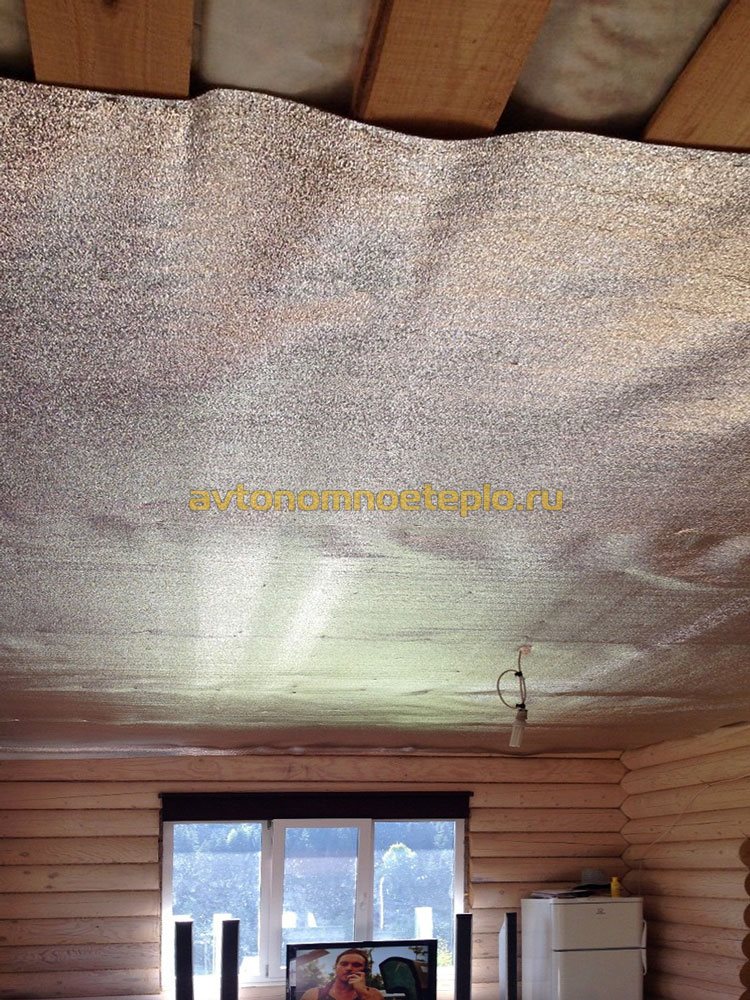
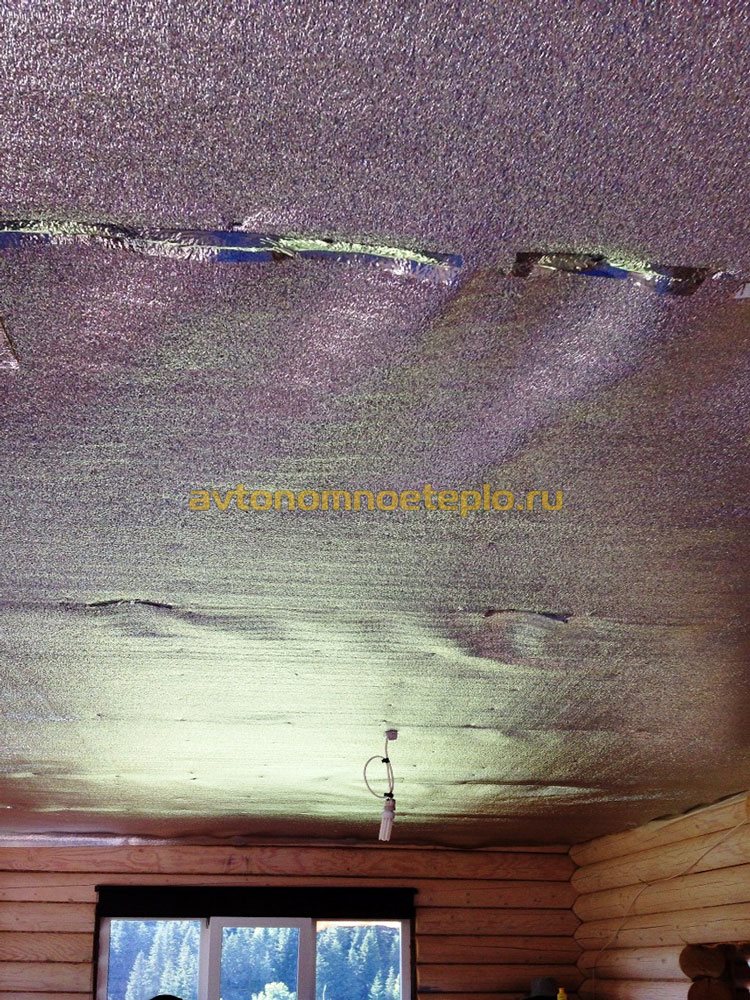
- A heat reflective coating is installed. The heat reflector is designed to direct the IR rays in a strict direction into the room and prevent heat from escaping. For this purpose, you can use any heat-insulating material, except for the one that has a foil layer.
- The future scheme is calculated, according to which it will be necessary to install the film. The following indicators are taken into account: at least 1-4 cm is indented from the edge of the wall. The width of the mat is 25 cm. It is strictly forbidden to overlap strips.
- Stripes are laid. They are attached to the wall with dowels in special places where there are no conductive elements. A gap of no more than 5 cm is left between the rows of the film. Since only the part of the wall where the mats are laid will heat up, this measure will ensure even distribution of heat in the room and prevent the appearance of cold zones.
- Power supply connection. All mats are connected in parallel. The operating instructions contain a connection diagram, which must be strictly followed. All electrically conductive areas are covered with bituminous film. Installation begins with the installation of a thermostat, then the power wires are scattered on mats.
- Check the performance of the wall heating system. Each individual mat must be evenly heated.With a lack of heating, the joints are pressed in or the film section is completely replaced.
- From above, the floors must be covered with decorative material. Gypsum-based non-flammable finishing materials are suitable for this purpose. You can use drywall or any plaster.


Solution options
In modern construction, it is customary to use three methods for masking heating mains. Each has its own advantages and disadvantages, and the choice depends on the living conditions in a particular case. Now more about all the options.
Pipes in the wall
The choice of this method is associated with the preparation of a detailed layout of highways. The sketch must clearly indicate the location of pipes, connecting elements and functional assemblies. And only after that you can start chasing the walls. The work is done in one of two ways:
- With a chisel and hammer. Very old and unproductive method. It is suitable when you want to avoid the formation of a large amount of dust in the room.
- Using a perforator. A very effective option that allows you to reduce the time to complete the work tenfold. But there will be a lot of dust.
If you draw the course of thermal mains on the wall, then the work will be argued. The contours of future recesses eliminate the need to determine the further path during the arrangement of the strobe. Speed up the work and cut the grinder around the perimeter of the recesses. You can make them in a matter of minutes, saving you a lot of time later on aligning the edging. In addition, this is a guarantee that the plaster will not fall off anywhere in a layer.
It is important to make recesses taking into account the thickness of the thermal insulation. It is always laid in a wall to avoid unproductive heat loss.
The most common option is covers made of flexible cellular polymer. In order not to be mistaken in size and leave a margin for plastering, 10-15 mm must be added to the outer diameter of the insulation. This will be the optimal width of the strobe in the wall. Do not forget about the gap between adjacent highways. When you have to make a recess for two (or more) adjacent pipes, you need to leave a free space of 10 millimeters between them. This is necessary for a thermal gap and good adhesion of the plaster to the base.
Important! After installing the pipes, you should not immediately start plastering the walls. It is advisable to first check the system for tightness under pressure
Only after making sure that there are no leaks anywhere, you can continue to work.
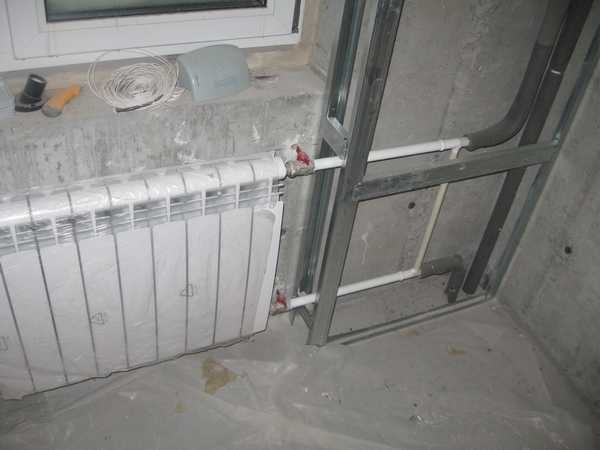
Plasterboard box
Pipe box
This is another method that solves the issue of how to hide heating pipes. Its essence lies in the fact that in the course of laying the pipes they equip the frame, which is subsequently sewn up with drywall. For the crate, you can use a metal profile or wooden bars. The structure is securely attached to the wall with self-tapping screws or dowels. Drywall, from which the front part is made, is very convenient to process. In addition to this, the material is environmentally friendly. It is attached to the base with screws. Creating a box has its advantages:
- Fast installation.
- Lower price compared to laying highways in the wall.
- When performing repair work, quick access to highways is provided. If desired, you can leave technological openings, although it is easy to do without them. Drywall is very easy to remove, and then it can be installed again in the same place.
- This option allows you to significantly improve the design of the room. For example, it is easier to solve the issue of concealed installation of a heating radiator.
A plasterboard box is a universal solution that allows you to decorate almost all engineering communications.
false wall
Installation and cistern hidden behind a false wall
This option is used in cases where it is not possible to solve the issue with the help of a drywall box.A similar situation may arise if horizontal lines intersect with vertical ones, or if installation of large communication nodes is required. The advantage of the wall is that it imitates a real wall and does not stand out in any way from the general background. Quite often, such a solution is found in toilet rooms when it is necessary to hide sewer and water systems. Before you hide the heating pipes behind a decorative wall, it is advisable to reconsider the location of other communications. It is possible that they can be hidden behind a false wall.
Installation of heating in the walls
The comfortable existence of a person in an apartment or a private house is provided primarily by the interior, decoration, decor, area and arrangement of rooms. One of the components of such comfort is the atmosphere in the living room, humidity, temperature and the absence of drafts. Windows and doors in this case must have good thermal insulation, as well as the heating system, which is a guarantor and protection against constant heat loss from the room during the cold season.
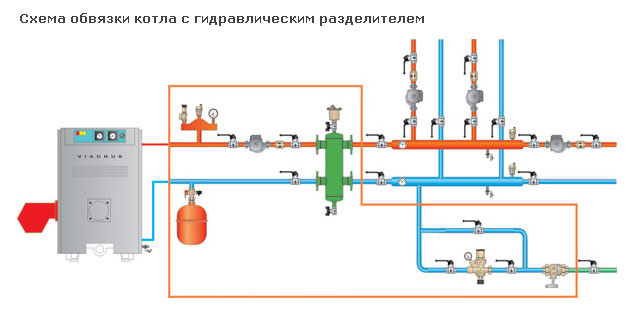
Scheme of piping the boiler with a hydraulic separator.
In order for the heating system to become really effective enough, it is necessary to think carefully and calculate what type of heating system to choose to achieve the optimal temperature in the room. In this regard, in recent years, the heating system in the walls of a house or apartment has become especially popular. What is a warm wall heating system? This is a system similar to the "warm floor" system, only used on the wall and installed behind some decorative wall covering or directly under the plaster layer.
How to close heating pipes in a wall or floor
At the stage of overhaul or construction of the premises, heating pipes can be hidden in the wall or floor. It is impossible to say for sure whether this is a good option or not.
Firstly, if you are going to hide communications in an apartment of a multi-storey building, and not in a private household, you may have problems. Alteration of engineering communications, according to the law, requires permission. Not only will you need to order a rework project, you will then need to coordinate it with the operating organization. And the chance of getting permission tends to zero. Even if you have obtained a permit, or are upgrading / equipping your home, there are pros and cons to this decision.
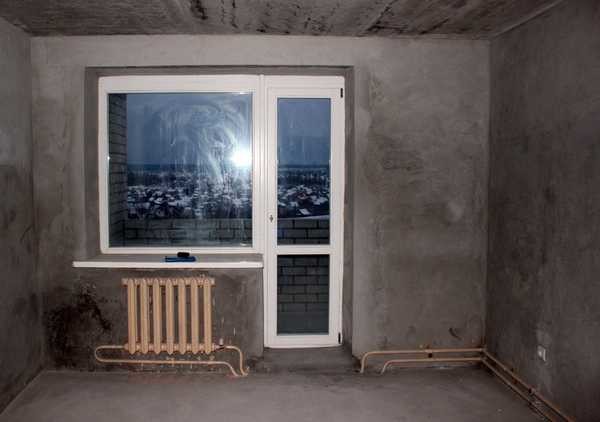
Not everyone wants the heating pipes to be in full view
Pros. firstly, they do not spoil the appearance of the room, and secondly, their heat transfer increases, since the thermal conductivity of building materials is better than the thermal conductivity of air. That is, it turns out that by hiding the pipes in the walls or floor, you increase the heating efficiency. But this is on condition that you do not protect them with a heat insulator, but such a solution also has negative sides (described below). To all this, such a solution has a rather big minus: in the event of a leak or the need for replacement / repair / revision, you will have to destroy the wall with all the ensuing consequences. We are not talking about a quick repair of a breakdown at all, and if you live in a high-rise building, then you are guaranteed to flood your neighbors ... So it’s better to hide heating pipes in the walls in your house: at least you won’t have to pay for repairs to your neighbors.
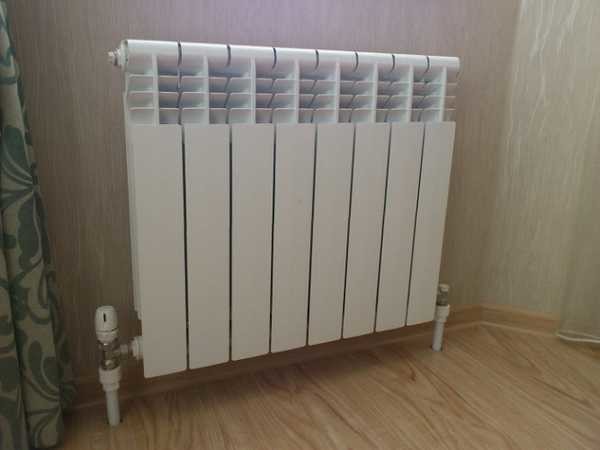
This is what a radiator might look like if the pipes are hidden in the floor
However, more and more people are doing just that. And all because modern materials have more than a solid period of trouble-free operation, some of which are calculated in tens of years. For example, the service life of some types of polypropylene products is 50 years. Almost the same amount of quality metal-plastic products serve.Copper has the longest service life - up to 100 years, although it also has its drawbacks: too high thermal conductivity of copper can lead to the fact that most of the heat will go to the walls, and nothing will reach the radiators, and copper is very demanding on conditions, and if not observed, they can collapse in a matter of months. A pipeline made of high-quality similar materials may well lie in the wall for more than a dozen years and at the same time there will be no problems for all the time
It is only important to choose high-quality material and lay it correctly
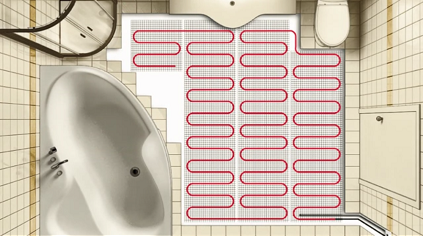
Why you need underfloor heating
Firstly, the floor will always be not only warm, but also dry. Moisture will not accumulate. The bathroom itself will also be dry, even if you started doing laundry or just washed yourself.
Secondly, it is not very convenient to install heating radiators in the bathroom, the room is small, and the underfloor heating system does not take up space and is not visible.
Thirdly, not only the floor will be warm, but the entire air space of the bathroom. The heated air will rise up and heat the entire room.
And fourth, all your towels in the bathroom will also be dry.
This idea of heating was borrowed from the Roman baths, where hot air passed through special underground channels and also heated the floor in the bath.
In this video you can see how to make a warm floor. You may want to do it yourself:
There is not one, but several ways to arrange such a floor.
Hide heating pipes under drywall
This option is suitable for both rooms and domestic premises: bathroom and kitchen. The advantages and disadvantages are almost the same as the previous method. The only difference is that you do not need any coordination and project: there is no transfer of engineering networks. So from the side of the law there can be no claims.
The advantage of this solution is that you can easily hide the heating pipes in a panel house, since it is almost impossible to ditch there, and there is nothing: the thickness of the plates is very small (besides the fact that permission is unrealistic to get). But getting to communications is almost as difficult. Unless to make one of the panels on hinges and a latch. To be able, if necessary, to easily reach valves or pipes. Fortunately, today there are a variety of accessories that will allow you to realize the idea. If you are going to "mask" the heating in the bathroom or toilet, you can provide an inspection hatch located in key places.
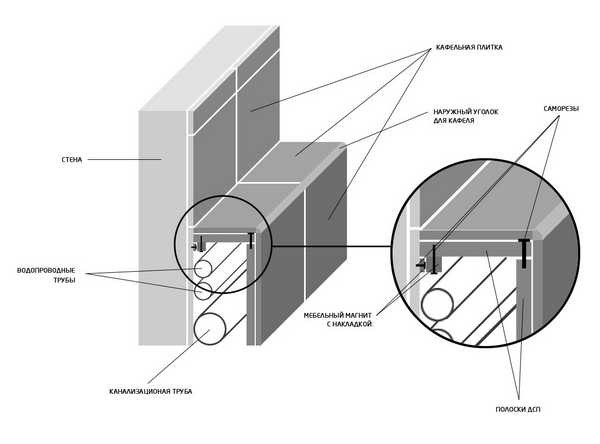
You can make one of the panels (top) on magnets
In any case, the procedure for collecting the box will be the same: first, assemble the frame of the desired shape from metal profiles, then attach finishing materials to it: drywall, MDF panels, plastic panels, plywood or OSB-boards, finally. Some of these materials require finishing, some do not. But further work is already underway. Such a box may look like a cabinet, a shelf.
To hide the heating pipes in drywall, you must first assemble the frame
One of the options for the frame can be a false wall. Neither the order of work, nor the principles are different. All the difference is in the volumes: both the frame is larger, and the surface that requires plastering. But the order is the same: first, a crate is attached to the wall. If the profiles are deep enough to hide the pipes in thermal insulation, that's good. If not, you'll have to at some distance mount another crate. Alternatively, to increase the space, you can first attach the counter-batten, and then the crate perpendicular to it, to which drywall or other panel material is already attached.
Often such boxes are used in a bathroom or toilet room, and everything is tiled with tiles, which are “planted” on glue. The seams are filled with standard grout, the corners can be closed with plastic corners.
The photo below shows a variant of how you can beautifully hide the heating pipes with a false panel along the wall.
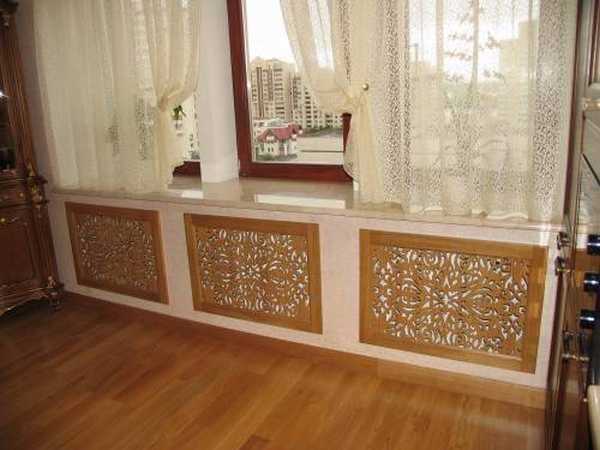
One way is a false wall. Looks attractive
How to hide heating pipes in hay or floor, under drywall
Modern building technologies allow us to make our homes more and more perfect both in terms of comfort and aesthetics. Heating, of course, increases the comfort of existence in winter (and not only ...), but the heating pipes that we are forced to lay in all inhabited premises are clearly not an ornament. Of course, modern plastic products look more presentable than steel ones, but they clearly fall short of a decorative element. Well, at least the quality of many materials allows you to hide them in a wall or floor, without fear of the need for an early repair.