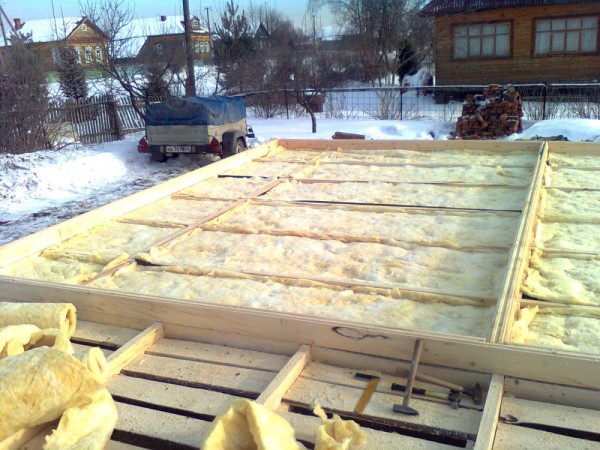
Materials and step-by-step guide for home insulation
What should be considered when choosing an insulating material?
When choosing a heater for the house, you need to pay attention to the following indicators:
- Dew point; Vapor permeability of walls.
The dew point is the temperature at which moisture in the air begins to condense into water.
The dew point is located in the wall and can move about it when the external and internal temperatures change.
For example, in a room the temperature is 20 degrees (50% humidity), which means that the dew point will be 13 degrees (that is, if there is an object with this temperature or lower in the room, condensation will form on it).

The vapor permeability of the walls is the function of the material to retain or pass steam through itself. This helps to remove steam (and lower humidity) from the room.
For the most effective insulation you need:
Try to insulate from the outside (if you insulate from the inside, the wall still remains cold, it just does not let the cold into the room).
And in winter, a wall with internal insulation can generally freeze through (especially in the corners).
If you are going to make a “pie” from different heaters, then you need to select it in such a way that the vapor permeability increases from the inside to the outside.
Problems
This method has a number of disadvantages. It is for this reason that the method has many opponents. Wall insulation “from the inside” can cause the following problems:
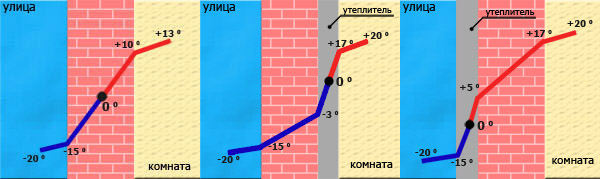
- The walls are not protected from the cold. The supporting structure of the building continues to be in contact with the outside air. This can lead to its gradual destruction. Cracks will begin to appear on the surface. This event not only does not protect the outer wall from the cold, but also takes away some of the heat from it, because before the insulation, part of the heat from the room heated the wall, and now this flow is blocked.
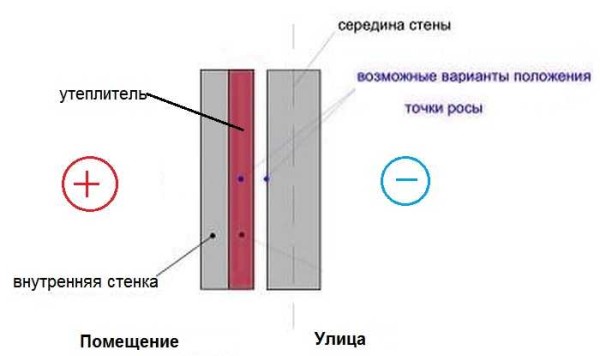
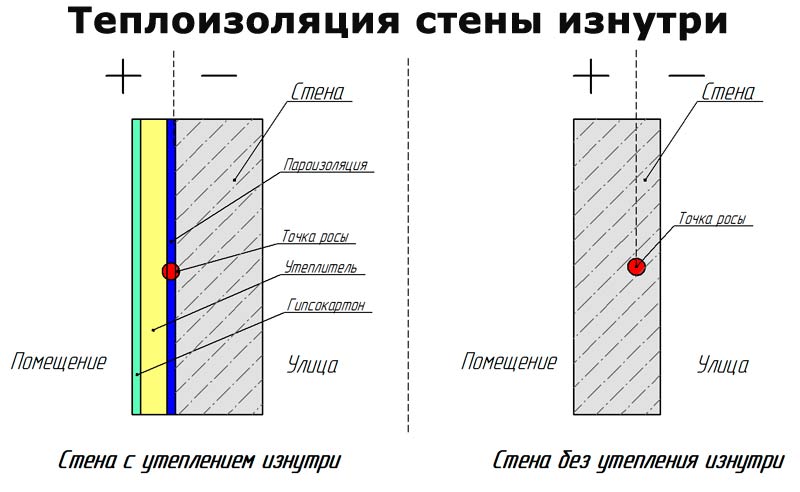
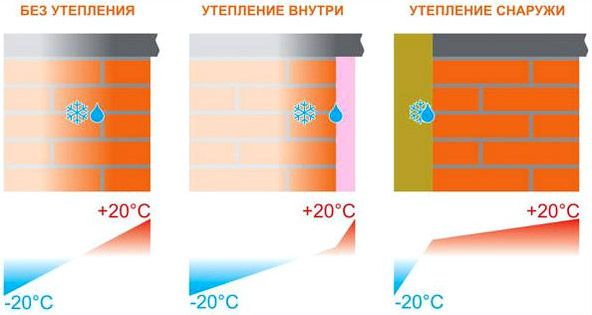
- Dropout of condensate. It forms on a cold surface in contact with warm air. Heat engineers call the place of condensation the dew point. The main task of thermal insulation is to move the dew point outside the wall. Insulation "from the inside" provides a shift in the dew point to the boundary between the wall and the insulation. This process is hidden, so the owners of the house do not notice it. But humidity will be an excellent condition for the reproduction of various microorganisms.
- Reduction in floor space. Modern types of heaters have good efficiency. But science has not yet come up with such a good material that its thickness is minimal. To insulate the house from the side of the room, it will take from 5 to 10 cm of insulation. It eats up a lot of space. This is not so noticeable to the eye, but if you calculate the losses for the entire building, the figure is significant.
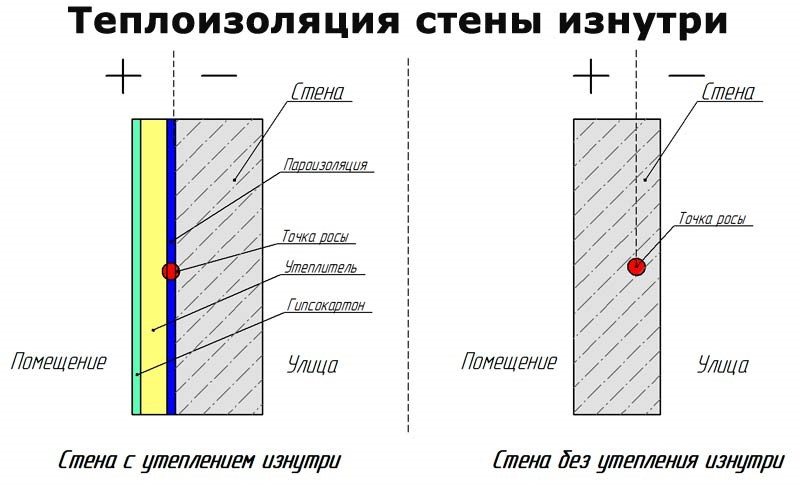 With internal insulation, the dew point shifts to the border between the wall and the insulation
Therefore, before deciding on the internal insulation of the walls of the house, we recommend that you carefully think about the listed problems. In this case, ignorance does not exempt from responsibility, since the result of inattention will make itself felt in the first years of operation.
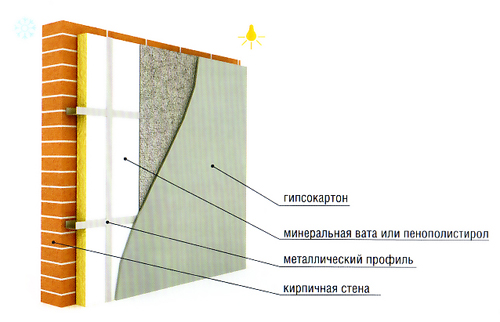
How to insulate walls from the outside
Wall surface preparation
The laying of expanded polystyrene or polystyrene is carried out according to the same principle as with internal insulation.
The preparation of the wall surface consists of two stages: cleaning and priming. Wall cleaning is used, as a rule, in panel houses in which the surface of the plates was painted and over time the paint began to peel off. Also, it is recommended to clean the wall if the so-called “fur coat” was applied to it - a decorative insulating layer that began to crack and crumble over time. When the surface of the wall is cleaned, we prime it and wait for it to dry completely.Please note that insulation work should be carried out in dry and calm weather, at temperatures from +5 to +30 degrees.
Insulation laying
When the wall surface is ready, we proceed to the installation procedure of the heat-insulating material. Laying insulation start from above, in horizontal rows. Styrofoam or expanded polystyrene is also fastened with the help of fungi. Please note that the insulation sheets should go at least 5 cm beyond the level of the seams of the panel plates, if you live in a panel house - this is necessary in order to insulate the seams. If you live in a brick house, then the insulation should go beyond the perimeter of your apartment from the outside. At the locations of the windows and at the end of the rows, we cut the insulation to the required size. About 5 fungi per sheet are used to fix the insulation.
Finishing work
Unlike internal insulation work, with external, finishing work is done in a slightly different way. First of all, the seams of the joints of the insulation are sealed with mounting foam, for this some installers make special grooves in these places to seal these seams well. When the mounting foam has dried, cut it off.
Next, using masking tape, we finish the seams, this must be done so that cracks do not form in this area. To do this, apply a thin layer of adhesive mixture and then melt the masking tape into it. After finishing the seams, we proceed to finishing the entire area of \u200b\u200bthe insulation. To completely finish the surface of the insulation, we need an adhesive mixture and a masking grid, do not confuse it with masking tape. This procedure is carried out in the same way as with internal insulation: an adhesive mixture is applied to a small area of \u200b\u200bthe insulation, in which the paint mesh is embedded. It is better to apply the mixture in small areas so that it does not dry out while you are busy with the previous area. Next, we install a stainless steel visor to ensure the drainage of water. To prevent moisture from remaining on the surface of the insulation, it is advisable to make the visor at an angle of 45 degrees so that water flows down.
To give a beautiful look, it is recommended to paint the surface in any color you like, paint for outdoor use.
Proper internal wall insulation in a house or apartment
There are only two ways to insulate the walls in the rooms from the inside and not get a problem in the form of dampness:
- recreating a multi-layer wall (place a half-brick wall with insulation at some distance);
- make the wall heated, and then insulate it.
These options work, but as you can see, they "eat up" a significant amount of space and cost decent money. In each case, it is necessary to consider what kind of insulation and how much is needed, but the wall cake remains the same.
Second wall
At some distance from the main wall, a second wall is installed with a thickness of 10-12 cm. Between the two walls, a layer of insulation is attached to the inner one, which is required for these conditions. At the same time, a ventilation gap of at least 3 cm must remain before the outer wall. In total, this entire structure will be 20-25 cm from the main wall. It will “eat” a very considerable area.
Options for insulating walls from the inside
As you can see, in this case, the dew point can be inside the insulation or on the inner surface of the wall facing the street. To be able to remove the formed moisture, you can make forced ventilation by installing one or two exhaust fans.
Since in this case the insulation will get wet, it is necessary to choose one that is not afraid of moisture. These are polyurethane foam, expanded polystyrene, foamed glass. You can use some types of stone wool, but only those that are not afraid of moisture (there are some).
It is necessary to fix the heat-insulating material simultaneously with the construction of the walls. They laid it out to a certain height, fixed the thermal insulation.It is inconvenient to work, but there is no other way out.
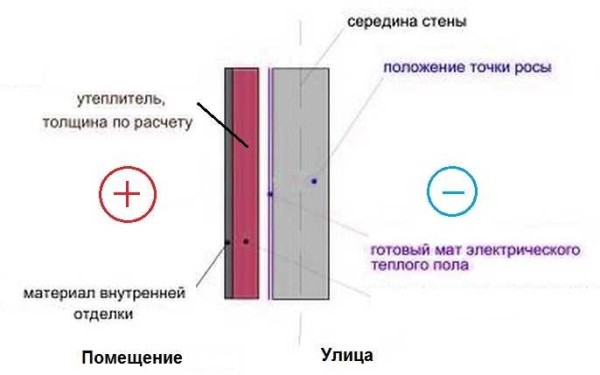
Heating with electricity
The idea of this method is to transfer the dew point inside the wall during internal insulation of a concrete or brick wall. To do this, it must be heated. The easiest way is to attach an electric underfloor heating mat. At some distance from it, a heater is installed, on top of which there is a finishing layer.
How to insulate a wall in an apartment from the inside
In this case, there are no problems with the removal of moisture, and much less space is required for the installation of the system: from 8 cm (with a ventilation gap of 3 cm and a heater thickness of 5 cm).
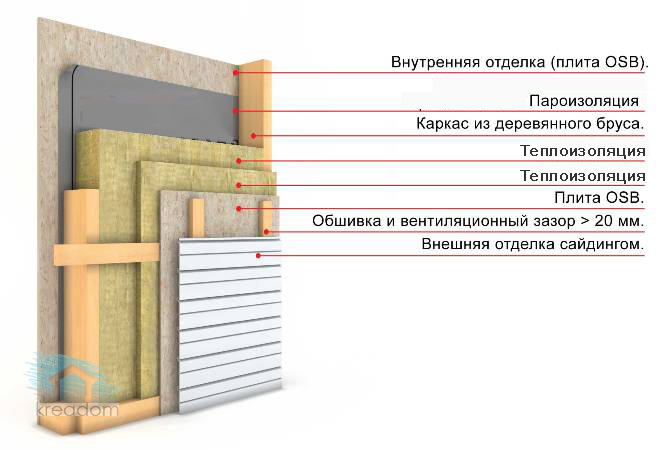
With this method, the heat-insulating material can be any. To install it, first a crate is made, then a counter-crate, and a suitable insulation is already attached to it.
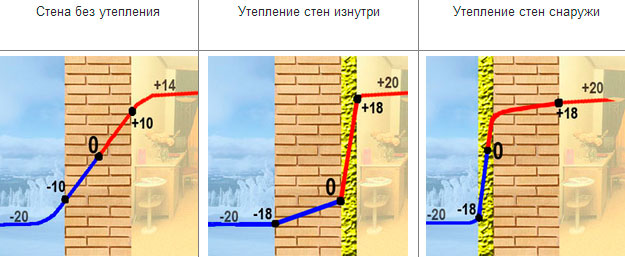
Comparative analysis of insulation inside and outside
Preserving good conditions in the house will enable high-quality insulation of walls, foundations and ceilings. You have to choose between two mounting methods of material for thermal insulation:
Insulation from the outside - placed on the outside of the building, its advantages include:
- protection of the surface from the influence of atmospheric conditions, extending the service life;
- the dew point remains on the outside of the room and the walls are not covered with condensate;
- heating costs are significantly reduced;
- the internal area of the house remains unchanged;
- a large number of heat insulators create a layer of sound insulation and reduce the level of penetrating noise;
- there is an opportunity to adjust the architectural image of the house to your own taste.
Of the bad qualities:
- high price of materials;
- the process of thermal insulation depends on the weather - at low temperatures or during rain, work cannot be performed.
Insulation inside - installed inside Houses. This option has a lot of negative factors, but provides a temperature increase in the room by a couple of degrees. Thermal insulation installed inside in several cases:
- if access to the surface from the outside is difficult (high-rise buildings);
- you need to preserve the appearance of the exterior of the house, for example, wood decor.
Cons of insulation inside:
- the required area is lost;
- condensation will appear between the wall surface and the heat insulator at the dew point, provoking the growth of fungus and mold;
- the walls are not protected from the influence of the external environment, they freeze through and become unusable.
The comparison shows that the insulation from the outside is better than the inside. It effectively maintains a high temperature and optimal moisture, increases the service life of load-bearing structures. Thermal insulation placed inside, loses on all counts, not counting the ability to do it at any time. But you can’t refuse it, for most owners of living space and houses this is the only option to reduce heat loss.
How and how to insulate the walls of the house from the outside
Let's dwell on the external insulation in more detail.
First of all, we inspect our wall, check the finishing layer for strength (ideally, you need to completely remove the finish).
We completely prepare the wall for insulation (you can follow the advice above). That is, we clean the past coating, close up cracks, primer.
After that, you need to choose and purchase a heater.
The most commonly used polystyrene (styrofoam).
The advantages of foam:
- Good thermal insulator; Mold and fungus very rarely form on it; Low price; Long service life; Good resistance to temperature fluctuations.
Do not forget that before insulating the wall must be leveled, large differences greatly spoil the future appearance of the facade.
Insulation installation
The foam has been selected and purchased, now you need to install it (we also bought glue, cement - we will lay insulation on this).
The glue must be diluted with water until the consistency of the plaster is obtained and the spatula must be applied to the wall.
On the lower border of the foam plastic sticker, we set the bar along which we will line up the panels.
First we smear the wall, then we cover the panels with a small layer and apply it to the wall (slightly pressing against the wall).
After that, we additionally fix the foam sheets with “umbrellas” (you can also fix them with “umbrellas” a few days after gluing).
Then we cover the joints and caps with glue (if the gaps are large, then we first blow it with construction foam).

A mesh is laid on top, a cement mixture is applied to the mesh (try to glue the mesh gradually, in parts).
After the mortar has hardened, we grind the surface with a grater with sandpaper, removing roughness and irregularities.
After that, we apply the last layer - the finishing mixture. After it dries, we also grind the surface with sandpaper.
Proper insulation of the house outside and inside
What you need, first of all, to know about the insulation of the house?
At the moment, there are two main types of insulation:
The outer one is installed on the outer part of the wall and is exposed to weather conditions (but does not take up the space of the rooms) and the inner one, which is attached to the inside of the wall (it is better to use in large rooms, since during installation the insulation eats up about 10-15 cm from all sides).
Of course, there are still disputes and discussions about the best type of insulation (insulate from the outside, inside or both outside and inside). A lot has already been said about this, in favor of each option there are advantages and disadvantages.
The better to insulate the walls inside the house or the problems with insulating houses from the inside
Now it is worth considering the possible problems of insulation
When insulating from the inside:
It is important to lay the insulation tightly and tightly adjoin the drywall. If you leave space or unsealed cracks, then cold will seep through them with the onset of cold weather. Also, make sure that the temperature of the load-bearing walls does not fall below the dew point, otherwise condensation will form. Well, moisture is a fungus, mold. How to get rid of these problems?
How to get rid of these problems?
Fasten the insulation tightly to the wall (it is better to use insulation with aluminum foil).
It is better to install not one layer of drywall, but several. So, all insulation work can be done with your own hands and this does not require special knowledge or special tools.
Externally, insulation is more beneficial both from the point of view of saving space and from the point of view of keeping warm.
The issue of proper home insulation is always relevant for regions with harsh climatic conditions.
High-quality thermal insulation reduces heating costs in winter and maintains a normal indoor temperature in summer. If the need for insulation is beyond doubt, then when choosing where to place it, difficulties arise. Having studied the pros and cons of external and internal thermal insulation, one can confidently judge their effectiveness.
Insulation inside, how to avoid condensation
When it is not possible to make thermal insulation from the outside, it is installed inside. The first task in this case is to avoid the occurrence of condensate and moisture that is detrimental to materials. Why do water droplets appear on the surface of the wall? This happens when cold material and warm vapor from the room come into contact. To keep the wall dry, it must be isolated from the penetration of steam. To do this you need:
- apply a heat insulator with a small vapor permeability, it will be better if its indicator is less than near the wall;
- make high-quality plasterboard cladding resistant to moisture;
- apply a waterproofing sheet during the installation of a heat insulator;
- reduce indoor humidity with ventilation.
When choosing a heat-insulating material, it is necessary to focus on vapor-resistant products: foamed polymer, extruded polystyrene foam, artificial latex. It is possible to use min. cotton wool, but its installation will require considerable effort:
- it is necessary to strengthen the waterproofing on the wall;
- make a wooden frame from bars impregnated with an antiseptic, or a zinc profile;
- put mineral wool, preferably with a glued layer of foil;
- make a vapor barrier;
- install gypsum cladding.
Extruded polystyrene, which consists of polyethylene foam and aluminum-based foil, can be used as a vapor barrier material. The canvases are laid end-to-end and fixed with brackets, in the connecting places they are smeared with glue with foil tape.
Artificial latex is an artificial two-component composition sprayed onto the surface of the wall. It is moisture-resistant, vapor-resistant, performs a monolithic surface without cold bridges. The heat insulator is applicable to any type of surface and resists energy loss well. A layer of material 5 cm thick is considered practical. From the side of the room, it is closed with a plasterboard partition. The disadvantage of this method is the high cost of services for applying artificial latex.
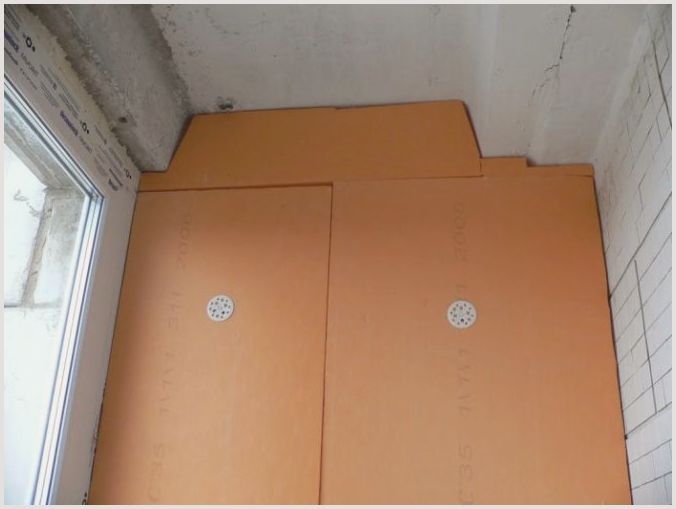
Foamed polymer and expanded polystyrene extruded more often than other heat insulators are used for wall thermal insulation inside. The work is divided into two stages.
- We prepare the surface, including the removal of obsolete finishes, cleaning and priming with an antifungal agent.
- On insulating boards, the adhesive composition is applied over the entire surface, and not pointwise as on the outside.
- In order to have good adhesion of materials to the wall surface, the surface of the foamed polystyrene is pierced with a roller with needles.
- The glue should be quite saturated to fill small bumps. The plates are tightly pressed against the wall. Installation is carried out end-to-end.
- After the glue dries, after 3-4 days, the fastening is increased with dowels-umbrellas.
- The joints of the plates are finished with polyurethane foam.
- Using glue, it is attached to the surface of the heat insulator armor mesh. Plaster is applied on top of the dried layer.
Comparing the two methods, we can safely say that insulation from the outside is more expedient. It significantly reduces heat loss and protects the walls of the house from premature destruction.
Insulation from the inside, how to avoid condensation
When it is not possible to arrange thermal insulation from the outside, it is mounted from the inside. The main task in this case is to avoid the appearance of condensate and moisture that is detrimental to materials. Why do water drops appear on the wall?
This happens when cold material and warm vapor from the room come into contact. To keep the wall dry, it must be isolated from the penetration of steam. For this you need:
- use a heater with a minimum vapor permeability, it is desirable that its indicator be lower than that of the wall; perform a high-quality finish from moisture-resistant drywall; use a waterproofing sheet when installing the insulation; reduce the humidity in the room with the help of ventilation.
When choosing a material for thermal insulation, it is worth stopping at vapor-tight products: polystyrene foam, extruded polystyrene foam, polyurethane foam. It is possible to use mineral wool, but its installation will require a lot of effort:
- it is necessary to fix the waterproofing on the wall surface; make a frame from wooden bars impregnated with an antiseptic or a galvanized profile; lay mineral wool, preferably with a glued layer of foil; perform a vapor barrier; install a drywall finish.
As a vapor barrier material, you can use foam plastic, consisting of foamed polyethylene and aluminum foil. The canvases are laid end-to-end and fastened with brackets, at the joints they are glued with foil tape.
Polyurethane foam is a synthetic two-component composition sprayed onto the wall. It is moisture resistant, vapor-tight, creates a monolithic surface without cold bridges. Insulation is used for any surface and effectively resists energy loss. A layer of material 5 cm thick is considered effective.
From the side of the room, it is closed with a plasterboard partition. The disadvantage of this method is the high cost of services for applying polyurethane foam. Polyfoam and extruded polystyrene foam are used more often than other heaters for thermal insulation of walls from the inside. The work is divided into several stages. Surface preparation, including the removal of old finishes, cleaning and priming with an antifungal agent. Glue is applied to the insulation boards over the entire surface, and not pointwise as on the outside. For better adhesion to the wall, the surface of the expanded polystyrene is pierced with a needle roller. thick to fill small irregularities. The plates are pressed tightly against the wall.
Installation is carried out end-to-end. After the glue has dried, after 3-4 days, the fastening is reinforced with dowels-umbrellas. The joints of the plates are treated with mounting foam. Using glue, a reinforcing mesh is attached to the surface of the insulation. Plaster is applied over the dried layer. Comparing the two methods, we can confidently say that external insulation is more expedient. It significantly reduces heat loss and protects the walls of the house from premature destruction.
https://youtube.com/watch?v=6KlLQrO5-IUrel%3D0%26controls%3D0%26showinfo%3D0
- shop.rockwool.ru
- dachnoe-delo.ru
- remontami.ru
Insulation of the foundation from the inside
 Before insulating the base of the building from the inside, the surface to be insulated should be carefully prepared:
- seal cracks, holes, cracks;
- apply a layer of frost-resistant waterproofing;
- wrap with a layer of vapor barrier, permeable only from the side of the house.
After the preparation has been completed, you can proceed to the choice of insulation material and installation technology. There are three main types of insulation:
- expanded clay;
- backfill soil;
- foam panels.
The most affordable and easy-to-use options are soil and expanded clay. They should be filled in the sinuses of the foundation. The only drawback of this type of insulation is that it will be impossible to revise or repair the subfloor. It should also be noted that the implementation of bulk thermal insulation is possible only in the open base of the building, without a basement.
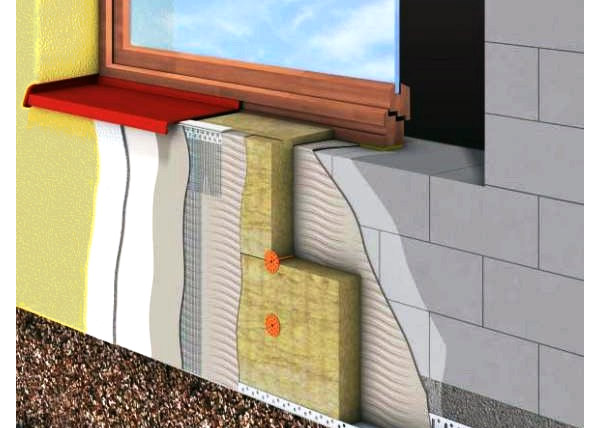
The procedure for panel insulation is as follows:
- glue the panels or strengthen them with thermal dowels;
- fill the formed seams with foam;
- stretch a reinforcing mesh made of fiberglass on the panel;
- to increase the fire resistance of the finish, a layer of plaster should be applied over the mesh.
Naturally, this method of warming the foundation from the inside is quite expensive, but much more effective.
The final stage is the ventilation of the subfloor. To do this, it is necessary to leave vents (through holes) located on the same axis in the foundation wall. In winter, the holes must be sealed, and in the warm period they must be opened so that the condensate accumulated during the winter comes out of the underground.
Conclusion on the topic
Being in our climatic zone, we can say with accuracy that it is certainly necessary to insulate a wooden house from a 200 × 200 bar. While the characteristics of the base material itself provide relatively good heat retention performance, with appropriate processing, these performance can be significantly improved. However, nevertheless, a wooden house cannot withstand sub-zero temperatures and at the same time ensure maximum energy saving qualities. Therefore, to create the missing parameters, it is necessary to create an additional thermal insulation cake. It is he who will provide the house with those qualities that he lacked in the absence of insulation.In addition, such an object will become much more comfortable and cozy, which will allow you to live in it, regardless of the temperature outside the window, even in the most severe frosts.
Wooden houses are much warmer than brick or frame houses. Both the beam and the log hold better and do not let heat through. However, experts recommend insulating such premises, especially if the house is planned to be used for living all year round. Additional insulation will not only enhance the thermal insulation qualities of the house, but also increase the service life of materials and structures.
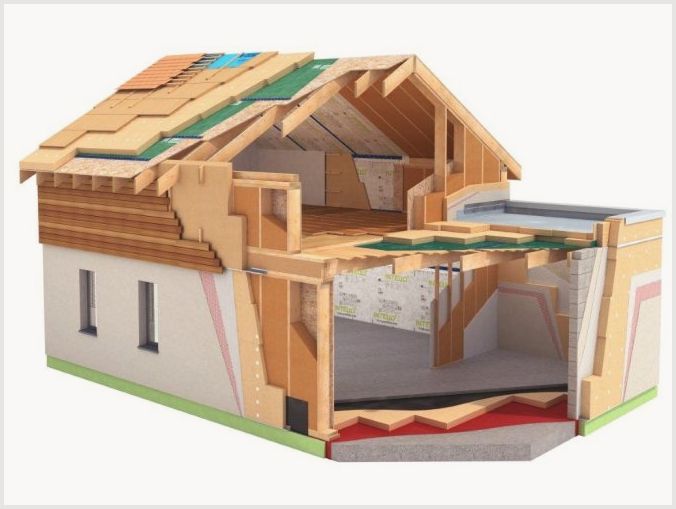
The house is insulated floors, ceiling and walls, foundation and roof or attic. High-quality finishes and insulation will ensure comfortable living and guarantee the durability of the building. Let's take a closer look at whether it is necessary to insulate a house made of timber or logs.