The kitchen is the main place in any home. Here, most often, all family members gather for a meal. Therefore, it is so important to create an atmosphere of comfort that encourages a calm, unhurried meal for pleasant communication. What is the right way to start a kitchen renovation? Its arrangement should be approached with the utmost responsibility. Especially if it is decided not to involve specialists in the repair, but to do the work with your own hands.

Stages of kitchen renovation
The initial stages of repair can be divided as follows:
- To endure the idea of repair, to think over every little thing, for which you need to clearly understand what you want to get as a result.
- Make a decision to bring your idea to life.
- Get to work, start making repairs. The first step is the main one.

The process of doing repairs yourself is not as scary as it seems at first. Difficulties will certainly arise, but everything can be solved. In addition, what will be the satisfaction from the work done with your own hands, when you get the conceived masterpiece! Now from the lyrics - to the repair process.
Preparatory work
The kitchen has many functions. As a rule, the area of this space is limited. Therefore, it is very important to correctly arrange all pieces of furniture and household appliances in order to use it comfortably. How to start a kitchen renovation correctly, what should be considered first of all?
When cooking, the kitchen will always be humid. Therefore, the material for finishing surfaces and furniture must be chosen moisture resistant, which are easy to clean. It is difficult to make the right choice without professionals.
- First you need to draw up a diagram of the future kitchen. The sketch will allow you to decide on the color scheme of the room, the correct arrangement of furniture and other items. This will help in choosing accessories.

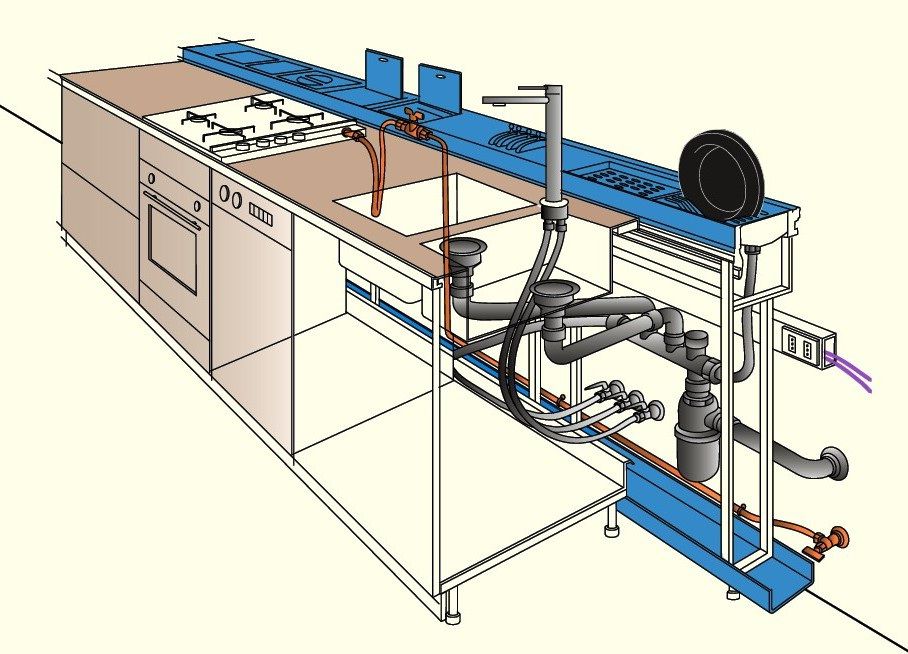
- Calculation of the necessary materials. This stage should be entrusted to specialists. It is necessary to correctly think over the plumbing and sewer systems, the location of the electrical wiring, placement of sockets, ventilation system.
Main stages of work
Next, the main work on the repair in the kitchen begins. Work is being done on demolition of old surfaces ceilings, walls, floors, communications. At this time, ventilation is created. Dismantling can be easily done by hand.

If replacement of door and window openings is required, they begin with the dismantling and replacement of windows. If necessary, create new partitions. Walls, floor and ceiling are aligned.

ceiling can be made tension, hinged plasterboard, decorate it with panels. But it will be easier and cheaper to decorate the ceiling with water-repellent paint.
The flooring can be chosen from the following: ceramic tiles, linoleum or natural stone. The latter material will cost much more.

The walls are usually decorated with washable wallpaper or tiles. Work surface area tiled.

After all the work has been done, the surfaces are finished and thoroughly dried, you can install household appliances and furniture.

Important! Particular attention should be paid to proper lighting. A high ceiling can be decorated with multi-level lighting fixtures. If the ceiling is low, spot lighting will do.

Separately, it is necessary to create lighting above the working area. Ideally, install the backlight on the bottom of the hanging cabinets. The dining area also requires additional lighting. Here you can stop at the wall lamp.
The last step will be the placement of accents, for which various accessories are used, which are designed to make the kitchen individual and cozy.
When planning a room, one should not forget that the main “backbone” of the kitchen is made up of three items: a stove for cooking, a sink and a refrigerator. They should be in every kitchen. Moreover, the convenience of using the premises depends on their location. These items should be close.
Tips and tricks for repair steps
For people who have finally decided to stop living in the monotonous old walls, it comes to mind to make a major alteration of the entire kitchen. There are some dangers here. In order not to make common mistakes, you should figure out where the repair begins, what should you pay attention to in the first place? The main stages of its implementation in more detail.
- The beginning of the repair is always very long and laborious. It is not too interesting to uproot old floors with your own hands, peel off wallpaper blackened from old age, and raise the flooring. The main thing at this time is to be patient and take out all the garbage. More pleasant work to create a new space will follow.
- First of all, electrical wiring is created. Marking the location of sockets and switches is done. If you do not do this right away, then it will be difficult to add another element in the right place.

The main places where sockets are required:
- electric stove;
- hood;
- wall near the working area;
- a place for a TV;
- location of the microwave, dishwasher;
- refrigerator.
- Finishing is always done from top to bottom, from ceiling to floor. Before you start finishing the ceiling, you need to decide on the type of hood and its location.
There can be two options here:
- convector installation;
- ventilation duct device.
The second option is great for creating two-level ceilings that allow you to hide the ventilation pipe. The best option for creating a ceiling - drywall. It is easy to use, allows you to realize any form.

- Wall decoration requires a primer on all old surfaces. Corners are recommended perforated corners. They are mounted on plaster. Be sure to plaster cavities, cracks.
High-quality putty and priming of surfaces is the basis of a good kitchen renovation.
- Work area layout. Can be tiled or hung finished work apron. When decorating a wall with tiles, it is very important to withstand the following parameters:
- the horizontal level of the wall must be perfect;
- angles should be exactly 90 degrees;
- choose the right height for the design of the working area. You should focus on the height of the plate.

Advice! In places where you plan to hang wall cabinets in the kitchen, you can save a little on material.
- Wall preparation. It includes putty work. It all depends on the chosen design material. Under the wallpaper does not require too much layer. And if the choice fell on decorative plaster, then the work should be done most carefully. The surface is then sanded.
- The next step is to cover the floor. The ideal material for this is ceramic tile. You can lay it with your own hands, the process should proceed slowly, carefully. Here you should also maintain a horizontal level. This is very important, otherwise the furniture will not stand up straight.

All dirty work done, you can start finishing.
Common kitchen renovation mistakes
Starting repairs in the kitchen with their own hands, many make the same mistakes. They subsequently turn into the inconvenience of operating the kitchen space. To avoid this and do everything right, you should familiarize yourself with some of the nuances.
- When determining the work surface and floors, it is worth choosing non-porous materials. Otherwise, cleaning will be difficult. Smooth tiles are much easier to clean.Especially not worth doing wooden floors.
- Do not create bulky air ducts. They do not look aesthetically pleasing and take up useful space. If the stove is located far from the vent, it is better to choose a hood that does not need an air duct.
- An unimportant decision - a lot of seams on the work apron. When pasting this wall with wallpaper, you should think about protection, for which you need to choose a holistic material. For example, large glass.
- In a large kitchen, you should not make a work surface along one wall. This creates additional inconvenience when cooking. It is better to create a U-shaped zone, where all the necessary devices are located within walking distance.
- Narrow aisles between furniture. This prevents free movement in the kitchen and opening drawers and cabinets. Keep a distance of at least 1.2 meters. Furniture should be chosen with slightly protruding handles, especially in corner cabinets.
- Replacing hanging drawers with open shelves. This gives the space airiness, lightness. But at the same time, it causes a lot of problems for cleaning and constant maintenance of order. Floor furniture is more convenient with drawers than with shelves.
- A glossy facade is beautiful and elegant, but completely impractical. Cleaning will be required daily.
- Not enough space for small household appliances can be a big problem. It is worth considering that the hostess uses a lot of small appliances. They require free location and access to electricity.
- Heavy hanging cabinets can only be hung on the main wall. Plasterboard partitions simply will not withstand them.
- The ideal location of household appliances is at the level of a person’s belt.
- Lack of lighting is the main problem of the kitchen. Lighting should be multi-level. It is worth conveniently placing the switches so that you do not have to go to them through a dark room.
Do-it-yourself repair is a simple matter. Considering all the nuances, you can quickly get a good result that will please the hostess and the whole family for a long time!