To finish the walls in the bathroom, many owners prefer to use ceramic tiles. It has many advantages: durability, strength, hygiene, beautiful appearance. However, the most beautiful and expensive material, the most outstanding design idea, can be spoiled due to irregularities in the base. Therefore, it is imperative to carry out leveling the walls in the bathroom under the tilesOtherwise, all efforts may be in vain. The quality of the preparatory work will certainly affect the durability and beauty of the tiled walls.

Wall preparation
The process of leveling walls for tiles in new buildings and in old houses will be slightly different. First of all, the fact that in a brand new apartment in most cases it will not be necessary to dismantle the old coating on the walls. But this is only if the walls were not finished at all in the bathroom and toilet. In any other situation, before leveling the walls in the bathroom, you will have to remove old tiles or paint.
In exceptional cases, if the old tile has a perfectly flat surface, you can not remove it from the wall, but stick the new tile on top. Of great importance here is the correct choice of adhesive for bonding ceramic surfaces: a new layer can simply slide off the old base. But, as a rule, after several years of operation, the tiled base acquires some minor defects, so it is better to get rid of it and align the walls under the tiles again.

- Old tiles and mortar are removed from the walls using a puncher, hammer and chisel. It's better to go from top to bottom. Otherwise, if the upper layers are loosely attached, they may collapse after the lower ones are removed, which is fraught with injury. With a chisel, tiles are pry on the wall in turn, a puncher can significantly speed up the dismantling process.
- At removing old paint from the walls it is most convenient to use a building hair dryer. After heating, it is easily cleaned with a spatula. You can use special flushing solutions, without forgetting the precautions.
- After the old tile is knocked down from the wall, it is necessary to carefully examine the resulting base. Old, poorly fixed plaster must be removed, and potholes should be repaired with mortar.
If the walls are concrete, then the stage of removing old plaster is unlikely to cause difficulties, but removing it from wooden surfaces is almost impossible. In this case, it is easier to build a new partition, for example, from drywall.
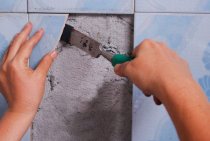
- Small cracks and crevices on the wall first widen a little, and then carefully sealed. For better adhesion of the old and new layers, small notches should be made in these areas.
- The same notches must subsequently be applied to the rest of the wall in order to improve the adhesion of the mortar. This is especially true in reinforced concrete houses where the surfaces are smooth. You also need to treat the surface of the wall with a primer, which will not only improve adhesion, but also prevent moisture from the mortar from seeping deep into the wall.

All these measures are necessary if the unevenness of the base does not exceed 6 cm, and it is planned to prepare the walls in the bathroom for tiles using plastering. With strongly curved walls, it is more advisable to use moisture-resistant drywall.
Determining the thickness of the plaster layer on the wall
In order for the base for the tile to turn out to be absolutely even, you can not do without hanging before installing the beacons. For this you will need:
- plumb;
- nails;
- strong thread or twine;
- beacons - flat slats made of wood or metal profile;
- special clips for attaching beacons to the wall or a quick-drying mortar based on gypsum or alabaster.
The technology is as follows:
- We drive in a carnation in the upper corner of the wall, leaving the cap sticking out by the approximate thickness of the leveling mortar.
- With the help of a plumb line, the cord of which is attached to the head of the newly driven nail, we drive the nail at the bottom of the wall so that its head also touches the cord.
- We repeat this procedure in the opposite corner of the wall.
- We connect all four nails with a tightly stretched thread horizontally and crosswise.
In this way, you can determine the thickness of the plaster over the entire area of \u200b\u200bthe wall. If the layer turns out to be too large or, conversely, somewhere the old surface will protrude beyond the plane of the stretched twine, then we make the necessary adjustment.
Installation of beacons on the wall
It is necessary to align the walls under the tiles using beacons. This stage of work will look like this:
- After a certain distance on the wall, we install beacons from the profile. Extreme beacons should recede from the corner at a distance of at least 10 cm.
It is better to choose the distance between adjacent profiles on the wall so that it is slightly less than the length of the existing rule.
- Fix the beacons on the wall with heaps of quick-drying mortar or on plastic mounts.
- The profile is pressed into the solution, following the readings of the level and plumb line and focusing on the previously stretched twine. In plastic fasteners, the necessary adjustment is performed by tightening the screws connecting the profile and the dowel in the wall.
- After all the rails are installed, you need to check again that they are located in a single plane.

Solution preparation
When the beacons are securely fixed to the wall, you can start preparing the solution. How to level the walls in such a damp room as a bathroom? Only with cement mortar, because gypsum mixtures are afraid of water. Masters prefer to prepare plaster on their own, mixing cement with sand in a ratio of 1: 2 or 1: 3. But it is easier and faster for an amateur to use ready-made dry mortars.
- First of all, you should carefully read the manufacturer's instructions. They are located on the outside of the bag.
- If the mortar for leveling the wall is prepared from cement and sand, dry components are poured into the container and water is added little by little, while stirring the mortar with a construction mixer or a drill with a special nozzle. In the case of using a dry plaster mixture, water is first poured, and plaster is already poured into it.
It is important not to overdo it with water: too thin a solution is inconvenient to work with, the mixture will always slide off the trowel or along the wall. Subsequently, such a solution is subject to significant shrinkage. Ideally, the solution should be slightly thicker than heavy sour cream.
It is necessary to use up the prepared plaster within half an hour, so you should not pour the entire bag into the container at once. It is better to prepare a new portion after the finished solution is over.

After mixing, the solution must be allowed to stand a little. The time interval is usually indicated in the manufacturer's instructions.
Applying mortar to the wall
How to properly align the walls under the tiles? The process goes like this:
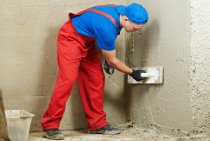
- The plaster is thrown into the space on the wall between the two lighthouses in such a way that its surface protrudes slightly above the surface of the lighthouses. Usually, a trowel or a wide spatula is used for this.

- Then the rule is taken, tightly pressed against the profiles, and with wave-like movements in the direction from bottom to top, the solution is leveled along the wall. The excess is sent back to the mixing tank.
- By repeating this operation the required number of times, all the gaps between the beacons are filled.The latter are easier to leave in the walls, but if there is a desire to use them again, then the profiles are removed, and the voids are filled with plaster and leveled with a spatula.
You can find recommendations to process the surface that has not yet hardened with a grater, but this is necessary only before wallpapering. We are leveling the wall under the tiles, so this operation can be skipped.
Leveling walls with drywall
How to level the walls in the bathroom if they have a significant curvature? Plaster in this case is not suitable: it will require too much of its layer. Moisture-resistant drywall is good for this purpose.
The method of fixing it may be different. You can build custom metal profile frame, or you can glue drywall directly to the wall with special glue. In the second case, the sequence of actions will be as follows:
- The wall is cleaned of dirt and treated with a deep penetration primer.
- Sheets of drywall are cut with an electric jigsaw to the desired size.
- Fragments are glued to the wall from the bottom up. Glue is applied in separate piles. The correct installation is controlled by the level and, if necessary, corrected with a rubber mallet.
- After the glue dries, the joints are sealed with silicone sealant and the usual finishing puttying of drywall with a finely dispersed moisture-resistant putty.

Cost of leveling the walls in the bathroom
As you can see, it is not necessary to hire professionals to prepare a quality base for tiles in the bathroom. It is quite possible to manage on your own. If you still decide to resort to the services of specialists, the prices for leveling the walls in the bathroom under the tiles will be as follows:
- wall plastering on lighthouses in Moscow - from 300 rubles. per 1 m2, in St. Petersburg - from 280 rubles. for 1 m2;
- sheathing with plasterboard using the frame method - from 500 rubles. per 1 m2 in Moscow and from 460 rubles. for 1 m2 in St. Petersburg;
- wall decoration with drywall for glue - from 350 rubles. per 1 m2 in the capital, from 320 rubles. for 1 m2 in St. Petersburg and Leningrad region.
In the regions of the Russian Federation, prices for such services vary in a fairly wide range.
To visually get acquainted with the process of leveling the walls in the bathroom under the tiles will help watching a selection of the best videos on the topic.