Battery decoupage master class
We have outlined the basic principles of battery decoupage. The master class will consist in a more detailed description of drawing drawings and fixing them on the radiator.
 We will need:
- sandpaper;
- solvent for degreasing the surface;
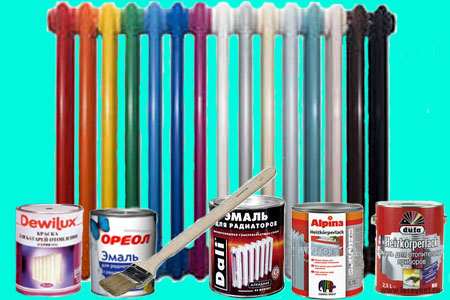
- white oil enamel;
- PVA glue;
- rice paper or decoupage napkins;
- brushes;
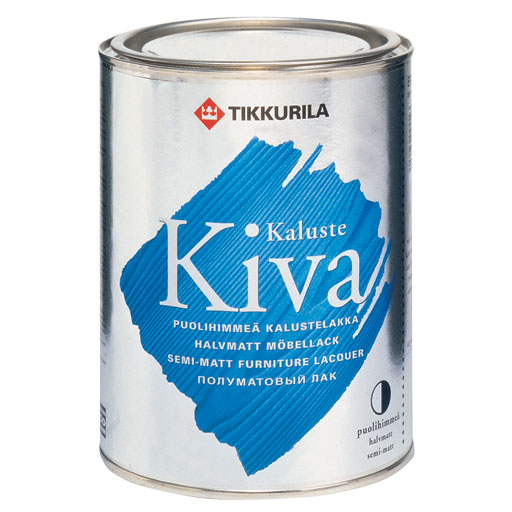
- heat-resistant varnish (up to 150 0 С);
- acrylic paints for painting in case of inconsistencies in the drawings.
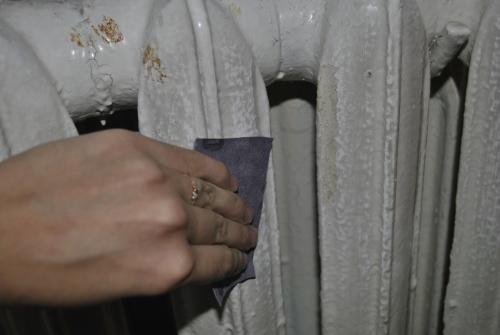
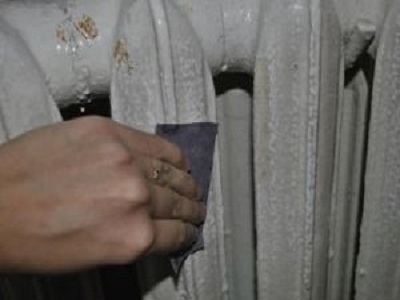 Carefully sand the surface of the battery, removing the old paint.
We remove the remaining dust, wash the battery, degrease it after drying.
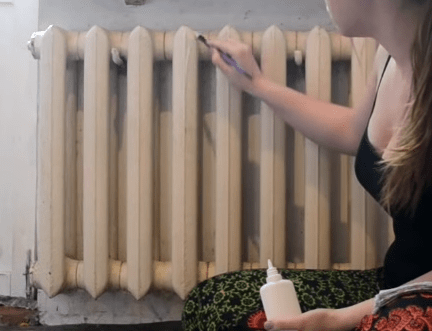
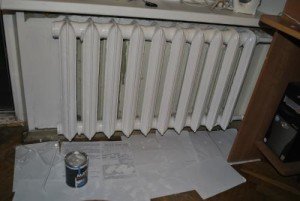
Apply a layer of white oil enamel. Nitro paint is not suitable, since it does not have proper heat resistance, the paint will swell when heated.
Allow at least 24 hours to dry.
 Preparing a drawing for drawing. It consists in the correct layout of the drawings for each section. Excess paper is removed.
Trying the resulting cut out images on the respective sections.
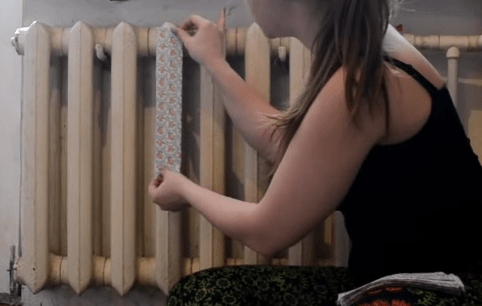
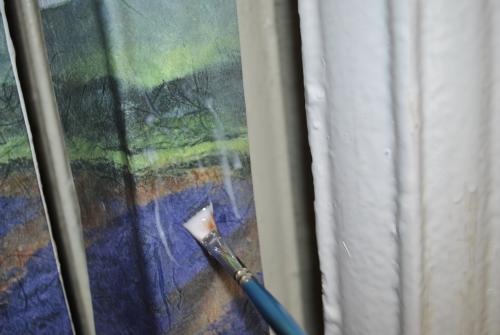
Dilute the PVA glue with water in a ratio of one to one. Let's start gluing the drawings on the edges of the battery, following from the center of the cut out image.
 When the cut out individual images are brought together into a single drawing, we critically examine the resulting composition. If there are inconsistencies in the images, the distortions can be corrected with acrylic paints. Then paint the upper and lower parts of the section that are not sealed with napkins with paints. It is necessary to select paints to match the decoupage color scheme.
 We give the created composition to dry properly.
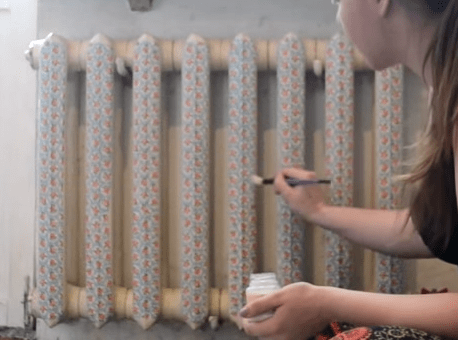
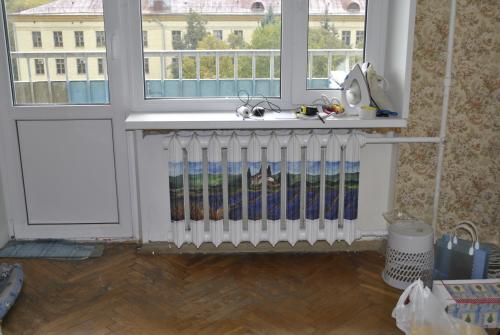
We cover the entire radiator with heat-resistant varnish.
The appearance of heating radiators installed in houses, even if they are the most modern, does not suit everyone. That is why many people prefer to mask them behind special screens or decorate them. You can decorate the batteries very beautifully and stylishly using the decoupage technique. The surface of modern flat batteries attracts many people, as it is possible not only to apply a separate pattern, but also to create whole unusual paintings.
Do-it-yourself decoupage of heating radiators is quite simple, the most important thing is to correctly select the appropriate background that will blend perfectly with the overall interior of the house. If the heating radiator has lost its former attractive appearance, then it needs to be repainted.
Special pictures and patterns made on:
- Specially designed napkins for decoupage;
- thin rice paper;
- Ordinary paper multilayer napkins.
The background color does not have to be white, so it can be selected depending on the existing pattern. To perform decoupage with napkins, you need to prepare certain materials and tools.

In particular:
- Drawings on napkins;
- Sandpaper;
- PVA glue;
- tassel;
- Acrylic lacquer;
- Rags.
The painted radiator should dry out during the day, and then clean the areas on which you want to apply the pattern with a little sandpaper and wipe with a damp cloth. Before you make decoupage with napkins, you need to determine the location for the pattern and cut the napkins into separate parts.
If the battery is pasted over with ordinary paper napkins, then initially it is necessary to separate a thin layer with a printed pattern from all the others. Apply glue to the surface of the battery with a brush and smear it well so that there are no dry spots left. A napkin with a pattern must be firmly fixed on the radiator very carefully, since the paper is very thin and can easily crumple and then everything will have to be redone.When all the patterns are completely glued to the battery, you need to apply acrylic varnish on top to give the surface a glossy effect and not damage the napkins during cleaning.
You can also perform decoupage on batteries using special stencils, which must be fixed on the surface of the battery, and then applied with acrylic paints. When the drawing dries, it is not necessary to varnish it, as the drawing will hold without it. To perform decoupage on cast iron batteries, you need to take napkins with a small repeating pattern applied to them, since it will not work to create one complete picture.
Decoupage. Technology
Decoupage is an imitation of painting. And every painting needs a level ground. Brand new radiators are produced with smooth-walled sections, so the pattern will fit perfectly. But you will have to work on old cast-iron rarities in order to level the surface as much as possible and remove layers of old paint, streaks and rust spots.
Old batteries require preparation for decoupage
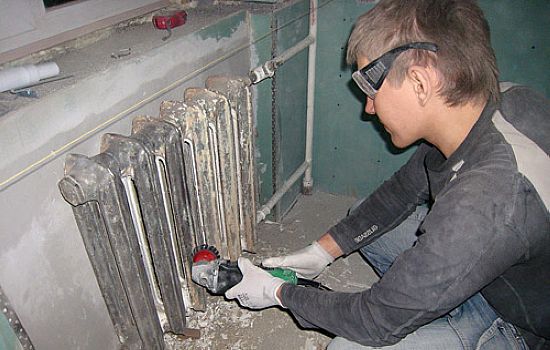
Step one. Removing old paint
Old paint is not easy to remove.
You can try using a solvent, applying it to the surface of the radiator and scraping off the softened enamel with a metal spatula. But if there are too many layers of paint, the option is too tedious. Plus, the pungent odors of solvents are detrimental to health.
Another way is mechanical. Sandpaper with different grain sizes and an angle grinder with abrasive nozzles will go into business.
Many craftsmen advise cleaning the surface of batteries using a drill and a brush nozzle (wire or polymer-abrasive). Old paint will fly off in no time, but it is worth coordinating noisy work with neighbors.
Repair and auto repair shops often offer sandblasting services. This method is highly effective, but will require the dismantling and transportation of a heavy radiator.
And another option is thermal. Old paint can be removed by heating the surface of the radiator with a blow dryer and then scraping off the loose enamel with a spatula. If there is an opportunity and desire to dismantle the radiator and take it out of the room, then a burner is applicable for cleaning. It remains only to lightly walk with sandpaper on the cast-iron surface.
After removing the old paint, the radiator should be degreased with white spirit, and then coated with a layer of anti-corrosion alkyd-based primer to improve the adhesion of the paint layer to the metal. The drying time of putty is from 20 minutes to several hours.
Step two. Radiator painting
First of all, you should choose a paint that will meet the following requirements:
- wear and heat resistance;
- non-toxicity;
- no change in the shade of the coating over time.
In addition, it is recommended to choose a paint that matches the wall behind the radiator. Plus, it is advisable to purchase matte water-dispersion paint (marked “for painting radiators”), decoupage will look more spectacular on it, and unpleasant chemical odors will not annoy you during the dyeing process.
It is most convenient to apply paint with a double-sided fur mitten. A rubber glove is put on the hand, and a fur mitten is worn on top. Thus, it is very convenient to paint over hard-to-reach areas. Do not forget to place an oilcloth or newspaper under the radiator so as not to stain the floor.
Step three. Preparation of materials
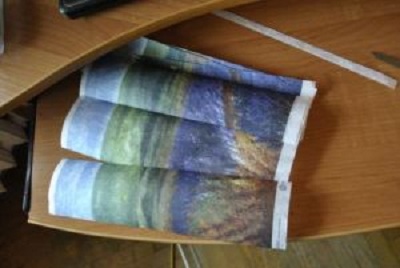
First, take a napkin with the desired pattern and separate the layer with the pattern. We measure the sections of the battery (length and width) in order to cut the napkin exactly to size. We cut the napkins, starting from the measurements obtained.
If there are no ready-made napkins, you can make them yourself. To do this, we find the desired pattern on the Internet. We take a two-layer white paper napkin, apply it over the printed pattern and fix it on one side with masking tape.Cut off the excess napkin. Now we print the drawing we like on a piece of paper with a napkin attached. Peel off the tape, the napkin is ready.
Video - How to make a napkin for decoupage of a radiator
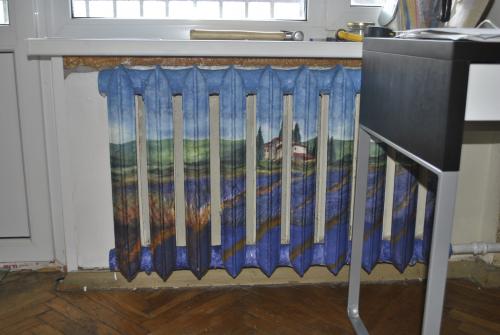
For the living room, it is best to select images of nature and abstraction, cartoon characters are appropriate in the nursery, and floral motifs and still lifes will look best in the kitchen.
This completes the preparation. Let's get creative.
Step four. Do-it-yourself decoupage of heating batteries
We take a strip of napkin and glue it with the wrong side to the section of the radiator smeared with glue. We smooth the napkin with a hand or a wide brush with a soft pile. If some sections of the strip do not stick, we coat these areas with glue directly on top of the napkin. We make sure that bubbles and bumps do not form in the process.

We rinse the brush from the glue and open the acrylic decoupage varnish, which can be glossy, matte or with various holographic effects. With light, clear movements, varnish the battery. The varnish will fix the drawing and give the work a finished look.
If desired, you can apply any lines with acrylic paint, additional drawings on top of the napkins, so that the work becomes truly exclusive.
We wait until the varnish dries and turn on the heating. Work completed.
What is the essence of decoupage technique
Decoupage is a technique for transferring drawings from colored paper to any surface: wood, ceramics, metal, etc. In this way, you can decorate anything, from dishes to pieces of furniture. The technology itself is several hundred years old. The fashion for such jewelry arose in the Middle Ages in France and does not fade to this day. Some craftsmen even decorate clothes in this way.
With decoupage elements, they usually try to update old furniture or decorate unsightly interior items. Many people are especially dissatisfied with old cast-iron radiators. They can not be hidden behind furniture, as it can block access to warm air. Does not save the situation and painting. White is boring. The craftsmen found a way out of this situation and turned ordinary radiators into a work of art, decorating them with beautiful and stylish patterns.
The best solutions for the kitchen
The design of kitchens, not as strict as is customary for living rooms, gives free rein to imagination. In addition to the above methods of hiding radiators, in rooms where culinary masterpieces are created, design delights are also created to decorate heating radiators. The battery and the pipe connecting it to the heat source can be painted in the color of the walls, decorated using the decoupage technique, or you can combine these two methods.
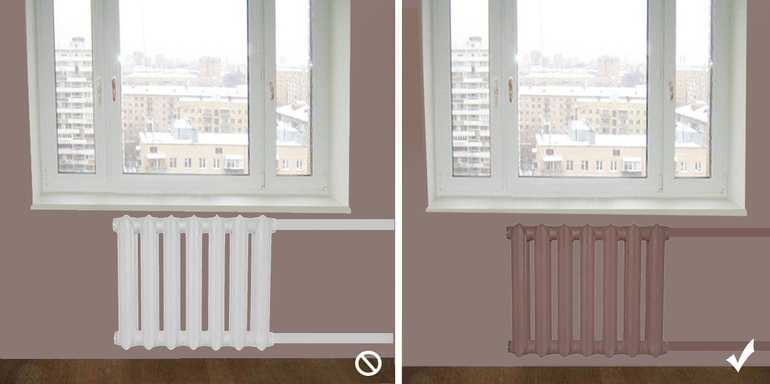
A battery painted to match the walls will be less conspicuous
Even more effect can be achieved if you paint the battery to match the wallpaper
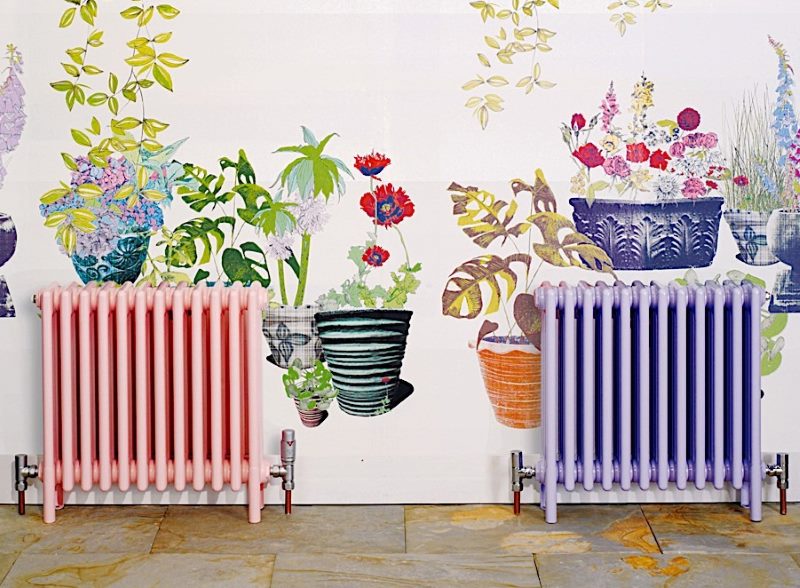
The battery can be flaunted by making it part of an artistic composition
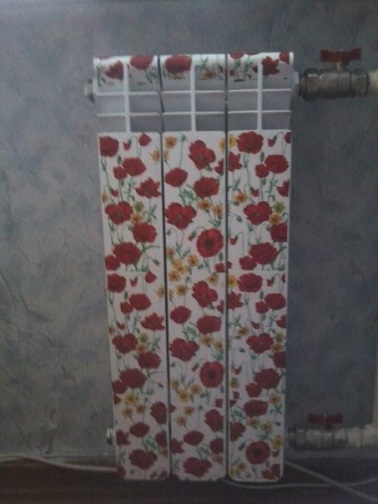
Lots of ideas are available on the web. Taking them as a basis, you can create a masterpiece yourself and without any special labor and time costs by decorating the external elements of the heating system with an elegant or cheerful pattern. Battery decoupage is the transfer of a pattern from a medium to a metal surface of a radiator. When decorating using decoupage technique, batteries can be decorated using ready-made drawings made on thin paper (both rice paper and ordinary decorative napkins are suitable). There are a lot of design options: flowers, wood decoration, geometric patterns.
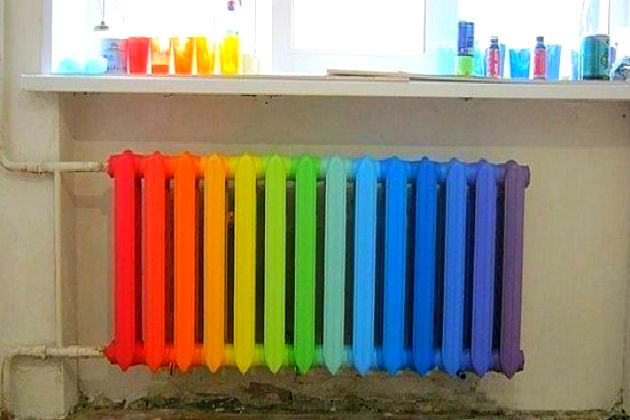
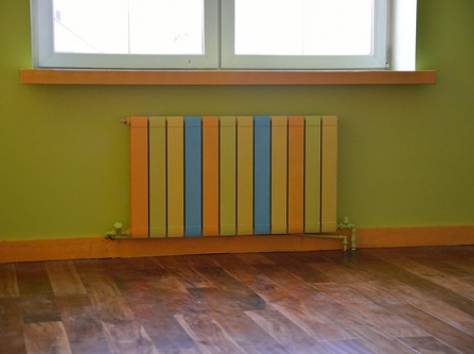
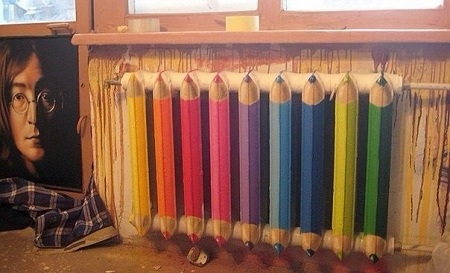
rainbow battery

Khokhloma painting on the radiator
If you have artistic abilities, then you can do without ready-made solutions and paint images directly on the surface. For such work you will need heat-resistant paints and varnish. The latter is necessary for those who decide to decoupage the battery on their own.For decoupage, you will also need glue, regular PVA will do.
Master class on decoupage of a battery or radiator with your own hands
The simplest and most accessible type of decoupage for everyone is pasting. It doesn't require any special talent. All you need is accuracy and the ability to choose the right materials. Such work will not require much time. But the result will certainly please, will become a source of pride.
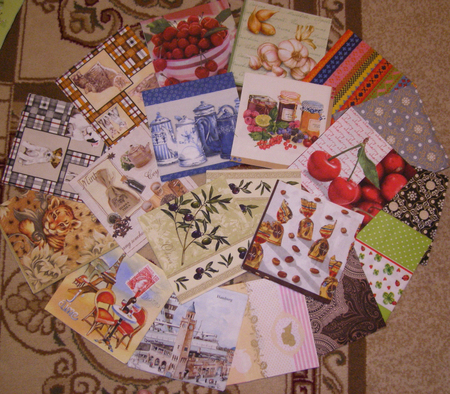
We use napkins
 For decoupage you will need napkins
- First you need to prepare the battery: wash it thoroughly with detergents. A brush is useful in the work, since the radiator has a lot of hard-to-reach places.
- Then, using sandpaper, you need to clean up all the places where the paint has peeled off so that the surface of the ribs becomes smooth. After that, the battery will have to be washed again.
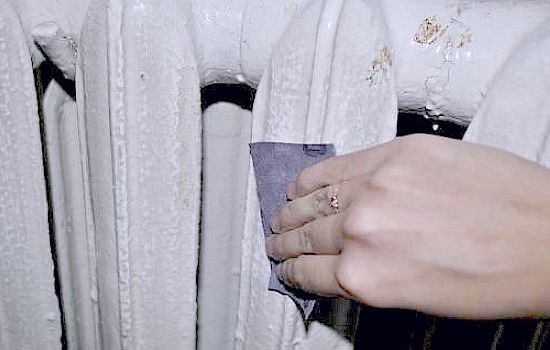
 The battery must first be cleaned with sandpaper
In decoupage, ready-made images printed on rice paper are most often used. You can choose the type for your battery at your discretion. But it should be noted that the standard dimensions of this paper are: 34*100. If such an image is applied, it will not be enough to completely cover the edges. We'll have to paint the picture. Therefore, you should choose options where the top, bottom are not difficult: earth, grass, sky.
 Think in advance about the pattern you want to apply
First, a base is created using oily white paint. The painted battery must be left for a day so that it dries completely.
 After cleaning, the battery must be painted with oil paint and wait until it dries completely.
Then you need to measure the width of the section, draw and cut the pattern into the appropriate strips. They are glued with ordinary PVA glue. The strips need to be gently smoothed out, removing air bubbles. When the glue dries, you need to start completing the drawing, painting over the remaining parts of the ribs, mixing paints to get the desired shade.
 Glue the fragments with PVA glue
In order to give the decoration strength, to give a more attractive look, after the paint has dried, the battery is covered with a heat-resistant varnish in two layers.
 After completion of all work, the battery is varnished
You can paste over the radiator with ordinary multi-layer table napkins. They are offered in a large assortment, which allows you to choose any pattern. Before gluing from napkins, you need to separate the top layer, cut into strips of the desired width. PVA glue is also used in the work. You can cover the surface with decoupage varnish.
Coloring
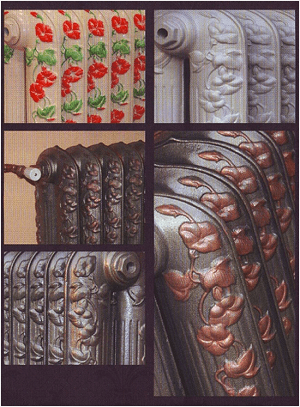
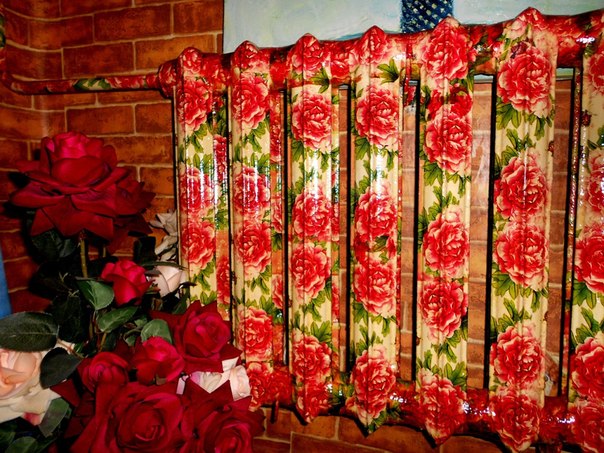
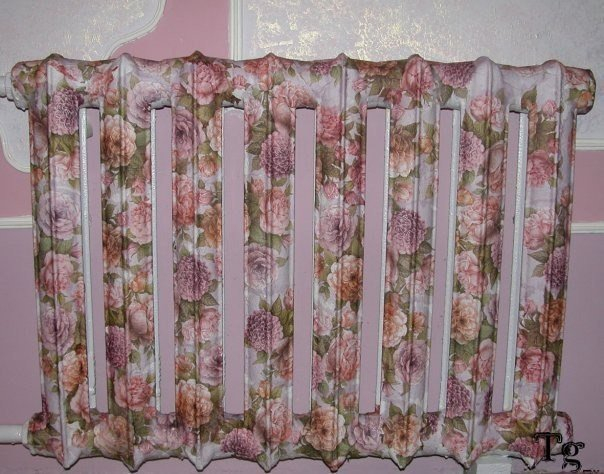
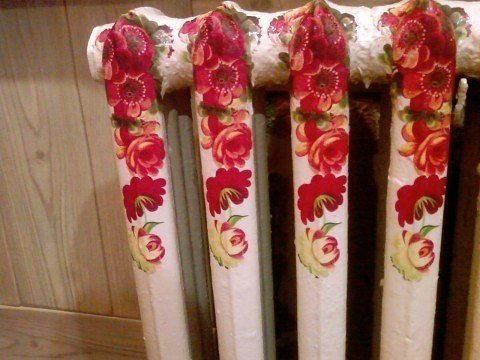
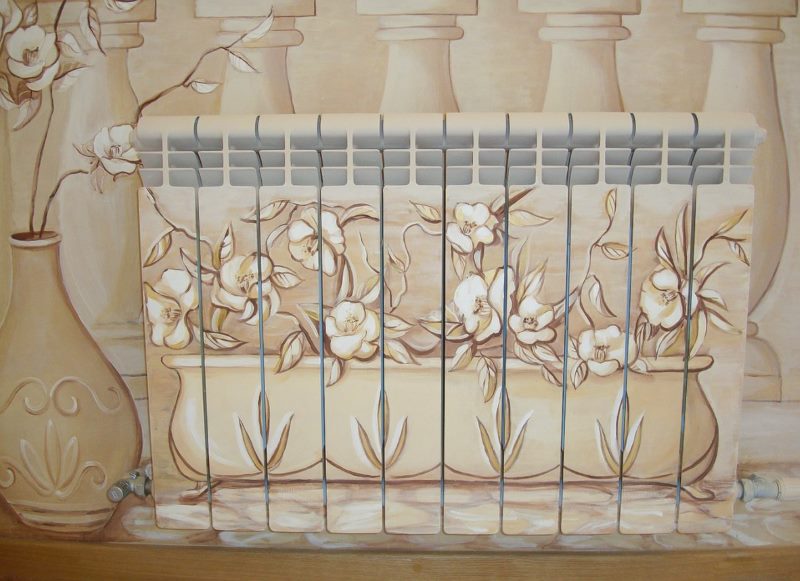
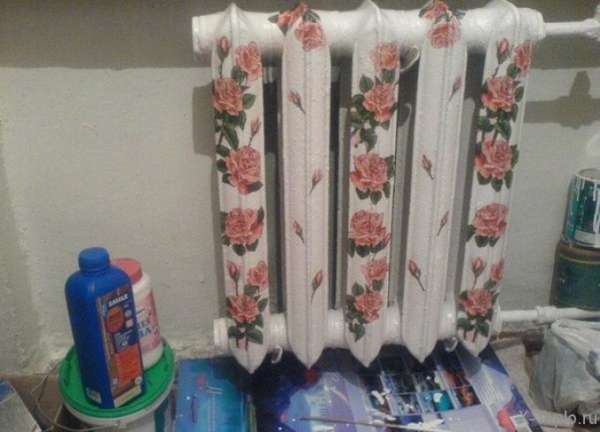
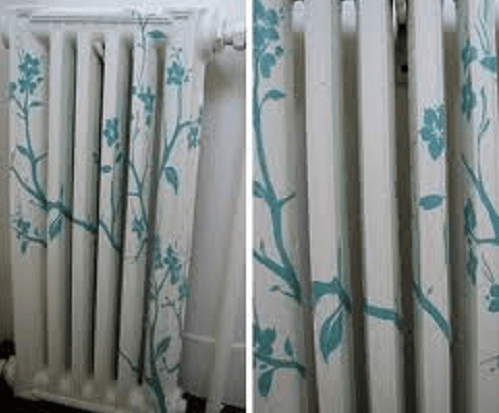
The ability to draw opens up great opportunities in decoupage. You can realize any creative idea, create images of any subject on the battery. Luxurious roses or modest daisies can bloom on the radiator sections, ladybugs, butterflies, birds or reptiles can “settle”, ethnic ornaments, ornate patterns or futuristic symbols will appear. It all depends on personal preferences and imagination.
Acrylic paints are used in the work. They are durable, resistant to external influences, dry quickly. These paints differ in density and purpose, so when buying them, you should make sure that they are suitable for indoor work. The beauty of the applied pattern will last for many years. Additional varnishing is not required.
You can also create volumetric decorations on the radiator. Masters who have skills in modeling and have creative abilities should use them to decoupage the battery. On the sections, you can create elements of stucco molding of the Renaissance or ancient times, use floral, plant, animalistic motifs. In the children's room, heroes of fairy tales and cartoons can become excellent decorations.
In this type of decoupage, a self-hardening mass is used.It easily takes any shape, is perfectly attached to metal, and has high heat resistance. Finished jewelry will dry quickly. They can be painted with acrylic paints to give the necessary brightness, and then coated with a double layer of heat-resistant varnish.
Video: how to decorate and arrange heating radiators
https://youtube.com/watch?v=PrYB-QK4a8I
Despite significant progress in the field of space heating, old cast-iron radiators are still installed in most apartments and houses. There is nothing wrong with this, especially if the batteries do their job well.
But what if the appearance of the device leaves much to be desired? Simple coloring is too commonplace, and protective screens are bulky and impractical. There is another original, fast, and most importantly, inexpensive way - this is battery decoupage.
Decoupage heating batteries master class
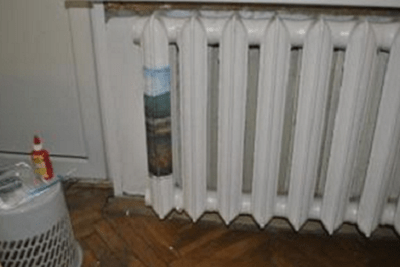
Before proceeding directly to decorating the radiator, you need to measure its overall height and width, as well as take the dimensions of one section. Then the paper is lined and strips are cut out of it, corresponding in width to one section. Two options are possible here: if the length of the strip does not completely cover one section, then when cutting paper, it should be calculated so as to completely cover the battery cell with several strips. In this case, it is necessary to follow the alignment of the pattern or ornament when joining different strips. In another option, you can cover only the areas in the middle of each section with decorative paper, and paint the remaining unformed places with acrylic paints in colors that match or vice versa, contrasting with the nature of the pattern or ornament of the decoupage paper.
 Decoupage of a modern battery
Before sticking decorative paper strips, dilute the polyvinyl acetate adhesive with water in a ratio of 1:1. In order to stick paper on the battery, you need to apply diluted glue with a brush on the surface of one section of the radiator with a thin evenly distributed layer, then attach and press a strip of paper, gently smooth it with your hands or with a dry brush from the middle to the edges, avoiding the formation of air bubbles and wrinkles. All other sections are glued in the same way.
Now the construction market sells special thin rice paper for decoupage with various patterns, its standard size is 100 x 34 cm. color range. Before gluing, the top layer is separated from the napkins and also cut along the width of the radiator section.
In the case of additional registration of non-pasted areas with paints, you can try to continue the drawing or motif of the ornament on paper. It is also necessary to paint the junctions of the sections with paints.
 original battery design
At the last stage, the battery is varnished in two passes. This should be done after the glued paper, as well as the paint, are completely dry. The varnish must withstand heating up to 150 degrees, which is indicated in the passport for paints and varnishes. The varnish coating must also dry completely; during the drying of the varnish, the surface of the battery must not be touched. After that, we can assume that the decoupage of the heating battery is completed.
The decoupage technique allows you to design batteries in any style that matches the general style of the room, use plant, flower, animal motifs, etc.
A detailed and visual master class on decoupage of a cast iron radiator:
Don't forget to rate the article.
Most city apartments are equipped with cast-iron batteries, which the owners simply cannot imagine alternatives to. The configuration of the cast iron section, successfully created in its time, has not undergone changes for a century.Often, in the process of redecorating an apartment, the owners look with embarrassment at the dull "accordions", not knowing how they can be ennobled. The maximum that the erudition of the masters is enough for is to paint them white or offer to install decorative screens.
Modern techno-design offers different shapes for radiators. Cast-iron batteries are not forgotten either, which began to be made using artistic casting methods in the retro, baroque, and modern styles. But replacing batteries is a troublesome and costly business, not everyone has such opportunities to replace boring radiators with more attractive and aesthetic ones. However, with the help of decoupage of a radiator, you can breathe new creativity into the appearance of "cast iron", making them a decoration of a room interior.
How to decoupage a heating battery with your own hands
Do-it-yourself decoupage of heating radiators is quite simple, the most important thing is to correctly select the appropriate background that will blend perfectly with the overall interior of the house. If the heating radiator has lost its former attractive appearance, then it needs to be repainted.
Special pictures and patterns made on:
- Specially designed napkins for decoupage;
- thin rice paper;
- Ordinary paper multilayer napkins.
The background color does not have to be white, so it can be selected depending on the existing pattern. To perform decoupage with napkins, you need to prepare certain materials and tools.
 In conclusion, it is recommended to cover the battery with a thin layer of acrylic varnish so that the drawing has its original appearance for as long as possible.
The painted radiator should dry out during the day, and then clean the areas on which you want to apply the pattern with a little sandpaper and wipe with a damp cloth. Before you make decoupage with napkins, you need to determine the location for the pattern and cut the napkins into separate parts.
If the battery is pasted over with ordinary paper napkins, then initially it is necessary to separate a thin layer with a printed pattern from all the others. Apply glue to the surface of the battery with a brush and smear it well so that there are no dry spots left. A napkin with a pattern must be firmly fixed on the radiator very carefully, since the paper is very thin and can easily crumple and then everything will have to be redone. When all the patterns are completely glued to the battery, you need to apply acrylic varnish on top to give the surface a glossy effect and not damage the napkins during cleaning.
You can also perform decoupage on batteries using special stencils, which must be fixed on the surface of the battery, and then applied with acrylic paints. When the drawing dries, it is not necessary to varnish it, as the drawing will hold without it. To perform decoupage on cast iron batteries, you need to take napkins with a small repeating pattern applied to them, since it will not work to create one complete picture.
Important! All these materials are the best suited for decoupage, as they are very thin and their borders are practically invisible after being applied to the battery. There are many different options for creating beautiful battery decoupage
You can create a simply unique design of radiators by combining different colors, styles and techniques. Before proceeding with decoupage, you need to decide whether you need to disguise the battery, or, on the contrary, make a bright accent on it.
There are many different options for creating a beautiful battery decoupage. You can create a simply unique design of radiators by combining different colors, styles and techniques. Before proceeding with decoupage, you need to decide whether you need to disguise the battery, or, on the contrary, make a bright accent on it.
 In the children's room for battery decoupage, a drawing depicting a landscape or cartoon characters is well suited.
Various landscapes or original photos are perfect for decoupage, which will help bring an element of wildlife into the interior.
Decorating a battery using decoupage technique consists of several stages.
- Surface preparation;
- Drawing drawing;
- Fixing the ornament.
Before proceeding with decorating the battery, it is necessary to thoroughly wash the radiator, and also, if necessary, apply new paint to it, the shade of which will be in harmony with the interior, and also goes well with the selected ornaments.
You can completely decoupage on batteries using only paper napkins or rice paper with a pattern printed on it. You can also add original three-dimensional elements by gluing different decorations. If desired, you can draw drawings on some parts of the battery using acrylic paint.