With bathroom finishes such as tiling, painting or pasting with waterproof wallpaper, a mandatory stage of work is the careful alignment of the walls. Given the high humidity in the bathroom, few are ready to trust such newfangled types of leveling bases as drywall, giving preference to a reliable and proven method of plastering. Due to the relatively small volume of the room, plastering the walls in the bathroom is accessible even to a beginner in the construction business. The main thing is the desire and the availability of detailed and competent instructions.

The choice of plaster for the bathroom
When choosing a material for a rough bathroom finish, it is recommended to give preference to a cement-based mixture containing antibacterial additives and plasticizers.

Sanitizing plaster
The best choice is a plaster with sanitizing properties, designed specifically for rooms with high humidity.
Advantages of sanitizing plaster:
- providing waterproofing of the walls in the bathroom;
- protection against the appearance of efflorescence on the walls;
- excellent vapor permeability;
- increased sulfate resistance;
- environmental friendliness;
- the ability to remove internal moisture from the wall to the outside;
- non-susceptibility to cracking even when applied in several layers;
- ease of application;
- fast drying;
- affordable cost.
Attention! Sanitizing mixture is not suitable for application on gypsum substrates.
Gypsum plaster for bathroom
Gypsum-based plaster is considered not the best option for use in the bathroom, although its use is still acceptable under certain conditions.

- Gypsum plaster should be recommended by the manufacturer for use in rooms with high humidity.
- Such plaster is suitable only as a base for tiles with the obligatory subsequent grouting of the joints with a special moisture-resistant compound.
- Plaster layer thickness based on gypsum should not exceed 2 centimeters.
- The surface after plastering before laying the tiles is not smoothed and remains rough.
- Before laying tiles, the surface must be additionally treated with a special waterproofing primer.
Attention! Plaster mixtures with gypsum components must not be used to level concrete walls. Due to the chemical reaction that occurs between gypsum and concrete, the plaster will swell and flake off.
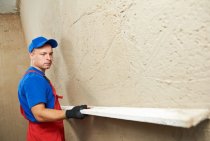
Plastering technology: work sequence
The quality of the plaster finish will correspond to the properties declared by the manufacturer only if the work is carried out in strict sequence in compliance with the technology.
Foundation preparation
The surface of the wall in the bathroom must be carefully prepared. Before you start plastering, you will have to complete the following steps.
- Carefully inspect the base: it should not crumble, have traces of grease and dirt. If necessary clean the walls of old plaster, paint, dust and any contaminants. Rinse the wall with water.
Tip: for removing old paint you can use a blowtorch or a special chemical solution sold in hardware stores.

- If the wall in the bathroom is made of brick, it is necessary to expand and deepen the seams and clean out all efflorescence with a steel brush. With a large amount of efflorescence, you can make your work easier by using a grinder with a brush head.
- If the walls are too smooth, make a notch to improve the adhesion of the mortar to the base. This is especially true for concrete walls.
- Treat the surface specially designed for this primer.
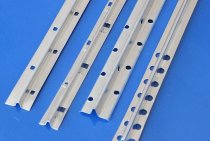
- Install on walls rail lighthouses. They should be located strictly vertically, the extreme ones should be at a distance of 30 cm from the adjacent wall. On them at a distance of about 1.2 m expose the rest. The slats are attached to the wall using a plaster mortar applied to the wall in 20 cm increments.

- Instead of beacons, you can use another method. Using a plumb line, determine the required thickness of the plaster layer. To indicate the required thickness, drive nails into the corners of the walls under the ceiling so that their hats are located in the same plane.
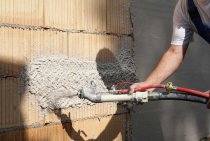
Spray stage
A day before the start of the main work, it is necessary to perform spraying, which serves as the initial stage of the plastering process. Spraying allows you to significantly improve the adhesion (adhesion) of the solution to the base. At this stage, a more liquid solution of a creamy consistency is used. The work is done as follows:
- the base is wetted with water;
- the solution is “thrown” onto the wall with a wide spatula or trowel so that the layer thickness is about 5 millimeters.
- You don't need to level the layer!
Applying a rough coat
A day after the spraying, the main layer of plaster is applied with a thickness of 5-7 millimeters. Carrying the draft layer is carried out in the following sequence:
- Using a spatula, or, which is much more convenient, a special ladle for plaster, sketch a layer of the required thickness.

- Start leveling the wall by stretching the rule along the beacon rails.

- If it turns out that the applied layer is not enough, then after complete solidification, another layer should be applied using a thicker mixture.
Finishing layer
The final layer serves as a base for tiles or other finishing material. The sequence of work when applying the finishing layer:
- Cover the rough layer with a primer and wait for it to dry.

- Mix the plaster according to the instructions on the package.

- Wet the wall with water.
- Apply the mixture to the edge of a wide spatula and begin to cover the wall with a thin layer of it, not exceeding 2 millimeters. The correct position of the spatula is at an angle of 15-20 degrees to the surface.

- After a few hours, until the composition is completely cured, process the coating with a grater, performing counterclockwise circular motions.

Tips for working with plaster
To avoid mistakes during operation, you need to consider several important points.
- Only clean water at room temperature is suitable for mixing the dry mix. The mixture should be gradually poured into the water, stirring constantly.
- It is desirable to use the finished mixture within 20 minutes, otherwise its properties deteriorate.
- When working with brickwork, the seams must be filled before applying the base layer.
- It is impossible to allow the layers to dry too quickly, and even more so to dry the surface forcibly.