alignment result and wall plastering is to obtain the most even surface. To achieve this result, experienced craftsmen advise using a simple but effective technology for installing special "beacons".

What is a "beacon"? In the terminology of finishing work, this word means - a kind of guide that sets the level to which the plaster layer must be applied. The system of beacons ensures the achievement of strict geometric conformity on the entire working surface.
Types of guides
Several decades ago, all kinds of improvised means were used as a “beacon” system - wooden slats were installed, ropes were pulled, pieces of drywall or plywood were glued, etc. These home-made fixtures cost almost nothing to their owner, but the quality of the finishing work suffered noticeably - the plaster was applied unevenly, and as a result, uneven walls were obtained.

Beacons for wall plastering are found in three variations
- Metal. Modern manufacturers have taken into account the need for the simplest possible installation of beacons and began to produce special metal devices, which are an L or T-shaped profile made of light metals. They fit snugly to the base on which the plaster layer is planned to be applied.
- Made from plaster.
- Gypsum.
Metal beacons: pros and cons. Installation technology

The most popular "beacon" system is metal guides. Benefits of using them:
- Ease of installation. Even a novice in the construction business can fix metal rails. This does not require professional training or relevant qualifications. The use of such beacons is within the power of everyone.
- Repeated use. Unlike wooden bars, metal guides can be used more than once. They are not subject to warping.
- Significant savings in plaster. Plastering in this way minimizes material consumption, that is, thanks to the guides, the thickness of the applied layer of plaster mixture.
If you reduce the layer of plaster by 1 cm, then the savings will be about ten liters of mortar per 1 sq.m.
Metal rails have their drawbacks:
- They take some time to install. However, this item can be considered a serious disadvantage only when large areas need to be plastered. For a small amount of work, this disadvantage is not significant.
- If metal rails are left in the wall, the galvanized metal may rust after a while. But we can fix this drawback - just remove the slats after plastering work.
Correctly install metal beacons as follows:

- First, markup the installation of beacons. To do this, use the building level.
- In sections of the wall with changes in height and turns, the guides can be cut into pieces. If necessary, they are bent to the desired angle.
- Metal beacons are fixed with a solution of alabaster (dry gypsum). If additional fixation is necessary, then they are placed under self-tapping screws / dowels 0.8 cm thick, 8 cm long.
- The width of the guide placement step may vary depending on the physical capabilities of the master finisher. The optimal distance between the beacons is 1 meter. Professionals place slats every 2 meters.

Gypsum and plaster beacons
Such guides are set only after the preparation of the walls. That is, along the perimeter and the middle of the working surface, you need to fill the nails in a row in advance.After their hats are set on a plumb line, a gypsum solution is applied to them in the form of small tubercles. As soon as the gypsum / plaster mass dries, the excess is removed to the level of the nail heads. The space around them is called marks or marks. Unlike plaster beacons, gypsum beacons are considered the most durable, they do not wear out much when leveling walls. The main disadvantage of gypsum beacons is that after plastering they will have to be cut down.
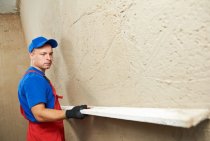
The "plaster" method involves the use of a system of "beacons" from a plaster solution. The technology of their exposure is identical to plaster. As soon as the bumps of plaster dry up, a long wooden lath is attached to them, the builders call it the rule. In a space that is limited by a wall and this rail, a solution is applied with throws. After some time, as soon as the solution sets, the rule is removed. In advance, you need to tap on the surface with a hammer. After that, a strip of plaster solution appears on the wall - this is the lighthouse.
Important! Each plaster guide is carefully rubbed.
Several such beacons are made on the working surface, a layer of plaster is applied to the space between them. The rule is applied to the lighthouses and, moving from top to bottom, cut off the excess layer of plaster. Next, the entire surface is plastered and rubbed.
In order to properly install the guides and as a result get smooth and plastered walls, you need to take into account some of the nuances:
- Plastering on lighthouses should be carried out under constant control over the amount of excess mortar on the marks, otherwise the plaster will be applied unevenly.
- You need to move the rule carefully and smoothly. A large amount of plaster mortar can bend the tool.
- Excess mixture is best removed in a pre-prepared box.
- If the rule is made of wood, then before work it must be impregnated with drying oil or coated with moisture-resistant paint so that it does not deform.
- Plastering a wall on lighthouses is only possible for experienced craftsmen, so its use is not very common.
- Beacons can be placed both horizontally and vertically.
The choice of a beacon system for plastering directly depends on the preparation and skills of the master. It is easier for beginners to install metal slats, more experienced builders use gypsum guides.