Drywall is one of the most common materials for interior finishing work. It allows you to quickly and efficiently level any surface, besides, this type of finish is cheap, affordable, and working with it is much easier than with plaster. If you do not have experience with this material, but would like to use it to decorate your apartment, the first question that you will have is how to fix drywall to the wall? Depending on the degree of curvature of the walls and the characteristics of the room, you can choose one of the two methods described in detail below.

Mounting methods
Fastening drywall to the wall is done in two ways:
- frameless method;
- frame.
The frameless method is considered the simplest, since for its implementation there is no need to build a crate: drywall is attached with gypsum glue. But in order to use this method, the height of the ceiling must match the size of the sheet. Using the frame method of fastening, you can finish the wall up to 10 meters high.

GKL installation in both ways is carried out in the process of interior decoration before laying the flooring. Work on laying electrical wiring, heating systems, plumbing and sewerage should be completed by the time the walls are covered with plasterboard.
Features of frameless fastening
How to properly fix drywall to the wall with an adhesive (frameless) method? In order to avoid problems in the future, the following conditions must be observed:
- absence of fungal infections and areas that can crumble;
- sufficient strength of the base;
- the wall should not freeze, it must be protected from the formation of dampness;
- The surface must be completely free of paint, oils and dust.
The frameless method is used when the curvature of the walls does not exceed 4 cm.
Fastening without frame involves gluing drywall to the wall. The process is carried out by several methods, which are selected depending on the quality of the wall.
- The first method is used for walls with a flat surface. In this case, the drywall is attached to the wall with gypsum mounting adhesive. The composition is applied to the surface along the entire perimeter with longitudinal lines.
- If there are irregularities, it is recommended to glue drywall sheets with Perlfix glue. The glue is applied in small piles along the entire length of the sheet at a distance of about 35 cm from each other and around the entire perimeter.

Installation instructions
Step-by-step instructions will help you understand how to fix drywall to the wall.
- Stage 1. Wall measurements and planning for the placement of drywall sheets are carried out.
Avoid cruciform joints; sheets should be placed with an offset.
- Stage 2. The surface is being prepared. If the wall is porous, it must be treated with a primer.
- Stage 3. GKL is cut. In addition to solid sheets, pre-prepared inserts are also useful.
Straight cuts are best done with a sharp construction knife, and when making curves and radius lines, a jigsaw will help.
- Stage 4. Glue is being prepared. It is acceptable to use gypsum mixtures that harden slowly, such as starting putty.
In order to extend the hardening time of the mixtures, wallpaper glue or PVA can be added to the dilution water.
- Stage 5. Plasterboard sheets are glued to the wall.

How to attach plasterboard to glue right?
- The thickness of the adhesive layer is selected depending on the scale of the surface irregularities. If it is sufficiently even, then the adhesive mixture is applied directly to the wall.
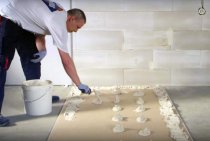
- To eliminate the large curvature, it is necessary to install beacons made of plasterboard strips 10 cm wide. They are glued around the entire perimeter and vertically, at a distance of 40–50 cm.
- With the help of a plumb line, the left and right extreme beacons are installed, then, focusing on the fishing line that is stretched between them, the remaining vertical strips are attached.
- Beacons are aligned using a rule.
- Drywall sheets are also pressed with a rule that is set in different directions. Tapping with a rubber mallet, correct their position.
- After the glue is completely dry, the seams are sealed with putty.

If you are worried about how to fix drywall securely, then know that this type of fastening does not require any additional steps.
It is important that 5–7 mm wide seams and 7–10 mm gaps from the floor and 3–5 mm from the ceiling are left between the sheets. For this, pre-prepared wedges made of wood are used.
GKL fastening by frame method
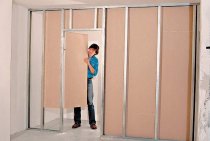
A more common way of fastening GKL is to mount sheets on a frame made of metal profiles installed along the wall.
A few nuances of the method:
- The space between the wall and the profile allows the use of insulation. The most commonly used mineral wool and foam boards. Before insulation, the wall needs to be treated with an antiseptic.
- In between, engineering communications, plumbing pipes, heating and electrical wiring are hidden behind the frame.
If there is high humidity in the room, it is necessary to use moisture-resistant drywall, the cardboard shell of which has a dark green color.
Wireframe method considered more complex and expensive, but has many advantages:
- good heat and sound insulation;
- surfaces with any degree of curvature can be leveled;
- no need to prepare the walls.

Work order:
- Stage 1. First of all, measurements and markings are performed for the installation of profiles and suspensions. The marking for the guides begins with the upper profile, the required distance recedes from the wall, a line is drawn, and transferred to the floor with a plumb line. Vertical bearing profiles should be located at a distance of 60 cm from each other, and so that each sheet of drywall fixed to the wall rests on three racks. Hangers should be installed at a distance of 60–80 cm.
- Stage 2. Installation is in progress. Perimeter must be installed guide profiles: using a perforator, dowels and screws, the upper one must be screwed to the ceiling, the lower one to the floor. At the marked points, suspensions are attached, carriers are inserted into the guide profiles. They must be secured with hangers.

- Stage 3. Now let's figure out how to fix drywall to the profile. Sheets are installed in a vertical position. You can attach drywall using 25 mm metal screws: they must be screwed so that the hats are “drowned” into the sheet.
To create a chamfer on the cut sheets of drywall, which is necessary for high-quality sealing of seams, an edge planer is used.
Upon completion of the work, the joints are sealed with putty using a reinforcing tape, and after drying, the drywall attached to the wall is completely puttied, after which a smooth and even surface without flaws is obtained.