Repair in the apartment includes a whole range of works aimed at leveling the surfaces of walls and ceilings. It's no secret that most of the Soviet-built buildings do not have ideally even walls. In order to eliminate this defect, the installation of plasterboard panels or lining, however, these methods are associated with the appearance of voids in the walls, as well as with a significant reduction in the usable area of the rooms.
To avoid such shortcomings, you can use plaster. This is the oldest and at the same time the most popular way to level walls. In turn, of all possible materials for plaster the most widely used for many years remains cement mortar.

This is not surprising given the following benefits:
- Strength. A well-made mortar, applied to the wall in compliance with all the technological features of the plastering process, can last for many years.
- Ease of manufacture and application of the solution. With certain qualities, such as accuracy and attentiveness, as well as a clear knowledge of the sequence of actions, anyone can handle this.
- Low cost. To date, cement mortar is perhaps the cheapest material for wall plastering.
Despite such wonderful advantages, it is possible to do high-quality wall plastering with your own hands in the absence of relevant experience, only by showing maximum diligence and familiarizing yourself with the features of such work beforehand.
The procedure for plastering walls with cement mortar includes four main stages:
- Wall surface preparation installation of lighthouses.
- Preparation of cement mortar.
- Application of the solution.
- Grout.
Let's consider each of them in more detail.
Wall preparation
The first stage of preparing the wall for plastering, which follows immediately after the furniture is removed from the room, is removing a layer of old plaster or paint. This is a rather laborious process, for which a puncher or a hammer with a chisel is used.
To increase the efficiency of removing old paint (the most problematic type of coating in this regard), they resort to the use of special grinders. For home repairs, it may be advisable to rent such a tool for a short time.

In the event that significant cracks or notches were found in the wall during the removal of the layer of old plaster, they must be repaired using a small amount of cement mortar and a special reinforcing mesh.
If the wall being processed is not monolithic, but is made of bricks or blocks, then all its seams must be deepened for better fixing of the plaster. Shallow notches are applied to the concrete wall with a perforator or chisel for this purpose.
The next stage of preparatory work is applying to the walls primers via paint brush.
Depending on the material from which the wall is made, the process of preparing it for plastering may differ slightly. In general, for reliable adhesion of the cement mortar to the wall surface, it is necessary to use a plaster mesh or tile adhesive applied with a notched trowel. If you use glue, then after applying it you need to wait at least a day. This is done to allow the glue to dry. It should be noted that this method is not well suited for plastering walls of a large area.
Preliminary work for walls made of foam block, cinder block or shell rock can simply consist in abundant wetting with water. However, the use of a reinforcing mesh can significantly increase the strength of the plaster, prevent it from cracking during drying, and significantly increase its service life. If there is no factory-made mesh, then home-made plaster reinforcement is sometimes used. To do this, with the help of quick mounting on the walls, aluminum wire is fixed.
The mesh used in plastering is an elastic metal product that is attached close to the wall on dowels driven into it beforehand. In this case, the attachment points should be placed at a distance of 30 to 40 cm from each other in a checkerboard pattern. When buying a reinforcing mesh for plaster, it is preferable to choose those types that have an anti-corrosion coating. Otherwise, you will have to independently cover such a product with a layer of primer or paint.

After making sure that the installed mesh is firmly attached to the wall, you can proceed with the installation of guide beacons, which are usually used as a perforated corner of various thicknesses (depending on the thickness of the plaster layer).

Guide beacons can be attached to the wall in one of the following ways:
- With the help of cement mortar, which is thrown onto the wall at the installation site of the corner. In this case, you need to pay attention to the careful alignment of the beacon in terms of level.

- With screws. This method of fastening is somewhat more laborious, as a rule, it is used if it is necessary to eliminate significant level differences in the plane of the wall. In order to fix the screw, wooden bald patches protruding from the wall are hammered into the holes previously drilled with a perforator. After that, they are marked with marks corresponding to the required level. According to these marks, the bales are cut off, then a beacon is mounted on them. In order to prevent the bending of the corner when applying the plaster, it is necessary to lay a certain amount of cement mixture in advance in the openings between adjacent attachment points.

To properly fix each lighthouse in level, you can use guides made of fishing line or thin rope. First, using a plumb line, the correct position of two threads fixed vertically at different ends of the wall is set. After that, focusing on them, using the level, pull the horizontal threads. Such a system can greatly facilitate the installation of beacons.
Preparation of cement slurry

After completion of the preparatory work, you can begin to prepare a cement-sand mortar for plastering walls. The percentage of its components depends primarily on the brand of cement.
As a rule, when preparing a mortar for plaster, M400 cement is used, mixed with sand in proportions of 1: 4. Before adding to the solution sand must be sifted through a fine mesh.
To prepare the solution, it is preferable to use a concrete mixer, since this will not only speed up the execution of such work, but also significantly improve its quality.
If there is no concrete mixer, which happens very often when doing repairs in an apartment with your own hands, you can prepare the mortar manually using any suitable container.
The cement-sand mixture should resemble dough in consistency. In this case, it will adhere well to the wall surface when thrown, and at the same time it will not slide off it under its own weight. However, it should be remembered that you can not apply more than 1 cm layer of plaster at once.
Mortar application
When the solution is thoroughly mixed, you can start applying it to the wall. This is done by throwing the mixture with a trowel or a special ladle.

To achieve high efficiency in such work is possible only by acquiring the appropriate experience through repeated repetitions. However, to achieve a good result, it is enough to follow a few simple rules:
- The direction of spraying the solution should be from the bottom up.
- Do not apply large amounts at once.
- You need to start work by filling the space between adjacent beacons, which is located second from the corner.
- After throwing a small amount of mortar (filling the gap between the beacons by 50 - 100 cm upwards), the plaster layer is leveled using a rule that slowly moves from bottom to top for this.

- If notches are found in the plaster layer, then a little cement mixture is applied to the rule to eliminate them, after which the alignment procedure is repeated. This happens until an even layer of plaster is obtained, completely coinciding with the lighthouses.
Sometimes, to apply the mortar to the wall, a technology is used that involves dividing the plaster layer into three parts. For the first of them, a more liquid solution is prepared, which is applied to the wall in a thin layer by spraying. After it hardens, a second layer of solution is applied, resembling dough in consistency. The third, final, layer, for the manufacture of which carefully sifted sand is used, serves for fine grouting of the wall surface.
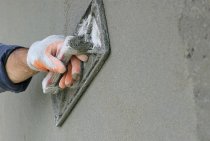
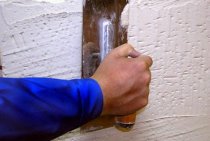
Grout
This is the final stage of plastering work using a cement-sand mixture. You can start grouting when the layer of applied plaster dries a little. In order to determine its readiness, you need to lightly press on the surface of the wall with your finger. If no trace is left, then you can start grouting.
The tool used in this type of work is a trowel or trowel. Grouting is carried out by performing circular movements of the tool along the surface of the wall. In order for the cement-sand mortar not to stick to the board, it is necessary to constantly moisten its surface with water. As a result, a uniform and smooth outer layer of plaster can be achieved.

After completion of work, thoroughly wash all tools used. The same applies to the concrete mixer, after each preparation of the solution, you need to pour a bucket of water into it and let it work for some time.
If you clearly follow all the steps described, then do-it-yourself plastering of walls with cement mortar will not be such a difficult process. With some effort, you can get a smooth and durable surface of the walls in the rooms.