Quite often, during repairs, one has to deal with the following situation: preparation for a certain type of finish takes no less time and effort than the finishing work itself. At the same time, the preparatory stage is extremely responsible: an insufficiently serious or careless attitude towards it can “go sideways”, significantly affecting the quality of the final result. The process of preparing walls for plastering was no exception: if the technology and recommendations of specialists are not followed, most likely, you will have to redo all the work, since fresh plaster will simply fall off. To avoid this, you need to know how to properly prepare the surface, remove the old finish and how to remove the plaster from the wall that has already served its purpose.

Getting rid of old finishes
The first thing to do at the stage of preparation for plastering is to remove the entire old finish to the very base, even if it holds well, since it is simply not designed for the load with which the new plaster layer will act on it.
- If the wall is covered with wallpaper, then moisten it with water and completely remove it with a spatula. It happens that the wallpaper goes badly, in this case you need to use one of the how to remove old wallpapersuitable for a particular type of canvas. If there is another layer of newspapers under the wallpaper, they must also be removed.

- If the wall is painted, there may be serious difficulties in removing it, which can be dealt with Effective methods for removing paint, for example, with special washes or a building dryer (the choice of method depends on the base material and the type of paint and varnish composition).
- Old tiles can be removed with a perforator. For more careful removal of tiles you need to use a hammer and chisel.
- After removing the decorative coating, you can begin to remove the plaster. It is removed completely to the base of the wall with a chisel, perforator or pickaxe. This process is quite laborious and requires additional explanations.

Stucco removal tool: which one to choose?
Starting work, you need to prepare the necessary tools, the number and name of which will depend on the degree of complexity of dismantling. In order to remove the plaster coating, you will need:
- goggles and respirator;
- rubber or canvas gloves;
- ax / hammer / small sledgehammer for beating off old plaster;
- chisel, preferably with a long handle;
- scraper / spatula;
- metal brush for cleaning cracks;
- machine for removing old plaster / perforator / grinder;
- garden sprayer / bucket with a wide brush-brush;
- shovel, brush, broom, polypropylene garbage bags.

Removing old plaster
To remove a very old plaster coating, cracked and completely worn out, you can use a steel scraper. With its help, falling off sections are pulled off, and then cut off. The coating, which is held firmly, is knocked down with an ax, chisel or pickaxe.

Regardless of the composition of the plaster, before removing it, it must be moistened in order to make it softer and reduce dusting.
If you cannot remove the plaster coating manually, then you can use one of the following tools:
- Perforator. This method is very dusty and noisy, which can create some inconvenience.
- Bulgarian. With its help, sections of plaster are cut out or the coating is cut into smaller parts, preparing them for beating with a chisel or perforator.
- A special machine for removing plaster.

According to experts, the manual method is still preferable: practice shows that a hatchet in skilled hands is more effective than a hammer drill.
Regardless of the method chosen, you first need to remove easily destructible areas, and then apply the tools. Removing plaster with different composition has its own specifics:
- Decorative plaster is usually cleaned quickly and easily, a thin layer can be removed with a grinder.
- Polymer and silicate compounds will require a lot of effort.
- When removing gypsum plaster, you must first wet it with water and leave for 20 minutes. To increase the ductility of the coating, acetic acid can be added to the water.

Removing plaster from drywall
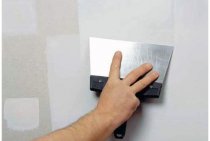
If you have to remove plaster from a drywall surface, then you need to do it carefully so as not to damage the sheets. In this case, a cycle is used, which in appearance resembles a sharpened spatula.
When removing plaster from GKL, you must adhere to the following sequence:
- First of all, the integrity of the coating is violated, weaker points are removed - this allows you to get to the end part of the layer.
- The cycle is driven under a layer of plaster.
- The cover is put on and removed in pieces.

If the plaster is holding well, then you can use a chisel or chisel, lightly and gently tapping on them.
Old plaster removed, what's next?
After all the old plaster is removed and the debris is removed, it is necessary to proceed to the following stages of preparation:
- Scrub the wall with a stiff iron brush and hot water.
- Check the base for crumbling parts and voids, for this you can tap the wall with a hammer. Loose areas need to be removed. Also, the top layer of the wall can become damp and become fragile from old age, for this you need to completely clean it off with an iron brush or a drill with a hard nozzle.
- Strobes are made in the wall for wiring or pipes, all cracks are rubbed, the seams are embroidered.
- The final step is cleaning and priming the surface. It is necessary to sweep the dust from the walls, then treat them with a deep penetration primer.

After the primer has dried, you can proceed to installation of lighthouses. They greatly facilitate the work and serve as guides along which the rule is guided. On sale there are aluminum and galvanized beacons for leveling walls with perforations designed for ease of fastening.
The specifics of wall preparation depending on the base material
The preparation of walls from different materials will be different, as each of them has its own properties.
- One of the most problematic are walls made of concrete slabs: due to their smoothness, they cannot provide good adhesion to the plaster mixture, which complicates the preparation. To keep the plaster firmly on the surface, serifs are made on the wall with a grinder or an ax. You can also apply a thin layer of tile adhesive or install a plaster mesh.
- The preparation of brick walls is quite simple. It is only necessary to clean the mortar between the bricks and spill the wall with water.

- For plastering wooden walls, obligatory sheathing with shingles or wire mesh is required, because the plaster does not lie on smooth wood.
- The construction of cinder blocks or sawn shell rock will only need to be moistened with plenty of water.
- Before plastering, it is enough to simply coat a plasterboard wall with a primer.
You also need to pay attention to some points:
- Places where surfaces of different textures are connected must be reinforced with a mesh of at least 20 mm in width to prevent cracks and plaster falling off.

- Reinforcing mesh is absolutely necessary if the plaster layer is thick enough.
- A layer of insulation is placed under shingles or mesh.
If the technology of all stages of work is observed - preparing the walls, mixing and applying the mortar, drying the plastered wall - the new plaster will not crack or crumble, allowing you to forget about laborious repairs for many years.