Tasks, advantages and disadvantages of cascade mixers
Cascade and mortise type mixers have their own specific operational tasks. The task of such faucets is to create a powerful and even water flow for quick, but gentle filling of the tub. Therefore, for such tasks, the design of the mixer must be very reliable and durable. The advantages of cascade mortise mixers include the fact that they have an adapted design,
aesthetics - the first advantage of a cascade mixer
durability, high quality of the material from which they are made, meet all the technological standards of the present time.
Of course, you should pay attention to the fact that the above advantages of cascade mortise mixers will be visible only with proper installation, based on a gradual and step-by-step procedure. That all models of this type of faucet were developed not only because of the technical need for improvement
Part of the reason is the rapid popularity of this type of faucet went hand in hand with the popularization of the design vision of a modern bathroom, as well as the desire of people to have their own graceful waterfall in their home that fills their bath.
That all models of this type of faucet were developed not only because of the technical need for improvement. Part of the reason is the rapid popularity of this type of faucet went hand in hand with the popularization of the designer's vision of a modern bathroom, as well as the desire of people to have their own graceful waterfall in their home that fills their bath.
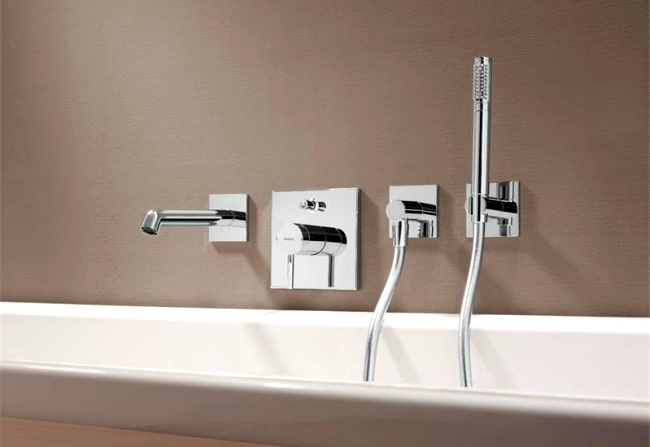
The initial and most basic advantages of this type of mixer have already been given above, but do not forget that the specific design of the cascade and mortise mixer is that it eliminated the most annoying problems associated with masking and hiding such technical elements, like hoses and pipes. Thus, the location of the bath from the side looks monolithic, aesthetically beautiful and the eyes are not distracted by the above elements of the water supply and drain system.
In addition, in the classic faucet installation model, the bath faucet also has an attached shower hose, which usually clings to
bathtub with built-in faucet
holder above the bath, which gives the bathroom a kind of messy look. As opposed to a conventional faucet, the cascading and inset faucet scheme allows such a shower hose to be hidden due to the space under the bath. And, if necessary, the hose from the shower will be freely pulled out through the hole in the bathroom.
But, despite all the advantages, nevertheless, mortise cascade mixers on the side of the bath have some disadvantages. These shortcomings are associated with the hole for the hose. The problem is that when the shower hose is pulled through the hole in the tub and pulled out of its concealment space below it, when the shower is not needed, the hose is subject to friction and serious bending in certain places. Because of this, he simply frays, which entails his exit from the working state in the near future.
Investigator, its service life is significantly reduced. For example, a shower hose that is installed on a wall-mounted faucet has a service life of one to several years, as practice shows, in most cases such hoses “outlive” the entire period to the maximum. At the same time, the service life of the same shower hose, but which is attached to a cascade and recessed mixer, has a service life of six months to one year. Thus, you will have to change shower hoses much more often.
Some Helpful Tips
The best option for installing the mixer is to attach it to the bath during the repair and installation of the bowl, when it is not yet connected to the sewer system. This is due to the fact that after installing the old mixer, some more finishing work will have to be done.
In order to install the mixer on the surface of the bath, experts recommend using a special bar. At the same time, many craftsmen do not use this bar, which does not harm the design of the crane at all. This is due to the fact that when installing a tap on a bathtub already connected to the sewer, it takes a long time to adjust the size of the bar. Fitting this product is usually complicated by the design of the bathtub rim. However, if the water pressure in the apartment is too strong, then it makes sense to spend time adjusting the bar to strengthen the water supply structure.
Stages and features of installation
For a professional plumber, installing a faucet on an acrylic bathtub is literally a matter of one to two hours.
But for a novice master who decides to install the mixer on his own, it may take much more time to complete all the operations. A good help will be the recommendations of experienced craftsmen on how to install a faucet in the bathroom.
To begin with, you should study the design of a bathroom faucet, since the installation of a popular single-lever faucet is somewhat different from the installation procedure for a traditional valve design. Before starting work, stock up on the necessary tools and materials:
- drill;
- milling nozzle;
- screwdriver;
- wrench;
- flexible hoses;
- fasteners.
To install a mortise mixer, you must:
- Choose a suitable place and make markings on the side of the bath.
- Drill a hole of suitable diameter using an electric drill, on which a nozzle with a hole cutter is installed.
- Place a special gasket under the mixer, which is supplied with the device.
- Insert the mixer into the hole.
- Fix the mixer under the side. For single-lever structures, a special stud should be used, which is then fixed with a steel half washer. In addition, fastening nuts are used, one or more.
- Firmly pull the mixer to the surface of the bath rim.
- Attach flexible hoses that will supply hot and cold water to the faucet. Special gaskets should be used for hose caps.
Manufacturers of mortise-type mixers often offer special mounting panels in addition to the main design.
The need for their use is motivated by the fact that when creating a hole in the side of the bathroom, its rigidity is violated, and the mounting panel or plank will strengthen the attachment point.
In practice, masters most often do without this additional element. Often the mounting plate does not fit in size, it requires trimming. In addition, it is difficult to apply this element on the edge of a rounded configuration. However, if there is any doubt that the bathtub will withstand the load with a reduced stiffness of the rim, an experienced specialist should be consulted on this issue.
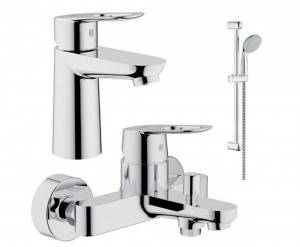
Mixer selection
Before starting the installation of the mixer, it must be purchased. Naturally, it must be solid and of high quality.
So what characteristics should a good bathroom faucet have? First, you need to pay attention to the weight of the mixer. It should not be too light, because the durability of plumbing depends on the thickness of the metal.
Of course, heavy plumbing can also have a number of disadvantages.
Bathroom faucet diagram.
Bathroom faucets are usually made from two materials - silumin and brass. Silumin faucets are much lighter than brass faucets and have a lower price. However, this material, which is an alloy silicon and aluminum, is highly unreliable. With such mixers, troubles such as breaking off the handles and breaking the clamping nuts often occur. Silumin plumbing is short-lived, however, it is quite popular because of its low cost.
Brass mixers are much more expensive than silumin ones, they have more weight and viscosity of the alloy. Such an alloy makes clamping nuts and pipes more reliable, such a mixer will not break even under various mechanical influences. If financial opportunities allow you to purchase more expensive plumbing, brass taps should be preferred.
The technical characteristics of the mixer are also important, for example, its dimensions and the correspondence of the model to the installation site. A faucet designed to be built into the side of the bathroom is not suitable for wall mounting and vice versa. Inspect the main parts of the faucet and determine if they are suitable for your bathroom - the length of the shower hose, the faucet spout and the availability of fixtures for mounting the shower head on the wall.
Features of drilling on enamel
Experts do not recommend beginners to make holes in the side of a cast-iron or steel bathtub on their own. Problems are caused by the presence of enamel, which performs not only decorative, but also protective functions. In case of incorrect drilling, there is a high risk of irreversible damage to this layer. And yet, there is a technique for home drilling of such surfaces, and an experienced master can quite cope with it.
In addition to the usual tools, such as a marker, tape measure, screwdriver and drill, you will need a special pen drill designed for drilling glass and ceramics, as well as transparent tape and a piece of plasticine. After marking, the drilling site should be carefully sealed with tape.
Then, from a piece of plasticine, you need to make a round rim and stick it around the circumference so that the place for drilling is in the center. The area bounded by the plasticine rim should be three times the size of the hole for the mixer. It turns out a flat round platform with a side. You need to pour water into it.
After that, you can start drilling in the center of the markup. It is recommended to use a drill with a diameter of 6mm at a speed of about 500-600 revolutions. The pressure should be moderate. In the process of such accurate drilling, a narrow through hole will appear in the side of the bath, through which the water present at the drilling site will flow out.
Now you should make a small cap from plasticine and stick it on the bottom of the side so that the resulting hole is in the center. Again you need to pour water and re-drill with a 12 mm drill. The pressure should be weak. When the drill passes through the side, you can remove all the plasticine and evaluate the quality of work, chips on the enamel should be minimal.
After that, you need to expand the hole to the required size in order to install the mixer. For this, a new markup is performed, with the designation of the boundaries of the hole. The surface must be sealed again with transparent tape. Expand the hole with a grinder using a rubber nozzle with an emery cloth. Turnover should be set to maximum, but the applied force should remain minimal.
When the hole is widened enough, a 20 mm nozzle can be used. It should be understood that with a minimum effort that will protect the enamel from damage, the work will not progress too quickly. It will take more than an hour to work with a grinder. When the hole is ready, an o-ring is inserted into it and the mixer is installed in the usual manner.
There are other ways to carefully drill into enamelled surfaces. Some craftsmen simply glue a metal plate to the enamel and drill through such a “sandwich”. The metal will protect the enamel from damage.Others, before drilling, carefully remove part of the enamel with a grinder, and then drill with a hole cutter.
Finally, there is a way to drill cast iron with a diamond core cutter using a wood jig. But in this case, the cutter must be cooled quite often by pouring water on it.
Instructions for installing a cascade and mortise mixer on the side of the bath
installation of a faucet on the side of the bath
In order for a house or apartment to have a bathtub with a mixer on board, in addition to a bathtub and a mortise mixer, you must also have tools such as:
- Screwdriver;
- adjustable wrench;
- electric drill with a milling nozzle;
- fasteners.
First of all, it is necessary to mark up where the mixer will be installed in the future. When choosing the installation location of the mortise mixer, it should also be taken into account that this place should be easily accessible so that in the future the connection to the water supply system is not complicated. If the old mixer is still installed in place, it must be dismantled. See how to disassemble a bathroom faucet.
Having made calculations and marks, it is necessary to arm yourself with a drill with a milling nozzle of the required diameter and carefully drill the bath rim in the marked place. After that, carry out the installation of the mixer, while not forgetting to place the necessary gaskets to avoid leaks.
In the event that the installation is carried out by a mixer with one lever, then a stud must be screwed to it from below, and then a steel half washer on the stud. After that, tighten the nut tightly, pulling the mixer itself with the help of a half washer. Having securely installed the mixer, it is necessary to connect the water supply of hot and cold water to it using bending hoses, while not forgetting to install rubber gaskets under the union washers. Upon completion of the above recommendations, check the performance of the mixers and operate at your pleasure.
If the bathroom is undergoing a major overhaul, up to the replacement of the bathtub, then it is advisable to purchase a bathtub with a built-in faucet already built into the board. Thus, you do not have to separately spend time installing the bathtub and mixer on board. In addition, such a purchase is beneficial not only because of time saving considerations, but also based on the fact that the end user can choose a bathtub with a built-in faucet on board in a ready-made model. Thus, you can protect yourself from the incompatibility of the faucet and the bathroom, both from the technical side and from the aesthetic side.
Think before you do
Before starting the installation of a faucet in the bathroom, it is also necessary to familiarize yourself with the disadvantages of devices designed to be installed on the side. Since not only some pluses exist with such an installation. It should be remembered that due to increased operational loads, the probability of malfunctions in such structures is quite high. Professionals recommend mounting in such a way as to provide access to the hidden part of the structure, for example, using a removable bezel.
Another problem that almost inevitably arises with inset faucets is the need to frequently change the shower hose. In some cases, this element fails within a couple of months after installation, since the hose hidden behind the side is in a bent state. There is no single solution to this problem. Owners are advised to choose the highest quality hose possible and to put up with the need for frequent replacement.
Advantages of this type of installation
Mounting a faucet to a wall has a long history. In the tiny bathrooms of the so-called "Khrushchev" and other small-sized apartments, such a solution was quite appropriate, since it saved space and money.
Sufficient installation height of the faucet above the bath, combined with a long spout, allows you to use the same device for both the bath and the adjacent washbasin.
A couple of decades later, the wall-mounted faucet had a competitor that was mounted directly on the side. It should be noted that this installation of a faucet in the bathroom has several advantages:
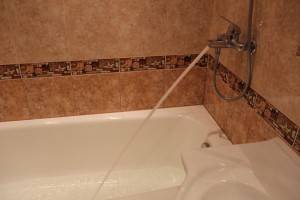
- provides quick filling of the bath;
- avoids splashes;
- optimizes the space of the bathroom;
- provides ample opportunities for interior design;
- differs in the increased convenience in operation;
- makes it possible to disguise the hose of the shower head.
As a result, the bathroom becomes as comfortable as possible and at the same time very beautiful and stylish. The cascading faucets, which are stylized as a small waterfall and can fill the bathtub in a matter of minutes, give a special chic to the interior design.
Features of the design of the mortise mixer
For installation on the side of the bath, manufacturers most often offer the so-called modular models, although there is also an option in the form of a monoblock. Before starting installation, you should carefully study the design of your mixer, as well as the manufacturer's recommendations for its installation and further operation.
Monoblock models are usually supplied assembled, but modular devices consist of several elements. First of all, this is a tap - the central part of the mixer, on the body of which there are three outlets:
- for hot water;
- for cold water;
- for pouring.
Separately there is a place for connecting a shower head. These entrances have standard dimensions, so the buyer can decide for himself where exactly the spout and shower head will be located. Connection to hot and cold water pipes is carried out using special half-inch eccentrics.
High-quality mortise mixers of well-known brands have the ability to withstand quite serious water hammer. In many models, a separate shower head is controlled by a lever mounted on the body of the spout. This design automatically switches the water supply from the shower back to the spout when the watering can is returned to its place.
Bathroom faucets, their types and choice of installation location
When buying a bathroom faucet, it is important not to get lost in the abundance of models on offer. When going to the store, you should already know exactly what device you need to buy.
Currently, bathroom faucets are available in three installation options:
- wall - the most common and familiar;
- on-board, installed on the side of the bath (which must have a width of at least 7-8 cm, otherwise installation will be impossible);
- a mixer on a rack or a special shelf is an expensive device, the cost of which is several times higher than that of a conventional mixer.
The latter option is rarely used, since its installation requires quite a lot of space, which is simply not available in a standard bathroom. You will only need to choose a place for installing the mixer in the case of equipping a new bathroom during the construction of a house or a major overhaul of a bathroom.
Here you need to focus on the following considerations:
- Choose the installation location by eye and evaluate whether it will be convenient to use the mixer.
- If this is a mixer with a shower, then it must be mounted at a height of 120 cm from the bottom of the bath after its installation.
- If the gander of the mixer also rotates the sink, then the height must be selected even more carefully. Please note that the height of the sink is rarely less than 85 cm. To this must be added the size of the faucet itself and the height necessary for comfortable hand washing.
- You should not mount the mixer on the horizontal, which is located at the height of the curb, which is usually done at a height of 100 cm from the floor.It is better to place the device where the wall is lined with smooth tiles, otherwise the faucet reflectors will not adhere tightly to the surface (the curb usually has a rough finish).
Faucet installation tools and workflow
If you simply change the old device to a new one, then you do not have to choose the installation location. Installation will be carried out where there is already a communications outlet. We will consider replacing a conventional wall-mounted faucet.
To replace the mixer you will need:

- new mixer;
- gas key No. 1;
- wrench;
- open-end wrenches No. 17 and No. 14;
- linen tow or teflon tape for sealing threaded connections.
Next, the procedure is as follows:
- Make sure that the faucets that shut off the supply of hot and cold water are in good condition. To do this, rotate them clockwise until they stop. If these are ball devices, then simply rotate them 90 degrees. When the valves are not used for a long time, lime deposits may appear inside the mechanism, which make rotation difficult and prevent the water flow from being completely blocked. If this is the case, then it is necessary to slowly open and close each tap several times. After making sure they are closed, fully open the water on the faucet and make sure it does not leak.
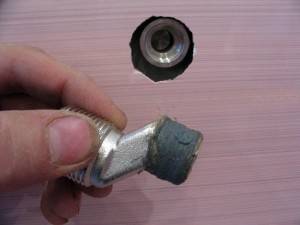
- Next, you need to dismantle the old device. To do this, unscrew the nuts holding it on the eccentrics. Evaluate the health of the old eccentrics - check their integrity and thread condition. If they are made of good metal, then it is not necessary to change them. This saves you the hassle of installing and positioning new eccentrics. If there are doubts about the serviceability of the old eccentrics, then carefully unscrew them counterclockwise from the pipe entry so as not to damage it (otherwise you will have to change the pipe entries, which will ruin all the repairs in the room). If the old eccentrics do not unscrew, then the places of their connection with the pipes can be gently tapped using an open-end wrench, or heated with a lighter fire. This usually helps. After removing the old eccentrics, it is necessary to clean the pipes of the water pipes from various contaminants.
- Twisting new eccentrics is done clockwise until it stops. Their outlet pipes must be located on the same horizontal line, and the distance between their axes must be 150 mm. Even before the start of twisting, tow or tape must be wound on the threads of both eccentrics. You need to start from the beginning of threading in the direction of the cut of the element. Tape or tow should be wound in a dense even layer. Checking the correct installation of the eccentrics is carried out by pre-installing the mixer in place. To do this, the device is baited with one input on any eccentric, and the second is combined with another eccentric. If everything fits together exactly, then you can make the final installation of the mixer. If not, then you need to tighten one of the eccentrics to the correct position.
- Put decorative caps on the eccentrics, install the sealing gaskets that are included in the kit on the mixer nozzles. Then unscrew the nuts on it until they stop, otherwise they will interfere with you. Wrap tow or tape tightly on the threads of the eccentrics. Tighten the mixer nuts by hand. Then tighten the connections with a wrench, but do not overdo it, otherwise the threads may be stripped.
- The last step is to install the attachments of the mixer: gander, shower hose and watering can. Be sure to seal all connections with tow or tape.
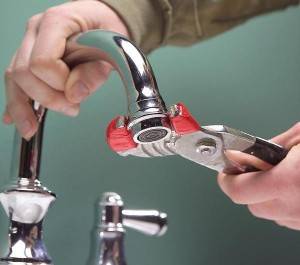 First unscrew the aerator from the tip of the spout, otherwise it may become clogged with particles of scale and deposits that have fallen into the pipes during installation of the device.
Check the faucet by changing the water pressure. In this case, there should be no leakage in any connection. If it is still found, you will have to remove the device and repeat the entire installation, while replacing all the tow and tape on the threads.
As you can see, the work of replacing the mixer is not difficult and may well be done with your own hands. Your assistants in this matter will be the accuracy and thoroughness of the implementation of all stages.
Connecting the faucet to the water supply
First you need to prepare all the necessary tools and materials:
Bathroom faucet installation diagram.
- mixer kit;
- spanners;
- FUM tape or tow;
- building level.
Before connecting the faucet to the bathroom plumbing, it must be assembled. When buying a product, it is necessary to carefully check the availability of all its necessary parts: body, gooseneck, eccentrics, shower head, shower hose, decorative shades and gaskets. The completeness of the mixer is usually indicated in its instructions, the parts are placed in fabric or plastic bags. It is also necessary to check the integrity of the threads of the fastening nuts and eccentrics.
Having assembled the mixer according to the instructions, proceed to its direct connection. In this case, you need to use a fum tape, instead of it you can take a natural tow treated with a special paste. The connection of the faucet in the bathroom is carried out by means of eccentrics. Having reeled up the eccentrics, they need to be screwed to the fittings of the water pipes located in the wall. Eccentrics allow you to shift the distance between the pipes to the required values.
The distance between the inlets is usually 15 cm. If the distance between the fittings does not correspond to this value, eccentrics help to correct this situation. The horizontal position of the eccentrics is checked with a building level.
Bathroom faucet connection diagram with dimensions.
After installing them, they try to connect the main mixer unit to them. If this is done without much difficulty, then the eccentrics are installed correctly. After that, the block must be removed and decorative shades attached, which should be adjacent to the wall cladding, which will also indicate the correct installation of the eccentrics.
The next step is to connect the block itself, while it is not recommended to use additional winding materials. Tight shrinkage is achieved due to the gaskets inside the clamping nuts, which are tightened with a wrench. If you have not assembled the mixer before, you need to do it now.
It is not necessary to use a wrench or adjustable wrench when assembling and installing the mixer
It should be used with caution, tightening the nuts slightly, without much effort. After the assembly of the mixer and its connection to the water supply are completed, you need to open the taps of the main highways and check the operation of the mixer
If leaks or drops are found at the joints, the nuts must be tightened more.