A large role in the overall visual perception of the room is played by the appearance of the ceiling. Ideally, a perfectly flat, smooth surface is considered optimal, without height distortions, cracks, potholes, and similar shortcomings. Plasterboard ceiling sheathing is one of the most popular solutions that allows you to quickly and easily achieve an attractive appearance and provide sound insulation. To understand how to sheathe the ceiling with drywall, the following tips and instructions will help you.

Required Tools
Installing drywall on the ceiling - not too complicated and time-consuming process, but it is still not done with bare hands, so you need a small set of tools:
- screwdriver;
- planer - useful when cutting chamfers;
- hydraulic level - will help to control the evenness of the installation in vertical and horizontal planes;
- roulette;
- knife - will be used to cut the plasterboard into pieces of the desired size;
- metal scissors for cutting profiles;
- perforator - is necessary for drilling holes into which dowels will then be mounted.

As for the materials, everything is extremely simple here: in addition to the drywall sheets themselves, you will need:
- guides and bearing profiles;
- dowels;
- self-tapping screws;
- crab connectors;
- suspensions.
If the question is how to install drywall on ceiling, you are interested in landscaping a bathroom or kitchen, you will need a moisture resistant plasterboard, because in these rooms there is increased humidity.

Expert advice
To figure out how to sheathe the ceiling with sheets of drywall with your own hands, practical advice from experienced craftsmen will help:
- All the tools and materials listed above should be prepared in advance so that you are not distracted by searching for them.
- Cleaning after repair is not the most pleasant task; covering doorways with foil will help to reduce the time for it after it is completed.
- The decision to sheathe the ceiling with your own hands will save you a lot of time and effort that you would have spent on leveling it.

- The distance between the base ceiling and the profiles directly depends on the lighting system being installed.
- Try to mark the sheets of drywall on the ceiling so that the joints are located on the profile.
- Hangers should be installed in a checkerboard pattern.
- Before you sew up your ceiling with drywall, double-check the quality of the assembled metal frame and run the wiring.
- Fasten the GKL with self-tapping screws.
- At any of the stages of work, if difficulties arise, drive the query into your search engine: “how to sheathe a ceiling with plasterboard with your own hands video”. Knowledge is not redundant.
Installation
To get a better result, it is better to involve an assistant.
Important! Take care of respiratory and eye protection during installation of the suspended structure.
Installation is carried out according to the following algorithm:
- We clean the base ceiling.
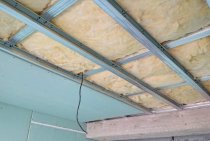
- Before we hem the ceiling with drywall, we calculate the height of the future ceiling, taking into account the communications that the suspended structure will hide and the lighting system.
- Using a hydraulic level and a pencil, we create a drawing on the surface, on which the attachment points of profiles and lamps will be marked.
- According to the marks made, we fix guide profiles around the perimeter of the room.
- We carry out the installation of suspensions, on which we will later fix the supporting profiles. It runs across the room.
- The installation of intermediate profiles is carried out half a meter from one another.
- Before sewing the frame, we check the correct installation of the intermediate profiles, as well as how securely they are installed.
- We fix drywall sheets in a checkerboard pattern using self-tapping screws.
- At the end of the work, with the utmost care, cut off the excess using a construction knife.

Finishing drywall after installation
Using the diagram above, you will get a ceiling surface with evenly installed plasterboards. Now they need to be properly processed.
- To begin with, we putty the joints, having previously sealed them with a reinforcing mesh.
- We sew the corners with metal corners, and then we also putty.
- We treat the entire ceiling surface with a primer solution, starting and finishing putty. After it dries, your plasterboard ceiling will be ready for any finishing work.

By finishing the ceiling with plasterboard, you will get a number of advantages:
- Such a sheathing will hide all the shortcomings of the base surface, utilities, wiring.
- Plasterboard ceiling can be given almost any shape, which opens up ample opportunities for the implementation of various design ideas.
- If one of the sheets is damaged, it is easy to replace it.
- Drywall is an absolutely harmless material for humans and the environment.
As you can see, with the necessary tools and basic skills, it is quite possible to install a plasterboard ceiling with your own hands and get a very decent result.
Price
Professional installation of a simple single-level ceiling in Moscow will cost from 370 rubles / m2, in St. Petersburg - from 390 rubles / m2. The price for the arrangement of a two-level ceiling structure, excluding materials, starts from 400 rubles / m2 in Moscow and from 550 rubles / m2 in St. Petersburg.