With the help of wallpaper, you can easily create an atmosphere of comfort in your home. A large selection of this finishing material on the market allows you to choose it in accordance with any interior ideas. A wide variety of tones, all kinds of textures and patterns - all this makes wallpaper a good helper in repairs. After the decision has been made to decorate the walls with a paper embodiment of design ideas, many are wondering how to glue wallpaper on drywall?

Wallpapering on drywall is considered the most common way to finish walls. The gluing process itself does not take much time and does not require special skills. The only caveat is the fact that the wallpaper has a lot of requirements for the quality of the surface.
Is special preparation required before wallpapering?
Before you start wallpapering, the drywall surface must be well prepared. Many people think that GKL has a perfectly flat surface, so the question arises: is it possible to glue wallpaper on drywall without first preparing the walls?
In principle, you can glue wallpaper on drywall without preparation, but as a result you will get the following:
- Puttyed joints and places for fastening self-tapping screws will be visible through the finish. If they are not processed at all, the wallpaper in these places will be torn, rust from the screws may appear on them.
- Wallpaper on drywall without putty is glued “tightly”, which will cause a lot of problems in the process of subsequent repairs. When it is necessary to replace the wallpaper with new ones, you will either have to tear off the old ones with pieces of drywall, or stick them on top of the old ones.

There is only one conclusion: drywall must be prepared for wallpapering.
All preparatory activities can be presented in the form of a phased scheme, each item of which requires careful implementation.
Stage number 1. Primer
The primer improves the adhesion of the putty with drywall, prevents the absorption of moisture from the putty and wallpaper glue into the GCR, as well as the development of fungus and mold.
Acrylic primer is considered the most common, although other types can be used. The mixture can be purchased ready-made or dry, requiring self-preparation. If the choice is made in favor of the composition for self-preparation, it is important to strictly follow the dosage suggested by the manufacturer.
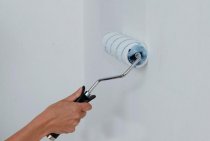
Priming drywall for wallpapering performed with a brush or a fleecy roller. The composition must be distributed as evenly as possible on the wall and wait for it to dry completely.

Stage number 2. Sealing joints
Correct Application seaming technologies allows you to make the joint, which is the weak point of the drywall construction, strong and invisible. Drywall seams are filled with a special putty designed specifically for these purposes ("Knauf Fugenfüller", Knauf Uniflot, etc.), or a high-quality starting mix.
- If there is no chamfer at the ends of the sheets, it is removed with a knife at an angle of 45 degrees.
- The space between the sheets will be filled with putty for seams, which must dry before starting the next stage.
- To reinforce the joints in the process of their sealing, sickle is used - a fiberglass tape with an adhesive composition specially applied to the surface. It must be glued very tightly in the center at the joints between the sheets. If the material does not adhere well, it is permissible to add PVA glue in a small amount.
- The seam is putty.
- After drying, the putty is rubbed with fine-grained sandpaper.

Stage number 3.Putty plasterboard walls
The putty solution can be prepared independently using a construction mixer, or you can purchase a ready-made mixture. For drywall, two types of putty are used: starting and finishing.
- With the help of the starting putty, you can eliminate any defects and damage to the drywall received during the installation process.
- The finishing mixture must be applied at the stage of finishing, it gives smoothness and allows you to remove minor defects and irregularities. If the drywall has no defects, one layer of finishing putty will be enough, and you can not use the starting one.
Myself puttying process performed with two spatulas. A small one is needed in order to collect a solution from a container, a wide one allows you to apply and evenly level the putty.

Stage number 4. Grinding
After complete drying, the surface is rubbed with sandpaper. Grinding is done with coarse-grained, and then fine-grained sandpaper.
This stage of wall preparation must be carried out carefully and slowly. Carelessness can provoke the appearance of chips, after which it will be necessary to repeat the puttying of the walls again.
Before starting work, make sure that you have personal protective equipment, as a result of grinding, a lot of caustic dust is generated, which can get into the eyes and respiratory tract.

Stage number 5. Re-priming the walls
Before sticking wallpaper on drywall, you will have to walk along the putty wall with a primer again. The primer contributes to better gluing of wallpaper and prevents the surface from absorbing abundant glue. Experienced professionals perform a second primer in two layers.
The second layer of primer should be applied only after the first has completely dried.
Stage number 6. Wallpapering
Before gluing wallpaper on drywall, you need to choose the right glue and mark the wall according to the width of the roll. This will allow you to calculate the number of rolls needed for gluing and facilitate the whole process.
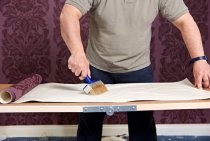
Glue is more convenient and practical to apply with a special roller. First of all, you need to coat the inside of the canvas, and then the section of the wall where you plan to stick the canvas. Next, you can glue the sheet. It will be good if there is an assistant, because it is quite difficult to glue wallpaper with high quality alone.

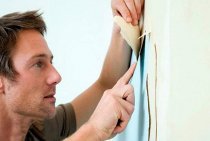
The sheet pasted on top must be leveled from the center to the edge. When the canvas is completely glued to the plasterboard wall, it must be smoothed out well using a piece of dry cloth. Sheets must be glued butt to butt, without overlap. As for the corners, it is recommended to glue the corner itself first, and then the wall that adjoins it.
You can watch a special video on how to stick wallpaper on drywall. To avoid electric shock, it is necessary to de-energize the room.