If you decide to update the room with the help of modern wall coverings - vinyl, non-woven and even thick paper - you definitely need to glue the wallpaper end-to-end. With this method, the webs are in contact with the edges, but do not go over each other at the seams. With strict adherence to the rules, the lines of the joints are invisible, and the coating seems to be solid.

Tools
To glue wallpaper without seams and visible joints, the first step is to take care of the appropriate type of wallpaper glue and suitable tools.
For work you will need:
- pencil, tape measure, plumb or level;
- a container and a wooden stick for kneading glue;
- spatulas - metal and plastic wallpaper, scissors, a sharp knife;
- brushes, rollers, rags.

Wall preparation
The secret to wallpapering success lies in the preparation of the wall.
- You need to start with the complete removal of the previous coatings.
- The next stage is plastering with a gypsum composition, which copes with most irregularities and cracks.
- Next - putty, removing roughness.
- The final operation is a primer that increases the density and moisture resistance of the putty.

All stages of preparing walls for wallpaper are described in this article.
Step-by-step instructions for processing drywall surfaces before gluing - here.
If the walls have gained shine, then everything is done correctly, the glue will lie on them evenly and the wallpaper will hold well.
Advice. To check the readiness of the walls, attach a piece of cellophane with masking tape to the surface. If after a day the inner side fogs up, you should wait a little with gluing. If the film remains unchanged, you can get to work.
Where to start
If preference is given to wallpaper made of non-woven, vinyl or cork, the border of the beginning does not matter, because the docking makes the seams invisible. But still, one of the following options is usually chosen:
- From the window - according to a long tradition.
- From the door, which is convenient to use as a vertical line.
- From the corner, if it has the correct shape, although such places are infrequently even. But using a plumb line or level, you can designate a perpendicular nearby, stepping back a distance identical to the width of the wallpaper, and start sticking from it, returning to the corner itself later.
- From a major landmark. When there are many passages and windows in the room, it is worth starting with the largest object.
- from multiple lines. The method is used when there is a large window, and pasting is carried out from it in different directions.

Wall marking
Now let's figure out where to start marking up. If vinyl, cork or non-woven wallpaper is chosen, it does not matter. With the help of a plumb line (better than a laser level), a pencil, a metal ruler, a vertical line is drawn in a convenient place, along which the first canvas will be glued. Such lines are applied along the entire wall at intervals equal to the width of the wallpaper.
Marking is needed so that the canvases are glued without distortions.
Cutting wallpaper
The roll is rolled out on the floor and cut into the desired segments with sharp clerical scissors, taking into account the margin and alignment of the pattern. Especially carefully cut wallpaper with a large or embossed pattern.

When cutting, it is important to take into account the size of the rapport - the height of the pattern repeated on the wallpaper.
Simple calculations are carried out. For example, the rapport value is 50 cm, the height of the wall to be glued is 280 cm. The number of rapports that will be placed at this height, rounded to the nearest whole number, is determined.
280 : 50 = 5,6
Round up to a higher value, we get 6 - the number of incomplete rapports that fit in the strip from ceiling to floor.
50 × 6 = 300 cm - the required length of the glued canvas.
Stack the cut sheets.
Advice.Marks made on the back of each sheet and showing the top of the canvas will help not to get confused during the gluing process.
How to glue butt paper wallpaper and paper-based vinyl?
For paper wallpaper:
- We select and prepare starch glue with an antifungal additive according to the manufacturer's instructions.
- Evenly lubricate the first strip, hold for 3-7 minutes for impregnation in the folded state.
- We glue the canvases on the wall with a neat and very tight alignment of the edges. Joints can be additionally glued with PVA.

Note! When wet, paper wallpapers stretch out, so it is important that for each panel from smearing with glue to gluing it to the wall, the same time interval is maintained. After drying, they shrink, so the edges of the canvases need to be adjusted as tightly as possible so that no gaps form between the sheets in the future.
The conditions for sticking vinyl wallpapers with a paper base are similar to the rules that apply to canvases made entirely of paper. They are also pre-coated with glue intended for them, given time for impregnation, then glued to the surface.
Features of butt-gluing vinyl wallpaper on non-woven and non-woven
These coatings, which have many advantages, differ for the better in gluing technology. They do not need to be coated - it is enough to glue the wall with glue. Everything is done much faster, the problem of soaking wallpaper panels disappears, they do not shrink when dried.
- The wall with the help of a roller is covered with a uniform and uniform layer of glue. In hard-to-reach places, a brush is used.
- You should wait until the glue is absorbed into the wall and dries. Then, on the area that will take one wallpaper, the glue is applied again.
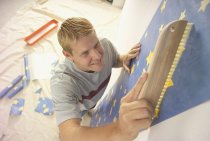
- The first canvas is applied without pressure to the wall, making sure that the side edge does not move from the vertical line. After making sure that everything is in order, the wallpaper is pressed against the wall and, constantly smoothing, they begin to stick. It is convenient to do this with a wallpaper spatula or a rubber roller. Air bubbles are removed with the same smoothing movements.
- The next canvas is glued like the first, but the edge of the already pasted wallpaper is taken as a guide. Joints are carefully smoothed out.

How to wrap corners
You should not try to make a connection of both walls adjacent to the corner with one canvas. The probability that the wallpaper will "lead" is almost one hundred percent.
The correct algorithm for pasting the inner corner:
- The distance from the corner to the nearest glued wallpaper strip is determined, the resulting value is increased by 5 cm.
- The wall and corner are well smeared with glue.
- The canvas is glued with the stipulated margin on the other side of the corner.
- With a rubber roller or a dry rag, the pasted wallpapers are carefully aligned both in the corner and on the wall.
- Due to the curvature of the corner, the amount of overlap of the wallpaper behind it will not be the same. It is necessary to determine the narrowest place and, stepping back 1 cm from the edge of the wallpaper towards the corner, make a mark here, from which a distance similar to the width of the roll is laid along the wall, and a vertical line is drawn through this point. It is from her that the next canvas will overlap.
- Using a paint spatula, a ruler and a wallpaper knife, the seam is trimmed. It is important to cut through both canvases at the same time, otherwise a gap along the cut line is possible.
- Remove excess wallpaper. The upper part is removed without problems, the lower part is removed by slightly turning the edge of the upper panel.

A well-aligned outer corner (with a level difference of no more than 0.2–0.4 cm) can be pasted over with a solid canvas. For a non-ideal external corner, a method that is practically the same as the method described above is appropriate.
- Also, with the calculation of turning around the corner by no more than 5 cm, a wallpaper is being prepared.
- From the turning point closest to the corner, the distance for the next strip is similarly marked (width of the wallpaper roll minus 1 cm).
- The overlapping web is located in the inversion section. Cutting the seam is carried out in a similar way.
It is possible to paste over a room with wallpaper end-to-end without the invitation of professionals. But only those craftsmen who strictly follow the gluing technology will have a pleasing result.