The choice of insulation
For the insulation of buildings and structures, different heaters are used.
Often people ask themselves the question - is it possible to insulate aerated concrete with polystyrene foam? Apparently, the characteristics of this material, which has recently appeared in our country, are not so widely known. We answer: it is possible.
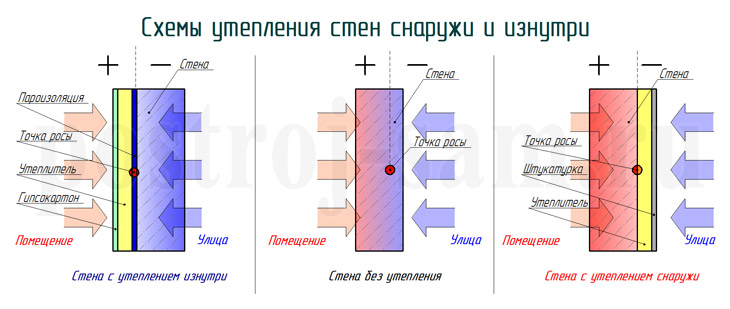
Therefore, there is no need to doubt whether it is possible to insulate aerated concrete with polystyrene foam. After insulating the “gas silicate” blocks, the position of the dew point changes. It shifts into the coverage area, while before that it was in the thickness of the wall.
Good thermal insulation of the walls of gas silicate blocks implies high-quality fixing of the insulation on their surface. For this, special adhesives or dowels can be used.
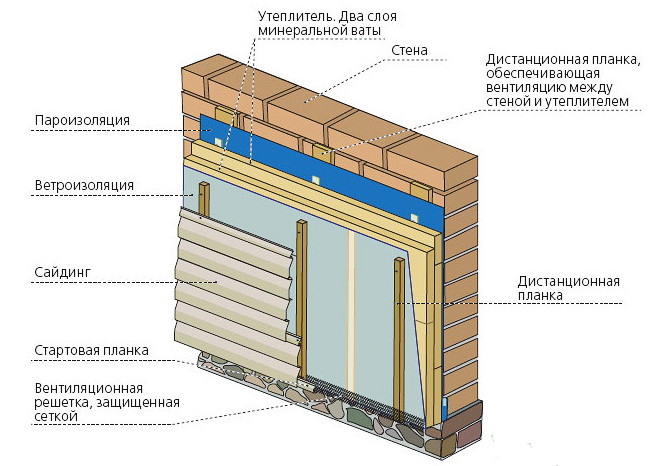
After installing the insulation, a reinforcing layer is made, which is a glass fiber mesh. At the end of the work, to give a good appearance, the insulation is covered with decorative plaster. As a rule, siding is used for the final finish. This facing material is attached to the wall with wooden slats, which serve as a kind of crate. Aerated concrete walls let in four times less heat than walls made of other building materials.
This suggests that a properly designed heating system is often enough. But, the use of insulation will not be superfluous for sure. The structure of aerated concrete is porous, due to which the thermal insulation properties of this material are high. Small pores are filled with air, resulting in a single system with good thermal insulation characteristics.
Material Features
Many of the nuances of using foam plastic as an insulating material for aerated concrete can be understood from its positive and negative properties.
The list of the first is several times larger than the second, so it is important to know about the plus:
- ease of transportation; ease of giving the required shape to the material; elasticity of the material; environmental friendliness; ease of self-assembly; minimum thermal conductivity of the material; reduction of heating costs; absence of sudden temperature changes inside the house.
Ease of transportation of polyfoam is explained by its small weight.
The latter can be achieved by a special method of producing the material, in which polystyrene granules are filled with gas, which subsequently makes up 98% of the total volume of insulation. The weight of one sheet of material is practically not felt, which means that during the installation process you can do without assistants, and lifting the foam to the floors above the first one will not require significant effort. In the process of laying the insulation, it is necessary to trim the material, in some situations the shape of the insulation can hardly be called standard, but this is not a problem with foam, because

to. it can be formed with almost any sharp object. In addition, the insulation has sufficient plasticity to give it curvilinear shapes of acceptable radii.
In the process of sanitary research, no harmful emissions of material were found that could cause various diseases during operation. This makes it possible to attribute the foam to environmentally friendly materials.
The thermal conductivity of the foam remains one of the lowest among the insulation. It is only 0.038 watts divided by a meter times a Kelvin. Thanks to this indicator, it is possible to reduce costs during the heating season, as well as for air conditioning in the summer.
In most situations, it is possible to avoid the use of cooling equipment, since the coolness accumulated at night or in the early morning is well preserved inside the room.
Of the minuses of using foam, you should be aware of:
- fragility; fire hazard; instability to UV rays; high density of the material; used by rodents as a place of residence.
The strength of the foam leaves much to be desired.
It is not difficult to damage the material with a small impact, which requires additional processing. Facade insulation options incorporate special substances that reduce the flammability of the material, but this does not exclude the possibility that the foam can melt in a fire with the release of harmful substances. The material also does not tolerate neighborhood with all types of paints that are based on organic solvents.
The insulation requires additional finishing, which would cover it from the sun's rays. If this is not done in time, then the surface of the material will lose its strength, and it will begin to crumble. Inside the foam sheets, pests can settle, which over time will negate its insulating properties.
Ventilated facade device
A ventilated facade will help insulate a house made of gas blocks and is durable and durable.
This design will help insulate the house of concrete blocks and is durable. You can arrange a ventilated facade of a “light” type using a simple solution. We use tools:
- dowels;
- drill;
- plumb;
- level;
- cord;
- hammer.
You will need materials:
- polystyrene plates;
- wooden blocks (treated with a bioprotective compound).
We work in the following order:
- We begin the insulation by assembling a frame of bars with a width close to the thickness of the insulation (5-6 cm).
- We fasten the bars to the walls of the house vertically (after 30 cm) using anchor dowels. You can set an exactly flat plane (using a plumb line, cord and level) by placing linings under the bars.
- Dowels-fungi (drilling a hole for them) fix the expanded polystyrene plates (in the walls of the blocks), which fill the space between the vertical elements of the frame.
- When installing the second level, the bars are placed horizontally. This space is left free, it is intended for ventilation of concrete blocks, insulation, frame.
- The bars of both levels are fixed at a distance that is a multiple of the width of the insulation boards. Now the facade is insulated and ready for installation of the house cladding.
It is always economically justified to insulate buildings built from cellular blocks. After the facade is thermally insulated, the walls are protected from moisture absorption into their thickness, so they do not dampen, so that the microclimate in the house is optimal in terms of humidity and temperature and is maintained in any weather. The insulation system of aerated concrete buildings can be made in a "light", but strong version, which is available for self-assembly.
Is it worth it to insulate
Aerated concrete itself is an excellent material with low thermal conductivity, which is used as an alternative to classic bricks or other blocks. The material is light in weight and, when properly installed, can prevent heat dissipation.

But it really needs additional finishing, because it can collapse under the influence of moisture.
For the most part, this happens during the cold season, when moisture accumulates in the pores of aerated concrete and increases its thermal conductivity, which increases heat transfer and negates the insulating properties. In addition, frozen moisture expands and damages the internal structure of aerated concrete. The insulation allows you to increase the insulating properties and prevent moisture from entering the pores of gas blocks.
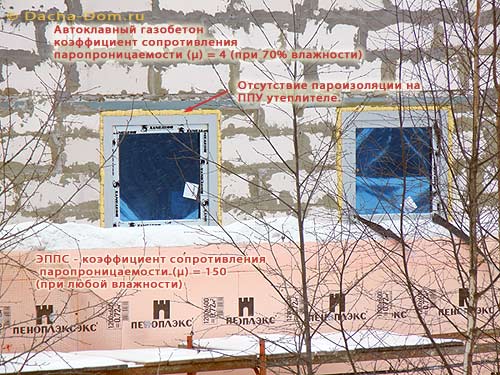
Due to its porosity, aerated concrete has vapor permeability, which helps to dissipate excess moisture that accumulates indoors during human life.
This means that the ideal way to insulate aerated concrete is a ventilated facade, which is necessary to remove the moisture given off.The easiest way to implement it is with mineral wool, which also has vapor permeability. If a foam plastic that does not have vapor permeability is mounted on top of aerated concrete, this can lead to moisture accumulation between the insulation and the block.
The result of this can be the appearance of mold and the destruction of aerated concrete. It is this factor that causes the fear of many users as to whether it is worth insulating aerated concrete with foam plastic. If everything is done correctly, then the foam can still be used to insulate gas blocks and foam blocks.
Important points of work
If foam plastic is chosen for the insulation of aerated concrete, then care must be taken that a minimum amount of moisture penetrates the insulation.
This can be achieved by installing high-quality passive or active ventilation inside the aerated concrete house. Due to the continuous change of air masses, moisture will be removed, and it will not be able to get to the foam and promote the appearance of mold and fungus. The thickness of the foam must also be correctly selected.
This will depend on specific territorial conditions. If a foam of insufficient thickness is installed, the dew point will shift to the gas blocks, so you should not save on material. For places with a cold climate, foam with a thickness of 15 centimeters or more may be required.
Finishing the house can be done not only with textured plaster, but also with siding. In this case, there is no need to tighten the foam with glue and mesh. Before installing the insulation, a wooden or metal crate is installed, which is necessary for siding.
Styrofoam is laid between the lattice elements, which is fixed with glue and umbrellas. The seams are filled with glue. After drying, the excess glue is cut off, and siding is attached to the crate, which will close the foam from external influences.
As you can see, there is no unequivocal ban on the use of foam plastic in tandem with a gas block. There are certain restrictions and cautions regarding materials, following which you can achieve the correct result.
It is necessary to mount a heater in warm dry weather. If it rained the day before, then it is necessary to allow time for the aerated concrete to dry well before starting to work with the material.
During the installation of insulation, it is important to constantly check the vertical and horizontal plane of the material with a level in order to achieve a smooth finish surface.
How to insulate a house made of aerated concrete, what thermal insulation material to choose? These questions concern many who have decided to build a house from cellular materials. Since the distinctive property of aerated concrete is vapor permeability, this property must be preserved.
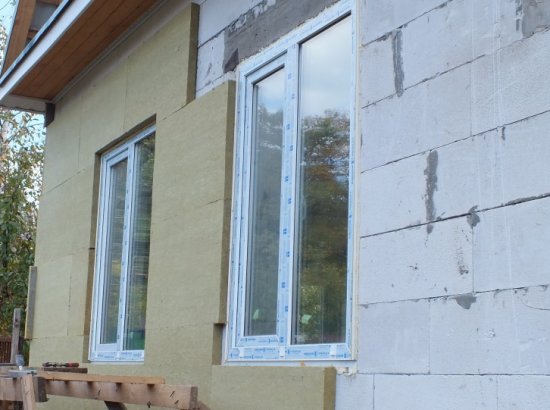
Insulation of a house made of gas blocks with mineral wool
For heat-insulating materials, this coefficient should be somewhat lower than that of the material from which the walls are built. If this parameter is higher, there is a possibility of moisture accumulation.
Is it possible to use foam plastic for insulation, a material that is very popular? How to properly insulate the gas silicate walls of the house?
The sequence of works on the installation of foam from the outside
To insulate the facade of the building, it is necessary to adhere to the following sequence
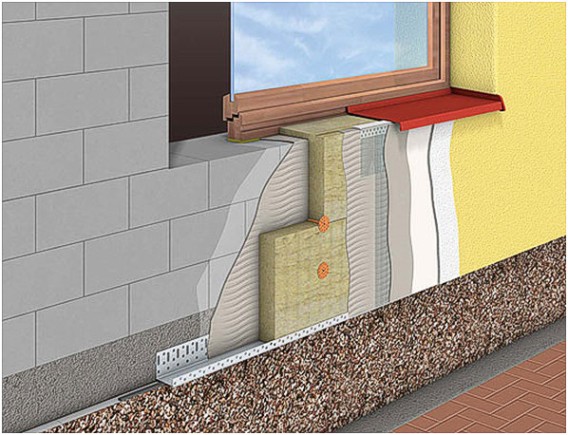
Surface preparation. The surface of aerated concrete must be cleaned of dirt, glue, dents and other irregularities should be leveled; Applying a primer for porous materials on the outside; It is recommended to reinforce with fiberglass mesh around the perimeter of windows.
Its size should be such that 10 cm enter under the insulation; Gluing foam boards. For this, a special adhesive for aerated concrete is used. Using a notched trowel, the adhesive is evenly distributed over a small section of the wall outside the house or onto a sheet of insulation.
The foam is pressed against the wall with light movements. All joints are processed with glue; For additional fastening outside, plastic long dowels with a cap are used - an umbrella in the middle of the sheet and at its corners; The sheets will be glued correctly with an offset, just like when laying blocks; Applying the first plaster layer on the foam plastic, followed by gluing the reinforcing mesh. The joints of the mesh must be overlapped, so that cracks will not form later; Applying a second layer of plaster; Painting the facade.
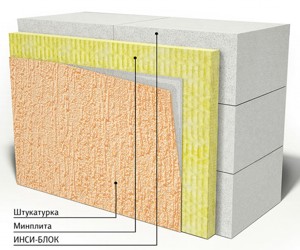
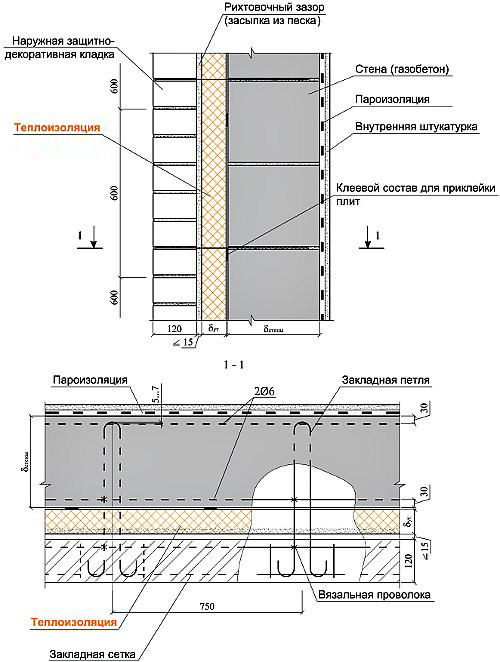
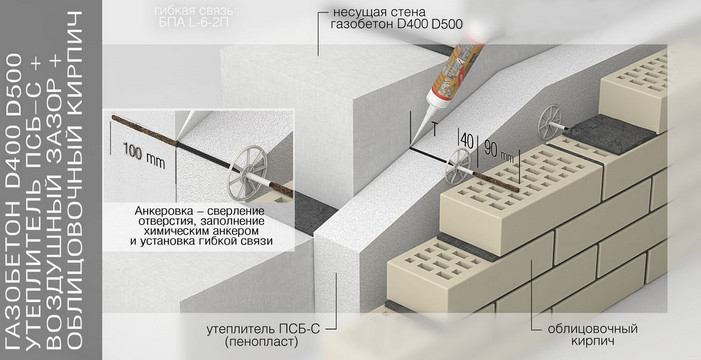
The scheme of insulation of the facade of aerated concrete foam
How to carry out thermal insulation of a gas silicate house
Insulation can be made of high quality if you choose the right heat-insulating materials. There are quite a few options for heaters that are well suited for a house made of gas silicate blocks. In this case, even classic heat insulators, which include mineral wool, polystyrene foam, polystyrene foam and plaster, will do. But modern owners began to gradually turn to a variety of thermal panels. Among the most famous materials of this type are thermal siding and thermal siding. They not only make the house warmer, but also improve its appearance.
A gas silicate house can be insulated in many ways. There is external and internal insulation. But, as with the thermal insulation of other buildings, it is still better to place the insulation on the outside. Then the walls themselves will be better protected from freezing, and the risk of condensation will decrease. The main methods of placing insulation should be considered further.
Insulation of gas silicate with mineral wool and foam plastic
If it is decided to use polystyrene foam or polystyrene foam for thermal insulation of a gas silicate building, additional vapor barrier will not have to be laid. Such a heater copes well with water and is very durable. To fix it, it is enough to use an adhesive mixture. For better fixing, dish-shaped dowels are also used.
When using mineral wool for fixing on walls made of gas silicate blocks, it is first necessary to mount the crate. Bars for the manufacture of crates are installed vertically. After that, a heater is laid between them. Due to the fact that mineral wool is able to absorb moisture, thermal insulation materials must be protected by hydro or vapor barrier. Then they move on to finishing, which can be made of siding or ordinary plaster for facade work.
Insulation of gas silicate with thermal panels
The functions of thermal panels are reduced to protecting the facade from mechanical damage, as well as protection from moisture. The front side of these materials can imitate various facing coverings, such as porcelain stoneware, stone, ceramics, and so on. Although some builders believe that thermal panels worsen the normal ventilation of the facade, this is not confirmed in practice.
Using thermal panels is very beneficial, because what material makes the walls of the house more interesting in appearance and able to withstand mechanical stress. Such material itself is environmentally friendly, does not load the facade too much, and is quickly installed.
The first task of the owner is the installation of the crate. To create it, you can use a bar or metal profiles. Thermal panels can be immediately installed on such a crate. The difficulty lies only in the fact that a certain set of tools is required. It is unlikely that it will be possible to cope without a jigsaw, a screwdriver and a grinder. To get rid of the remaining gaps, you will also need mounting foam.
https://youtube.com/watch?v=2z3azX8GEvU
The procedure for installing thermal panels
1. Installation of the crate. Here you need to take into account that the thermal panels should be separated from the walls by a small gap.You also need to check that the thermal panels subsequently lay down completely horizontally. To do this, at the bottom of the wall, you can immediately beat off the reference line. The starting bar is attached to it with the help of self-tapping screws.
2. Suspensions are mounted on the starting bar. Elements of a U-shaped profile are installed in them. It is better to take material with dimensions of 60 × 27 mm. For fastening the strips, 4 self-tapping screws are used. In the corners, 2 strips should be installed so that the thermal panels adjoin better along the slopes.
3. Installation of a low tide at the bottom of the plinth, where the starting bar is located.
4. Laying insulation. Expanded polystyrene or mineral wool is suitable. They are laid between previously installed profiles.
5. Installation of thermal panels. They are attached with self-tapping screws to vertical profiles.
When the procedure is completed, all remaining gaps must be sealed with mounting foam. Between the thermal panels there are seams that need to be filled with grout.
Insulating a gas silicate house is not so difficult. The owner only needs to choose the most successful material and competently perform its installation. Then the gas silicate house is well protected from heat loss.
More about the advantages of aerated concrete
Less significant, but still important advantages of the material are:
- Relatively low cost. Light weight. Ability to pass steam and gas. Low thermal conductivity. Strict linear dimensions of blocks.
Walls made of aerated concrete blocks should be designed so that the vapor permeability of the surface decreases towards the inner layer from the outer one. Insulation of aerated concrete walls from the outside should be carried out with this in mind.
If you neglect this moment, the steam that accumulates in aerated concrete blocks will lead to increased humidity, which will negatively affect not only the quality of the building material, but also the entire structure. Additional advantages include frost resistance and fire safety.
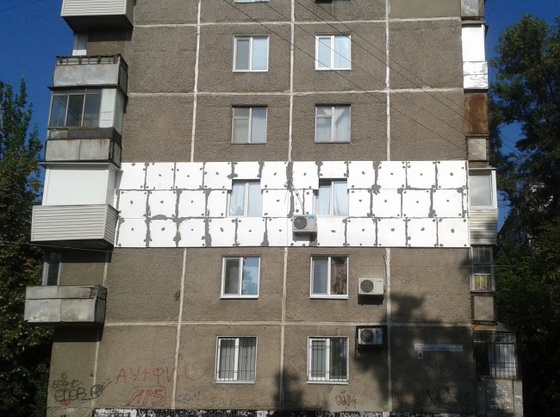
Installation of foam
Two types of glue can be used for gluing the foam. One of them is made on the basis of cement and is prepared by kneading. In this case, a significant part of the time is spent on the preparation of the composition.

Another material option is special formulations that are similar to polyurethane foam, but have a lower coefficient of expansion. The application of such adhesives is carried out by means of a gun, which is used for polyurethane foam. If the plinth is made with a small border that protrudes outside the walls, then you can immediately proceed with the installation of the foam, if it is not there, then you will need to first fix the starting bar.
The latter is a metal profile, the width of which is selected according to the thickness of the foam used.
At a height of 15–20 cm, a line is beaten off from the blind area with a coloring cord. A metal profile is exposed along this line and fixed to the wall with dowels and self-tapping screws. It must be fixed around the entire perimeter of the house. Next, glue is applied to the foam sheet with a snake, and it is tightly applied to the wall with support on the mounted profile.
Installation must begin from one of the corners of the building. Each subsequent row is laid with an offset of half the sheet to ensure the interlacing of the insulation seams. In this case, it will be easier to eliminate cold bridges, as well as provide greater surface strength. Each seam is additionally filled with glue.
Laying material is made under the roof.
In this case, glue alone will not be enough to fix the foam, because as the plane builds up, its weight increases.
Plastic umbrellas are used as additional clamps for the foam plastic. Five holes must be drilled to install them on the foam sheet.One of them is in the middle of the foam sheet and four others are drilled into the seam to secure two adjacent foam sheets with one umbrella. Umbrellas are clogged so that their hats are flush with the foam, after which their position is fixed with a plastic nail. After the installation of plastic foam fasteners is completed, you can proceed to strengthen the insulated surface with a fiberglass mesh. Self-tapping screws are not used to fix it.
First of all, the entire surface of the foam is covered with a special cement-based material. The layer of material should be such that the mesh can be easily recessed into it. As soon as the layer of material is applied to the width of the mesh roll, the latter is applied to the surface and embedded in the adhesive with a wide spatula. Individual mesh sheets are overlapped onto the foam to create a monolithic plane.
As soon as the glue layer dries, it is grouted with fine sandpaper. Next, another layer of glue is applied to the foam, which is also cleaned with sandpaper. The process is repeated one more time to achieve the desired result. After curing with plaster, you can proceed to the finishing.