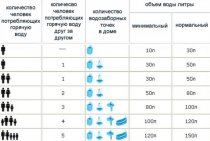
Types of devices for pumping water
One physical force used to lift the water up is not enough, as the process becomes difficult and laborious. Therefore, mankind has long ago invented many devices that facilitate the lifting of liquid from a well or natural reservoir to the surface.
All devices are united by a common principle of operation, which is based on the interaction of the valve system.
There are a lot of varieties of hand pumps, but four main types can be distinguished:
- piston;
- rod deep (varieties of piston);
- vaned;
- membrane.
For manufacturing at home, the first type is usually chosen if it is necessary to maintain a well of small depth (3-6 m), or the second, if it is necessary to raise water from a well from a depth of 10-12 m.
These models are considered the most productive, easy to assemble and install, reliable. The rest have significant shortcomings, the biggest of which is considered to be insufficient productivity.
It is piston devices that have occupied the main niche among factory manual equipment; they are popular among home craftsmen.
Image Gallery
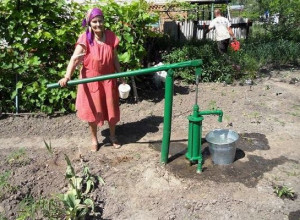
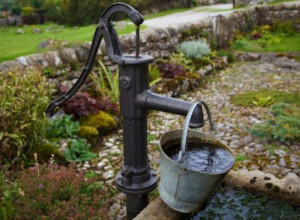
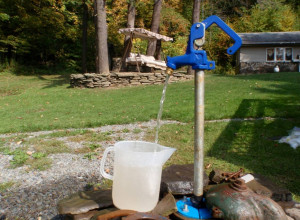
The advantage of piston column pumps is the ease of assembly and installation. All parts necessary for the manufacture of the body and dynamic parts can be found on the farm or purchased.
And to connect the elements into a single device, a home tool is usually enough: a drill, a circular saw, a hacksaw, pliers, and keys. If you need a welding machine, you can rent it or borrow it from neighbors.
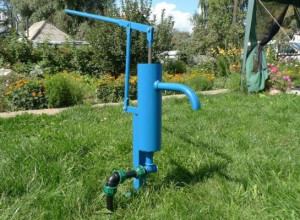
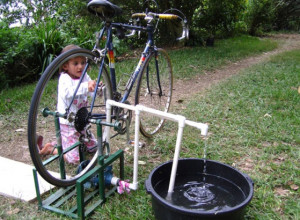
Less popular manual modifications
In addition to piston models, which have proven themselves well in factory and handicraft versions, other devices are also used.
They are less productive, but interesting in terms of design and principle of operation.
Image Gallery
There are factory models that are impractical to make with your own hands. For example, impeller-based equipment. Such devices are used in the industrial sector, they are not very convenient for giving.
In addition, buying a compact metal device that looks like a twist for cans will cost no more than making it yourself.
None of the considered homemade pump designs suits you? Then we recommend that you look at more options for homemade products, the manufacture of which we examined.
Preparatory stage pit device
The topsoil is prone to shedding, so the well is protected by a special structure - a pit, in other words, a pit one and a half meters by one and a half meters, the depth of which is not more than 2 meters. Boards are used to strengthen the walls, they also line the floor. The strength of the floor depends on the thickness of the boards, so products are used no thinner than 5 cm. From above, the pit is covered with a second flooring.
Sand holes are small and shallow, while artesian holes go several meters into the ground.
Then holes are prepared in the following order:
- erecting a drilling tower;
- remove the top flooring;
- find the center point on the bottom deck;
- make a hole, the diameter of which coincides with the shoe and couplings;
- cut out the second hole - in the upper flooring.
The precision of the vertical created by the two pilot holes guarantees good drilling.
Well-needle and tubular well features of arrangement and use
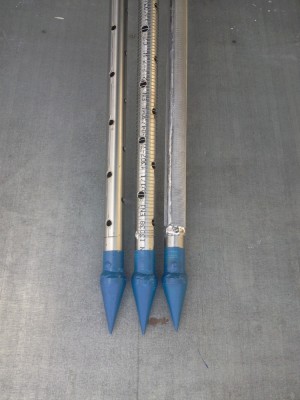
A tubular well and an Abyssinian are varieties of a classic well with a difference in the arrangement of the trunk. Instead of rings, the shaft of a tubular source is formed from steel pipes, and the Abyssinian well is a needle-shaped well made of steel pipes of small diameter. Water intake is drilled to a depth of 15 m.Wells of this type cannot always be located at the level of water-bearing sand, and groundwater cannot be used as drinking water.
The Abyssinian well is an improved type of tubular well. Despite the shallow depth, there is a chance to get fairly clean water: perched water and precipitation do not penetrate into the source. One of the main advantages is the low cost of arrangement and ease of implementation. The Abyssinian well can be made without the involvement of specialists.
 Abyssinian needle well can be used to collect drinking water for one house
The depth of the source is from 8 to 15 m. At this depth lies the first aquifer of sand. The end of the casing pipe is installed at the boundary between the layers of loam and sand. The main difficulty is to find a place where there will definitely be water at a shallow depth. Usually guided by the presence and depth of neighboring water intakes. If the sites are located at the same height, it is likely that the water reservoir occupies a large area.
A well-needle is equipped exclusively in soft soils: clay, loam, clay with interlayers of sand, quicksand. In stony soil, such wells are not drilled: if a needle hits a boulder, all the work will have to be redone.
 Small diameter drive pipe is not designed for stony ground
Water can be used after testing. Usually the water quality is acceptable, with the installation of a filter system, it can be used for cooking. The life of the well does not exceed 10-12 years. The flow rate is subject to seasonal fluctuations, up to 1.5 m3. The amount of water is sufficient for 1 - 2 draw-off points.
Surface water intakes are clogged by the shock-rope method. When arranging the Abyssinian well, the pipe is simultaneously the lower part of the casing string and the drill. Equipped with a needle pointed tip and a filter, the pipe is driven into the ground.
 Instead of the impact method, a hand drill or MBU is used
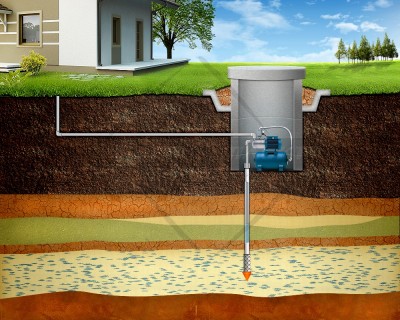
After passing to a depth of up to 150 cm, the next segment is screwed (or welded). The finished source is equipped with a surface or submersible pump. To install the equipment, a pit is preliminarily prepared, which must be thermally insulated.
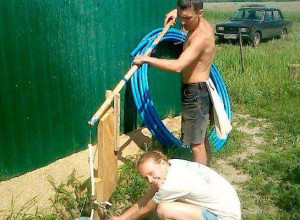
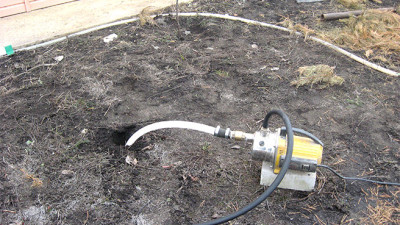 Seasonal water supply can be organized outdoors with flexible hoses
Small wells require constant operation. Regular water intake prevents the filter from clogging. Systematic cleaning can extend the life of the source. Preventive cleaning is recommended annually.
Winter or summer plumbing
Plumbing in the country is not always used all year round. In some cases, it is needed only from spring to autumn, so they arrange a simplified summer version. It makes no sense to spend money on an expensive capital system when no one lives in the house in winter. Summer water supply will provide irrigation, a shower is connected to it, used for other household purposes. It can be permanent or collapsible, but in both cases it is not used in winter.
Hoses are used silicone or rubber, which have thick walls reinforced with nylon. Plastic is cheap, but short-lived under the sun. Rubber is more expensive, but will last at least 15 years. At the end of the season, the hoses are disconnected, twisted, pouring out the remaining water, and sent for winter storage.
Permanent summer plumbing is laid in shallow trenches so as not to interfere and so that someone would not be tempted to steal. Only water taps are brought to the surface. The difficulty of the structure is that it is required to observe a constant slope. It goes from the connection point to the lowest point where the drain valve is installed. Water is drained through it before frost.
Arrangement of winter plumbing is more difficult
They take into account the slope of the relief, freezing of the soil and other factors that are taken into account during the construction of a capital water supply system. In this respect, the dacha option does not differ from what is done in private houses with permanent residence.
How to make a tripod for drilling
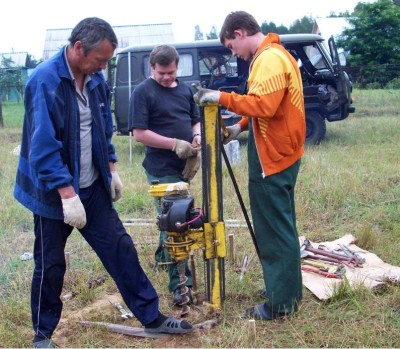
To properly make the simplest device for hanging a drill column with your own hands, it is enough to take 3 beams or logs that are connected at the top, forming a pyramid with a triangular base. Also, metal pipes can be used as supports. A winch is suspended in the center of the connection. Through an adapter in the form of a freely rotating spindle with a ring or clamp, a drill column is connected, in the upper part of which a collar is fixed.
Thus, at least 2 people are needed to service this device, but 3 are better, then two will rotate the drill, and the third will control the winch.
To make it easier to work, we first dig a well or a pit up to 2 meters deep. A flooring is laid on its bottom, the walls are sheathed with boards that prevent shedding. Leave the center of the hole free for drilling. The second flooring is laid on top, the tripod is installed with a support outside the pit or well.
As the drill sinks, the column is built up with new rods, the uppermost of which is attached to the collar. To make the passage of hard rocks easier, you can add water to the well, but then it will be more difficult to understand when wet soil will go, signaling that an aquifer has begun. At the end of the work, you can think about how to close the well with a lid with your own hands. It is better to use a viewing hatch.
A suburban area without water is a small desert. Neither to break a flower bed, nor to equip a pool, nor other benefits of civilization, familiar and simply necessary for a person, related to water supply. There can be only one way out in such a situation - a well in the country with your own hands or on order. It all depends on how much money you have and how willing you are to work. If you are full of strength and enthusiasm, then such a troublesome task as arranging a well in the country will be up to you. Let's look at what wells can be in general and what is their difference.
Mechanisms for independent well device
Usually, special drilling equipment is used to construct a well, so a completely logical question arises: how to drill a well in a country house without using it? It turns out that there is a simple manual mechanism, consisting of a drilling rig and a column suspended from it. Let's take a closer look at the individual pieces of equipment.
The base is a tower resembling a tripod. The material for the supports are either metal pipes or logs connected at the top with a pivot. There is also a block for lifting the drill string. The two legs of the tower are connected by a winch (gate).
The design of drilling equipment can be different. In some cases, if the water-resistant layer lies close to the surface of the earth, a hand drill is enough
The column for drilling is the main functional element. It consists of several three-meter rods connected by couplings. Sometimes a length of one and a half meters is enough. It is the column that is immersed in the ground, and its length is adjusted with the help of rods. The replacement of special equipment is water pipes equipped with steel couplings.
Drill heads must be selected depending on the nature of the soil. Here are the most commonly used: 1 - "spoon", 2 - "serpentine", 3 - "chisel", 4 - "bailer"
The impact or soil cutting element is the drill head. It is screwed onto the column using a threaded adapter. In the process of lowering the head into the soil, the soil fills the cavity of the drill. For different types of rocks, different nozzles are used: the “spoon” is suitable for soft soil, the “serpentine” for dense, “chisel” for hard rocks.The bailer takes out the loosened soil up.
So that the walls of the well do not crumble, casing pipes are used - as a rule, these are ordinary plastic plumbing products, light and easy to install. The bottom of the pipe is a kind of shoe with a smooth or jagged edge below.
Two main types of shoe for casing pipes: a - notched (cutter), b - smooth. Cutting area: 1 - teeth, 2 - smooth edge
Thus, the device of the well occurs with the use of special equipment, some of which can be purchased at the store, some can be made independently.
Drilling process sequence of actions
If you prepare the necessary equipment and follow the sequence of stages, there will be no questions about how to make a well. The finished drilling rig is equipped with a head and a mechanism in the form of a winch. The bar is passed through both holes down, if necessary, it is increased and the collar is fixed. The gate is usually rotated by two, and a third person is needed to correct the position of the bar.
If the well is shallow, then only the drill column is used, directing it down strictly vertically. A tripod with a lift is necessary for deep wells
A mark is placed on the column, retreating from the upper flooring 60-70 cm. Having lowered the column to a designated distance, it is removed back, removing the rock raised along with the drill. In the same way, the purified column is immersed several times. Greater depth requires extension of the rod. To do this, with the help of a coupling, another pipe is attached.
Depending on the stability of the soil, a drilling method is chosen - with or without casing pipes. With stable, dense soil, it is possible to drill the entire well without using casing pipes. The crumbling rocks indicate that after 2-3 meters a pipe equipped with a shoe should be installed. The diameter of the pipe is wider than the diameter of the couplings, so the pipe enters the shaft with difficulty. Sometimes screwing or a sledgehammer is used to place it there.
As casing pipes, products for laying water pipes are used - metal or polypropylene pipes of the required diameter for outdoor work
If the rocks crumble, collapse should be avoided. To this end, the drill is not lowered too low - below the end of the casing pipe for a certain distance. Usually it is equal to half the length of the drill. Thus, the process consists in alternating drilling and installation of casing pipes, which are built up as they go down.
Conclusions and useful video on the topic
Before embarking on the independent manufacture of a hand pump, study the experience of home craftsmen. This will help not only to learn new technologies, but also avoid annoying mistakes.
A manual water pump is a great helper in a difficult situation. If an accident occurs on the electric main, you will not be left without water: you can also pump several buckets from the well with a manual pump.
And in order to assemble a useful device on your own, you do not need to study complex technologies or look for special materials - you will find everything in the household
.
Have you decided to assemble a homemade water pump from improvised materials? Maybe you want to clarify some points that are not fully analyzed in this material? Ask your questions in the comments block - we will try to help you.
Or maybe you want to supplement our article with clarifications or useful recommendations? Write to us, please, about it, express your opinion.
As the heroine of the famous film said, whoever takes a pack of tickets will receive ... Well, why not a water pump? , so much so that you don’t dig a well, and don’t drill a well? The problem is easily solved.
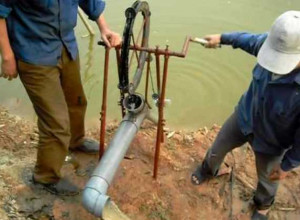
- First, we clamp the water pipe d 25 mm with a clamp and pull it to the wag, which has the shape of a half-beam. On one side of the pipe we screw in a metal tip that has the shape of a cone.
- Together, and then, if possible, then the four of us drive the pipe into the ground with the help of a vaga until it stops.
- With the help of a coupling, we build up another pipe and on a grand scale (again with the help of a wag) we drive the pipe into the ground.
- In the same way, we build up another pipe and continue to drive the entire pipeline into the ground until it reaches the aquifer.
- In one stroke, the pipeline is clogged by 40-50 cm (if on clay).
- During clogging, it is recommended to turn the pipeline clockwise and add water from above to facilitate clogging.
- Then it will be necessary to pull out the entire line of pipes, unscrew the metal tip from the first pipe and instead screw in a perforated pipe section of 1-1.2 m and re-lower the entire pipeline into the already finished well.
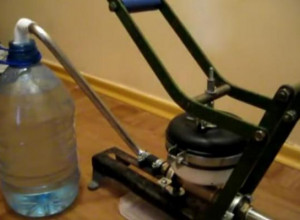
- Make and connect a hand pump (water column) to the pipeline. Its device is shown in the drawing.
- It is possible to connect an electric suction pump.
Advantages of such a column:
if all the necessary material is prepared in advance, it is possible to mount the entire device in 5-6 hours. The design is simple, and the materials are quite affordable. For 5-6 pressings of the handle, a bucket of water is collected.Flaws:
The depth of the aquifer should not exceed 10 m. It is impossible to break through the soil in stony soils.
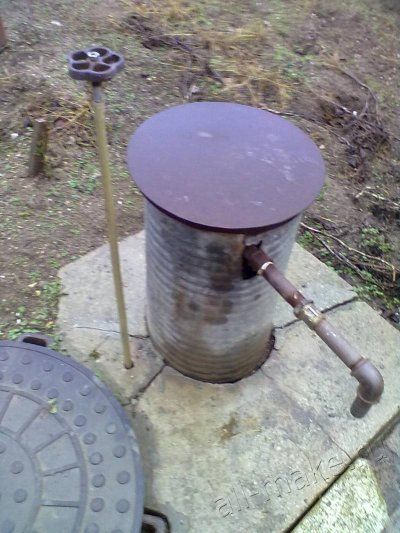
At each dacha, or personal plot, there is a source of water supply - a column or a well. Of course, having a well is better than a tap from the mains water supply for many reasons. Water from a well is naturally cleaner and healthier for humans and for watering plants. At low temperatures in winter, the water does not freeze, as thermal heat prevents it from turning into ice. But not every summer resident has the opportunity to have a well or a well on his site. Basically, summer residents use taps from the public water supply network. Of course, there are no complaints in the summer, except that they can turn off the water due to some kind of breakdown or accident at the water utility. But in winter, the column is in trouble. All summer residents who have a bathhouse in their summer cottage always come in winter to take a steam bath and wash.
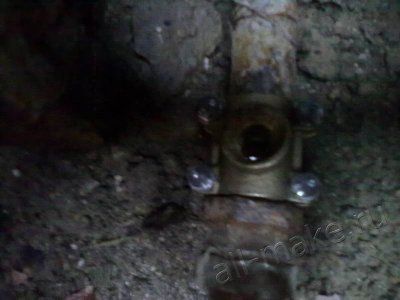
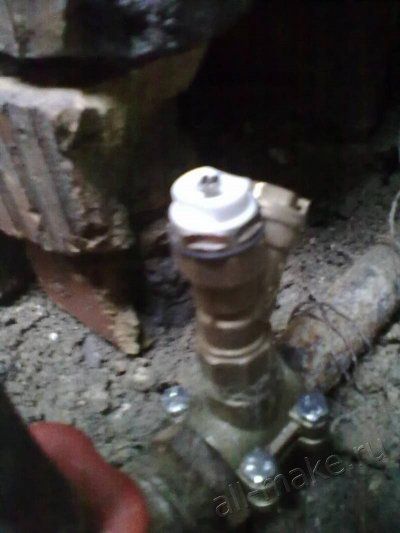
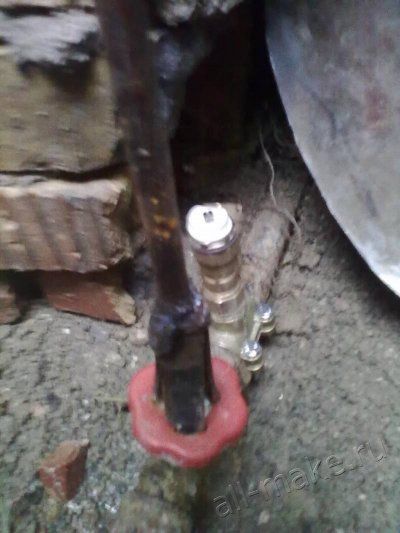
But for those owners who have columns, the water often freezes in the riser and a whole range of problems is immediately formed. How to be, than to defrost and other whirlwind. And so the problem is very serious and requires its solution. It is necessary to look into the very essence of the problem - why does water freeze, and how to prevent it? Water freezes in the riser from low temperatures, often any kind of column insulation does not save, since we have strong frosts. But the author found a simple and ingenious solution to this problem. At the bottom of the pipe, when buried in the ground, he installed a tee and a Mayevsky crane. And this is how it works, the drain valve located below the ground level will not freeze, since the thermal heat of the earth is stipulated above will not allow the pipe to freeze, and from the upper part of the pipe the water will merge into the drainage through the Mayevsky crane and the riser will remain dry to its underground part, which is prevent freezing of the riser. And so now we will consider how the author did all this and what he needed for this.
Materials:
Mayevsky crane, tee, adapter, fum tape.Tools:
set of keys, gas wrench, screwdriver, pliers.