Types of heating and cooking stoves
The history of the wood stove goes back centuries, if not millennia. In different countries, the best models have received well-deserved distribution.
Such designs are used today, both in the classical form and with some additions.
Russian stove: complex and efficient
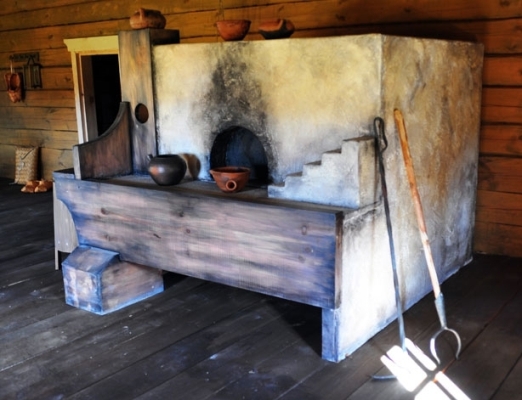
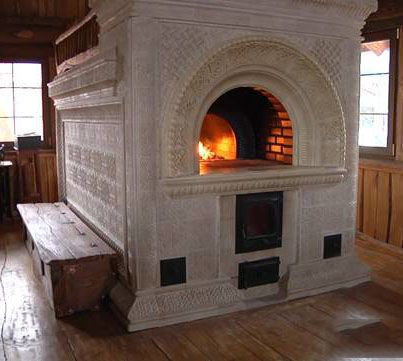
The traditional Russian oven is a large versatile device. Although there is no cast iron hob, you can cook food in it. The massive body perfectly warms the room, and in the upper part there are beds - a warm bed.
The long firebox is divided into two zones: the bakery, located in front, and the firebox, where the firewood is burned. This oven operates in two modes. First, it is heated for a while. During this period, the device accumulates heat. After that, for about a day, the heated furnace warms up, slowly giving off thermal energy.
During this period, in the bakery, you can cook various dishes with the very unique taste that no other cooking unit can give them. The characteristics of the Russian stove are due to the special nature of the movement of air flows inside the device.
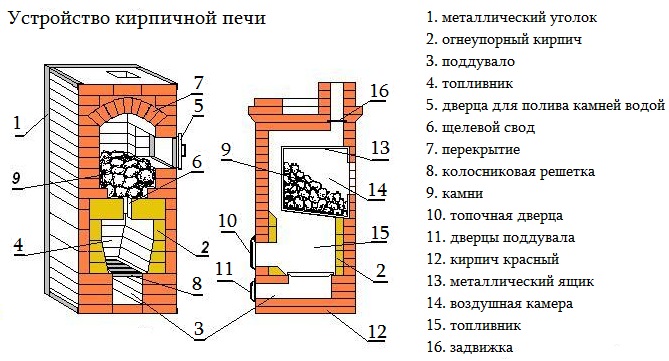
In front of the fuel chamber there is a so-called cap, the area above it is called an overtube, and even higher there is a tapering pommel - hailo.
Thanks to such a device, a recovery zone is formed in the plenum, where the smoke coming out of the furnace heats up the oncoming flow of fresh air. In this case, the flows do not mix, oxygen enters the furnace in full.
The arrangement of the fuel chamber is also unusual. The bottom of the firebox is uneven, it is laid out with a rise relative to the cooking chamber. The upper arch is also not horizontal, it is higher in the back, lowers closer to the mouth and ends with a threshold.
Between the base of the Russian stove and its fuel chamber, a long cavity is made, called guardianship. It is always warm here, it is often used for storing firewood. Under such conditions, the fuel dries well, it flares up faster and gives off heat better.
On our website there is a block of articles devoted to the independent construction of various models of the Russian stove, we recommend that you familiarize yourself with:
"Dutch" - a simple heating unit
The Dutch stove was originally created for heating. It differs from traditional Russian in a simpler and more easily modernized design. The device and dimensions can vary depending on the situation, for example, on the size of the house.
At the bottom there is a combustion chamber, at the top there is an extensive network of smoke circulations, including several vertical channels interconnected by horizontal bridges. As a result, the path along which the smoke moves is lengthened, and the heat remains in the house.
In modern versions, the “Dutch” is also supplemented with a hob, but initially the hearth was set separately for these purposes.
Inexperienced stove-makers are advised to start practicing on this type of stove, as it is quite difficult to spoil it.
Swedish oven: an interesting combined option
Another interesting option for a novice master is a “Swedish” oven. Its design was developed by Swedish scientists not so long ago, in the middle of the 18th century. They took the Dutch as a basis and greatly improved it.
The lower part of such a stove is wider; at the bottom, in addition to the combustion chamber, there is an oven installed on the side. As a result, the first heat from the combustion of fuel does not go through the chimney, but works to warm up the oven. If you open it, the heat will warm the floor and rise up.
The firebox itself is a variant of a simplified hood, both primary combustion of fuel and chemical secondary combustion take place here. A niche is made in the upper part of the structure, which was traditionally used to dry clothes that were wet during the day.
The oven, installed on the side of the firebox, quickly accumulates primary heat. The cabinet above the stove was used to store food cooked in the evening, by morning it remained warm and quickly warmed up in the oven.
The vertical system of smoke circulation channels warms up the house well, but with an open view, the heat quickly disappears, you just need to remember to cover it after the firebox.
Such a stove is heated twice a day. The efficiency of the “Swede” is almost as high as that of the Russian stove, while it is easier, cheaper to fold it, and it takes up less space. But high efficiency is achieved due to accurate calculation, therefore, during masonry, dimensions and proportions will have to be strictly observed.
Various functional purpose
First you need to decide on the functions that the device will perform.
It could be an oven
- for cooking only;
- exclusively for home heating;
- to perform both of these functions, i.e. combined option.
The cooking stove is most often placed in small freestanding kitchens. The heat of burning firewood is more than enough not only for cooking, but also for heating such a room.
Therefore, the device is placed next to two outer walls so that excess heat energy moves to the street. The chimney in this case is arranged strictly vertical, small in size.
Heating stove. The design provides for maximum retention of thermal energy within the house. Such a device has neither a stove nor an oven, but the oven array is equipped with an extensive smoke circulation system.
A bulky chimney is necessary so that the products of combustion do not leave the house too quickly and have time to heat the brickwork, which then gives off heat to the indoor air. Such a stove is placed as close as possible to the center of the house so that the heating of individual rooms is uniform.
Detailed information about the device of stove heating in a private house is presented in this article.
Combined oven. For its device, both a hob and a branched chimney are used. They put it in the kitchen, but not near the outer walls, but next to the inner ones. The chimney is also, if possible, shifted towards the living rooms in order to provide them with sufficient heat.
Swedish styling technology
A brick stove for a house should be installed strictly on a waterproofing foundation. Buslaev's oven weighs more than 750 kg, so it is impossible to assemble it directly on the concrete floor: over time, the surface is deformed, which can lead to malfunctions of the oven and even a fire. Therefore, the concrete foundation must be covered with a waterproofing material.
Projects of brick kilns provide for the penetration of groundwater into the lower layers of the foundation, which is why the brick will begin to dampen and eventually collapse. Therefore, it is better to protect the structure with roofing felt or roofing felt. Already immediately after the waterproofing work, marking and ordering begins.
First row
The first row is made of solid masonry, and the outer row is laid out only with solid bricks.
It is very important to control their integrity and strength - this moment can play a decisive role in the operation of furnaces. You can also use halves inside - the main thing is that there are no thick gaps left, and tightness is preserved
Second row
Similar brickwork, but this time it requires the installation of a blower door, which will be located under the firebox. The firebox is the space in the furnace where combustion takes place.
Third and fourth row
The third row is laid in half a brick with the obligatory preservation of openings for installing a blower and a cleaning department (120x120 mm). The fourth is going on the same principle.

But from this moment it is necessary to start forming a blower chamber measuring 200x300 mm. Usually it is located in the left and rear of the oven.
At this level, you need to mount the grate.It is installed in special openings that are made in bricks. A temperature gap of 10 mm should be left along the perimeter of the grate and lowered to the grate within 20-30 degrees of inclination. Then the furnace door is mounted.
6th to 9th row
Here begins laying out the oven. Bricks are stacked on an edge over the entire area of the stove. Steel sheets are fixed around the oven to protect against burning through. From the seventh to the ninth row, an increase in the width of the channel is formed, which is laid at the back wall on the right. A clay mixture is laid on top of the oven. The oven and furnace door are fixed in the structure.
Tenth row
The hob is mounted and the channel expands with a gradual rounding of the corners. With the help of a level, it is necessary to check that the cast-iron plate lies horizontally, without deviations.
The space between the stove and the wall of the stove is laid.
Eleventh row
Two brick walls are formed in a quarter, and their laying is carried out. This is where the cleaning and installation of the cooking chamber door takes place. With the help of a strong sheet of steel, beams for partitions of the flue are created. Channels 160x200 mm are formed from them.
Twelfth row
Support beams for a brick vault are erected from strip and angle steel, after which forced ventilation is created in the form of a 150x100 mm channel. Brick stoves are also formed here.
The brick is ground into a conical shape to narrow the ventilation duct, and the small stove must be covered with a steel sheet.
Thirteenth row
Outside the chimney (in front), cleaning is laid, and hinged partitions are installed. The masonry itself is carried out in half a brick, a valve and a cornice are mounted. At the same time, it is necessary to maintain indents of 30 mm on each side. Above the channels, the masonry is also ground into a cone.
Fourteenth row
The indents increase by another 30 mm, after which you can continue to form the cornice. Above the large stove, it is necessary to install metal corners and a strip that will block the small stove.
Next, an overlap is made, valves are installed, a ventilation duct is mounted at the furnace portal. It remains only to mount the chimney with fluff.
Types according to the type of firebox
The Russian stove is characterized by economical consumption of firewood, a small amount of fuel is used to heat it, the heat is stored for a long time. This feature is due to the special structure of the chamber, especially for a white oven.
Three large groups can be distinguished according to the type of firebox, some of them are practically not used now, such designs include black chicken ones. In white with chimneys are more efficient, safer, can be used for heating, cooking, heating a steam room.
in black
The oldest variant is the black smoked oven, which got its name from the peculiarity of the firebox. Such structures were built from ordinary clay, not brick, and did not have a chimney. When burning, thick black smoke was formed, which came out through special holes in the walls (portage windows), a vestibule above the door. To avoid a fire, a small fire was always maintained, a strong flare-up was not allowed. It is necessary to constantly supply cold air to the house, but this significantly reduces the efficiency of the structure, increases the consumption of firewood or wood chips.
Russian oven "in black"
Today, chicken models are practically not used, they can only be found in some classic Russian baths, and even then it is extremely rare. This is due to the need to comply with safety measures, constant maintenance of not only the furnace itself, but also the premises, the walls and ceilings of which are gradually covered with a layer of soot. However, there are also a number of advantages:
- with their help, you can smoke meat or fish;
- the room is perfectly disinfected under the influence of smoke;
- the stove provides the most efficient heat transfer to the room.
in gray
This option has replaced the chicken one, it is safer and more convenient, the smoke does not come out through the portage window, but through a wooden pipe or a hole made in the ceiling above the structure. But among the disadvantages is an increased fire hazard - the exit of smoke through the roof is accompanied by sparks and high temperatures.
in white
The safest and most convenient are traditional white ovens. For the construction, special burnt bricks are used, a pipe is used to remove smoke. The special design of the chimney not only effectively removes combustion products, but also increases draft, increasing the efficiency of the furnace. The design of the pipe has a curved shape, which increases efficiency, allows you to effectively extinguish sparks, which makes the structure safe and protects the house from fires. The curved shape of the chimney provides a quick heating of the surrounding structures - a house with such a stove warms up quickly, becomes warm and comfortable. For heating, a minimum of firewood is used, which is a big advantage.
Construction of brick ovens
According to the design, there are several types of structures:
- Dutch. The Dutch channel is compact and easy to self-erect. Due to the low efficiency (40%), it is installed in the garage, in the country, in the workshop and is operated in the smoldering or slow burning mode.
- Swedish. The chamber-channel Swede has an efficiency of about 60%, is compact and practical. The product requires careful selection of building materials.
- Russians. With an efficiency of 75%, they are the most difficult to work with. Only specialists should fold these structures.
A Russian stove is often equipped with a bathhouse, a residential building or a two-story cottage.
Universal cooking and heating units are the most popular option in homes and cottages. They consist of an array with a firebox and an air duct, a chimney and a foundation.
Foundation
 Foundation for the furnace
It is necessary to fold the base for the furnace separately from the general house foundation:
- due to the large weight of the structure, the soil sags more than under the walls of the building;
- the furnace unit has unstable linear dimensions due to heating;
- between the heating structure and the load-bearing walls there must be an indent that protects against fire;
- a separate base is easier to rebuild, modify and repair.
For the manufacture of the foundation, rubble or brick is used, the binder is lime or cement.
Array kiln
 The furnace array consists of a firebox, a body and smoke circuits. The optimal material for it is red solid brick. Refractory bricks are suitable for lining. The case with lining is not bandaged due to the difference in the thermal expansion of the elements. When constructing a furnace array, it is necessary:
- bandage the seams;
- soak red bricks for 10-15 minutes in water so that they do not take water from the solution;
- control the horizontality and diagonality of the row;
- fill the seams with a solution without excess;
- wipe the inside of the chimney with a scouring brush.
The construction of the furnace array is carried out with a preliminary set of dry. Fitting allows you to mark up the structure relative to other elements of the room.
Pipe
Chimneys have a vertical arrangement, it is distinguished by clear height and cross-sectional parameters. Depending on the location of the furnace chimney, it happens:
- mounted - continues the structure in a straight position, located above the chimneys and the body;
- indigenous - for the pipe you will need a separate foundation, they bring it to the stove with the help of a sleeve in the corners;
- wall - the channel is located in the main wall of the house.
In the case of a pipe protrusion above the roof, an otter is created - an expansion structure that prevents condensate from entering. In the attic area, the chimney must be plastered and whitewashed - this makes it easier to find areas with leaks. A metal deflector (a cap with legs) blocks the access of rain and snow to the channel, and acts as a spark arrestor.
How to build a long burning stove
Quite a few owners of homes with stove heating would be interested in converting their brick stove so that it works in a long-burning mode. However, this cannot be done at home.
The fact is that in order to work in this mode, the tightness of the furnace must be ensured, in which smoke with a high concentration of carbon monoxide will be collected. These gases must not be allowed to enter the room. At the same time, for smoldering, it is necessary to minimize the flow of air, which can be done using the blower door, but this is very inconvenient.
To some extent, smoldering of fuel can be achieved in a Russian or Dutch oven. However, this is not safe, so it is still better to opt for a stove that retains heat for a long time. Alternatively, you can buy a factory-made long-burning metal stove, which, by the way, will be cheaper than building a brick stove for a house with your own hands according to the drawings. Yes, and their efficiency will not be lower.
If you still decide to build a brick oven yourself, weigh all the arguments and decide on the design. Then you will need to find an order with a description of the masonry and purchase consumables
Please note that furnace work requires certain skills.
Before laying the stove, it is necessary to pour a powerful foundation, and its dimensions should exceed the body of the stove by 10-15 cm on each side. You can use a concrete solution with a reinforcing mesh, rubble stone or concrete blocks. Remember that the stove foundation should not be connected to the main foundation of the house, otherwise the stove or chimney may burst during interseasonal ground shifts.
The body of the furnace is laid out from two types of bricks - solid and fireclay. Refractory fireclay bricks are used for laying especially hot places - a combustion chamber and smoke channels. For adhesion of refractory bricks, a mortar based on fireclay clay or with the addition of fireclay powder is used.

Please note that to compensate for the difference in thermal expansion between refractory and ceramic bricks, a gap of 5 mm is left. All factory parts - views, grates, doors, dampers, hob - must be installed in the places provided for by the scheme
For the strength of fastening the door, a calcined wire 30-40 cm long is threaded into it and walled up in masonry. As for the grate and cast-iron plate, grooves are made under them in bricks, taking into account gaps to the metal of 5 mm for thermal expansion and laying a cord or asbestos fabric
All factory parts - views, grates, doors, dampers, hob - must be installed in the places provided for by the scheme. For the strength of fastening the door, a calcined wire 30-40 cm long is threaded into it and walled up in masonry. As for the grate and cast-iron plate, grooves are made under them in bricks, taking into account gaps to the metal of 5 mm for thermal expansion and laying a cord or asbestos fabric.
The last element of the furnace is the chimney. It can be made of ceramic bricks or you can purchase a ready-made block chimney. Factory products are not only durable, but also resistant to condensate containing carbonic acid, do not clog for a long time and provide good traction.
The finishing of the finished furnace is made at the discretion of the owners. You can use clinker, ceramic tiles or finishing stone. This will give the stove a finished and attractive look, as well as protect it from moisture and dust, which will extend its life.
Not only its durability, but also the safety of residents will depend on how responsibly and competently you approach the choice of stove design and its manufacture. Be that as it may, a wood-burning brick oven always fills the house with living warmth and brings coziness and comfort.
Chimney options for brick ovens
The efficiency of a wood-burning stove largely depends on the type of chimney.Properly organized movement of flue gases allows you to save heat and effectively remove the products of combustion of fuel without endangering the health of the residents of the house.
Such a design could be:
- with horizontal channels;
- with vertical channels;
- combined.
In the direction of movement of flue gases, stoves with smoke turns are divided into direct-flow and counter-flow. In the second option, the smoke, before flying out into the chimney, makes several turns inside one of the smoke chambers. It moves at this time in two different directions.
The system with horizontal channels is used infrequently. It heats the oven more evenly, but for each horizontal level you will have to make a cleaning door. A modification of such a chimney can be an option with pockets. These cavities will hold the smoke for some time and increase the efficiency of the stove.
vertical channel. The principle of operation of such a chimney was described above as a characteristic feature of the “Dutch” stove. In such a system, soot accumulates less, it is easier to clean.
But here the resistance to the movement of the smoke flow increases, so it is necessary to make such a chimney long enough to ensure normal draft. In the vertical version, the first channel warms up more than the others.
Such a temperature difference can cause damage to the masonry. To improve the situation, it is possible to arrange an overflow variant in which the middle channel is made much wider than the outer ones. The cross section here will be larger, this will slow down the flow rate and make the heating more uniform.
The bell-type furnace is an alternative to the design with vertical and horizontal chimneys. Instead of channels, there is a spacious cavity in which smoke accumulates, and after cooling, it moves down and leaves through the chimney. Even after complete combustion of the fuel, the gases in the cap continue to give off heat.
In contrast to the vertical smoke circulation system, there is no danger of rapid blowing out of gases and cooling of the furnace. Cap sizes and configurations may vary.
When designing a stove, it is possible to combine hoods with elements of a vertical chimney in order to obtain an efficient design and increase efficiency.
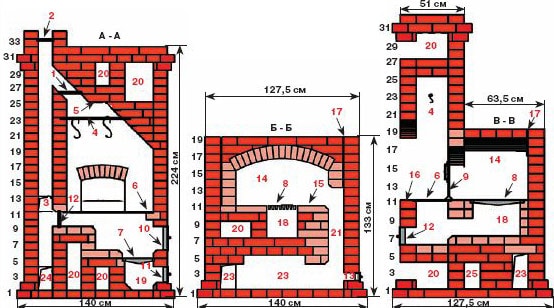
Buslaev oven projects
The design has a built-in hood. The oven is small. It is ideal for any private home, as it allows not only to heat the premises, but also to cook food. Despite its compact size, the stove heats spacious rooms well, so there are ready-made projects of houses with a stove.
Special schemes for laying brick ovens will help you get the job done without complicated calculations.
For installation, you will need the following materials:
- doors - fireboxes (0.2x0.25 meters), VK (0.39x0.5 meters), blower (0.14x0.14 meters);
- refractory - 43 pieces;
- solid brick - 382 pieces;
- oven-cabinet 28x33x50 cm;
- cast iron stove 0.7x0.4 meters with burners (removable rings of different diameters);
- valves - steam exhaust (12x13 centimeters) and smoke (12x25 centimeters);
- grate - grate 30x20 centimeters;
- corner - three blanks of equal-shelf rolled products 1 meter long and 45x45 millimeters in size;
- steel - a piece of 0.3x0.28 meters;
- strip - 4 pieces of meter (4 millimeters), 0.25 meters (2 millimeters), 0.35 meters (3 millimeters);
- cast iron stove - 0.4 x0.25 meters; 40x15 centimeters.
Projects of brick ovens of this type are as follows:
- Complete row.
- The door blew.
- Window opening for cleaning.
- The bottom of the oven is laid out from refractory, three sides are lined with iron.
- Installation of the furnace door, grate, under the furnace - refractory, cleaning overlap, blower door.
- DS installation.
- Laying refractory on the edge around the LH.
- Laying according to the scheme.
- The upper coating of the oven with clay (1 centimeter) is carried out, the DT overlaps, a stove with burners is attached.
- Installation of smoke circulation with cleaning windows, the plate is not laid. In the future, the brick is placed on the edge.
- Cleaning is covered, channels are created, 25 cm strips are laid.
- The cleanings are finished, the fixing wire is embedded.
- The cap is installed.
- Installation of the ceiling VK, while the hoods remain.
- The stoves are laid out according to the scheme.
- The small stove ends with sheet iron, the masonry is carried out in the order of the brick oven.
- A cleaning hole of a large stove is laid out, the edges of the side walls of the channels are crimped.
- Protrusion masonry.
- The protrusions are duplicated and the corner is mounted.
- The chimney of the BP overlaps similarly to the 19th row.
- A three-row neck is made, the size of the chimney is reduced to a section of 26x13 centimeters for the top valve.
- A chimney with grooves is created on this and subsequent rows.
The dimensions of the structure increase when using clinker facing bricks, so it is not recommended to use them instead of solid material. When finishing with tiles, durability is ensured (the material lasts for decades), in addition, it can be dismantled for facing other heating structures.
Advantages and disadvantages
 The main advantage of the Russian stove is that it cools down for a long time.
The advantages of the Russian stove include the following properties:
- Durability. A brick structure, subject to operating conditions, will last for decades.
- High degree of fire safety.
- Cooking takes place without direct contact with fire.
- The oven cools down slowly.
- Wide functionality of modern models.
- Low cost. Due to the simplicity of design and lack of automation.
- You can build with your own hands. A project of the future furnace is preliminarily created, and then laying work is carried out.
The disadvantages are the following:
- Low efficiency (about 30%) compared to modern heating devices, in which the efficiency exceeds 90%.
- Uneconomical consumption of firewood.
- Uneven heating of the room. The difference between the upper and lower points can be 20°C.
- Uneven combustion of fuel. Firewood in different parts of the stove burns with different strengths.
- It is impossible to observe the cooking process.
After studying the positive and negative qualities of the Russian stove, you can decide whether to make it in the house or not.
Laying a simple version of the furnace
Independent masonry of the simplest type of stove provides for the manufacture of a base and an array.
Building a foundation
A practical concrete monolith with metal corner reinforcement along the ribs is easy to construct. When finished, the foundation should protrude 5-7 cm from the furnace. Depth - no more than 75 cm, for a one-story house 50 cm is allowed, for a two-story house - 1 m. The base is not brought to the floor covering by 14 cm, covered with roofing felt or roofing felt for waterproofing.
 Masonry scheme of the Russian stove
Ordinal masonry method
To fold the stove with your own hands, step-by-step instructions for beginners should not be complicated.
Ordinal installation method:
- Marking the future product on the waterproofing coating.
- Full layout of the first row with a check for evenness. Formation of the blower chamber.
- Blower door installation. Steel wire is threaded into the ears and launched into the seams. To eliminate the displacement, the sash is temporarily held with bricks.
- Installation of calibration rails and laying the second or third row.
- Forming channels to remove soot in the fourth row. For each hole you will need a separate sash.
- In the fifth row, the simplest scheme involves the installation of a grate. It is fixed in special recesses of the bottom row. The door through which the structure will be heated is temporarily fixed with bricks or a wooden plank.
- From the sixth row they switch to refractory bricks.
- From the seventh row, gas outlets are made and vertical walls are laid out with fireclay bricks. The material is placed on edge.
- Knocking out ¼ bricks under the furnace door in the eighth row.
- Laying wire under the cast iron part in the 9th row.
- In the 11th row, a furnace plate with a sealant made of basalt cardboard or asbestos cord is placed in the chamber opening. The end part of the cooking place is made out with a metal corner.
- From 12 to 16 rows make a camera.
- Making a support for bricks of the 17th row by laying steel strips on the side walls.
- From the 18th to the 19th row, continuous masonry is carried out, two heat exchangers are installed vertically.
- Arrangement of a horizontal channel for removing soot and the formation of an oven in the 20th row.
- Overlapping the door in the 22nd row.
- Creating a gas duct overlap horizontally in the 23rd row. Installation of steel strips above the oven.
- Installing a cleaning sash and overlapping a niche in the 25-28th row.
- Fastening of the valves of the vertical gas duct (first the frames, then the partitions) in the 30th row.
- Laying out the transition section of the chimney in rows 31-35.
- The construction of fluff from the 36th to the 38th row.
The chimney riser is laid out from rows 1 to 26, the central damper is placed in row 27, and in the 31st, the masonry section should be smaller to bring the pipe through the roof.
https://
Possible difficulties
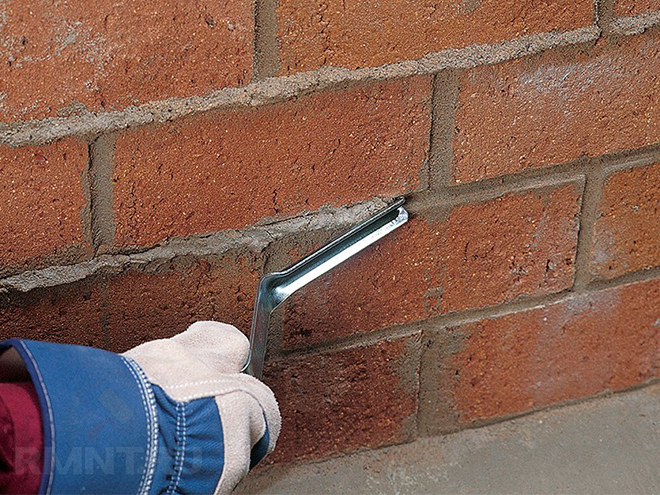 Removing excess solution
Without experience and practice, starting to lay the stove is not easy. In some cases, it is necessary to change the location of the floor beams, disassemble the structure, destroy the foundation. To avoid mistakes, you must:
- Make a test laying on a brick without mortar. This makes it easier to understand the layout of the elements.
- Use wooden slats 5-7 mm thick to equalize the thickness of the inter-brick joint.
- Perform thickness calibration if laying under jointing.
- Fit the bricks to size, number them with a marker and put them in a separate pile.
- Apply the mortar in a layer of 10 to 12 mm.
- Tap the brick laid on top with a rubber mallet until it hits the rail.
- Skim off excess mixture.
- Remove the strips after installing 3-4 rows, fill the seams with mortar and immediately embroider.