Owners of apartments today can, starting from personal aesthetic tastes and financial capabilities, choose the option of finishing the floor in the apartment. Everyone knows the classic variations - linoleum, parquet, laminate, tile. However, lovers of fashion trends will not disregard a fairly new technology that is rapidly gaining popularity - a self-leveling floor with a pattern.

Introduction to patterned floor technology
Many are interested in what and how beautiful self-leveling floors with a pattern are made of.
Such floors differ not only in external design, but also in the chemical composition of the mixtures. They are:
- Methyl methacrylate. Possess the highest durability among self-leveling floors and are characterized by durability. The basis for them is a mixture of methyl methacrylate resins.
- epoxy mixtures. They are also not afraid of loads of both chemical and mechanical nature. Also, this type of flooring with a pattern is characterized by ease of care and hygiene.
- Polyurethane. Distinctive features of this type of floors are high wear resistance and resistance to moisture, steam, various acids. Compared with other compositions, such mixtures dry faster, but they are afraid of temperature changes.
- Cement-acrylic mixtures. They are created using the "liquid component" and building mixtures. The main advantage of such a floor with a pattern is the budget cost.

Cost of work
Only the price can prevent you from making your floor unique, spectacular and practical. In Moscow, 1 sq. m of self-leveling floor with a pattern will cost 5,000–7,000 rubles, in St. Petersburg - 4,500–6,500 rubles, and in a large area, the cost of a meter will be lower than in a small room.
You can reduce the cost of organizing a floor with a three-dimensional pattern if you install it yourself. To do this, you need to read the instructions and pay attention to the choice of the key component of such a floor covering - 3D images.

Choosing a floor pattern
Step-by-step instructions for creating a floor covering with your own hands will help you create a unique pattern on the floor (video). The first thing to do is to choose an original image for it.

- An actual solution for a living room can be an image of a city square or a meadow of flowers.
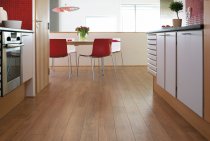
- The decoration of the kitchen can be a plain floor, variations with images of wildlife or geometric shapes.

- It is better to decorate the floor in the bathroom with images of the appropriate theme - the water world and everything connected with it will fit perfectly into the overall style.

- A well-known painting or a simple but unique ornament can be a suitable pattern for the bedroom floor.

- There are a lot of options for decorating the floor of a children's room, the most popular are cartoon characters, drawings on a space theme, sports orientation and others.

Instructions for self-creation of a floor with a pattern
The answer to the question of how to make a self-leveling floor with your own hands will be a step-by-step instruction. In the process of installing the floor covering, you will need the following set of tools:
- a grinding machine or a grinder equipped with a diamond disc with a diameter of up to 18 cm;
- a vacuum cleaner;
- construction mixer or drill for preparing mixtures;
- spatulas of various shapes, the presence of flat and serrated is required;
- rollers - needle and fur;
- flat brush;
- shoes with spikes - paint shoes;
- leveling mixture;
- overalls, respirator, cotton and rubber gloves;
- transparent finish;
- varnish to protect the surface with a pattern;
- solvent - will help to cope with contamination of tools.
When the accessories are prepared, you can proceed to work on creating a floor with a pattern, while it is important to perform all the steps in stages.

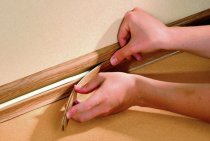
Preparing the base for the 3D floor
The base before arranging the self-leveling floor with a pattern is prepared in the standard way:
- The concrete base for the floor must be processed with a grinding machine; if protrusions are noticeable, they must be removed with a perforator.
- Cracks and chips that may be in the base must be filled with a mixture of epoxy or cement.
- The surface should be thoroughly cleaned of dust, debris, oil stains.
- Next, a high-quality coating must be applied to the surface with a wide roller or brush. deep penetration primer.
- When the first coat of primer dries, apply the second and also wait for it to dry completely.

Working on the base layer of the patterned floor
At this stage, the base mixture of the floor is prepared, which should be perfectly even.
- The dividing element of the structure will be a damper tape, which should be fixed around the perimeter of the room.
- Using a level or level, you need to install beacons. They should be fixed as evenly and accurately as possible.
- For three-dimensional floors with a pattern, a special mortar is required. It consists of a building mixture and water, which must be mixed in a proportion of 25 kg to 6 liters. You may need less liquid, so do not rush to add a lot of water, the resulting mixture should get viscous. An excess of liquid can lead to the fact that the finished coating will not be very durable and of high quality.
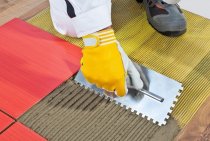
- On the finished base it is necessary to apply the finished mixture.
- Using a T-bar, you need to level the mixture on the surface.
- Use a spiked roller to remove air bubbles.
As a result, you should get a perfectly even base layer, for this you need to regularly monitor the condition of the coating with a level.
- After that, you need to leave the mixture to dry for several hours, there should be no drafts and bright lighting in the room.

drawing
At this stage of creating a floor with a pattern, various options are possible.
- Drawings should be applied directly to the base layer. If there are no artist skills, but you want to design a 3D floor in an original way, it is better to use the services of a specialist.
- A more traditional option is also available - choose the picture you like and then print it on a banner fabric or vinyl film. Its dimensions should slightly exceed the area of \u200b\u200bthe base.
When creating a drawing, it should be noted that an image painted with polymer or acrylic paints can last longer, because it is not afraid of the sun's rays.
- You can add sophistication to the design through the use of additional decorative elements - sand, marble chips, sparkles.

The paint used for the drawing must be given time to dry well.
Finishing layer
The application of a transparent protective layer is a crucial step in working with a self-leveling floor with a pattern.
- It is necessary to prepare the mixture to create a transparent layer. To do this, you need to mix Elakor-ED.
- The finished mixture should be carefully applied to the surface, the layer thickness should be at least 3 mm. When leveling the mixture, it is necessary to simultaneously eliminate air bubbles.

- Next, you should walk through the mixture with a spiked roller. You need to continue working until the mixture begins to thicken. It usually takes 15-30 minutes. At this stage, you need to act in studded shoes so as not to damage the coating.
- The floor, covered with plastic wrap, should dry out, this will take 24-48 hours.
- The final step is the application of varnish. It will be able to provide surface protection, as well as make it more attractive.You can use varnishes with anti-slip effect.